In the previous tutorial, we learned to create REST APIs using DropWizard. Now let’s build a REST client for consuming REST APIs across the network. Dropwizard includes both Apache HttpClient and Jersey Client.
1. Maven Dependency
The dropwizard client module is added as a separate module.
<dependency>
    <groupId>io.dropwizard</groupId>
    <artifactId>dropwizard-client</artifactId>
    <version>4.0.0</version>
</dependency>
2. Apache HTTPClient Configuration
The underlying library for dropwizard-client is Apache’s HttpClient.
2.1. Configuration
Dropwizard provides easy-to-declare and use REST client configuration. We need to create HttpClientConfiguration and give it io.dropwizard.setup.Environment reference.
import com.fasterxml.jackson.annotation.JsonProperty;
import io.dropwizard.client.HttpClientConfiguration;
import io.dropwizard.core.Configuration;
import jakarta.validation.Valid;
import jakarta.validation.constraints.NotNull;

public class ApplicationConfiguration extends Configuration {

  @Valid
  @NotNull
  private HttpClientConfiguration httpClient = new HttpClientConfiguration();

  @JsonProperty("httpClient")
  public HttpClientConfiguration getHttpClientConfiguration() {
    return httpClient;
  }

  @JsonProperty("httpClient")
  public void setHttpClientConfiguration(HttpClientConfiguration httpClient) {
    this.httpClient = httpClient;
  }
}
To register the HTTP Client, use the e.jersey().register(new APIController(httpClient)) method with the controller that needs access to HttpClient.
public class App extends Application<ApplicationConfiguration> {

  @Override
  public void initialize(Bootstrap<ApplicationConfiguration> b) {
  }

  @Override
  public void run(ApplicationConfiguration c, Environment e) throws Exception {

    LOGGER.info("Registering REST resources");
    e.jersey().register(new EmployeeController(e.getValidator(), new EmployeeRepository()));

    LOGGER.info("Registering Application Health Check");
    e.healthChecks().register("application", new ApplicationHealthCheck());

    LOGGER.info("Registering Apache HttpClient");
    final HttpClient httpClient = new HttpClientBuilder(e)
        .using(c.getHttpClientConfiguration())
        .build(getName());
    e.jersey().register(new APIController(httpClient));
  }

  public static void main(String[] args) throws Exception {
    new App().run(args);
  }
}
Finally, we have injected the HTTP client in APIController as follows:
import jakarta.ws.rs.GET;
import jakarta.ws.rs.Path;
import jakarta.ws.rs.PathParam;
import jakarta.ws.rs.core.Response;
import org.apache.hc.client5.http.classic.HttpClient;

@Path("client-root-path")
public class APIController {

  private HttpClient httpClient;

  public APIController(HttpClient httpClient) {
    this.httpClient = httpClient;
  }

  @GET
  @Path("/{id}")
  public Response getEmployeeById(@PathParam("id") Integer id) {
    //use httpClient to access the remote resource
    return null;
  }
}
2.2. Default Properties
The default configuration for HttpClientConfiguration is as follows:
- timeout: 500ms
- connectionTimeout: 500ms
- timeToLive: 1 hour
- cookiesEnabled: false
- maxConnections: 1024
- maxConnectionsPerRoute: 1024
- keepAlive: 0s
2.3. Custom Configuration for HttpClient
Add the custom configuration into a YAML file as follows:
httpClient:
  timeout: 100ms
  connectionTimeout: 1000ms
  timeToLive: 1h
  cookiesEnabled: true
  maxConnections: 1024
  maxConnectionsPerRoute: 1024
  keepAlive: 0ms
  retries: 0
Now we can inject the configuration while running the application as a command line parameter to the server command:
java -jar target/hello-world-0.0.1-SNAPSHOT.jar server app-config.yml3. Jersey Client Configuration
3.1. Configuration
If you wish to use Jersey client, instead of HttpClient, for easy-to-use APIs and simple serialization and deserialization methods for POJOs, we can inject JerseyClient as follows:
public class ApplicationConfiguration extends Configuration {

  @Valid
  @NotNull
  private JerseyClientConfiguration jerseyClient = new JerseyClientConfiguration();

  @JsonProperty("jerseyClient")
  public JerseyClientConfiguration getJerseyClientConfiguration() {
    return jerseyClient;
  }

  @JsonProperty("jerseyClient")
  public void setJerseyClientConfiguration(JerseyClientConfiguration jerseyClient) {
    this.jerseyClient = jerseyClient;
  }
}
Now we can inject the JerseyClient similar to the previous approach discussed above,
final Client jerseyClient = new JerseyClientBuilder(e)
  .using(c.getJerseyClientConfiguration())
  .build(getName());

e.jersey().register(new APIController(jerseyClient));
Now we can use the JerseyClient in the controller as follows:
@Path("client-root-path")
public class APIController {

  private JerseyClient client;

  public APIController(JerseyClient client) {
    this.client = client;
  }

  @GET
  @Path("/{id}")
  public Response getEmployeeById(@PathParam("id") Integer id) {
    //use client to access the remote resource
    return null;
  }
}
3.2. Custom Properties
The default configuration for JerseyClientConfiguration is as follows. You can change their values accordingly.
jerseyClient:
  minThreads: 1
  maxThreads: 128
  workQueueSize: 8
  gzipEnabled: true
  gzipEnabledForRequests: true
  chunkedEncodingEnabled: true
4. Demo
Now when you have access to jakarta.ws.rs.client.Client or org.apache.http.client.HttpClient inside REST client resource APIController.java, you can library specific methods to call HTTP URIs as usual.
@Path("client-root-path")
public class APIController {
private JerseyClient jerseyClient;
public APIController(JerseyClient jerseyClient) {
this.jerseyClient = jerseyClient;
}
@GET
@Path("/employees/")
public String getEmployees() {
//Do not hard code the path in your application
WebTarget webTarget = jerseyClient.target("http://localhost:8080/employees");
Invocation.Builder invocationBuilder = webTarget.request(MediaType.APPLICATION_JSON);
Response response = invocationBuilder.get();
ArrayList<Employee> employees = response.readEntity(ArrayList.class);
return employees.toString();
}
@GET
@Path("/employees/{id}")
public String getEmployeeById(@PathParam("id") int id) {
//Do not hard code the path in your application
WebTarget webTarget = jerseyClient.target("http://localhost:8080/employees/" + id);
Invocation.Builder invocationBuilder = webTarget.request(MediaType.APPLICATION_JSON);
Response response = invocationBuilder.get();
Employee employee = response.readEntity(Employee.class);
return employee.toString();
}
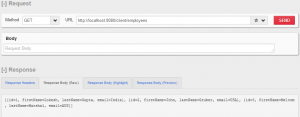
}In the above class, we accessed REST APIs created in dropwizard hello world tutorial.
After accessing the APIs, I returned the response in plain text form as shown in the below image.

I have set the context path of the client resource class to /client/ to logically separate the URIs of client and service endpoints.
Drop me your questions in the comments section.
Happy Learning !!