RESTEasy provides very excellent support for building Ajax-powered clients if you are developing a web application. RESTEasy can generate a JavaScript API that uses AJAX calls to invoke JAX-RS operations. The JavaScript code generated for accessing REST APIs looks very similar to java code, and you will feel you are calling the REST APIs using Java.
This approach’s beauty (or drawback?) is that your class names and method names are directly accessible through javascript code. Even you do not need to write the Ajax handling code, which is automatically embedded in your webpage.
Using class and method names in JS code might become a very serious security loop hole. So please use it wisely.
In this tutorial, I have built a normal HTML form that is used to add a user to the system. I will use the RESTEasy Ajax client to access the REST API for adding the user and getting the response back.
1. Maven
Start with adding the latest version of resteasy-jsapi from the Maven repository.
<dependency>
    <groupId>org.jboss.resteasy</groupId>
    <artifactId>resteasy-jsapi</artifactId>
    <version>6.2.1.Final</version>
</dependency>
You can add the jar files in your lib folder if you are not using the maven build tool.
2. Add JSAPIServlet Mapping
Add the JSAPIServlet declaration in your web.xml file. The JavaScript API servlet must be configured to enable the JavaScript API.
<servlet>
  <servlet-name>RESTEasy-JSAPI</servlet-name>
  <servlet-class>org.jboss.resteasy.jsapi.JSAPIServlet</servlet-class>
</servlet>

<servlet-mapping>
  <servlet-name>RESTEasy-JSAPI</servlet-name>
  <url-pattern>/js/*</url-pattern>
</servlet-mapping>
3. REST API Endpoints
I am writing a minimal REST API not to make the example complex.
@Path("/rest")
public class UserService
{
@Path("/users")
@POST
public Response addUser(@QueryParam("firstName") String firstName, @QueryParam("lastName") String lastName)
{
//vaildate first name
if(firstName == null || firstName.isEmpty())
{
return Response.ok().entity("First name is mandatory dude").build();
}
//vaildate last name
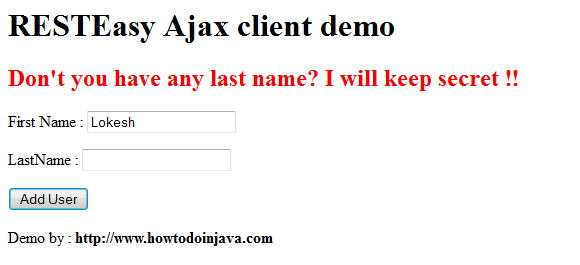
if(lastName == null || lastName.isEmpty())
{
return Response.ok().entity("Don't you have any last name? I will keep secret").build();
}
//Add user and return the response
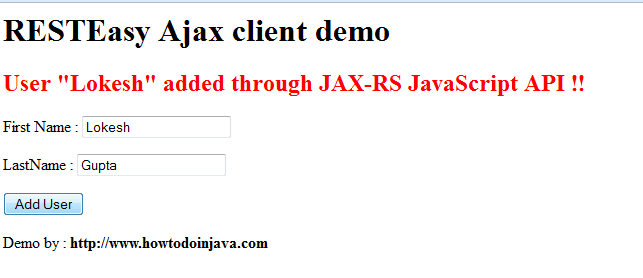
return Response.ok().entity("User "" + firstName + "" added through JAX-RS JavaScript API").build();
}
}4. Using the AJAX Client
Each JAX-RS resource class will generate a JavaScript object of the same name as the declaring class (or interface), which will contain every JAX-RS method as properties.
var message = UserService.addUser({firstName:firstNameTxt,lastName:lastNameTxt});Example 1:
I am using the default index.jsp file for writing the client code and call the above generated JS file.
<html>
  <head>
    <!-- This will include the whole javascript file including ajax handling  -->
    <script lang="javascript" src="./js"></script>

    <!-- Write the javascript code for accessing REST APIs -->
    <script lang="javascript">
      function addUserForm()
      {
        //Collect input from html page
        var firstNameTxt = document.getElementById("firstName").value;
        var lastNameTxt = document.getElementById("lastName").value;

        //Call the REST APIs with directly method names
        var message = UserService.addUser({firstName:firstNameTxt,lastName:lastNameTxt});

        //Use the REST API response
        document.getElementById("error").innerHTML = "<h2><span style='color:red'>" + message + " !!</span></h2>";
      }
    </script>
  </head>
  <body>
    <h1>RESTEasy Ajax client demo</h1>
    <div id="error"></div>
    <form method="post">
      <p>First Name : <input type="text" name="firstName" id="firstName"/></p>
      <p>LastName : <input type="text" name="lastName" id="lastName"/></p>
      <input type="button" value="Add User" onclick="addUserForm()" />
    </form>
    Demo by : <b>http://www.howtodoinjava.com</b>
  </body>
</html>
Example 2:
If you find using class names and method names not manageable because they might get changed on another day. Do not worry, REST implicit object is to rescue you. We can use REST.Request().exeute() method to invoke the REST APIs.
A demo REST call is made like this:
function addUserForm()
{
  //Collect input from html page
  var firstNameTxt = document.getElementById("firstName").value;
  var lastNameTxt = document.getElementById("lastName").value;

  var req = new REST.Request();
  req.setURI(REST.apiURL + "/rest/users");
  req.setMethod("POST");
  req.setEntity({firstName:firstNameTxt,lastName:lastNameTxt});
  req.execute(function(status, request, entity){
    document.getElementById("error").innerHTML = "<h2><span style='color:red'>" + entity + " !!</span></h2>";
  });
}
5. Demo
To test the application, deploy the application on any web server.
Type the URL http://localhost:8080/RESTfulValidation/
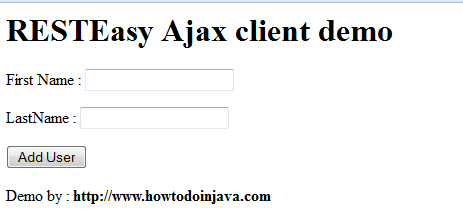
Fill in your first name and press add button:
Fill in all mandatory fields, and press add button
Happy Learning !!