
Building robust and scalable REST APIs is a common requirement for modern web development. This application will explore how to create REST APIs for CRUD operations using Spring Boot framework. Apart from building simple REST APIs, we will learn about request validation, error handling, testing, API documentation, and deployment.
Step 1. Create a New Project
We can choose either between Maven or Gradle for dependency management. To create a project using Maven, we can run the following command in the command prompt:
mvn archetype:generate
	-DgroupId=com.howtodoinjava
	-DartifactId=spring-boot-rest-example
	-DarchetypeArtifactId=maven-archetype-quickstart
	-DinteractiveMode=false
The project’s pom.xml include the following dependencies:
spring-boot-starter-web: enables creating MVC applications, including REST APIs.spring-boot-starter-data-jpa: enables persistence and database operations.spring-boot-starter-test: enables unit testing of the application with JUnit 5.
We can, optionally, add the h2 and Lombok dependencies if we want to use in-memory database and annotation processing.
<parent>
  <groupId>org.springframework.boot</groupId>
  <artifactId>spring-boot-starter-parent</artifactId>
  <version>3.1.1</version>
  <relativePath/> <!-- lookup parent from repository -->
</parent>

<properties>
  <project.build.sourceEncoding>UTF-8</project.build.sourceEncoding>
  <maven.compiler.source>17</maven.compiler.source>
  <maven.compiler.target>17</maven.compiler.target>
</properties>

<dependencies>
  <dependency>
    <groupId>org.springframework.boot</groupId>
    <artifactId>spring-boot-starter-web</artifactId>
  </dependency>
  <dependency>
    <groupId>org.springframework.boot</groupId>
    <artifactId>spring-boot-starter-data-jpa</artifactId>
  </dependency>
  <dependency>
    <groupId>com.h2database</groupId>
    <artifactId>h2</artifactId>
    <scope>runtime</scope>
  </dependency>
  <dependency>
    <groupId>org.projectlombok</groupId>
    <artifactId>lombok</artifactId>
    <optional>true</optional>
  </dependency>
  <dependency>
    <groupId>org.springframework.boot</groupId>
    <artifactId>spring-boot-starter-test</artifactId>
    <scope>test</scope>
  </dependency>
</dependencies>
The same project can be created in Gradle as follows:
gradle init --type java-application --dsl groovy --project-name spring-boot-rest-exampleAnd we can add the dependencies as follows:
dependencies {
implementation 'org.springframework.boot:spring-boot-starter-data-jpa'
implementation 'org.springframework.boot:spring-boot-starter-web'
compileOnly 'org.projectlombok:lombok'
runtimeOnly 'com.h2database:h2'
annotationProcessor 'org.projectlombok:lombok'
testImplementation 'org.springframework.boot:spring-boot-starter-test'
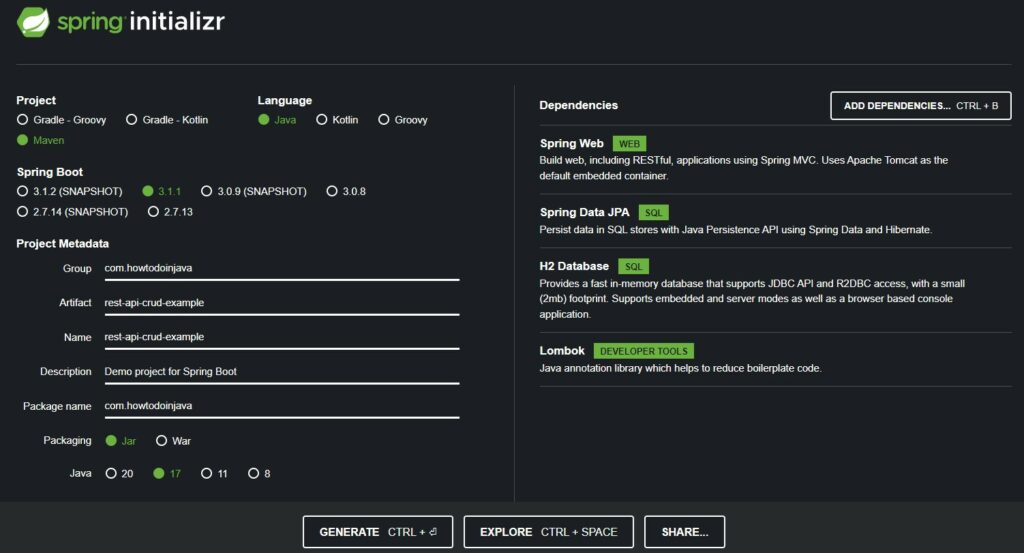
}Another approach is to use the Spring Initializr online tool and choose the required dependencies, build tool and Java runtime. It will generate the project in zip file, which we can download and import in an IDE.
Step 2. Create Model and Configure Persistence
In REST, the data is modeled into resource representations. It is generally the JSON or XML document received when the REST API is invoked over HTTP protocol. In Java, the resource presentation can be any plain Java object that has fields, setters, getters and constructors. We can also override the hashCode() and equals() methods if we need to customize the object equality rules.
The following Item class has the @Entity annotation as well so we can persist it into the database using JPA repositories.
@Entity
@Data
@NoArgsConstructor
@AllArgsConstructor
public class Item {

  @Id
  @GeneratedValue(strategy = GenerationType.IDENTITY)
  private Long id;

  private String name;
}
Spring Data JPA module has various repository interfaces, such as JpaRepository, that provide the inbuilt methods for CRUD operations on JPA entities.
@Repository
public interface ItemRepository extends JpaRepository<Item, Long> {
}
In the end, do not forget to add the DataSource properties that establish a connection to the backend database. In this demo, we are using the H2 database. You can change the properties to connect to another database transparently.
spring.datasource.url=jdbc:h2:mem:test
spring.datasource.username=sa
spring.datasource.password=
spring.datasource.driverClassName=org.h2.Driver
spring.jpa.database-platform=org.hibernate.dialect.H2Dialect

spring.jpa.hibernate.ddl-auto=update
Step 3. Create REST Resource/Controller
The REST resource exposes the API URLs where the clients can connect to and request CRUD operations. In our example, we are creating the resource for Item class. The ItemController class uses the Spring MVC annotations, such as @RestController, @GetMapping and @PostMapping, to annotate the methods as handler methods for REST resources.
@RestController
public class ItemController {

  @Autowired
  ItemRepository itemRepository;

  @GetMapping("/items")
  List<Item> all() {
    return itemRepository.findAll();
  }

  @GetMapping("/items/{id}")
  Item getById(@PathVariable Long id) {

    return itemRepository.findById(id).get();
  }

  @PostMapping("/items")
  Item createNew(@RequestBody Item newItem) {
    return itemRepository.save(newItem);
  }

  @DeleteMapping("/items/{id}")
  void delete(@PathVariable Long id) {
    itemRepository.deleteById(id);
  }

  @PutMapping("/items/{id}")
  Item updateOrCreate(@RequestBody Item newItem, @PathVariable Long id) {

    return itemRepository.findById(id)
        .map(item -> {
          item.setName(newItem.getName());
          return itemRepository.save(item);
        })
        .orElseGet(() -> {
          newItem.setId(id);
          return itemRepository.save(newItem);
        });
  }
}
Step 4. Configure Error Handling
In the real world, not all the requests will be valid requests. In some cases, the requests will throw exceptions and we need to configure the error-handling mechanism.
For example, if a client requests an Item whose ID does not exist in the database, API must throw the HTTP 404 Not Found error.
@GetMapping("/items/{id}")
Item getById(@PathVariable Long id) {

  return itemRepository.findById(id)
      .orElseThrow(() -> new ItemNotFoundException(id));
}
In Spring Boot, we can configure the error handling by configuring the @ControllerAdvice and @ExceptionHandler annotations. Its handler methods will catch the configured exception from any controller in the application and translate the exception into a valid REST response.
public class ItemNotFoundException extends RuntimeException {

  private Long id;

  public ItemNotFoundException(Long id) {
    super("Could not find item " + id);
  }
}
@ControllerAdvice
public class ApplicationExceptionHandler {
@ExceptionHandler(ItemNotFoundException.class)
@ResponseBody
@ResponseStatus(HttpStatus.NOT_FOUND)
String itemNotFoundHandler(ItemNotFoundException ex) {
return ex.getMessage();
}
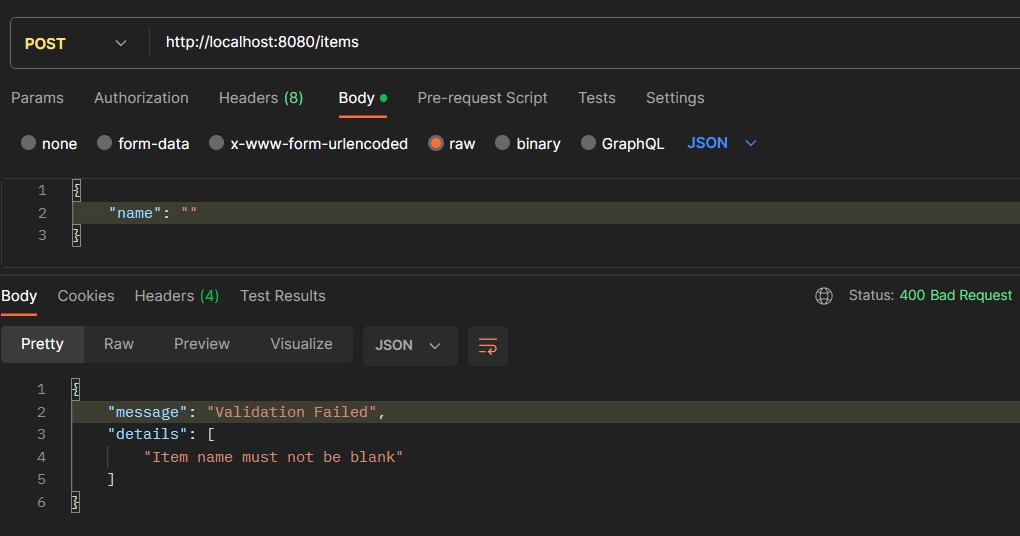
}Step 5. Configure Request Validation
REST APIs must have a mechanism to cleanse the request body and provide appropriate messages suggesting what is wrong with the input body. This can be done by configuring the Jakarta Validation which seamlessly integrates with the Spring boot applications.
<dependency>
  <groupId>org.springframework.boot</groupId>
  <artifactId>spring-boot-starter-validation</artifactId>
</dependency>
To add validation of a request body, annotate the request input object with @Valid annotation in the handler method.
@PostMapping("/items")
Item createNew(@Valid @RequestBody Item newItem) {

  return itemRepository.save(newItem);
}
Next, we can add the JSR 380 annotation in the model class to add the validation rules specific to the fields.
public class Item {

  ...

  @NotBlank
  private String name;
}
Step 6. API Documentation
Documentation is an essential part of building REST APIs. It helps the clients in learning how to consume the APIs in a consistent manner.
In this example, we are creating the REST API documentation using OpenAPI 3 specification for Spring Boot 3.x applications.
<dependency>
  <groupId>org.springdoc</groupId>
  <artifactId>springdoc-openapi-starter-webmvc-ui</artifactId>
  <version>2.1.0</version>
</dependency>
After setting up the above dependency, we can run our application and find the OpenAPI descriptions at /v3/api-docs, which is the default path:
http://localhost:8080/v3/api-docsNote that the springdoc-openapi dependency already includes Swagger UI, so we can interact with our API specification and exercise the endpoints at:
http://localhost:8080/swagger-ui/index.html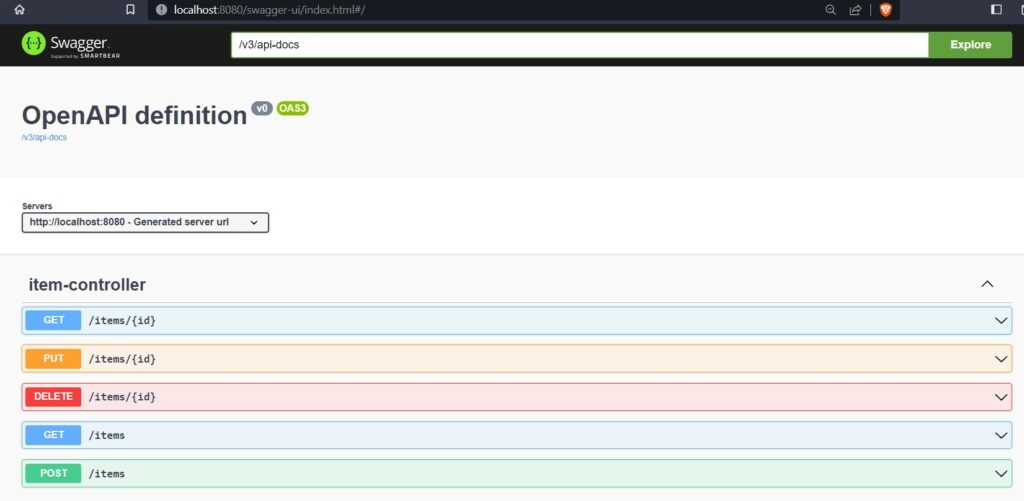
Step 7. Build and Deploy the REST API
The most preferred way to build the APIs is creating a JAR file deployment or creating a docker image to deploy as a container for scalability.
By default, the deployment is set to jar in the pom.xml file. We can change it to war if we want to deploy the APIs in an external application server.
<packaging>jar</packaging>So we can create the deployment build file using the mvn package command.
mvn clean packageStep 8. Demo
Let us run the application and see what we have built till now. Run the application from the terminal using the command:
mvn clean spring-boot:runInvoke the API URL /items. It should return the two items that we saved during the application startup:
@SpringBootApplication
public class App implements CommandLineRunner {

  public static void main(String[] args) {
    SpringApplication.run(App.class, args);
  }

  @Autowired
  ItemRepository itemRepository;

  @Override
  public void run(String... args) throws Exception {
    itemRepository.save(new Item(null, "Item 1"));
    itemRepository.save(new Item(null, "Item 2"));
  }
}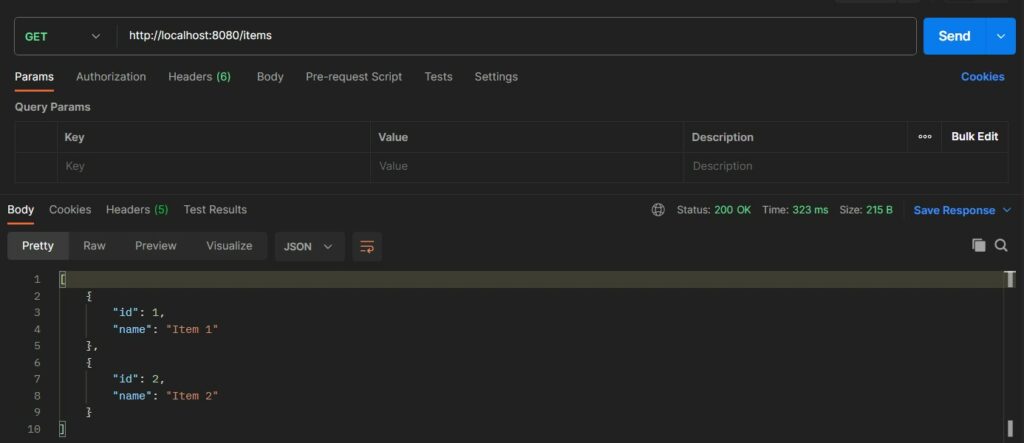
Next, invoke a few APIs to verify that all the REST APIs are working as desired.

Also, check the error scenarios.
Conclusion
In this Spring boot REST API tutorial, we created APIs for CRUD operations step-by-step, providing explanations and code examples along the way. It provided a clear understanding of how to structure your code, implement CRUD operations, handle validations and errors, and deploy the application.
Happy Learning !!