
The JDK from Oracle is free to download and use for personal use. The Oracle JDK now comes with strict (and paid) licensing terms. If you plan to use Java in any commercial or shared capacity, we can use OpenJDK.
Regrettably, this open-source version does not include installers for all the different platforms. Being open source, however, means other groups are welcome to step in and provide any missing pieces and so several OpenJDK installer-based packages do exist.
Amazon has consistently released timely installers under the Corretto moniker. In this tutorial, We’ll go through OpenJDK Corretto’s basic installation steps on Windows, Mac, and Linux.
Installing the OpenJDK on your chosen operating system is usually just a matter of uncompressing the downloaded file into a folder and making sure a few environment variables (JAVA_HOME and PATH) are correctly set.
1. Installing OpenJDK Corretto on Linux
For the popular Debian and Red Hat distributions, you can download the appropriate file (.deb or .rpm, respectively) and use your usual package manager to install the JDK. The file for generic Linux systems is a compressed tar file (tar.gz) that can be unpacked in any shared directory of your choice.
The first step is to decide where you want to install the JDK. We will store ours in /usr/lib/jvm, but other distros might use other locations, such as /opt, /usr/share, or /usr/local.
Using your favorite terminal app, change to the directory where you downloaded the file and run the following commands to install Java:
~$ cd Downloads
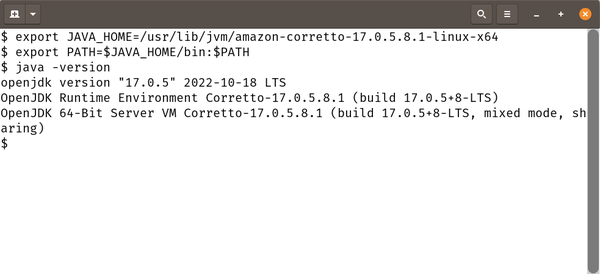
~/Downloads$ sudo tar xzf amazon-corretto-17.0.5.8.1-linux-x64.tar.gz --directory /usr/lib/jvmWith Java successfully unpacked, you can configure your terminal to use this version by setting the JAVA_HOME and PATH environment variables:
$ export JAVA_HOME=/usr/lib/jvm/amazon-corretto-17.0.5.8.1-linux-x64
$ export PATH=$JAVA_HOME/bin:$PATH
If you want to make those JAVA_HOME and PATH changes permanent, you could add both of the export lines to your .bashrc file.
You can then test that this setup is working by checking the version of Java using the -version flag.
2. Installing OpenJDK Corretto on macOS
For macOS users, the Corretto download and installation process is straightforward.
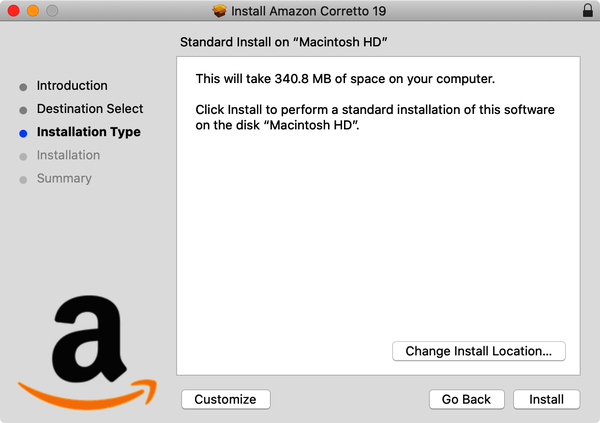
Select the version of the JDK you want to use, then select the .pkg link from the subsequent download page. Double-click the downloaded file to start the wizard.
The JDK will be installed on the disk running macOS in its own folder under the /Library/Java/JavaVirtualMachines directory. It will be symbolically linked to /usr/bin/java.
After you complete the installation, you can test Java by opening the Terminal app typically found in the Utilities folder under the global Applications folder.
Type java -version and you should see whatever version you downloaded reflected in the output.
3. Installing Corretto on Windows
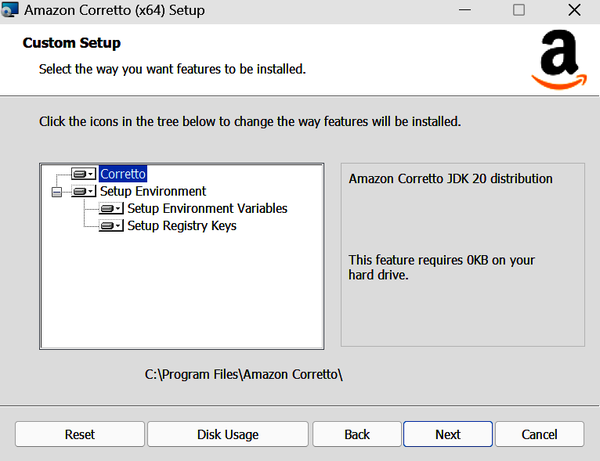
To install Corretto for Windows, download the .msi file from Amazon’s site and follow the typical Windows install wizard. You can accept the defaults as you go through the short prompts, or tweak things if you are familiar with administrative tasks, such as configuring environment variables and registry entries.
If you are prompted to allow the installer to make changes to your system, go ahead and say yes.
Open the Windows terminal (search for term or cmd) and check for the version of Java by typing ‘java -version‘.
Now you are free to point other applications such as IntelliJ IDEA at your installed JDK and simply work with those tools.
4. Conclusion
This short tutorial discussed how to install OpenJDK Correto distributed by Amazon on different operating systems such as Linux, macOS, and Windows.
Happy Learning !!