
Learn to create and configure JSP view resolver in Spring Boot 3 application which uses JSP template files to render the view layer. Also, learn to build and deploy the application and serve static content in the JSP files.
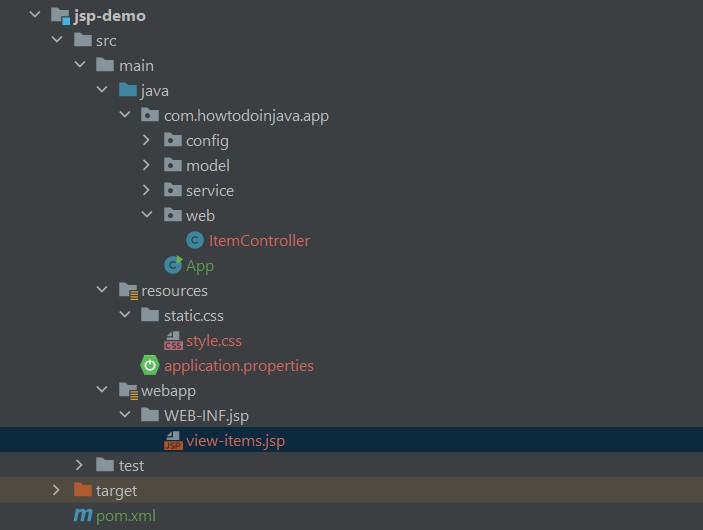
1. Project Structure
For reference, the files in this application are placed as the given structure in the image.
2. Maven
To sever an application using JSP, we need the following dependencies. Note that we are using the Jakarta Servlet API which uses the Jakarta namespace required by Spring Boot 3.
- spring-boot-starter-web
- tomcat-embed-jasper
- jakarta.servlet.jsp.jstl-api
- jakarta.servlet.jsp.jstl
<dependency>
  <groupId>org.springframework.boot</groupId>
  <artifactId>spring-boot-starter-web</artifactId>
</dependency>
<dependency>
  <groupId>org.apache.tomcat.embed</groupId>
  <artifactId>tomcat-embed-jasper</artifactId>
  <scope>provided</scope>
</dependency>
<dependency>
  <groupId>jakarta.servlet.jsp.jstl</groupId>
  <artifactId>jakarta.servlet.jsp.jstl-api</artifactId>
  <version>3.0.0</version>
</dependency>
<dependency>
  <groupId>org.glassfish.web</groupId>
  <artifactId>jakarta.servlet.jsp.jstl</artifactId>
  <version>3.0.1</version>
</dependency>
Additionally, we must use the war packaging as jar packaging is not supported as discussed in the official documentation.
<packaging>war</packaging>3. Application Setup
3.1. Extend SpringBootServletInitializer in the Application Class
The first step in producing a deployable war file is to provide a SpringBootServletInitializer subclass and override its configure() method. This makes use of Spring Framework’s Servlet 3.0 support and allows you to configure the application when it is launched by the Servlet container.
import org.springframework.boot.SpringApplication;
import org.springframework.boot.autoconfigure.SpringBootApplication;
import org.springframework.boot.builder.SpringApplicationBuilder;
import org.springframework.boot.web.servlet.support.SpringBootServletInitializer;

@SpringBootApplication
public class App extends SpringBootServletInitializer {

  @Override
  protected SpringApplicationBuilder configure(SpringApplicationBuilder builder) {
    return builder.sources(App.class);
  }

  public static void main(String[] args) {
    SpringApplication.run(App.class);
  }
}
3.2. Web Controller
The controller class is a regular @Controller class with request mapping annotations. Please note that we should not use the @RestController annotation, by mistake.
@Controller
public class ItemController {

  @Autowired
  ItemService itemService;

  @RequestMapping("/view-items")
  public ModelAndView viewBooks(ModelAndView model) {

    model.setViewName("view-items");
    model.addObject("items", itemService.getAll());
    return model;
  }
}
3.3. Model and Service
For reference, we are using a simple POJO Item as model and ItemService for returning a list of items. The service returns two items. In a real application, it will connect to the database and fetch the details from the database or any other source.
@Service
public class ItemService {

  public List<Item> getAll() {
    return List.of(new Item(1L, "Item - 1"), new Item(2L, "Item - 2"));
  }
}
@Data
@AllArgsConstructor
@NoArgsConstructor
public class Item {
private Long id;
private String name;
}4. Setting up JSP View Resolver
To resolve JSP files location and automatically configure the JSP view resolver, we can have two approaches:
4.1. Using application.properties
The following properties automatically configure the Spring MVC to serve the content from the configured location and register the JstlView class. It is a specialization of InternalResourceView for JSTL pages, i.e. JSP pages.
Once registered, every view name returned from a handler will be translated to a JSP resource (for example: “home” → “/WEB-INF/jsp/home.jsp“), using this view class to enable explicit JSTL support.
spring.mvc.view.prefix=/WEB-INF/view/
spring.mvc.view.suffix=.jsp
4.2. Using Java Configuration
We can configure the JSP view resolution in the Java configuration also, as follows. Do not forget to use the @EnableWebMvc which configures the other necessary beans to support a MVC application.
@Configuration
@EnableWebMvc
public class WebMvcConfig implements WebMvcConfigurer {

  @Bean
  public ViewResolver viewResolver() {
    final InternalResourceViewResolver bean = new InternalResourceViewResolver();
    bean.setViewClass(JstlView.class);
    bean.setPrefix("/WEB-INF/jsp/");
    bean.setSuffix(".jsp");
    return bean;
  }

  @Override
  public void configureViewResolvers(ViewResolverRegistry registry) {
    registry.viewResolver(viewResolver());
  }
}
4.3. Serving Static Content
By default, Spring MVC serves the static files (JS, CSS etc) from the following directories:
- /src/main/resources
- /src/main/resources/static
We can configure the custom URI and directory location as follows. The following configuration will serve a file http://localhost:8080/static/css/style.css from the location /src/main/resources/static/css/style.css.
@Configuration
@EnableWebMvc
public class WebMvcConfig implements WebMvcConfigurer {

  //...

  @Override
  public void addResourceHandlers(ResourceHandlerRegistry registry) {
    registry
        .addResourceHandler("/static/**")
        .addResourceLocations("classpath:/static/")
        .setCachePeriod(3600)
        .resourceChain(true)
        .addResolver(new PathResourceResolver());
  }
}
5. JSP Files
The JSP files can be placed in /webapp/WEB-INF/jsp directory as /WEB-INF/jsp path has been configured with the view resolver. Add the webapp directory as the resources root so its content is copied to the root directory when building the project.
<%@ page contentType="text/html;charset=UTF-8" language="java" %>
<%@taglib prefix="c" uri="http://java.sun.com/jsp/jstl/core"%>
<html>
    <head>
        <title>View Items</title>
        <link href="/static/css/style.css" rel="stylesheet">
    </head>
    <body>
        <table>
            <thead>
                <tr>
                    <th>Id</th>
                    <th>Name</th>
                </tr>
            </thead>
            <tbody>
                <c:forEach items="${items}" var="item">
                    <tr>
                        <td>${item.id}</td>
                        <td>${item.name}</td>
                    </tr>
                </c:forEach>
            </tbody>
        </table>
    </body>
</html>
6. Package and Run the Application
After the code has been created, we can package the application from the terminal:
mvc clean installIt will create a war file in the target directory. We can run the war file in two ways:
- Using the
java -jarcommand from the terminal. - Deploying in the Tomcat application server.
To run the application from the terminal, run the following command:
java -jar .\target\jsp-demo-1.0-SNAPSHOT.warIt will start the embedded Tomcat server and deploy the application with it.
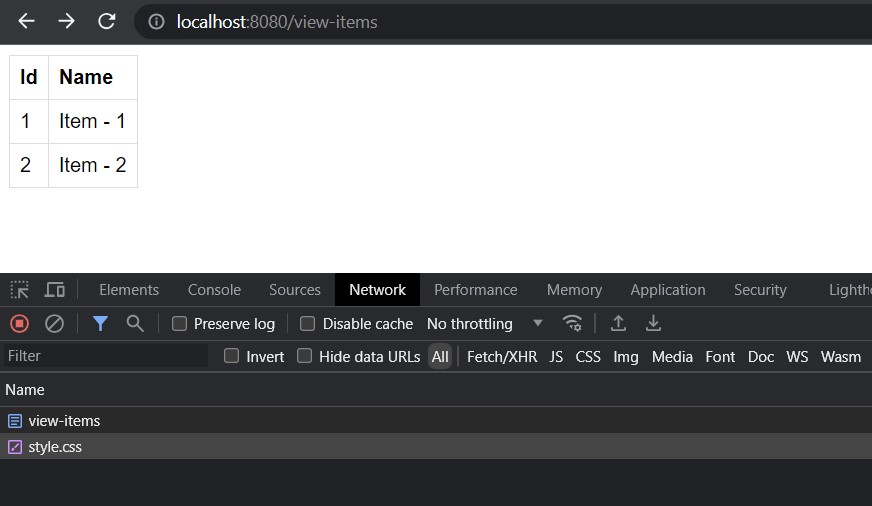
7. Demo
After the application has been deployed, we can access a valid application URL in the browser and the JSP page will be rendered in the browser.
8. FAQs
8.1. Views are not resolved with 404 Error
In most cases, this error indicates that you are trying to run the application as embedded jar deployment or you are not using the java-jar command to run the application.
To fix this issue, you must run the application with java-jar command or deploy it inside a Tomcat server.
java -jar .\target\jsp-demo-1.0-SNAPSHOT.war8.2. ClassNotFoundException: jakarta.servlet.jsp.jstl.core.Config
This error indicates that you are still using the javax.servlet:jstl dependency. With the latest Spring Boot release, we must use the Jakarta namespaces so add the following dependency.
<!-- Remove javax packages -->
<dependency>
  <groupId>javax.servlet</groupId>
  <artifactId>jstl</artifactId>
  <version>1.2</version>
</dependency>

<!-- Add jakarta packages -->
<dependency>
  <groupId>jakarta.servlet.jsp.jstl</groupId>
  <artifactId>jakarta.servlet.jsp.jstl-api</artifactId>
  <version>3.0.0</version>
</dependency>
<dependency>
  <groupId>org.glassfish.web</groupId>
  <artifactId>jakarta.servlet.jsp.jstl</artifactId>
  <version>3.0.1</version>
</dependency>
9. Conclusion
In this Spring Boot JSP example, we learned to serve the JSP pages in a Spring boot 3 application, configure the view resolution, and serve static content with a demo. We also learned to fix some common mistakes that developers make when serving the JSP page.
Happy Learning !!
Thank you so much man!
Hi Lokesh
Is there any way we can configure JSP Tiles with Spring boot 3.2.0
Seems like it is not possible , would you please share some example ??
Hi Jai, Tiles have been retired and reached End of Life. It is good time to move to a new UI framework. Seems Spring also decided to drop its support without any announcement. [Link]
Thanks for that , wondering if you know any good fit for view layer ? which would work well with Spring boot 3.2.0 ?
Spring recommends thymleaf and it integrates as well. Even migration may not be that difficult if you have Spring MVC style form/data-bindings. BUT if you have stateless REST APIs then using a dedicated and mature UI framework (such as Angular or React) makes more sense to me. These frameworks have way more large community support and ready-made components to use.
you are using spring parent version 1.0 not 3.X
Perhaps you are referring to version of parent module. The parent refers to version 3.1.x.
is it possible to run .html with internal resolver
HI,
Using src/main/webapp/WEB-INF/jsp/welcome.jsp is discouraged if you want to deploy via a jar package.
“Do not use the src/main/webapp folder if your application will be packaged as a jar. Although this folder is a common standard, it will only work with war packaging and it will be silently ignored by most build tools if you generate a jar.”
Reference: https://docs.spring.io/spring-boot/docs/1.1.4.RELEASE/reference/htmlsingle/#using-boot-structuring-your-code
Whitelabel Error Page
This application has no explicit mapping for /error, so you are seeing this as a fallback.
Sun Jan 26 12:22:18 IST 2020
There was an unexpected error (type=Internal Server Error, status=500).
The absolute uri: http://www.springframework.org/tags cannot be resolved in either web.xml or the jar files deployed with this application
Worth mentioning, this project as a standalone would not work as Versions of dependency items are missing in pom.xml. After a little research I found it is depending upon a ‘spring-boot-starter-parent’ project as baseline. My guess is, version of dependencies are being controlled from the parent project. As Ankit has mentioned above, we need a tool to download the dependencies from parent project i.e.
mvn eclipse:eclipse -DwtpVersion=2.0command.org.springframework.boot
spring-boot-starter-parent
2.1.5.RELEASE
Thank you it’s working on my machine
for all those who don’t able to import this in your STS .plz try the below steps.
1) unzip the file and copy the unzipped file to your work-space(i.e the drive) u have chosen for STS.
2)open the unzipped folder (normally in windows) and got to POM file. Now click on the address bar .and copy it.
ur address bar should look something like this.
D:\SPRING BOOT 4\WORKSPACE SPRING BOOT\spring-boot-demo-jsp-example\spring-boot-demo
note: the address at last must be showing \spring-boot-demo
3)now open cmd and browse to the specific drive (if it is other than C drive) abd paste the copied address and press enter
4) NOw the important part … Type the command Exactly like I have written.
mvn eclipse:eclipse -DwtpVersion=2.0
and press enter if everything is right it will start downloading the required files and Build Success will be shown.
Now just open ur STS and try to import the file u will be able to import it. :)
Thanks for sharing it.
As a fix ,in pom.xml, for spring-boot-starter-tomcat remove tag. It is needed only if its not a spring boot application. It is failing because there is no explicit tomcat server.
After fixing this issue also example is not working properly.
Suppose I am hiiting localhost:8080/next
then response is
2019-02-14 16:29:20.601 DEBUG 2436 — [nio-8080-exec-4] s.w.s.m.m.a.RequestMappingHandlerMapping : Looking up handler method for path /WEB-INF/view/next.jsp
2019-02-14 16:29:20.602 DEBUG 2436 — [nio-8080-exec-4] s.w.s.m.m.a.RequestMappingHandlerMapping : Did not find handler method for [/WEB-INF/view/next.jsp]
basically is not treating it a request to get static resource.
If you create a method in controller with @Requestparam(/WEB-INF/view/next.jsp) then it gets detected.
Lokesh could you help us on this.
I cannot get this to work. I downloaded your source and imported it as a project into Intellij Idea. When I try to run it, I get the following exception:
java.lang.IllegalStateException: ApplicationEventMulticaster not initialized – call ‘refresh’ before multicasting events via the context: org.springframework.context.annotation.AnnotationConfigApplicationContext@1e4a7dd4: startup date [Tue Jul 10 21:12:36 PDT 2018]; root of context hierarchy
Try this: https://stackoverflow.com/questions/44686432/java-lang-illegalstateexception-applicationeventmulticaster-not-initialized-c/45450371#45450371
I downloaded the attached example and imported in eclipse as maven project and it worked perfectly.
Thanks
When I run this code using “mvn spring-boot:run”, then application is running fine. But when I converted the same application into executable jar file, (changed war to jar in pom.xml) and executed the jar file then this error is coming,
Could you please resolve this issue. I need this very urgent, in my project as well I’m encountering the same issue. Here is email id, “tshravan2012@gmail.com”. Thanks a lot for your time.
Hmmm, mvn spring-boot:run works while idea spring-boot doesn’t. This is a problem
Your example doesn’t work.
I encountered next error: “.. Caused by: java.lang.ClassNotFoundException: javax.servlet.Filter”
which shows me that it caused by explicit dependency for tomcat with provided: https://stackoverflow.com/questions/30374316/spring-boot-java-lang-noclassdeffounderror-javax-servlet-filter
I wonder why should i have that dependency at all if spring uses tomcat embedded by default. So i removed it, but now i obtained: “Whitelabel Error Page”
you must run the app with mvn clean spring-boot:run command
I have followed you tutorial to add view layer to my existing spring boot rest application. Following is the method i am trying to use a home page view(home.jsp). I am not getting the jsp page render, instead I am getting a string ‘home’ when i ran the project. Please help me in fixing issue, I am new to spring boot.
@RequestMapping(value = “/dashboard”)
@ResponseBody
public String getMyMessage() {
return “home”;
}
my MvcConfiguration class is:
import org.springframework.context.annotation.Configuration;
import org.springframework.web.servlet.config.annotation.EnableWebMvc;
import org.springframework.web.servlet.config.annotation.ViewResolverRegistry;
import org.springframework.web.servlet.config.annotation.WebMvcConfigurerAdapter;
import org.springframework.web.servlet.view.InternalResourceViewResolver;
import org.springframework.web.servlet.view.JstlView;
@Configuration
@EnableWebMvc
public class MvcConfiguration extends WebMvcConfigurerAdapter{
@Override
public void configureViewResolvers(ViewResolverRegistry registry) {
InternalResourceViewResolver resolver = new InternalResourceViewResolver();
resolver.setPrefix(“/WEB-INF/views/”);
resolver.setSuffix(“.jsp”);
resolver.setViewClass(JstlView.class);
registry.viewResolver(resolver);
}
}
@Neelam Panwar, You need to remove @ResponseBody annotation from your getMyMessage() method. That is for render a JSON object or a string. If you want to return a JSP view. you just need to remove that.