
Spring Data offers a variety of annotations and techniques to facilitate data creation and updation timestamps in the applications.
The commonly used approach involves:
- Using Hibernate’s @CreationTimestamp and @UpdateTimestamp annotations
- Using Spring Data’s @CreatedDate and @LastModifiedDate annotations
- Using JPA lifecycle callback methods with @PrePersist, and @PreUpdate annotations
- Using database triggers
- Using 3rd-party libraries such as Envers
In this post, we will explore each option and identify when to use which solution for tracking the entity changes.
1. Why do we need to track the create and update timestamps?
Tracking create and update timestamps is a common practice in software development, especially in systems that involve data storage and management. The primary reasons for tracking these timestamps include:
- Auditing: Timestamps provide an audit trail that helps in tracing the history of changes made to a piece of data. This can be crucial for tracking who made changes when those changes were made, and what those changes were.
- Troubleshooting and Debugging: When something goes wrong in a system, having timestamps can be invaluable for troubleshooting. By analyzing the sequence of events through timestamps, developers can pinpoint where errors occurred, and identify potential causes.
- Data Analysis: Timestamps provide a historical perspective on data changes, which can be useful for analyzing trends and patterns over time. This can be beneficial for making informed decisions, predicting future trends, etc.
2. Demo Setup
Now, let’s create a simple Spring Boot application that uses Spring Data JPA. To understand different ways of storing creation and updation time we will use Employee entity.
@Entity
public class Employee {

    @Id
    @GeneratedValue(strategy = GenerationType.IDENTITY)
    private Long id;
    private String name;
}
To interact with a database we need to add Spring Data JPA dependency to our project. For the purpose of this demonstration, we will use an in-memory H2 database.
<dependency>
        <groupId>org.springframework.boot</groupId>
        <artifactId>spring-boot-starter-data-jpa</artifactId>
</dependency>
<dependency>
        <groupId>com.h2database</groupId>
        <artifactId>h2</artifactId>
        <scope>runtime</scope>
</dependency>
3. Using Hibernate @CreationTimestamp and @UpdateTimestamp
The @CreateTimestamp annotation marks a property as the creation timestamp of the entity. The property value will be set to the current VM date exactly once when saving the entity for the first time.
The @UpdateTimestamp annotation marks a property as the updated timestamp of the entity. The property value will be set to the current VM date whenever the entity is updated. When the entity is saved the first time, the updation timestamp value is the same as the creation time, but during subsequent entity updates the creation time is not changed only the updation time is updated.
This annotation can be applied to a field of type:
- java.util.Date
- java.util.Calendar
- java.sql.Date
- java.sql.Timestamp
- java.time.Instant
- java.time.LocalDate
- java.time.LocalDateTime
- java.time.LocalTime
- java.time.MonthDay
- java.time.OffsetDateTime
- java.time.OffsetTime
- java.time.Year
- java.time.YearMonth
- java.time.ZonedDateTime
3.1. Using @CreationTimestamp and @UpdateTimestamp Annotations
Let’s add a field createdAt and updatedAt in Employee entity with @CreateTimestamp and @UpdateTimestamp annotation respectively. We declare the fields as LocalDateTime. This field will have the type Timestamp in our generated schema:
import jakarta.persistence.Entity;
import org.hibernate.annotations.CreationTimestamp;
import org.hibernate.annotations.UpdateTimestamp;
import java.time.LocalDateTime;

@Entity
public class Employee {

    //...

    @CreationTimestamp
    private LocalDateTime createdAt;

    @UpdateTimestamp
    private LocalDateTime updatedAt;
}
Now, we can verify in the log that Hibernate automatically sets createdAt and updatedAt while saving a new employee and only updates updatedAt while updating the data.
Employee employee = new Employee("Test Name");

employee = repository.save(employee);

log.info("After save create timestamp: " + employee.getCreatedAt());
log.info("After save create timestamp: " + employee.getUpdatedAt());

Thread.sleep(2000);

employee.setName("New Name");
employee = repository.save(employee);

log.info("After save update timestamp: " + employee.getCreatedAt());
log.info("After save update timestamp: " + employee.getUpdatedAt());
The program output:
After save create timestamp: 2023-08-22T21:38:21.981057
After save create timestamp: 2023-08-22T21:38:21.981057

After save update timestamp: 2023-08-22T21:38:21.981057  //Unchanged
After save update timestamp: 2023-08-22T21:38:24.053087
3.2. Changing Source of Current TimeStamp
By default, the timestamp is generated using the current JVM (Java Virtual Machine) time and this might not handle timezones correctly or might not align with the desired timezone of the application. This can be changed by explicitly specifying the source(). Otherwise, the default timezone used by the annotations are (timing=INSERT,source=VM).
Since Hibernate 6.0.0, we can optionally specify the database as the source of the date. In this case, the underlying database specifies how to determine the current date. This, for example, could be the database function current_timestamp().
@CreationTimestamp(source = SourceType.DB)
private Timestamp createdAt;

@UpdateTimestamp(source = SourceType.DB)
private Timestamp updatedAt;
4. Using Spring Data @CreatedDate and @LastModifiedDate
Spring Data JPA provides the @CreatedDate and @LastModifiedDate annotations for managing creation and modification timestamps, respectively.
- The @CreatedDate declares a field as one representing the date the entity was created.
- The @LastModifiedDate declares a field as one representing the date the entity was recently modified.
The annotations can be used on properties of Java data types:
- org.joda.time.DateTime
- java.time.Instant
- java.time.LocalDateTime
- java.util.Date
- long or java.lang.Long
4.1. Using @CreatedDate and @LastModifiedDate Annotations
At first, we need to add @EnableJpaAuditing in our configuration class to enable auditing via annotation configuration:
import org.springframework.context.annotation.Configuration;
import org.springframework.data.jpa.repository.config.EnableJpaAuditing;

@Configuration
@EnableJpaAuditing
public class JpaConfig {
  //...
}
Next, we add @EntityListeners annotation to enable auditing for the entities. We’ll also add two new fields for storing the created and last modified dates to our Employee entity. The properties are annotated by the @CreatedDate and @LastModifiedDate annotations accordingly, and their values will be set automatically during persistence:
import jakarta.persistence.Entity;
import jakarta.persistence.EntityListeners;
import org.springframework.data.annotation.CreatedDate;
import org.springframework.data.annotation.LastModifiedDate;
import org.springframework.data.jpa.domain.support.AuditingEntityListener;
import java.time.LocalDateTime;

@Entity
@EntityListeners(AuditListener.class)
public class Employee {

    //...

    @CreatedDate
    private LocalDateTime createdDate;

    @LastModifiedDate
    private LocalDateTime lastModifiedDate;
}
4.2. Demo
Now, if we test the entity persist and update operations, we can verify that creation and updation timestamps are added when persisting the entity. While updating the entity, only lastModifiedDate is updated.
    Employee employee = new Employee("Test Name");

    employee = repository.save(employee);
    log.info("After save create timestamp: " + employee.getCreatedDate());
    log.info("After save create timestamp: " + employee.getLastModifiedDate());

    Thread.sleep(2000);

    employee.setName("New Name");
    employee = repository.save(employee);

    log.info("After save update timestamp: " + employee.getCreatedDate());
    log.info("After save update timestamp: " + employee.getLastModifiedDate());
The program output:
After save create timestamp: 2023-08-22T21:50:19.432972100
After save create timestamp: 2023-08-22T21:50:19.432972100

After save update timestamp: 2023-08-22T21:50:19.432972100  //Not Changed
After save update timestamp: 2023-08-22T21:50:21.523034400  //Changed
5. Using JPA Lifecycle Callbacks
Spring Data provides a more customizable approach to timestamp management using JPA Lifecycle Callbacks annotations:
- @PrePersist
- @PreUpdate
These annotations allow us to define methods within our entity class that are executed before an entity is persisted or updated. This approach is useful when we want to set the timestamps or log some extra information before any DML statement executes.
In the Entity class, we can specify a method as a callback, which will invoke during a particular entity lifecycle event. Internal callback methods should always return void, and take no arguments. They can have any name and any access level, but shouldn’t be static as shown below:
import jakarta.persistence.Entity;
import jakarta.persistence.PrePersist;
import jakarta.persistence.PreUpdate;
import java.time.LocalDateTime;

@Entity
@Slf4j
public class Employee {

  //...

  private LocalDateTime createdOn;
  private LocalDateTime updatedOn;

  @PrePersist
  protected void onCreate() {
      log.info("onCreate() called");
      createdOn = LocalDateTime.now();
  }

  @PreUpdate
  protected void onUpdate() {
      log.info("onUpdate() called");
      updatedOn = LocalDateTime.now();
  }
}
While persisting a new entity we can verify the onCreate() method was called successfully and a value was assigned to createdOn field. Similarly, during the update operation onUpdate() was called and updatedOn field was assigned a value.
Employee employee = new Employee("Test Name");
employee = repository.save(employee);

log.info("After save create timestamp: " + employee.getCreatedOn());
log.info("After save create timestamp: " + employee.getUpdatedOn());

Thread.sleep(2000);

employee.setName("New Name");
employee = repository.save(employee);

log.info("After save update timestamp: " + employee.getCreatedOn());
log.info("After save update timestamp: " + employee.getUpdatedOn());
The program output. Notice that when the entry was first persisted, the createdOn field was set to null.
c.howtodoinjava.audit.entity.Employee    : onCreate() called
com.howtodoinjava.audit.Main             : After save create timestamp: 2023-08-22T21:58:04.285686
com.howtodoinjava.audit.Main             : After save create timestamp: null

c.howtodoinjava.audit.entity.Employee    : onUpdate() called
com.howtodoinjava.audit.Main             : After save update timestamp: 2023-08-22T21:58:04.285686
com.howtodoinjava.audit.Main             : After save update timestamp: 2023-08-22T21:58:06.374623400
6. Using Database Triggers
While Spring Boot’s annotations offer convenient ways to manage timestamps, we can also leverage database triggers for auditing. Database triggers can be set up to automatically update timestamp fields upon certain database events, such as insert or update operations.
Use this approach when you don’t want to handle timestamps in your spring application but rather want the database to handle the insertion and updation time.
The below example shows how to set up a database trigger on the employee table before insertion and updating.
DELIMITER ;;
CREATE TRIGGER create_timestamp BEFORE INSERT ON employee
FOR EACH ROW
BEGIN
	SET NEW.created_at = NOW();
END;;
DELIMITER ;
DELIMITER ;;
CREATE TRIGGER update_timestamp BEFORE UPDATE ON employee
FOR EACH ROW
BEGIN
SET NEW.updated_at = NOW();
END;;
DELIMITER ;7. Using Third-Party Libraries like ‘Envers’ for Auditing
For more comprehensive data tracking, the Envers library can be integrated into our Spring Boot application. Envers provides audit logging for our entities. For each entity, an audit table will be created (suffix: *_aud), which will hold the history of changes made to the entity. we can then retrieve and query historical data without much effort.
The envers library has a concept of revisions which uses a table REVINFO, generated by default and it includes two important fields, REV and REVTSTMP, and records the timestamp of every revision. Basically, each transaction is a new revision (unless the transaction didn’t modify any audited entities).
As the revisions are global, having a revision number, we can query for various entities at that revision, retrieving a (partial) view of the database at that revision. we can find a revision number having a date, and the other way around, we can get the date at which a revision was committed.
To use Envers, we need to add the spring-data-envers dependency into our pom.xml:
<dependency>
  <groupId>org.springframework.data</groupId>
  <artifactId>spring-data-envers</artifactId>
</dependency>
Then we add the @Audited annotation, either on an @Entity (to audit the whole entity) or on specific @Columns (if we need to audit specific properties only).
import org.hibernate.envers.Audited;
import jakarta.persistence.Entity;
@Entity
@Audited
public class Employee {
// field, getters and setters
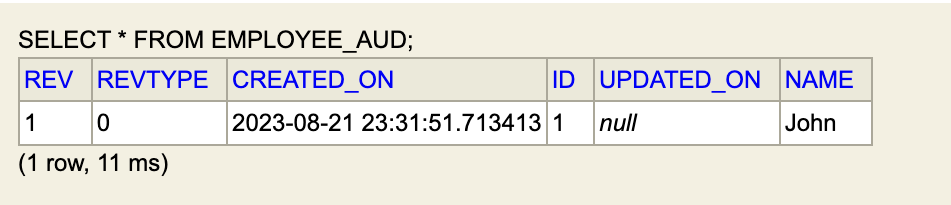
}Now, if we query the employee_aud table, we will see the history of changes made to the table as shown below:
Once we create an entity initial we see that there is only 1 row for an id initially:
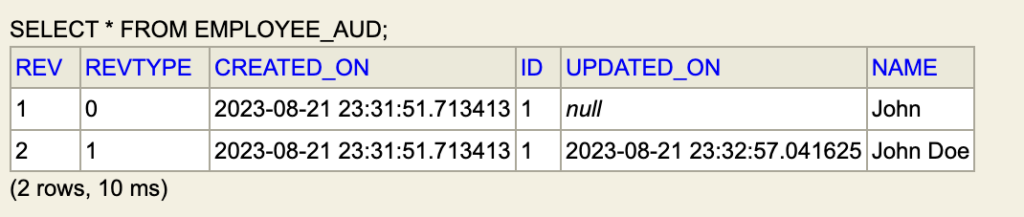
Finally, when an entity is updated we see that the audit table has 2 entries for id = 1, name was changed from John to John Doe:
8. Best Practices
Here are some best practices for auditing the JPA entities effectively:
- Use Case Clarity: Understand the purpose of each annotation and use them appropriately in your application.
@Audited: Use this annotation when you want to keep the history of all the changes made to the entity.@CreatedDate/@CreationTimestamp: Use these to automatically set a timestamp when an entity is created.@LastModifiedDate/@UpdateTimestamp: Utilize these to automatically update a timestamp when an entity is modified.@PrePersist/@PreUpdate: Use these to log or modify some data before insertion or updation.
- Choose Relevant Annotations: Depending on the requirements, we must choose the appropriate annotation(s) for the entities. We might not need all of them for every entity.
- Performance Considerations:
- Be cautious with the usage of auditing annotations in high-throughput systems, as they might impact performance.
- Configure auditing and Envers properties according to the application’s performance requirements.
Remember that the choice of approach depends on the project’s needs and trade-offs between ease of use, maintainability, and performance.
9. Conclusion
In this Spring Data article, we delved deep into maintaining the creation and updation timestamps of JPA entities with the usage of @CreateTimestamp, @UpdateTimestamp, @CreatedDate, @LastModifiedDate, @PrePersist, and @PreUpdate annotations.
We also learned how to setup database triggers for auditing. Additionally, we learned to use Envers library for comprehensive auditing of the entities.
Happy Learning !!