In this spring webflux websocket example, Learn to create reactive applications using spring webflux which support websocket connection between a client and server.
A websocket is a bi-directional, full-duplex, persistent connection between a web browser and a server. Once the connection is established, it stays open until the client or server decides to close this connection. Websockets have practical use in applications where multiple users connects with each other and send and receive messages e.g. chat applications.
1. Maven Dependencies
We need to have spring-boot-starter-webflux and javax.websocket-api dependencies.
Spring WebFlux expects that WebSockets version 1.1 is used. When using 1.0, the code won’t run.
<project xmlns="http://maven.apache.org/POM/4.0.0"
	xmlns:xsi="http://www.w3.org/2001/XMLSchema-instance"
	xsi:schemaLocation="http://maven.apache.org/POM/4.0.0
	;
	<modelVersion>4.0.0</modelVersion>

	<groupId>com.howtodoinjava.demo</groupId>
	<artifactId>spring-webflux-example</artifactId>
	<version>0.0.1-SNAPSHOT</version>
	<packaging>jar</packaging>

	<parent>
		<groupId>org.springframework.boot</groupId>
		<artifactId>spring-boot-starter-parent</artifactId>
		<version>2.1.2.RELEASE</version>
		<relativePath /> <!-- lookup parent from repository -->
	</parent>

	<name>spring-webflux-example</name>
	<url>http://maven.apache.org</url>

	<properties>
		<project.build.sourceEncoding>UTF-8</project.build.sourceEncoding>
		<java.version>1.8</java.version>
	</properties>

	<dependencies>

		<dependency>
			<groupId>org.springframework.boot</groupId>
			<artifactId>spring-boot-starter-webflux</artifactId>
		</dependency>

		<dependency>
			<groupId>javax.websocket</groupId>
			<artifactId>javax.websocket-api</artifactId>
			<version>1.1</version>
		</dependency>

	</dependencies>
</project>
2. WebSocketHandler – Message handler
At the center of the application, we will have a WebSocketHandler which will handle WebSocket messages and lifecycle events. The given EchoHandler will receive a message and return it prefixed with “RECEIVED ON SERVER ::”.
package com.howtodoinjava.demo.handler;

import org.springframework.web.reactive.socket.WebSocketHandler;
import org.springframework.web.reactive.socket.WebSocketSession;
import reactor.core.publisher.Mono;

public class EchoHandler implements WebSocketHandler
{
	@Override
	public Mono<Void> handle(WebSocketSession session)
	{
		return session
				.send( session.receive()
						.map(msg -> "RECEIVED ON SERVER :: " + msg.getPayloadAsText())
						.map(session::textMessage)
					);
	}
}
3. Configure WebSocketHandler
First, WebSocketHandler needs to be mapped to a URL using the SimpleUrlHandlerMapping. Then we need a WebSocketHandlerAdapter which will invoke the WebSocketHandler.
Finally, to let the WebSocketHandlerAdapter understand the incoming reactive runtime request, we need to configure a WebSocketService with the ReactorNettyRequestUpgradeStrategy (as we are using default netty server).
package com.howtodoinjava.demo;

import java.util.HashMap;
import java.util.Map;

import org.springframework.boot.SpringApplication;
import org.springframework.boot.autoconfigure.SpringBootApplication;
import org.springframework.context.annotation.Bean;
import org.springframework.core.Ordered;
import org.springframework.web.reactive.HandlerMapping;
import org.springframework.web.reactive.handler.SimpleUrlHandlerMapping;
import org.springframework.web.reactive.socket.WebSocketHandler;
import org.springframework.web.reactive.socket.server.WebSocketService;
import org.springframework.web.reactive.socket.server.support.HandshakeWebSocketService;
import org.springframework.web.reactive.socket.server.support.WebSocketHandlerAdapter;
import org.springframework.web.reactive.socket.server.upgrade.ReactorNettyRequestUpgradeStrategy;

import com.howtodoinjava.demo.handler.EchoHandler;

@SpringBootApplication
public class EchoApplication {
	public static void main(String[] args) {
		SpringApplication.run(EchoApplication.class, args);
	}

	@Bean
	public EchoHandler echoHandler() {
		return new EchoHandler();
	}

	@Bean
	public HandlerMapping handlerMapping() {
		Map<String, WebSocketHandler> map = new HashMap<>();
		map.put("/echo", echoHandler());

		SimpleUrlHandlerMapping mapping = new SimpleUrlHandlerMapping();
		mapping.setUrlMap(map);
		mapping.setOrder(Ordered.HIGHEST_PRECEDENCE);
		return mapping;
	}

	@Bean
	public WebSocketHandlerAdapter handlerAdapter() {
		return new WebSocketHandlerAdapter(webSocketService());
	}

	@Bean
	public WebSocketService webSocketService() {
		return new HandshakeWebSocketService(new ReactorNettyRequestUpgradeStrategy());
	}
}
4. Websocket client
Let’s create a reactive webclient first. To test it in browser, we have following two files app.js and index.html. The JS file has code to connect/disconnect, send messages and display received messages from server.
var ws = null;
var url = "ws://localhost:8080/echo";

function setConnected(connected)
{
	document.getElementById('connect').disabled = connected;
	document.getElementById('disconnect').disabled = !connected;
	document.getElementById('echo').disabled = !connected;
}

function connect()
{
	ws = new WebSocket(url);
	ws.onopen = function() {
		setConnected(true);
		log('Info: Connection Established.');
	};

	ws.onmessage = function(event) {
		log(event.data);
	};

	ws.onclose = function(event) {
		setConnected(false);
		log('Info: Closing Connection.');
	};
}

function disconnect()
{
	if (ws != null) {
		ws.close();
		ws = null;
	}
	setConnected(false);
}

function echo()
{
	if (ws != null)
	{
		var message = document.getElementById('message').value;
		log('Sent to server :: ' + message);
		ws.send(message);
	} else {
		alert('connection not established, please connect.');
	}
}

function log(message)
{
	var console = document.getElementById('logging');
	var p = document.createElement('p');
	p.appendChild(document.createTextNode(message));
	console.appendChild(p);
}
<!DOCTYPE html>
<html>
<head>
<link type="text/css" rel="stylesheet"
	href="https://cdnjs.cloudflare.com/ajax/libs/semantic-ui/2.2.10/semantic.min.css" />
<script type="text/javascript" src="app.js"></script>
</head>
<body>
	<div>
		<div id="connect-container" class="ui centered grid">
			<div class="row">
				<button id="connect" onclick="connect();" class="ui green button ">Connect</button>
				<button id="disconnect" disabled="disabled" onclick="disconnect();"
					class="ui red button">Disconnect</button>
			</div>
			<div class="row">
				<textarea id="message" style="width: 350px" class="ui input"
					placeholder="Message to Echo"></textarea>
			</div>
			<div class="row">
				<button id="echo" onclick="echo();" disabled="disabled"
					class="ui button">Echo message</button>
			</div>
		</div>
		<div id="console-container">
			<h3>Logging</h3>
			<div id="logging"></div>
		</div>
	</div>
</body>
</html>
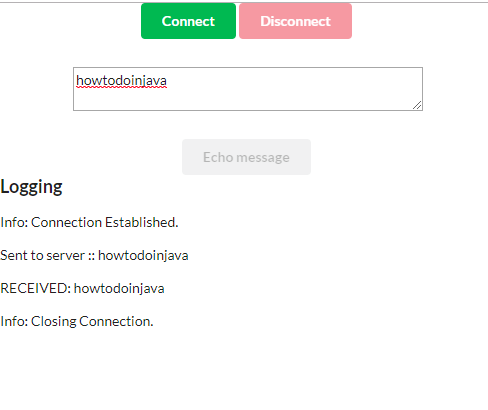
5. Test Spring webflux websocket example
Hit the browser with URL : http://localhost:8080/index.html
Test the websocket connect, disconnect feature and then try to send few messages.
Drop me your questions related to creating a reactive websocket connection with server using spring webflux.
Happy Learning !!
I have question . In case if all message broadcast through webSocket if i want this message for specifically user . How can i do . Any people help me
Did u find the way to solve this problem?
Hi, thanks for this clear and very useful example. Could you tell me where to find more info about how to connect two or more sessions in a chat? Thanks a lot.
Thanks great example for beginners. Can you tell how do we add security to webflux websocket so that the client should send url wss://localhost:8080/sample to connect to websocket.