In Vaadin hello world example, we will learn to create a simple Vaadin application, and then we will deploy the application in the built-in Jetty server.
1. Creating Vaadin Project using Maven Archetype
Use the below maven command in your workspace to create the simplest Vaadin web application.
$ mvn archetype:generate
	-DarchetypeGroupId=com.vaadin
	-DarchetypeArtifactId=vaadin-archetype-application
	-DarchetypeVersion=LATEST
	-DgroupId=com.howtodoinjava.vaadin.demo
	-DartifactId=VaadinExample
	-Dversion=1.0
	-Dpackaging=war
Please update the groupId and artifactId as per your choice.
2. Import Generated Project to IDE
Now import the generated project into the IDE (in my case, it’s eclipse) as an existing Maven project.
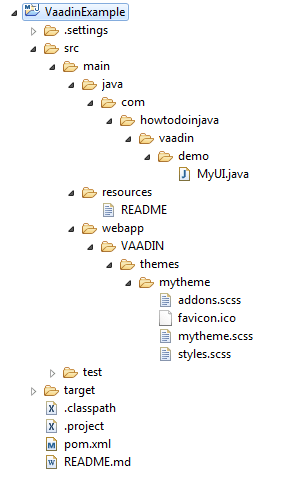
The generated project contains a standard folder structure for any maven web application.
3. Generated files
Along with folder structure, we get given below generated files along with vaadin hello world project.
3.1. pom.xml
<?xml version="1.0" encoding="UTF-8"?>
<project xmlns="http://maven.apache.org/POM/4.0.0" xmlns:xsi="http://www.w3.org/2001/XMLSchema-instance"
	xsi:schemaLocation="http://maven.apache.org/POM/4.0.0 https://maven.apache.org/xsd/maven-4.0.0.xsd;
	<modelVersion>4.0.0</modelVersion>

	<groupId>com.howtodoinjava.vaadin.demo</groupId>
	<artifactId>VaadinExample</artifactId>
	<packaging>war</packaging>
	<version>1.0</version>
	<name>VaadinExample</name>

	<prerequisites>
		<maven>3</maven>
	</prerequisites>

	<properties>
		<vaadin.version>7.7.0</vaadin.version>
		<vaadin.plugin.version>7.7.0</vaadin.plugin.version>
		<jetty.plugin.version>9.3.9.v20160517</jetty.plugin.version>
		<project.build.sourceEncoding>UTF-8</project.build.sourceEncoding>
		<maven.compiler.source>1.8</maven.compiler.source>
		<maven.compiler.target>1.8</maven.compiler.target>
		<!-- If there are no local customisations, this can also be "fetch" or "cdn" -->
		<vaadin.widgetset.mode>local</vaadin.widgetset.mode>
	</properties>

	<repositories>
		<repository>
			<id>vaadin-addons</id>
			<url>http://maven.vaadin.com/vaadin-addons</url>
		</repository>
		<repository>
			<id>vaadin-snapshots</id>
			<url>https://oss.sonatype.org/content/repositories/vaadin-snapshots/</url>
			<releases>
				<enabled>false</enabled>
			</releases>
			<snapshots>
				<enabled>true</enabled>
			</snapshots>
		</repository>
	</repositories>

	<dependencyManagement>
		<dependencies>
			<dependency>
				<groupId>com.vaadin</groupId>
				<artifactId>vaadin-bom</artifactId>
				<version>${vaadin.version}</version>
				<type>pom</type>
				<scope>import</scope>
			</dependency>
		</dependencies>
	</dependencyManagement>

	<dependencies>
		<dependency>
			<groupId>javax.servlet</groupId>
			<artifactId>javax.servlet-api</artifactId>
			<version>3.0.1</version>
			<scope>provided</scope>
		</dependency>
		<dependency>
			<groupId>com.vaadin</groupId>
			<artifactId>vaadin-server</artifactId>
		</dependency>
		<dependency>
			<groupId>com.vaadin</groupId>
			<artifactId>vaadin-push</artifactId>
		</dependency>
		<dependency>
			<groupId>com.vaadin</groupId>
			<artifactId>vaadin-client-compiled</artifactId>
		</dependency>
		<dependency>
			<groupId>com.vaadin</groupId>
			<artifactId>vaadin-themes</artifactId>
		</dependency>
	</dependencies>

	<build>
		<plugins>
			<plugin>
				<groupId>org.apache.maven.plugins</groupId>
				<artifactId>maven-war-plugin</artifactId>
				<version>2.6</version>
				<configuration>
					<failOnMissingWebXml>false</failOnMissingWebXml>
					<!-- Exclude an unnecessary file generated by the GWT compiler. -->
					<packagingExcludes>WEB-INF/classes/VAADIN/widgetsets/WEB-INF/**</packagingExcludes>
				</configuration>
			</plugin>
			<plugin>
				<groupId>com.vaadin</groupId>
				<artifactId>vaadin-maven-plugin</artifactId>
				<version>${vaadin.plugin.version}</version>
				<executions>
					<execution>
						<goals>
							<goal>update-theme</goal>
							<goal>update-widgetset</goal>
							<goal>compile</goal>
							<!-- Comment out compile-theme goal to use on-the-fly theme compilation -->
							<goal>compile-theme</goal>
						</goals>
					</execution>
				</executions>
			</plugin>
			<plugin>
				<groupId>org.apache.maven.plugins</groupId>
				<artifactId>maven-clean-plugin</artifactId>
				<version>3.0.0</version>
				<!-- Clean up also any pre-compiled themes -->
				<configuration>
					<filesets>
						<fileset>
							<directory>src/main/webapp/VAADIN/themes</directory>
							<includes>
								<include>**/styles.css</include>
								<include>**/styles.scss.cache</include>
							</includes>
						</fileset>
					</filesets>
				</configuration>
			</plugin>

			<!-- The Jetty plugin allows us to easily test the development build by
				running jetty:run on the command line. -->
			<plugin>
				<groupId>org.eclipse.jetty</groupId>
				<artifactId>jetty-maven-plugin</artifactId>
				<version>${jetty.plugin.version}</version>
				<configuration>
					<scanIntervalSeconds>2</scanIntervalSeconds>
				</configuration>
			</plugin>
		</plugins>
	</build>

	<profiles>
		<profile>
			<!-- Vaadin pre-release repositories -->
			<id>vaadin-prerelease</id>
			<activation>
				<activeByDefault>false</activeByDefault>
			</activation>

			<repositories>
				<repository>
					<id>vaadin-prereleases</id>
					<url>http://maven.vaadin.com/vaadin-prereleases</url>
				</repository>
			</repositories>
			<pluginRepositories>
				<pluginRepository>
					<id>vaadin-prereleases</id>
					<url>http://maven.vaadin.com/vaadin-prereleases</url>
				</pluginRepository>
			</pluginRepositories>
		</profile>
	</profiles>

</project>
3.2. MyUI.java
package com.howtodoinjava.vaadin.demo;

import javax.servlet.annotation.WebServlet;

import com.vaadin.annotations.Theme;
import com.vaadin.annotations.VaadinServletConfiguration;
import com.vaadin.server.VaadinRequest;
import com.vaadin.server.VaadinServlet;
import com.vaadin.ui.Button;
import com.vaadin.ui.Label;
import com.vaadin.ui.TextField;
import com.vaadin.ui.UI;
import com.vaadin.ui.VerticalLayout;

/**
 * This UI is the application entry point. A UI may either represent a browser window
 * (or tab) or some part of an HTML page where a Vaadin application is embedded.
 * <p>
 * The UI is initialized using {@link #init(VaadinRequest)}. This method is intended to be
 * overridden to add a component to the user interface and initialize non-component functionality.
 */
@Theme("mytheme")
public class MyUI extends UI {

    @Override
    protected void init(VaadinRequest vaadinRequest) {
        final VerticalLayout layout = new VerticalLayout();

        final TextField name = new TextField();
        name.setCaption("Type your name here:");

        Button button = new Button("Click Me");
        button.addClickListener( e -> {
            layout.addComponent(new Label("Thanks " + name.getValue()
                    + ", it works!"));
        });

        layout.addComponents(name, button);
        layout.setMargin(true);
        layout.setSpacing(true);

        setContent(layout);
    }

    @WebServlet(urlPatterns = "/*", name = "MyUIServlet", asyncSupported = true)
    @VaadinServletConfiguration(ui = MyUI.class, productionMode = false)
    public static class MyUIServlet extends VaadinServlet {
    }
}
3.3. web.xml
If you want to use web.xml file, because your server does not support servlet 3.0 specification, you can use this configuration in web.xml file.
<?xml version="1.0" encoding="UTF-8"?>
<web-app id="WebApp_ID" version="2.4"
	xmlns="http://java.sun.com/xml/ns/j2ee" xmlns:xsi="http://www.w3.org/2001/XMLSchema-instance"
	xsi:schemaLocation="http://java.sun.com/xml/ns/j2ee
     https://www.oracle.com/java/technologies/;

	<servlet>
		<servlet-name>myservlet</servlet-name>
		<servlet-class>com.vaadin.server.VaadinServlet</servlet-class>
		<init-param>
			<param-name>UI</param-name>
			<param-value>com.howtodoinjava.vaadin.demo.MyUI</param-value>
		</init-param>
	</servlet>

	<servlet-mapping>
		<servlet-name>myservlet</servlet-name>
		<url-pattern>/*</url-pattern>
	</servlet-mapping>
</web-app>
Do not forget to remove @WebServlet(urlPatterns = "/*", name = "MyUIServlet", asyncSupported = true) if you are using web.xml file.
4. Build the Project
Now it’s time to build the project so that it can download all the dependencies and include them into the project’s runtime.
$ mvn clean install
The above maven command will download the dependencies (it will take some time), and build the war file VaadinExample-1.0.war.
5. Run and Test Vaadin Hello World Application
Now it’s time to run the application. In the command prompt, run the following command to start included jetty server.
$mvn jetty:run
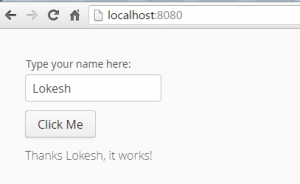
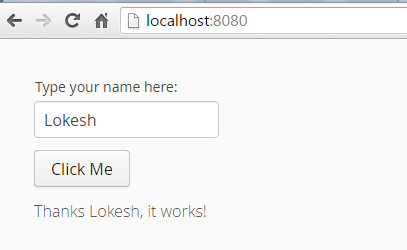
This will start the built-in jetty server and you can access the application at http://localhost:8080/.

Now fill in your name or any string in the text box and click on the button. It will print the message below the button.
Happy Learning !!
Resources: