Vaadin is a Java framework that simplifies front-end development by providing a rich set of reusable UI components and layouts. In this Spring Boot and Vaadin tutorial, we will explore the process of developing a basic CRUD application.
1. Goals
Our goal is to construct a user interface that includes a table displaying the list of users, as well as text fields and buttons for executing CRUD operations. To store data, we will utilize an in-memory H2 database.
2. Maven
The easiest way to get started with Vaadin is to include the starter dependency vaadin-spring-boot-starter that includes all the essential modules and auto-configuration.
<dependency>
  <groupId>com.vaadin</groupId>
  <artifactId>vaadin-spring-boot-starter</artifactId>
</dependency>
Adding vaadin-bom is also recommended if we need additional Vaadin dependencies.
<properties>
  <vaadin.version>24.1.1</vaadin.version>
</properties>

<dependencyManagement>
  <dependencies>
    <dependency>
      <groupId>com.vaadin</groupId>
      <artifactId>vaadin-bom</artifactId>
      <version>${vaadin.version}</version>
      <type>pom</type>
      <scope>import</scope>
    </dependency>
  </dependencies>
</dependencyManagement>
Note that Vaadin applications created with the https://start.vaadin.com are by default Spring Boot applications.
3. Persistence
We will utilize Spring Data JPA to work with the in-memory H2 database. Furthermore, our goal is to set up the database, define the necessary model, and implement the repository for interaction with the database.
3.1. Setting Up H2 Database
Add the datasource properties into the application.properties:
spring.datasource.url=jdbc:h2:mem:testdb
spring.datasource.driverClassName=org.h2.Driver
spring.datasource.username=sa
spring.datasource.password=
spring.jpa.database-platform=org.hibernate.dialect.H2Dialect
spring.h2.console.enabled=true
3.2. Model
Create a Person model class, which will be used for storing data and for mapping Java objects to a database table:
import jakarta.persistence.Entity;
import jakarta.persistence.GeneratedValue;
import jakarta.persistence.Id;

@Entity
public class Person {

    @Id
    @GeneratedValue
    private Integer id;

    private String firstName;

    private String lastName;

   //constructors, getters, setters
}
3.3. JPA Repository
Create PersonRepository interface which extends the JpaRepository. It allows us to use all the needed functions for CRUD operations:
import org.springframework.data.jpa.repository.JpaRepository;

public interface PersonRepository extends JpaRepository<Person, Long> {
}
3.4. Loading Initial Data
Now we can effortlessly populate our database with initial data using the CommandLineRunner bean.
@SpringBootApplication
public class CrudWithVaadinApplication {

    public static void main(String[] args) {
        SpringApplication.run(CrudWithVaadinApplication.class, args);
    }

    @Bean
    public CommandLineRunner loadData(PersonRepository repository) {
        return (args) -> {
            repository.save(new Person("Tom", "Todle"));
            repository.save(new Person("Jane", "June"));
        };
    }

}
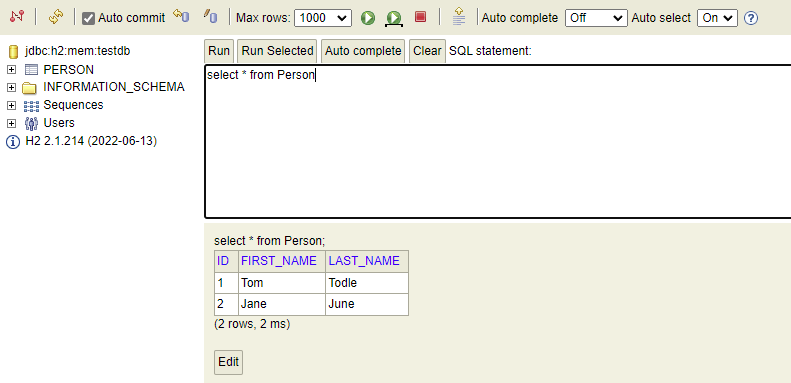
To verify the populated data, we can access the database interface in a web browser by navigating to localhost:8080/h2-console/
4. Creating User Interface with Vaadin
Vaadin includes over 40 UI components to help us build applications faster and focus primarily on building end-user functionality. The Vaadin components are custom HTML elements that are registered with the browser.
In this section, our objective is to develop a UI for user-management and establish its integration with our configured database.
4.1. View Routes
A Vaadin component can be made the navigation target by adding an @Route("<path>") annotation. Routes can be nested by defining the parent layout in the annotation:
@Route(value = "")4.2. Basic Layouts
The Vaadin UI components are created inside a Layout. Layouts decide how components are positioned in the browser window.

Vaadin provides several layout components and each has its own purpose and usage.
- AppLayout: includes a header, a sidebar or menu, and a content area where the main content of the application is displayed.
- VerticalLayout: displays components vertically in a top-down order or to stack components vertically.
- HorizontalLayout: displays components horizontally in a left-to-right order or to align components horizontally.
- GridLayout: divides the available space into a grid of cells for creating more complex grid-based layouts.
- FormLayout: organizes components in a single column with their captions for creating forms or vertical layouts with captions.
- SplitLayout: divides the available space into two or more resizable areas.
- Tabs: organizes components into separate tabs for creating multi-tab views.
In this tutorial, we are using the VerticalLayout implementation.
4.3. Initial Vaadin Screen for the Demo
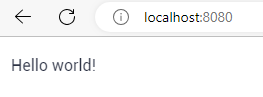
In the following MainView class, we are extending it with the VerticalLayout class. And then we are adding a Label to it. When we run the application, we should be able to see the blank UI loaded with only a label with the message.
import com.vaadin.flow.router.Route;
import com.vaadin.flow.component.html.Label;
import com.vaadin.flow.component.orderedlayout.VerticalLayout;

@Route("")
public class MainView extends VerticalLayout {

    public MainView() {
        add(new Label("Hello world!"));
    }
}
4.4. Creating Grid and Displaying Person Data
To create Vaadin Grid, also we can call it ‘table‘, we have to initialize the Grid class with 2 properties: Person.class and boolean false (in order not to generate columns automatically). Then we need to add some columns with headers and enable sorting.
public MainView() {

  this.grid = new Grid<>(Person.class, false);
  grid.addColumn(Person::getId).setHeader("ID").setSortable(true).setWidth("20px");
  grid.addColumn(Person::getFirstName).setHeader("First name").setSortable(true);
  grid.addColumn(Person::getLastName).setHeader("Last name").setSortable(true);

  ...
}
To populate the data from the database, we need to use the repository.findAll() with the Grid.setItems() method. Additionally, it is essential to remember to include a grid in our view for displaying the data.
public MainView(PersonRepository repo) {

  ...
  grid.setItems(repo.findAll());
  add(grid);
  ...
}
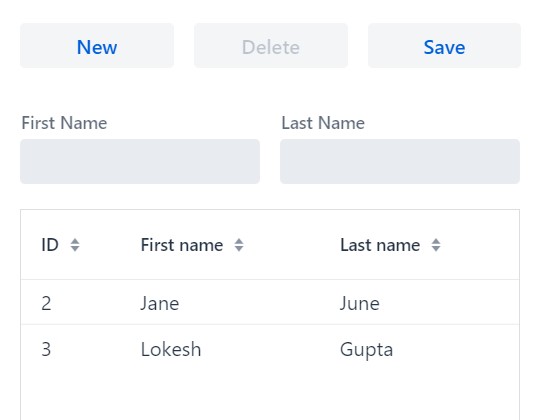
4.5. Adding Buttons and Input TextFields
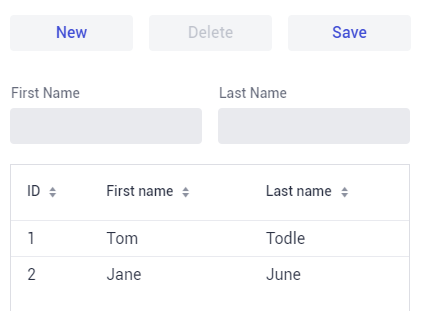
Next, we incorporate New, Delete, and Save buttons to facilitate CRUD operations, along with two text fields dedicated to editing the First Name and Last Name.
private Button newBtn = new Button("New");
private Button deleteBtn = new Button("Delete");
private Button saveBtn = new Button("Save");

private HorizontalLayout btnLayout = new HorizontalLayout();
private HorizontalLayout fieldsLayout = new HorizontalLayout();

private TextField name = new TextField("First Name");
private TextField lastName = new TextField("Last Name");
Note, we are adding all the buttons and text fields to horizontal layouts accordingly. Plus, we will adjust the width for a more aesthetic look.
private HorizontalLayout btnLayout = new HorizontalLayout();
private HorizontalLayout fieldsLayout = new HorizontalLayout();

private String MAX_WIDTH = "400px";
private String BUTTON_WIDTH = "123px";

public MainView(PersonRepository repo) {

  ...
  newBtn.setWidth(BUTTON_WIDTH);
  deleteBtn.setWidth(BUTTON_WIDTH);
  saveBtn.setWidth(BUTTON_WIDTH);

  btnLayout.add(newBtn, deleteBtn, saveBtn);
  btnLayout.setMaxWidth(MAX_WIDTH);

  fieldsLayout.add(name, lastName);

  add(btnLayout);
  add(fieldsLayout);
  ...
}
Now we have a complete visual interface:
5. Handling Button Click Events for CRUD Operations
To handle the button clicks, we need to add addClickListener() method that will be invoked everytime the corresponding button is clicked. In the method handler, we need to write the logic for the operation.
newBtn.addClickListener(click -> {

    clearInputFields();
    grid.select(null);
});

deleteBtn.addClickListener(click -> {

    repo.delete(grid.getSelectedItems().stream().toList().get(0));

    clearInputFields();
    refreshTableData();
});

saveBtn.addClickListener(click -> {

    Person customer = new Person();
    customer.setFirstName(name.getValue());
    customer.setLastName(lastName.getValue());
    customer.setId(idField.getValue());

    repo.save(customer);

    clearInputFields();
    refreshTableData();
});

private void refreshTableData() {

    grid.setItems(repo.findAll());
}

private void clearInputFields() {

    name.clear();
    lastName.clear();
    idField.clear();
}
Also, to select an item to edit, we can select the record directly in the table and handle the grid.addSelectionListener().
grid.addSelectionListener(selected -> {

  deleteBtn.setEnabled(true);

  Person selectedCustomer = selected.getFirstSelectedItem().get();
  name.setValue(selectedCustomer.getFirstName());
  lastName.setValue(selectedCustomer.getLastName());
  idField.setValue(selectedCustomer.getId());
});
6. Demo
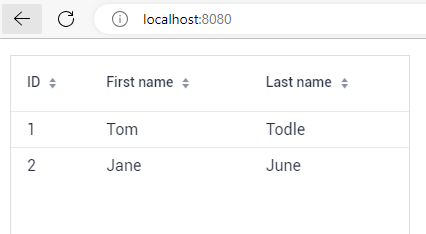
Start this application as a Spring boot application which starts the web application in the embedded Tomcat server. Hit the root URL : http://localhost:8080/
Verify that the grid is rendered with two default person details from H2 database. Play with the application. Create a few new persons, and edit existing persons. Delete some persons.
7. Conclusion
In this Spring Boot 3 and Vaadin hello world tutorial, we learned to create a new Vaadin application with a simple UI and displayed the data in table format. We also learned to add the buttons and handle the button clicks to perform various CRUD operations directly using the JPA repository.
Next, check out the Spring Vaadin examples to learn more.
Happy Learning !!
Very detailed and educative post. It gives me the basic and starting information I need. Thank you for this.