
Since JUnit 4, the @BeforeClass and @AfterClass methods for setup and teardown operations had to be declared as static. In JUnit 5, this restriction has been lifted and we can use equivalent @BeforeAll and @AfterAll annotations on non-static methods too, thus offering more flexibility and enabling the use of instance-specific setup and cleanup logic.
In this JUnit 5 tutorial, we will learn to write non-static @BeforeAll and @AfterAll methods by annotating our test with @TestInstance(TestInstance.Lifecycle.PER_CLASS) and thus using these methods to access test instance-specific variables in them.
1. By Default, @BeforeAll and @AfterAll Methods should be ‘Static‘
In JUnit 5, @BeforeAll and @AfterAll methods had to be declared as static, meaning they were associated with the test class itself rather than with instances of the class.
Sometimes, this can be a limitation, for example, when running tests in parallel. In a parallel execution environment, static methods may introduce concurrency issues, but non-static methods ensure each test instance is isolated.
public class TestClass {

  @BeforeAll
  static void setupBeforeAll() {
    // Class-specific setup logic before all tests.
  }

  @AfterAll
  static void cleanupAfterAll() {
    // Class-specific cleanup logic after all tests.
  }

  @Test
  void test1() {
    // Test 1 logic.
  }

  @Test
  void test2() {
    // Test 2 logic.
  }
}
2. Making @BeforeAll and @AfterAll Methods as Non-Static
To write and use non-static @BeforeAll and @AfterAll methods in JUnit 5, we must annotate the test class with @TestInstance(TestInstance.Lifecycle.PER_CLASS). This indicates that we want to use a non-static test instance lifecycle. This ensures that JUnit creates a new test instance for each test class.
@TestInstance(TestInstance.Lifecycle.PER_CLASS)
public class TestClass {
  //...
}
In the above example, the @BeforeAll and @AfterAll methods are non-static. This allows them to access instance-specific data or perform instance-specific setup and cleanup operations.
@TestInstance(TestInstance.Lifecycle.PER_CLASS)
public class TestClass {

  @BeforeAll
  void setupBeforeAll() {
    // Instance-specific setup logic before all tests.
  }

  @AfterAll
  void cleanupAfterAll() {
    // Instance-specific cleanup logic after all tests.
  }

  @Test
  void test1() {
    // Test 1 logic.
  }

  @Test
  void test2() {
    // Test 2 logic.
  }
}
3. An Example
Suppose we have a shopping cart module and we want to test the functionality in a concurrent environment. We have written the following test class that utilizes a shopping cart, as a list, and tests the add/remove operations.
We ran the tests repeatedly and concurrently for 10 times.
public class TestNonStaticBeforeAllAndAfterAll {

  private static List<String> cart = new ArrayList<>();

  @BeforeAll
  static void setupBeforeAll() {
    System.out.println("Setting up the shopping cart for all tests");
    cart.add("Item 1");
    cart.add("Item 2");
  }

  @AfterAll
  static void cleanupAfterAll() {
    System.out.println("Cleaning up the shopping cart after all tests");
    cart.clear();
  }

  @RepeatedTest(10)
  @Execution(ExecutionMode.CONCURRENT)
  void testAddItemToCart() {
    cart.add("Item 3");
    // Test logic to add an item and assert its presence in the cart.
  }

  @RepeatedTest(10)
  @Execution(ExecutionMode.CONCURRENT)
  void testRemoveItemFromCart() {
    cart.remove("Item 1");
    cart.remove("Item 2");
    cart.remove("Item 3");
    // Test logic to remove an item and assert its absence in the cart.
  }
}
In addition, we configured the default execution mode for top-level classes to parallel by setting the following properties /src/test/resources/junit-platform.properties file.
junit.jupiter.execution.parallel.enabled = true
junit.jupiter.execution.parallel.mode.default = concurrent
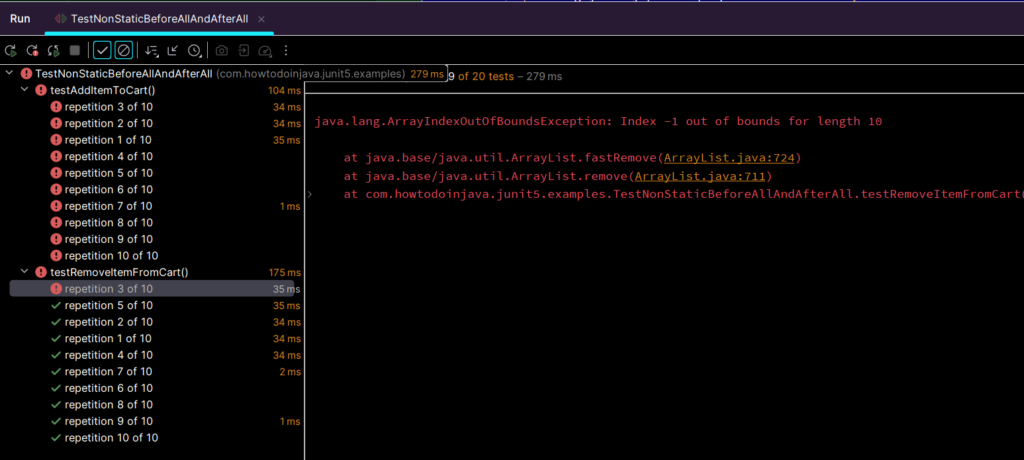
junit.jupiter.execution.parallel.mode.classes.default = concurrentNow when we run the test class a few times, several tests will fail because of the concurrent access to cart in separate test class instances.
java.lang.ArrayIndexOutOfBoundsException: Index -1 out of bounds for length 10

	at java.base/java.util.ArrayList.fastRemove(ArrayList.java:724)
	at java.base/java.util.ArrayList.remove(ArrayList.java:711)
	at com.howtodoinjava.junit5.examples.TestNonStaticBeforeAllAndAfterAll
            .testRemoveItemFromCart(TestNonStaticBeforeAllAndAfterAll.java:39)
To fix the issue, we will make the recommended changes in the first section of this article i.e. making the test lifecycle PER_CLASS.
This is the updated test class.
@TestInstance(TestInstance.Lifecycle.PER_CLASS)
public class TestNonStaticBeforeAllAndAfterAll {
private List<String> cart = new ArrayList<>();
@BeforeAll
void setupBeforeAll() {
System.out.println("Setting up the shopping cart for all tests");
cart.add("Item 1");
cart.add("Item 2");
}
@AfterAll
void cleanupAfterAll() {
System.out.println("Cleaning up the shopping cart after all tests");
cart.clear();
}
@RepeatedTest(10)
@Execution(ExecutionMode.CONCURRENT)
void testAddItemToCart() {
cart.add("Item 3");
// Test logic to add an item and assert its presence in the cart.
}
@RepeatedTest(10)
@Execution(ExecutionMode.CONCURRENT)
void testRemoveItemFromCart() {
cart.remove("Item 1");
cart.remove("Item 2");
cart.remove("Item 3");
// Test logic to remove an item and assert its absence in the cart.
}
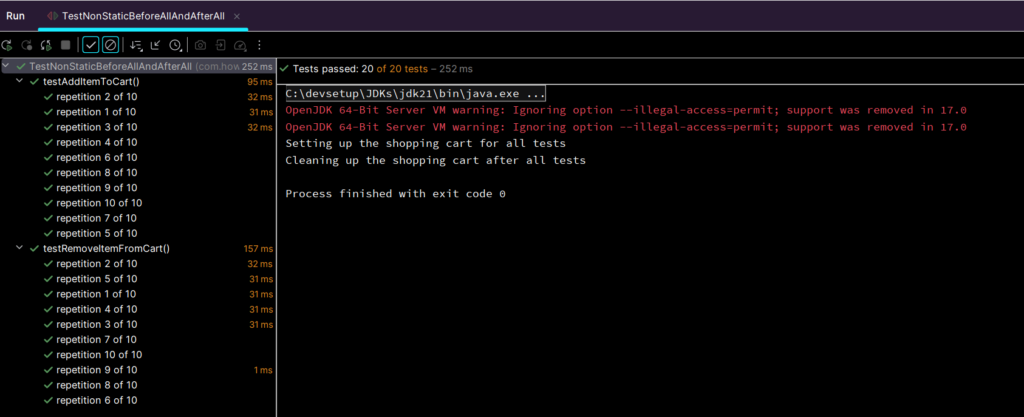
}Now when running the test class again in the concurrent environment, all the tests pass every time.
4. Conclusion
In this JUnit 5 tutorial, we learned to use non-static @BeforeAll and @AfterAll methods that help in accessing the test instance-specific variables in these setup and teardown methods. For quick reference again, we need to annotate our test with @TestInstance(TestInstance.Lifecycle.PER_CLASS).
Happy Learning !!