This JUnit 5 tutorial discusses how the JUnit framework adapted the Java 8 coding style and several other new features in the new version 5 release. It also explains how JUnit 5 is different from JUnit 4.
JUnit is the most widely used testing framework for Java applications and the de facto standard for developing unit tests in Java. It is open-source software hosted on GitHub and has an Eclipse Public License.
JUnit 4 has been doing its job perfectly for a very long time. In between, JDK 8 brought fascinating features, most notably lambda expressions. JUnit 5 aimed to adapt the Java 8 style of coding; that’s why Java 8 is the minimum required version to create and execute tests in JUnit 5 (though it is possible to run tests written with JUnit 3 or JUnit 4 for backward compatibility).
1. Terminology
Before going deep into concepts, let’s clarify a few commonly used terms in the context of JUnit tests.
| Term | Description |
|---|---|
| Container | A node in test tree that contains other containers or tests. For example, a test class. It can contain other nested test classes as well as test methods. |
| Test | A node in the test tree that verifies the expected behavior when executed. E.g. a test method. |
| Lifecycle Method | A method annotated or meta-annotated with @BeforeAll, @AfterAll, @BeforeEach, or @AfterEach. |
| Test Class | A top-level class that contains at least one test method. It must not be abstract class. |
| Test Method | A method that is annotated or meta-annotated with @Test, @RepeatedTest, @ParameterizedTest, @TestFactory, or @TestTemplate. |
2. JUnit 5 Architecture
Historically, JUnit 4 was monolithic and not designed to interact with popular build tools (Maven and Gradle) and IDEs (Eclipse, NetBeans, and IntelliJ). These tools had tight coupling with JUnit 4 and often relied on reflection to get the necessary information. This brought challenges, such as if the designers of JUnit decided to change the name of a private variable, this change could affect the tools that were accessing it reflectively.
JUnit 5 introduced the modular approach into the framework and it was capable of allowing JUnit to interact with different programmatic clients that used different tools and IDEs. It introduced the following logical separation of concerns in the form of APIs:
- An API to write tests, mainly for use by developers
- A mechanism for discovering and running tests
- An API to allow easy interaction with IDEs and tools and to run tests from them
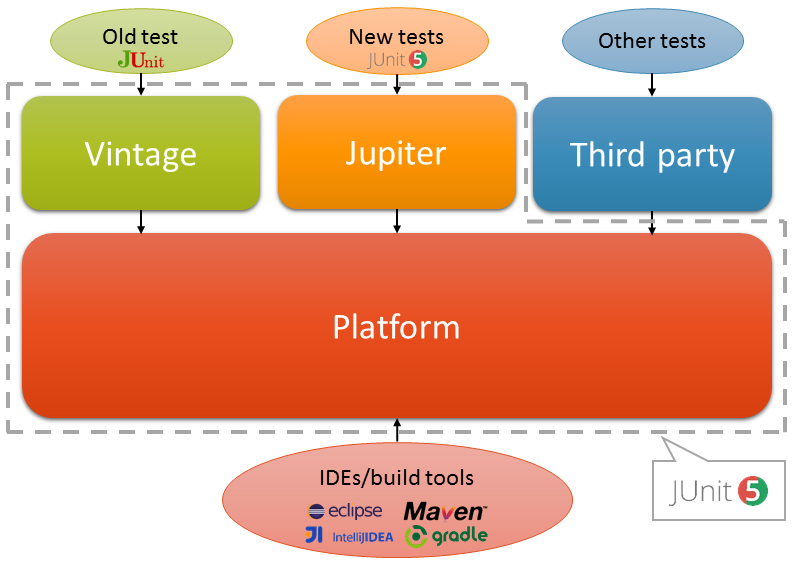
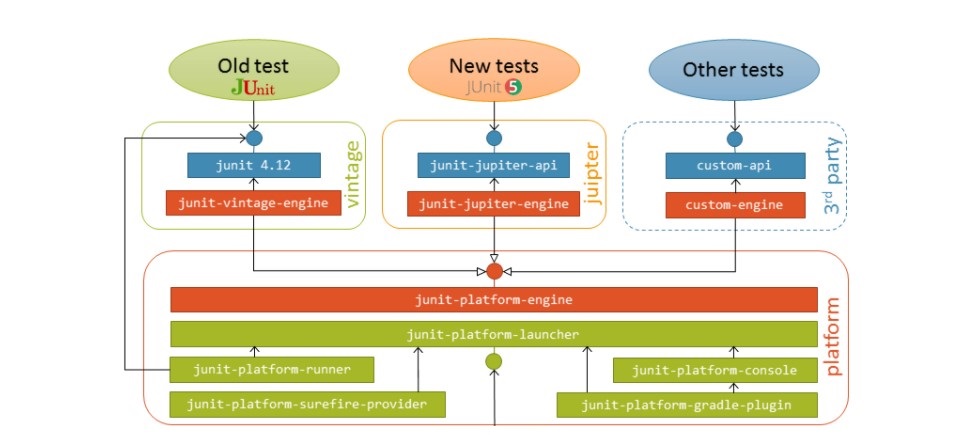
As a result, JUnit 5 is composed of several different modules from three different sub-projects:
JUnit 5 = JUnit Platform + JUnit Jupiter + JUnit Vintage
- JUnit Platform: To be able to launch JUnit tests, IDEs, build tools or plugins need to include and extend platform APIs. It defines the
TestEngineAPI for developing new testing frameworks that run on the platform. It also provides a Console Launcher to launch the platform from the command line and build plugins for Gradle and Maven. - JUnit Jupiter: It includes new programming and extension models for writing tests. It has all new JUnit annotations and
TestEngineimplementation to run tests written with these annotations. - JUnit Vintage: Its primary purpose is to support running JUnit 3 and JUnit 4 written tests on the JUnit 5 platform. It’s there is backward compatibility. It requires JUnit 4.12 or later to be present on the classpath or module path.
3. JUnit 5 Maven Dependencies
Version 5 of the JUnit is a modular one; you can no longer simply add a jar file to your project compilation classpath and your execution classpath. You can use JUnit 5 in your Maven or Gradle project by including the dependencies that are required in your project.
Let’s start with a brief look at the artifacts that are commonly used in real-world applications:
- junit-jupiter-api: It is the main module where all core annotations are located, such as @Test, Lifecycle method annotations and assertions.
- junit-jupiter-engine: It has test engine implementation which is required at runtime to execute the tests.
- junit-jupiter-params: It provides support for parameterized tests.\
- junit-platform-suite: It provides the @Suite support that makes the legacy JUnit 4’s JUnitPlatform runner obsolete.
- junit-vintage-engine: it contains the engine implementation to execute tests written in JUnit 3 or 4. For this purpose, of course, you also need the JUnit 3 or 4 jar.
<properties>
    <junit.jupiter.version>5.11.0</junit.jupiter.version>
    <junit.platform.version>1.11.0</junit.platform.version>
</properties>

<dependencies>
    <dependency>
        <groupId>org.junit.jupiter</groupId>
        <artifactId>junit-jupiter-engine</artifactId>
        <version>${junit.jupiter.version}</version>
        <scope>test</scope>
    </dependency>
    <dependency>
        <groupId>org.junit.jupiter</groupId>
        <artifactId>junit-jupiter-api</artifactId>
        <version>${junit.jupiter.version}</version>
        <scope>test</scope>
    </dependency>
    <dependency>
        <groupId>org.junit.jupiter</groupId>
        <artifactId>junit-jupiter-params</artifactId>
        <version>${junit.jupiter.version}</version>
        <scope>test</scope>
    </dependency>
    <dependency>
        <groupId>org.junit.platform</groupId>
        <artifactId>junit-platform-suite</artifactId>
        <version>${junit.platform.version}</version>
        <scope>test</scope>
    </dependency>
</dependencies>
dependencies {
testRuntime("org.junit.jupiter:junit-jupiter-api:5.11.0")
testRuntime("org.junit.jupiter:junit-jupiter-engine:5.11.0")
testRuntime("org.junit.jupiter:junit-jupiter-params:5.11.0")
testRuntime("org.junit.platform:junit-platform-suite:1.11.0")
}
test {
useJUnitPlatform()
}
Read More: Maven Example | Gradle Example
To be able to run tests from the command prompt, make sure your pom.xml configuration file includes a JUnit provider dependency for the Maven Surefire plugin.
<build>
  <plugins>
    <plugin>
      <artifactId>maven-surefire-plugin</artifactId>
      <version>2.22.2</version>
    </plugin>
  </plugins>
</build>
Now we open a command prompt in the project folder (the one containing the pom.xml file), and run this command:
mvn testThis command will take the Java source code, compile and test it by executing all the tests in /src/main/test directory.
4. JUnit 5 Annotations
4.1. Built-in Annotations
JUnit 5 offers the following builtin annotations to write tests.
A method that is directly annotated or meta-annotated with @BeforeAll, @AfterAll, @BeforeEach, or @AfterEach is called the lifecycle method.
| Annotation | Description |
|---|---|
| @BeforeEach | The annotated method will be run before each test method in the test class. |
| @AfterEach | The annotated method will be run after each test method in the test class. |
| @BeforeAll | The annotated method, which must be static, will be run before all test methods in the test class. |
| @AfterAll | The annotated method will be run after all test methods in the test class. This method must be static. |
| @AutoClose | The annotated field represents a resource that will be automatically closed after test execution. |
| @Test | It is used to mark a method as a JUnit test. |
| @TestInstance | Used to configure the test instance lifecycle for the annotated test class. |
| @DisplayName | Used to provide any custom display name for a test class or test method |
| @Disabled | It is used to disable or ignore a test class or test method from the test suite. |
| @Nested | Used to create nested test classes. |
| @Tag | Mark test methods or test classes with tags for test discovery and filtering. |
| @TestFactory | Mark a method as a test factory for dynamic tests. |
| @ParameterizedTest | Denotes that a method is a parameterized test. |
| @RepeatedTest | Denotes that a method is a test template for a repeated test. |
| @TestClassOrder | Used to configure the test class execution order for @Nested test classes in the annotated test class. |
| @TestMethodOrder | Used to configure the test method execution order for the annotated test class, similar to JUnit 4’s @FixMethodOrder. |
| @Timeout | Used to fail a test, test factory, test template, or lifecycle method if its execution exceeds a given duration. |
| @TempDir | Used to supply a temporary directory via field injection or parameter injection in a lifecycle method or test method. |
A typical test class with JUnit 5 annotations is as follows:
import org.junit.jupiter.api.Test;
import static org.junit.jupiter.api.Assertions.assertEquals;

public class AppTest {


  @BeforeAll
  static void setup() {
    // setup the common resource(s) for all tests
  }

  @AfterAll
  static void tearDown() {
     // close the common resource(s) for all tests
  }

  @Test
  void testMethod_expect_true() {

    boolean result =  systemUnderTest.someMethod();
    assertTrue(result);
  }

  @Test
  @Disabled
  void testMethod_temporary_disabled() {
      assertEquals(2, 1, "2 is not equal to 1");  //Not executed because it is disabled
  }
}
4.2. Custom Composed Annotations
We can also create composed annotations that will automatically inherit the semantics of its meta-annotations.
For example, instead of copying and pasting @Tag(“developement”), we can create a composed annotation @Dev as follows:
@Target({ ElementType.TYPE, ElementType.METHOD })
@Retention(RetentionPolicy.RUNTIME)
@Tag("developement")
public @interface Dev {
  //...
}
We can then use the @Dev annotation in tests that must be executed on the development environment. This makes it easy to change the environment name later, if needed, without modifying all the test classes.
@Dev
@Test
void someTest() {
    // ...
}
5. How to Write Tests?
There is not much change between JUnit 4 and JUnit 5 in test writing styles.
- A test class is any top-level class, static member class, or @Nested class that contains at least one test method. Test classes must not be
abstractand must have a single constructor. - A test method is written using @Test, @RepeatedTest, @ParameterizedTest, @TestFactory, or @TestTemplate annotations.
- Test classes, test methods, and lifecycle methods are not required to be public, but they must not be private. Using the public modifier is recommended.
Here are sample tests with their life cycle methods. Notice that all the annotations come from the org.junit.jupiter.api package.
import org.junit.jupiter.api.AfterAll;
import org.junit.jupiter.api.AfterEach;
import org.junit.jupiter.api.Assertions;
import org.junit.jupiter.api.BeforeAll;
import org.junit.jupiter.api.BeforeEach;
import org.junit.jupiter.api.Disabled;
import org.junit.jupiter.api.Tag;
import org.junit.jupiter.api.Test;
import com.howtodoinjava.junit5.examples.Calculator;

public class AppTest {

  @BeforeAll
  static void setup(){
    System.out.println("@BeforeAll executed");
  }

  @BeforeEach
  void setupThis(){
    System.out.println("@BeforeEach executed");
  }

  @Tag("DEV")
  @Test
  void testCalcOne() {
    Assertions.assertEquals( 4 , Calculator.add(2, 2));
  }

  @Tag("PROD")
  @Disabled
  @Test
  void testCalcTwo(){
    Assertions.assertEquals( 6 , Calculator.add(2, 4));
  }

  @AfterEach
  void tearThis(){
    System.out.println("@AfterEach executed");
  }

  @AfterAll
  static void tear(){
    System.out.println("@AfterAll executed");
  }
}
6. Test Suites
Using JUnit 5 test suites, you can run tests spread into multiple test classes and different packages. JUnit 5 provides these annotations to create test suites.
- @Suite
- @SelectClasses
- @SelectPackages
- @IncludePackages
- @ExcludePackages
- @IncludeClassNamePatterns
- @ExcludeClassNamePatterns
- @IncludeTags
- @ExcludeTags
To execute the suite, you need to use @Suite annotation and include junit-platform-suite module in the project dependencies.
@Suite
@SelectPackages("com.howtodoinjava.junit5.examples")
public class JUnit5TestSuiteExample {
   //...
}
7. Test Assertions
Assertions help in validating the expected output with the actual output of a test.
To keep things simple, all JUnit Jupiter assertions are static methods in the org.junit.jupiter.Assertions class e.g. assertEquals(), assertNotEquals().
void testCase() {
    //Test will pass
    Assertions.assertNotEquals(3, Calculator.add(2, 2));

    //Test will fail
    Assertions.assertNotEquals(4, Calculator.add(2, 2), "Calculator.add(2, 2) test failed");

    //Test will fail
    Supplier<String> messageSupplier  = () -> "Calculator.add(2, 2) test failed";
    Assertions.assertNotEquals(4, Calculator.add(2, 2), messageSupplier);
}
Read More: JUnit 5 Assertions
8. Test Assumptions
Assumptions class provides static methods to support conditional test execution based on assumptions. A failed assumption results in a test being aborted.
Assumptions are typically used whenever it does not make sense to continue executing a given test method. These tests are marked as passed in the test report.
The Assumptions class has three such methods: assumeFalse(), assumeTrue() and assumingThat()
public class AppTest {
    @Test
    void testOnDev()
    {
        System.setProperty("ENV", "DEV");
        Assumptions.assumeTrue("DEV".equals(System.getProperty("ENV")), AppTest::message);
    }

    @Test
    void testOnProd()
    {
        System.setProperty("ENV", "PROD");
        Assumptions.assumeFalse("DEV".equals(System.getProperty("ENV")));
    }

    private static String message () {
        return "TEST Execution Failed :: ";
    }
}
Read More: JUnit 5 Assumptions
9. Backward Compatibility for JUnit 4
Since all classes and annotations specific to JUnit Jupiter reside under the org.junit.jupiter base package, having both JUnit 4 and JUnit Jupiter in the classpath does not lead to any conflicts. Therefore, it is recommended to write the new tests on Junit 5 infrastructure.
JUnit 4 has been here for quite a long time, and numerous tests are written in it. JUnit Jupiter needs to support those tests as well. For this purpose, the JUnit Vintage sub-project was developed.
JUnit Vintage provides a TestEngine implementation for running JUnit 3 and JUnit 4-based tests on the JUnit 5 platform. As long as the ‘junit-vintage-engine‘ artifact is in the classpath, the JUnit Platform launcher will automatically pick up JUnit 3 and JUnit 4 tests.
<dependencies>

	<dependency>
		<groupId>junit</groupId>
		<artifactId>junit</artifactId>
		<version>4.12</version>
		<scope>test</scope>
	</dependency>

	<dependency>
		<groupId>org.junit.vintage</groupId>
		<artifactId>junit-vintage-engine</artifactId>
		<version>5.10.0</version>
		<scope>test</scope>
	</dependency>

</dependencies>
After adding these dependencies, we can run the JInit 4 tests in JUnit 5 environment easily.
Note that the new tests can be written in JUnit 5 in the same code base if the project has the required Junit 5 dependencies, as discussed at the start of this article.
<dependencies>
	<dependency>
		<groupId>org.junit.jupiter</groupId>
		<artifactId>junit-jupiter-api</artifactId>
		<version>5.10.0</version>
		<scope>test</scope>
	</dependency>
		<dependency>
		<groupId>org.junit.jupiter</groupId>
		<artifactId>junit-jupiter-engine</artifactId>
		<version>5.10.0</version>
		<scope>test</scope>
	</dependency>

	<!-- JUnit 4 Vintage and JUnit 4 dependencies as well-->
</dependencies>
10. Migration from JUnit 4 to JUnit 5
While JUnit 5 provides support for JUnit 4’s annotations, it’s recommended that you migrate to the new annotations to fully take advantage of JUnit 5 features.
The official JUnit 5 reference has a list of changes that we need to make for a robust migration. It provides a migration path with the help of the JUnit Vintage test engine. The main changes are listed below:
| Step | Discussion |
|---|---|
| Replace / update the dependencies. | JUnit 4 needed a single dependency whereas JUnit 5 needs several dependencies based on the usage of modules. |
| Replace the annotations | JUnit 5 has a separate package structure from JUnit 4, so even if the annotation names are the same, we still need to change the import statements. |
| Replace the assertions and assumptions | JUnit 5 has separate classes and packages for assertion and assumption statements. We need to use the new classes. |
| Replace JUnit 4 rules and runners | This needs more careful changes. We need to understand the JUnit 5 upgrades and make those changes one by one in each class. |
If you have legacy code or external dependencies that rely heavily on JUnit 4, you might need to consider a more gradual migration strategy. You could start by running JUnit 4 and JUnit 5 tests side by side until you’re confident in migrating completely.
11. Conclusion
JUnit 5 feels so exciting and feature-rich. And now, it is open for extension by third-party tools and APIs. You may not feel that much different as a test writer, but when you go for its extension or try to develop an IDE plugin, you will praise it.
You may also consider adding test templates into Eclipse IDE to improve your development speed as a developer.
Happy Learning !!
hi can you explain me how to use junit with spring i have many doubt in it
for example 1) how to configure application context for testing .. and many more
Thanks for writing this blog post, it’s short and to the point!
As a test writer, you may not feel that much different but when you will go for its extension or try to develop any IDE plugin, you will praise it.
I have to say that, looking into the JUnit5 source code, I think it’s a lot more complex than JUnit4, writing an extension for JUnit5 that changes how test methods are executed seems next to impossible to me (whereas in JUnit4 that’s trivial)!
I want to be able to run every test method on a remote machine. In JUnit4, I would implement a
Runnerand be done in 5 minutes. In JUnit5, it seems I have to implement a full-blownTestEngine?! TheExtensionmechanism allows post processing a test instance, but not replacing it entirely (or at least overriding the methods).Any ideas on how to proceed other than just sticking with JUnit4?