
Testcontainers is a Java library to run tests that depend on external services such as databases, message brokers, and web servers by creating and deploying temporary Docker containers. Testcontainers are useful to avoid installing and configuring actual software in each environment or machine where tests will run and pass.
This tutorial will explore how we can use Testcontainers for testing a MongoDB client in a Spring Boot application.
1. How Testcontainers Work?
Testcontainers allows JUnit to have lightweight, throwaway instances of the actual databases, browsers or other docker images on a machine or pipeline when we run our tests. It requires Docker to be installed on the machine where we are running the tests. It also requires the Docker daemon to be running, and in runtime, the library spin up the containers with the parameters needed.
In our tests, we ask the library to find and initialize an external dependency by using its specific class name. We can optionally pass on some basic configurations, such as version and port number. For example, Db2Container class spins up a DB2 container in runtime.
@ClassRule
public Db2Container db2 = new Db2Container().acceptLicense();
@Test
public void someTestMethod() {
String url = db2.getJdbcUrl();
... create a connection and run test as normal
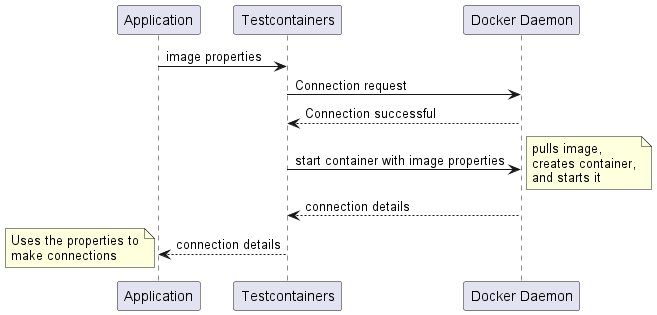
}Internally, Testcontainers library performs the following actions:
- First, it identifies the docker daemon running on the machine and connects to it.
- Next, it searches for a container using the image properties specified in the test.
- It lets the daemon pull the image from the docker hub registry if it is not already present.
- The daemon will then starts the container and notify Testcontainers that the container is ready to be used. The daemon also returns the container’s properties to Testcontainers.
- The container properties are available to the application and can be used to connect to the container.
Let’s look at a small diagram to understand how Testcontainers works:
2. Setting up the Demo Application
This tutorial uses a simple CRUD application that reads and writes products to a MongoDB database. We’ll then go on to write unit tests for the service layer and will Testcontainers to spin up a MongoDB image.
2.1. Maven
Let’s start by adding the required dependencies to our project. We’ll add the Spring boot web, mongodb, and test starter dependencies:
<dependency>
    <groupId>org.springframework.boot</groupId>
    <artifactId>spring-boot-starter-web</artifactId>
</dependency>
<dependency>
    <groupId>org.springframework.boot</groupId>
    <artifactId>spring-boot-starter-data-mongodb</artifactId>
</dependency>
<dependency>
    <groupId>org.springframework.boot</groupId>
    <artifactId>spring-boot-starter-test</artifactId>
</dependency>
Alternatively, we can use the Spring Initializr to generate the project and add the dependencies.
2.2. Entity, Repository and Service Classes
Let’s start with the Product entity class with simple attributes.
@Document
public class Product implements Serializable {

    private String id;
    private String name;
    private double price;

    // Constructor,  getters and setters
}
Next, we create the ProductRepository interface, which is of type MongoRepository.
public interface ProductRepository extends MongoRepository<Product, String> {
}
Finally, we’ll create the ProductService class that uses the ProductRepository to create and update the products.
@Service
public class ProductService {

    private final ProductRepository productRepository;

    public ProductService(ProductRepository productRepository) {
        this.productRepository = productRepository;
    }

    public Product save(Product product) {
        return productRepository.save(product);
    }

    public Product findById(String id) {
        return productRepository.findById(id).orElseThrow(() -> new RuntimeException("Product not found"));
    }

    // Other methods
}
3. Integration Test without Testcontainer
Let’s write a simple test for the ProductService class. The test creates a Product and saves it in MongoDB, then verifies that the product has been created using its id.
We have used the @SpringBootTest to load the application context and autowired the ProductService bean. Note that when making database interactions, by default, Spring Boot will try to connect to a MongoDB server running on localhost:27017. Since we don’t have a MongoDB server running, the test will fail with a MongoTimeoutException.
@SpringBootTest(webEnvironment = SpringBootTest.WebEnvironment.RANDOM_PORT)
public class ProductServiceTest {

    @Autowired
    private ProductService productService;

    @Test
    public void givenProduct_whenSave_thenProductIsSaved() {

        Product product = new Product("1", "Product 1", 100.0);
        Product savedProduct = productService.save(product);
        assertEquals(product.getName(), savedProduct.getName());

        Product foundProduct = productService.findById("1");
        assertEquals(product.getName(), foundProduct.getName());
    }
}
4. Testcontainers in Action
Let us fix the test by using Testcontainers to run a temporary MongoDB container. Let me repeat again that a prerequisite for running Testcontainers is to have Docker installed and running on the machine. The library will automatically download the Docker images required for the tests.
4.1. Maven
We’ll start by adding the Testcontainers’ JUnit support and MongoDB-specific dependency to our project. There are separate dependencies for each supported container.
<dependency>
  <groupId>org.testcontainers</groupId>
  <artifactId>junit-jupiter</artifactId>
  <scope>test</scope>
</dependency>

<dependency>
    <groupId>org.testcontainers</groupId>
    <artifactId>mongodb</artifactId>
    <version>1.17.6</version>
    <scope>test</scope>
</dependency>
4.2. Testcontainer Initialization
Testcontainers provides a special class MongoDBContainer to create and initialize the MongoDB module. This will create a MongoDB container with version 6.0 and expose port 27017 on the container.
@Container
static MongoDBContainer mongoDBContainer = new MongoDBContainer("mongo:6.0").withExposedPorts(27017);
Next, we’ll need to tell Spring Boot to connect to the container instead of the default URL. We’ll do this by overriding the spring.data.mongodb.uri property using the @DynamicallyPropertySource annotation.
The @DynamicPropertySource annotation allows us to set properties in the Spring Environment dynamically. In the method, we’ll start the container and then set the spring.data.mongodb.uri property to the replica set URL of the container.
@SpringBootTest
@Testcontainers
class AppTests {

    @Container
    static MongoDBContainer mongoDBContainer = new MongoDBContainer("mongo:6.0").withExposedPorts(27017);

    @DynamicPropertySource
    static void mongoDbProperties(DynamicPropertyRegistry registry) {

        mongoDBContainer.start();
        registry.add("spring.data.mongodb.uri", mongoDBContainer::getReplicaSetUrl);
    }

    @Test
    void myTest() {
        // ...
    }
}
This will happen before the application context is loaded so that Spring Boot will connect to the MongoDB container instead of the default URL.
4.3. Using @ServiceConnection
Alternatively, since Spring boot version 3.1, we can use the service connections. A service connection is a connection to any remote service represented by ConnectionDetails beans. When using a service connection, Spring boot autoconfiguration consumes automatically registered ConnectionDetails beans and prioritizes the service connection details over any other connection-related configuration properties.
In the following configuration, the @ServiceConnection indicates that the container should be used a source of MongoDB connection details.
@SpringBootTest
@Testcontainers
class AppTests {

    @Container
    @ServiceConnection
    static MongoDBContainer mongoDBContainer = new MongoDBContainer("mongo:6.0").withExposedPorts(27017);

    @Test
    void myTest() {
        // ...
    }
}
Do not forget to add spring-boot-testcontainers module to use the service container annotations.
4.4. Run the Test
Let’s run the test again. This time, the test will pass. If we take a look at the execution logs, we’ll see that the MongoDB container was started before the test was run:
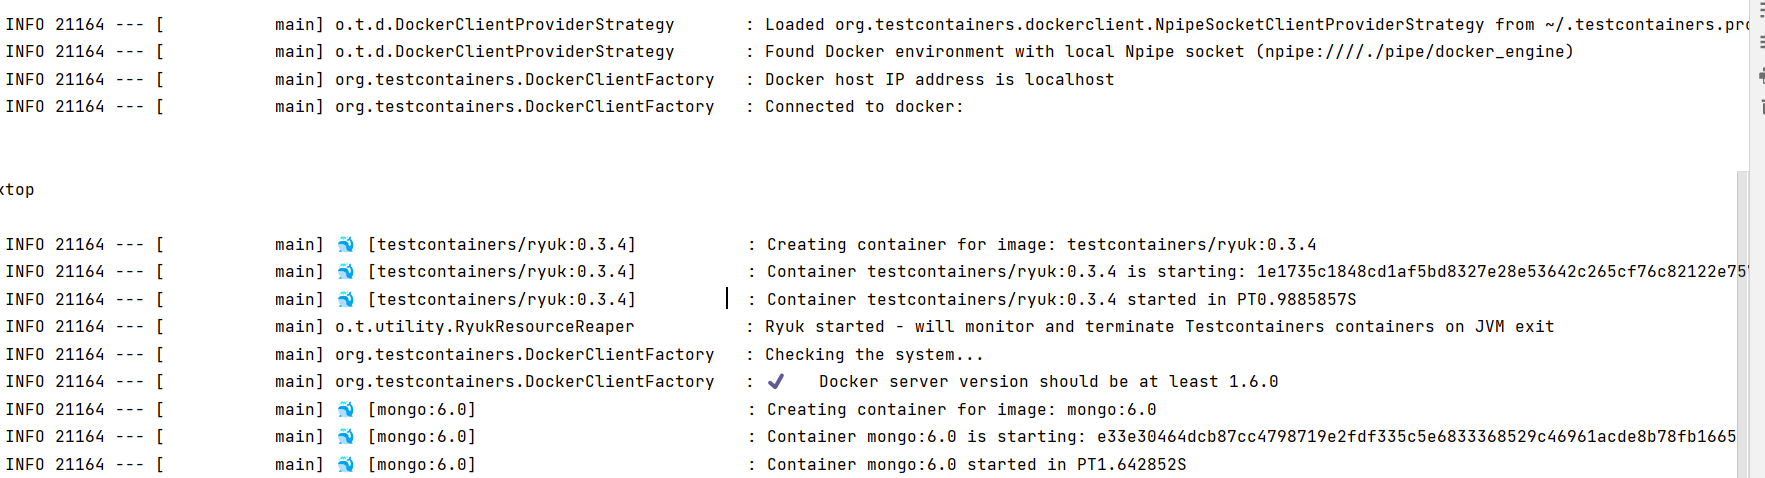
Let’s look at some essential points to note in the logs:
- First, the library connects to Docker.
- It then creates an internal container called testcontainers/ryuk which is used to manage the lifecycle of the other containers.
- Next, it creates the MongoDB container and starts it. Note that the id of the container is returned as e33e30….
The test is run after the container is started. If we take a look at the logs, we’ll see that the application is able to connect to the MongoDB container:
2022-12-30T16:30:30.452+05:30 INFO 21164 --- [localhost:51408] org.mongodb.driver.cluster : Monitor thread successfully connected to server with description ServerDescription{address=localhost:51408, type=REPLICA_SET_PRIMARY,...setName='docker-rs', canonicalAddress=e33e30464dcb:27017, hosts=[e33e30464dcb:27017], ....}Here, it’s important to note the canonicalAddress is the address of the MongoDB container started above – e33e30464dcb:27017. This means that the application is able to connect to the MongoDB container. After the test execution, finally, the containers for MongoDB and ryuk are stopped by the library.
5. Conclusion
This tutorial explored the basics and internal workings of the Testcontainers library. We learned to use Testcontainers to run a test that uses the MongoDB client to connect to a spun-up temporary MongoDB container in the local docker installation. The test was able to find, deploy and connect to the container, and finally, after the test execution, the container was stopped.
Happy Learning !!
Amazing content, really, thanks a lot