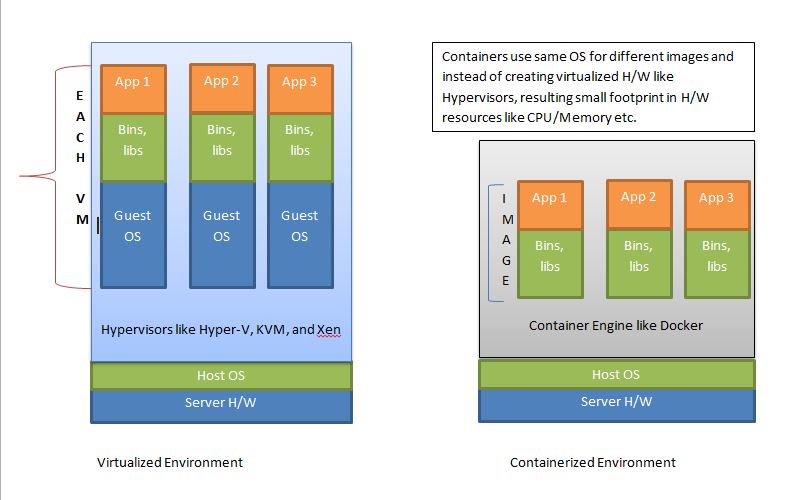
Docker is a developer tool to package applications along with their runtime environment, so anybody can deploy and run them on any other machine without facing runtime environment conflicts. It is very similar to the virtual machine concept (virtualization), where you can get a VM image and run it on any supporting hardware. All internal programs in VM will function as they were packaged originally.
The difference between a VM and a docker image is that the docker image does not package the whole virtual operating system. It uses the OS resources just like other processes in the developer’s machine, only the application and its runtime-specific dependencies are packaged (Containerization).

Docker allows users to publish docker images and consume those published by others in repositories like Docker Hub.
In this tutorial, learn to install a Docker container in Windows, create a Docker image and deploy the Dockerized image (which is one simple spring boot-based microservice) in the developer machine.
1. Installing Docker on Windows
To install docker on Windows machine, follow the below steps:
1.1. Choose the Appropriate Docker installer for your System
Before starting with the installation process we need to understand the exact Docker version that is suitable for the Windows that you are using. Docker has provided two versions of Windows distribution as bellow
- For Windows 10 we need to follow this link https://docs.docker.com/docker-for-windows/
- For Windows 7, 8 and older versions we need to use Docker Toolbox and here is the official link for that https://docs.docker.com/toolbox/overview/
We will follow the Docker toolbox installation steps for this article.
1.2. Download Docker Installer
We need to first download the Docker toolbox distribution from https://download.docker.com/win/static/stable/x86_64/ and we will follow the installation steps in local Workstation.
1.3. Enable Hardware Virtualization Technology
In order to Docker toolbox works properly we need to make sure your Windows system supports Hardware Virtualization Technology and that virtualization is enabled. Docker has provided detailed step on this here: https://docs.docker.com/toolbox/toolbox_install_windows/#step-1-check-your-version. If we don’t have this enabled then we need to go to BIOS option and enable Hardware Virtualization. The BIOS is bit different for different models of Computer, so please follow official guideline for enabling that.
1.4. Run Docker Installer
Once we have the Installer downloaded and we have enabled the Hardware Virtualization, we can start the installer. It’s just like a simple another windows based installation process guided by a installation wizard.
1.5. Verify the Installation
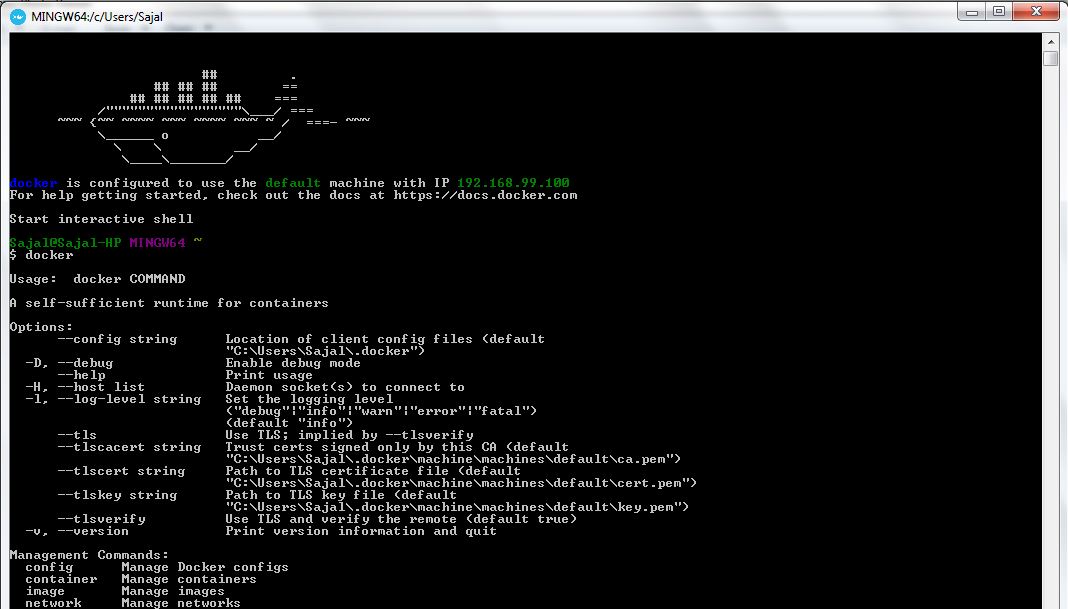
To verify Docker installation, open Docker Quickstart Terminal shortcut from either Desktop or Start menu. Verify that Docker prompt is coming and then need to test few basic commands. The docker prompt and sample docker command will look like below.
1.6. Note Down the Docker IP
We need to now note down the Docker IP assigned to this Container. We will access this IP to access the Applications installed inside Docker. To know the IP from the command prompt use command docker-machine ip. Here is the sample output of the command. Please note that this IP will be different for different M/Cs.

2. Creating a Docker Image
We will first create a spring boot-based REST API, add docker-specific configuration and then we will create docker image.
2.1. Create a Spring Boot Application
Develop one simple hello world Microservice for testing. We have used spring boot and Maven and Eclipse as IDE. Add a REST endpoints so that once this application is deployed in to Docker, we can test this by accessing the rest endpoint.
package com.example.howtodoinjava.hellodocker;

import java.util.Date;
import org.springframework.boot.SpringApplication;
import org.springframework.boot.autoconfigure.SpringBootApplication;
import org.springframework.web.bind.annotation.PathVariable;
import org.springframework.web.bind.annotation.RequestMapping;
import org.springframework.web.bind.annotation.RestController;

@SpringBootApplication
public class HelloDockerApplication {

  public static void main(String[] args) {
    SpringApplication.run(HelloDockerApplication.class, args);
  }
}

@RestController
class HelloDockerRestController {
  @RequestMapping("/hello/{name}")
  public String helloDocker(@PathVariable(value = "name") String name) {
    String response = "Hello " + name + " Response received on : " + new Date();
    System.out.println(response);
    return response;

  }
}
Update resources/application.properties with server port information.
server.port = 9080Now test this microservice by running the project as spring boot application.
2.2. Add Dockerfile
Now create a file named Dockerfile in the root directory and add the below lines as Docker configurations.
FROM openjdk:8-jdk-alpine
VOLUME /tmp
ADD target/hello-docker-0.0.1-SNAPSHOT.jar hello-docker-app.jar
ENV JAVA_OPTS=""
ENTRYPOINT [ "sh", "-c", "java $JAVA_OPTS -Djava.security.egd=file:/dev/./urandom -jar /hello-docker-app.jar" ]
This is used by Docker while creating the image. It is basically declaring the Java runtime information and target distributions. For more details, follow docker builder reference.
2.3. Add Maven Docker Plugins
Add two maven plugins in the pom.xml file so that we can use the Docker related maven commands while creating the instance. Those plugins are dockerfile-maven-plugin and maven-dependency-plugin.
We have used the minimal configurations required to build the project.
<plugin>
  <groupId>com.spotify</groupId>
  <artifactId>dockerfile-maven-plugin</artifactId>
  <version>1.3.4</version>
  <configuration>
    <repository>${docker.image.prefix}/${project.artifactId}</repository>
  </configuration>
</plugin>
<plugin>
  <groupId>org.apache.maven.plugins</groupId>
  <artifactId>maven-dependency-plugin</artifactId>
  <executions>
    <execution>
      <id>unpack</id>
      <phase>package</phase>
      <goals>
        <goal>unpack</goal>
      </goals>
      <configuration>
        <artifactItems>
          <artifactItem>
            <groupId>${project.groupId}</groupId>
            <artifactId>${project.artifactId}</artifactId>
            <version>${project.version}</version>
          </artifactItem>
        </artifactItems>
      </configuration>
    </execution>
  </executions>
</plugin>
2.4. Create Docker Image
Now use maven command mvn clean install dockerfile:build to create docker image.
mvn clean install dockerfile:build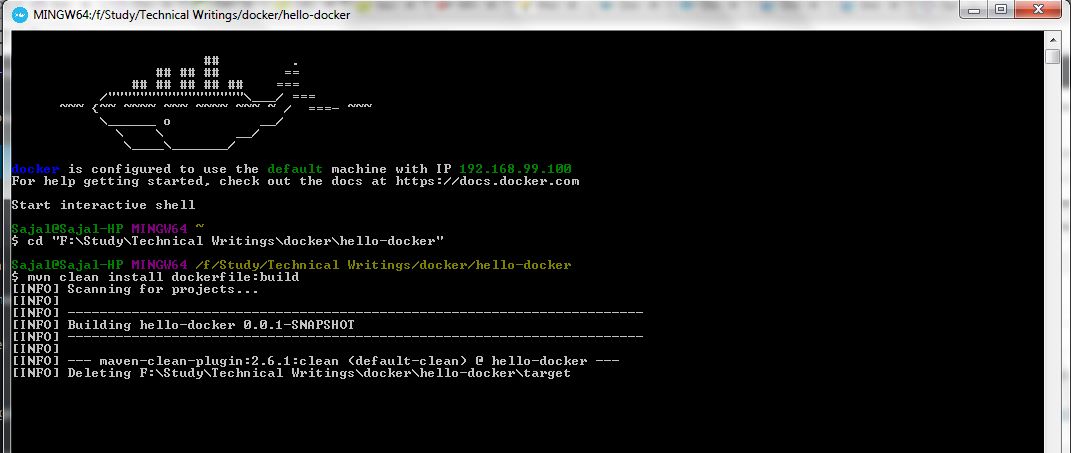
Please make sure your local application is not running while you are building the image, in that case you might get maven build failure, as in clean step it will not be able to delete the target folder as the jar is being used by java process.
Here is the last few lines of maven output log where it is building the image.
[INFO] Image will be built as hello-howtodoinjava/hello-docker:latest
[INFO]
[INFO] Step 1/5 : FROM openjdk:8-jdk-alpine
[INFO] Pulling from library/openjdk
[INFO] Digest: sha256:2b1f15e04904dd44a2667a07e34c628ac4b239f92f413b587538f801a0a57c88
[INFO] Status: Image is up to date for openjdk:8-jdk-alpine
[INFO]  ---> 478bf389b75b
[INFO] Step 2/5 : VOLUME /tmp
[INFO]  ---> Using cache
[INFO]  ---> f4f6473b3c25
[INFO] Step 3/5 : ADD target/hello-docker-0.0.1-SNAPSHOT.jar hello-docker-app.jar
[INFO]  ---> ce7491518508
[INFO] Removing intermediate container c74867501651
[INFO] Step 4/5 : ENV JAVA_OPTS ""
[INFO]  ---> Running in f7cd27710bf3
[INFO]  ---> 086226135205
[INFO] Removing intermediate container f7cd27710bf3
[INFO] Step 5/5 : ENTRYPOINT sh -c java $JAVA_OPTS -Djava.security.egd=file:/dev/./urandom -jar /hello-docker-app.jar
[INFO]  ---> Running in 9ef14a442715
[INFO]  ---> bf14919a32e2
[INFO] Removing intermediate container 9ef14a442715
[INFO] Successfully built bf14919a32e2
[INFO] Successfully tagged hello-howtodoinjava/hello-docker:latest
[INFO]
[INFO] Detected build of image with id bf14919a32e2
[INFO] Building jar: F:\Study\Technical Writings\docker\hello-docker\target\hello-docker-0.0.1-SNAPSHOT-docker-info.jar
[INFO] Successfully built hello-howtodoinjava/hello-docker:latest
[INFO] ------------------------------------------------------------------------
[INFO] BUILD SUCCESS
[INFO] ------------------------------------------------------------------------
3. Deploy and Run Docker Image
So we have created the Docker Image (i.e. hello-docker-0.0.1-SNAPSHOT-docker-info.jar). We also have a installed docker container running in our local machine.
Now, to run the docker image inside installed docker container, we will use below command.
docker run -p 8080:9080 -t hello-howtodoinjava/hello-docker --name hello-docker-imageHere the option -p 8080:9080 is important. It says that expose port 8080 for internal port 9080. Remember our application is running in port 9080 inside docker image and we will access that in port 8080 from outside Docker container.
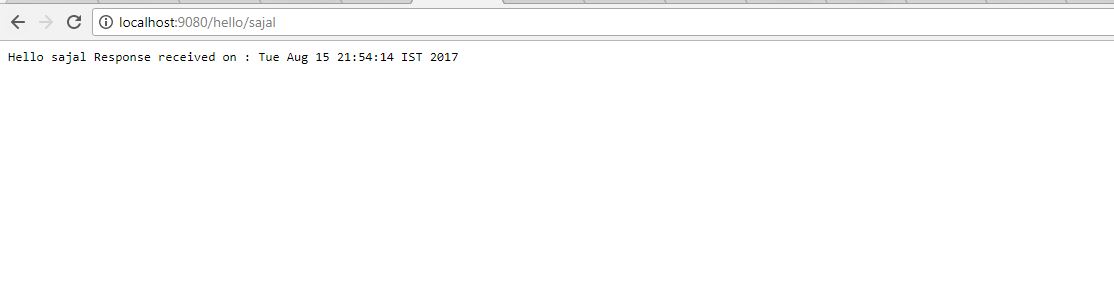
Now access the application with URL http://192.168.99.100:8080/hello/sajal. Notice that the browser output is same as output of standalone REST API on localhost.
4. Stop Docker Container
We can list down all docker containers by command docker ps in the terminal and we can use command docker stop <name>
docker stop <name>
5. Summary
We learned to install Docker in Windows OS. We also learned to create a spring boot project with one REST endpoint and build Docker image for it. Then we learned to run the docker image inside docker container and tested REST endpoint inside docker image.
Docker is very cool tool to solve very old developer problem that “it works in my local machine”. Now if something works in your machine, you can surely run that on other machine as well.
Happy Learning!!!
Great Man. Have one question if i modify java file and wants to run updated code so should i create docker image again to see the changes or any other way to update an existing image, Because if i create again docker image it will download all dependencies again.
Thanks for the article nice info. about Docker.
if you phase any errors in windows machine use below commands.
to build:- docker build -t test_dockereg_images .
to run:– docker run -p 8080:9200 -t test_dockereg_images –name hello-docker-image
You check in the URL you will get the response.
Thanks,
Kumar
Nice Article about docker.
Do the changes what ever you see in the above if you face any issue in windows machine like compile time errrors
if any one facing while building the docker file use below command for building and to run
for building use this cmd —-? docker build -t test_dockereg_images
to run use this cmd —> docker run -p 8080:9200 -t test_dockereg_images –name hello-docker-image
Check the URL u will see the changes.
Thanks,
kumar
Excellent example , easily can understand with given screenshots,examples. very great .
The Build has failed with “com.spotify.docker.client.shaded.javax.ws.rs.ProcessingException: org.apache.http.conn.HttpHostConnectException: Connect to localhost:2375 [localhost/127.0.0.1, localhost/0:0:0:0:0:0:0:1] failed: Connection refused: connect”
Can anybody please suggest what can be done here.
Upgrade spotify plugin to 1.4.10
Congratulations.
Hello Wilson.,
Did you try to execute the above tutorial in windows? If yes , did you face the following error – Could not build image: java.util.concurrent.ExecutionException: com.spotify.docker.client.shaded.javax.ws.rs.ProcessingException: org.apache.http.conn.HttpHostConnectException: Connect to localhost:2375 [localhost/127.0.0.1, localhost/0:0:0:0:0:0:0:1] failed: Connection refused: connect -> [Help 1]
Thanks & Regards
Nirjithi
I ran into this problem aswell. I was able to fix by changing the Docker Desktop Settings
– Click on the Docker Icon -> Settings -> General -> Check the box “Expose daemon on tcp://localhost:2375 without TLS”
i am using docker on windows 7, in my system, there is no docker desktop, i have only docker tool box, inside docker tool box we have docker-machine cli based tool, how to enable export daemon option in my set up
for me it worked very nicely. thank you so much. Great. Great. I feel that I have achieved something. Very simple demo. We have learnt very easily such a challenging task.
I tried to run this below command :
docker run -p 8080:9080 -t hello-howtodoinjava/hello-docker –name hello-docker-image
$ docker run -p 8080:9080 -t hello-howtodoinjava/hello-docker –name hello-docker
–name: 1: –name: Syntax error: Unterminated quoted string
Could you please tell me what is the issue with this command?
I am current getting below error while building in the windows Docker toolbox. Your help is appreciated.
[ERROR] Get https://registry-1.docker.io/v2/: dial tcp: lookup registry-1.docker
.io on 10.0.2.3:53: no such host
[INFO] ————————————————————————
[INFO] BUILD FAILURE
[INFO] ————————————————————————
[INFO] Total time: 26.691 s
[INFO] Finished at: 2017-11-20T15:34:08+11:00
[INFO] Final Memory: 51M/636M
[INFO] ————————————————————————
[ERROR] Failed to execute goal com.spotify:dockerfile-maven-plugin:1.3.4:build (
default-cli) on project hello-docker: Could not build image: Get https://registr
y-1.docker.io/v2/: dial tcp: lookup registry-1.docker.io on 10.0.2.3:53: no such
host -> [Help 1]
[ERROR]
Thanks for this post on Docker.