In this Spring security oauth2 tutorial, learn to build an authorization server to authenticate your identity to provide access_token, which you can use to request data from the resource server.
1. Introduction to OAuth 2
OAuth 2 is an authorization method to provide access to protected resources over the HTTP protocol. Primarily, oauth2 enables a third-party application to obtain limited access to an HTTP service –
- either on behalf of a resource owner by orchestrating an approval interaction between the resource owner and the HTTP service
- or by allowing the third-party application to obtain access on its own behalf.
1.1. Roles
OAuth defines four roles –
- Resource Owner – The user of the application.
- Client – the application (user is using) which require access to user data on the resource server.
- Resource Server – store user’s data and http services which can return user data to authenticated clients.
- Authorization Server – responsible for authenticating user’s identity and gives an authorization token. This token is accepted by resource server and validate your identity.
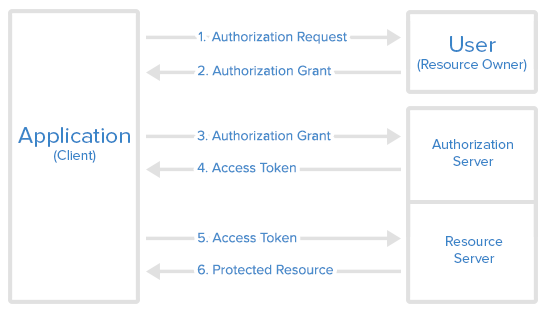
1.2. Access Token vs Refresh Token
An access token is a string representing an authorization issued to the client. Tokens represent specific scopes and durations of access, granted by the resource owner, and enforced by the resource server and authorization server.
The refresh token is issued (along with the access token) to the client by the authorization server, and it is used to obtain a new access token when the current access token becomes invalid or expires. The refresh token is also used to get additional access tokens with identical or narrower scope (access tokens may have a shorter lifetime and fewer permissions than authorized by the resource owner). Issuing a refresh token is optional at the discretion of the authorization server.
- The responsibility of access token is to access data before it gets expired.
- The responsibility of refresh token is to request for a new access token when the existing access token is expired.
2. Oauth2 – Authorization Server
To create an authorization server using spring security oauth2 module, we need to use annotation @EnableAuthorizationServer and extend the class AuthorizationServerConfigurerAdapter.
import org.springframework.beans.factory.annotation.Autowired;
import org.springframework.context.annotation.Configuration;
import org.springframework.security.crypto.bcrypt.BCryptPasswordEncoder;
import org.springframework.security.oauth2.config.annotation.configurers.ClientDetailsServiceConfigurer;
import org.springframework.security.oauth2.config.annotation.web.configuration.AuthorizationServerConfigurerAdapter;
import org.springframework.security.oauth2.config.annotation.web.configuration.EnableAuthorizationServer;
import org.springframework.security.oauth2.config.annotation.web.configurers.AuthorizationServerSecurityConfigurer;

@Configuration
@EnableAuthorizationServer
public class OAuth2AuthorizationServer extends AuthorizationServerConfigurerAdapter
{
    @Autowired
    private BCryptPasswordEncoder passwordEncoder;

    @Override
    public void configure(AuthorizationServerSecurityConfigurer security) throws Exception {
        security
            .tokenKeyAccess("permitAll()")
            .checkTokenAccess("isAuthenticated()")
            .allowFormAuthenticationForClients();
    }

    @Override
    public void configure(ClientDetailsServiceConfigurer clients) throws Exception {
        clients
            .inMemory()
            .withClient("clientapp").secret(passwordEncoder.encode("123456"))
            .authorizedGrantTypes("password", "authorization_code", "refresh_token")
            .authorities("READ_ONLY_CLIENT")
            .scopes("read_profile_info")
            .resourceIds("oauth2-resource")
            .redirectUris("http://localhost:8081/login")
            .accessTokenValiditySeconds(120)
            .refreshTokenValiditySeconds(240000);
    }
}
Spring security OAuth exposes two endpoints for checking tokens (/oauth/check_token and /oauth/token_key) which are by default protected behind denyAll(). The tokenKeyAccess() and checkTokenAccess() methods open these endpoints for use.
The ClientDetailsServiceConfigurer is used to define an in-memory or JDBC implementation of the client details service. We have used in-memory implementation. It has the following important attributes:
- clientId – (required) the client id.
- secret – (required for trusted clients) the client secret, if any.
- scope – The scope to which the client is limited. If the scope is undefined or empty (the default), the client is not limited by scope.
- authorizedGrantTypes – Grant types that are authorized for the client to use. The default value is empty.
- authorities – Authorities that are granted to the client (regular Spring Security authorities).
- redirectUris – redirects the user-agent to the client’s redirection endpoint. It must be an absolute URL.
3. Oauth2 – Resource Server
To create a resource server component, use @EnableResourceServer annotation and extend the ResourceServerConfigurerAdapter class.
import org.springframework.context.annotation.Configuration;
import org.springframework.security.config.annotation.web.builders.HttpSecurity;
import org.springframework.security.oauth2.config.annotation.web.configuration.EnableResourceServer;
import org.springframework.security.oauth2.config.annotation.web.configuration.ResourceServerConfigurerAdapter;

@Configuration
@EnableResourceServer
public class OAuth2ResourceServer extends ResourceServerConfigurerAdapter
{
	@Override
	public void configure(HttpSecurity http) throws Exception {
		http
        	.authorizeRequests()
        	.antMatchers("/api/**").authenticated()
        	.antMatchers("/").permitAll();
	}
}
Above config enable protection on all endpoints starting /api. All other endpoints can be accessed freely.
The resource server also provides a mechanism to authenticate users themselves. It will be a form-based login in most cases.
import org.springframework.context.annotation.Bean;
import org.springframework.context.annotation.Configuration;
import org.springframework.core.annotation.Order;
import org.springframework.security.config.annotation.authentication.builders.AuthenticationManagerBuilder;
import org.springframework.security.config.annotation.web.builders.HttpSecurity;
import org.springframework.security.config.annotation.web.configuration.WebSecurityConfigurerAdapter;
import org.springframework.security.crypto.bcrypt.BCryptPasswordEncoder;

@Configuration
@Order(1)
public class SecurityConfig extends WebSecurityConfigurerAdapter {

    @Override
    protected void configure(HttpSecurity http) throws Exception {
    	http
        	.antMatcher("/**")
	        	.authorizeRequests()
	        	.antMatchers("/oauth/authorize**", "/login**", "/error**")
	        	.permitAll()
        	.and()
            	.authorizeRequests()
            	.anyRequest().authenticated()
        	.and()
        		.formLogin().permitAll();
    }

    @Override
    protected void configure(AuthenticationManagerBuilder auth) throws Exception {
        auth
        	.inMemoryAuthentication()
            .withUser("humptydumpty").password(passwordEncoder().encode("123456")).roles("USER");
    }

    @Bean
    public BCryptPasswordEncoder passwordEncoder(){
        return new BCryptPasswordEncoder();
    }
}
Above WebSecurityConfigurerAdapter class setup a form-based login page and open up the authorization urls with permitAll().
4. Oauth2 Protected REST Resources
For demo purposes, I have created only one API which returns the logged-in user’s name and email.
import org.springframework.http.ResponseEntity;
import org.springframework.security.core.context.SecurityContextHolder;
import org.springframework.security.core.userdetails.User;
import org.springframework.stereotype.Controller;
import org.springframework.web.bind.annotation.RequestMapping;

@Controller
public class RestResource
{
	@RequestMapping("/api/users/me")
	public ResponseEntity<UserProfile> profile()
	{
		//Build some dummy data to return for testing
		User user = (User) SecurityContextHolder.getContext().getAuthentication().getPrincipal();
		String email = user.getUsername() + "@howtodoinjava.com";

		UserProfile profile = new UserProfile();
		profile.setName(user.getUsername());
		profile.setEmail(email);

		return ResponseEntity.ok(profile);
	}
}
public class UserProfile
{
private String name;
private String email;
//Setters and getters
@Override
public String toString() {
return "UserProfile [name=" + name + ", email=" + email + "]";
}
}5. Demo
We have an API http://localhost:8080/api/users/me, which we can access by directly putting username/password in the login form, but the third-party applications cannot access the API as we do in browsers. They need an oauth2 token.
5.1. Getting Authorization Grant Code from User
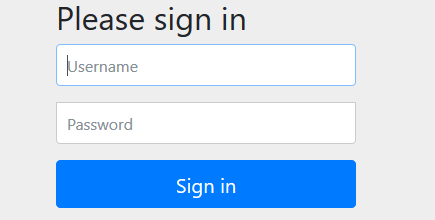
As shown in the above sequence diagram, the first step is to get an authorization grant from the resource owner from URL : http://localhost:8080/oauth/authorize?client_id=clientapp&response_type=code&scope=read_profile_info
It will bring a login page. Provide a username and password. For this demo, use “humptydumpty” and “123456”.
After login, you will be redirected to the grant access page where you choose to give access to third-party applications.
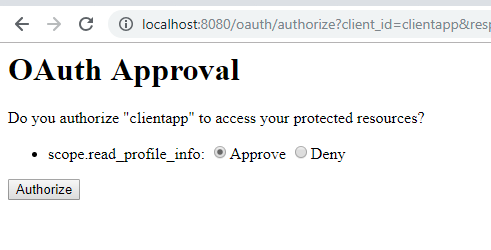
It will redirect to a URL like : http://localhost:8081/login?code=EAR76A. Here 'EAR76A' is authorization code for the third-party application.
5.2. Getting Access Token from Authorization Server
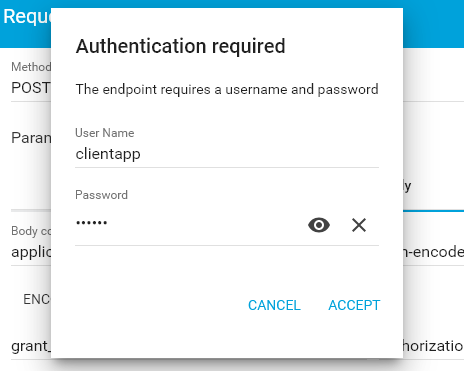
Now the application will use an authorization grant to get the access token. Here we need to make the following request. Use the code obtained in the first step here.
http://localhost:8080/oauth/token

Headers:

Content-Type: application/x-www-form-urlencoded
authorization: Basic Y2xpZW50YXBwOjEyMzQ1Ng==

Form data - application/x-www-form-urlencoded:

grant_type=authorization_code
code=EAR76A
redirect_uri=http://localhost:8081/login
It will ask for client app credentials in a separate window.
Or make a similar request from cURL.
curl -X POST --user clientapp:123456 http://localhost:8081/oauth/token
		-H "content-type: application/x-www-form-urlencoded"
		-d "code=FfrzTj&grant_type=authorization_code&redirect_uri=http%3A%2F%2Flocalhost%3A8082%2Flogin&scope=read_user_info"
{
"access_token": "59ddb16b-6943-42f5-8e2f-3acb23f8e3c1",
"token_type": "bearer",
"refresh_token": "cea0aa8f-f732-44fc-8ba3-5e868d94af64",
"expires_in": 4815,
"scope": "read_profile_info"
}Read More : How to execute cURL commands in windows
5.3. Accessing User Data from Resource Server
Once we have the access token, we can go to the resource server to fetch protected user data.
Hit the following request:
curl -X GET http://localhost:8080/api/users/me
	 -H "authorization: Bearer 59ddb16b-6943-42f5-8e2f-3acb23f8e3c1"
It will return the response.
{"name":"humptydumpty","email":"humptydumpty@howtodoinjava.com"}6. Dependencies
The pom file used for this spring security 5 oauth2 example is:
<?xml version="1.0" encoding="UTF-8"?>
<project xmlns="http://maven.apache.org/POM/4.0.0"
    xmlns:xsi="http://www.w3.org/2001/XMLSchema-instance"
    xsi:schemaLocation="http://maven.apache.org/POM/4.0.0 https://maven.apache.org/xsd/maven-4.0.0.xsd">
    <modelVersion>4.0.0</modelVersion>
    <parent>
        <groupId>org.springframework.boot</groupId>
        <artifactId>spring-boot-starter-parent</artifactId>
        <version>2.1.4.RELEASE</version>
        <relativePath /> <!-- lookup parent from repository -->
    </parent>
    <groupId>com.howtodoinjava</groupId>
    <artifactId>spring-oauth2-resource-server-demo</artifactId>
    <version>0.0.1-SNAPSHOT</version>
    <name>spring-oauth2-resource-server-demo</name>
    <description>Demo project for Spring Boot</description>

    <properties>
        <java.version>1.8</java.version>
    </properties>

    <dependencies>
        <dependency>
            <groupId>org.springframework.security.oauth.boot</groupId>
            <artifactId>spring-security-oauth2-autoconfigure</artifactId>
            <version>2.1.8.RELEASE</version>
        </dependency>
        <dependency>
            <groupId>org.springframework.boot</groupId>
            <artifactId>spring-boot-starter-web</artifactId>
        </dependency>
        <dependency>
            <groupId>org.springframework.boot</groupId>
            <artifactId>spring-boot-starter-test</artifactId>
            <scope>test</scope>
        </dependency>
        <dependency>
            <groupId>org.springframework.security</groupId>
            <artifactId>spring-security-test</artifactId>
            <scope>test</scope>
        </dependency>
    </dependencies>

    <build>
        <plugins>
            <plugin>
                <groupId>org.springframework.boot</groupId>
                <artifactId>spring-boot-maven-plugin</artifactId>
            </plugin>
        </plugins>
    </build>

</project>
Drop me your questions in the comments.
Happy Learning !!
5.3. Accessing User Data from Resource ServerOnce we have the access token, we can go to the resource server to fetch protected user data.
Hit the following request:
Could you please tell me where I hit the request?
You can use the cURL or Postman.
Could you please explain the redirect to the 8081 port? Where is oauth configured to listen on that port? It is just default? Where is the oath service on 8081 actually powered up?
As far as I can tell no service is running on 8081 on my machine, I therefore can’t retrieve a token, after having retreived the 6-character grant.
What am I doing wrong?
you can change the server port no
in application.properties
Hi Lokesh, please provide example on oauth2 implementation without login page and custom external authentication provider like PingFed.
It is REST API service security Oauth2 implementation using PingFed external authentication provider.
While accessing URL(http://localhost:8080/api/users/me) in the browser, getting below exception
Can anyone help on this. Thank You
maybe you can change “User user = (User) SecurityContextHolder.getContext().getAuthentication().getPrincipal();” with “Authentication user = SecurityContextHolder.getContext().getAuthentication();” and “String email = user.getName()+ “@howtodoinjava.com”;”
Hi, try changing “/api/v1/**” to “/api/**” in OAuth2ResourceServer
Hi Lokesh, I am able to generate the access token , but not able to access end point with access token. When I am running curl -X GET http://localhost:8080/api/users/me
-H “authorization: Bearer 59ddb16b-6943-42f5-8e2f-3acb23f8e3c1” using generated access token , it is redirecting me to login page again. Could you please help me with this
Hi, did you find the solution? I have the same problem. Regards
Hi , I am able to generate the access token , but I am not able to access the resource using access token. It is directing me to login page in postman
Hi any solution on this ?
Hello Sir,
Actually i have some confusion or query,
I have multi module project like micro services. All module run on separate port.
Now my auth-module run on port 8080. And category module run on port 8081.
So how can i apply authentication mechanism.
I read something like public key private key scenario.
If you have some idea on this or some another way then please guide me.
org.springframework.security.oauth.boot
spring-security-oauth2-autoconfigure
2.1.8.RELEASE
is not working
Hi Lokesh,
I have a few points and doubts please help me to get over it
1) Even with proper request header, I was getting exception about missing grant type which is resolved now as it was expecting below two parameters in the URL, not as headers I checked in the TokenEnd class and worked.
http://localhost:8080/oauth/token?grant_type=authorization_code&code=Ex3g512)If i am using this with H2 DB of spring then on accessing console http://localhost:8080/h2-console asking me the password through login page (same page which we have created for protecting our resource) and after providing proper credential whenever i am trying to open database giving me white page error. May i know the reason.
3)In
OAuth2ResourceServer.javawe have below codehttp .authorizeRequests() .antMatchers("/api/**").authenticated() //this line help us to protect our api .antMatchers("/").permitAll(); //what does this line do actually? 4)In SecurityConfig.java http .antMatcher("/**") //Line 1 .authorizeRequests() .antMatchers("/oauth/authorize**", "/login**", "/error**") .permitAll() .and() .authorizeRequests() .anyRequest().authenticated() .and() .formLogin().permitAll();can you please tell me one by one each line use? And Line 1(should not be
/api?) is not like it will stop each request for authorization?Thanks
Hi Lokesh,
I have one question we used spring boot and after logout from my application and hit the below api then it will return JSON data like as below so I have to implement that, once the user is logout then the user hits the API manually then restrict that API.
Output.
[{"billingRuleId":20,"rowDate":"2019-08-30T05:48:59.200+0000",
"billingRuleName":"BOG""bogPaymentCalcMethodId":1,
"startDate":null,"endDate":null,"enabled":1]
so anyone who has token can hit my api and view the secured data which is not good right so any solution for it?
I am beginner to Spring. I’ve been with this problem for several days and I wouldn’t know how to solve it.
I have two microservices:
1. Microservice authentication : This allows return a `JWT token` to user when it access to path: `/oauth/token`
2. Microservice Account user : This microservice will have a lot of functions but the problem is it:
The user must be register in platform and this microservice call to server oauth to save the new created user.
So, I create the controller to microservice Oauth:
 @PostMapping
    @PreAuthorize("#oauth2.hasScope('server')")
    public UserDto createUser(@Valid @RequestBody UserDto userDto) {
        Usuario savedUser = new Usuario();
		try {
			savedUser = userService.create(this.toUsuario(userDto));
		} catch (ArendheException e) {
			// TODO Auto-generated catch block
			e.printStackTrace();
		}
        return toDto(savedUser);

    }
The WebSecurityConfigureAdapter is:
@Configuration
public class SpringSecurityConfig extends WebSecurityConfigurerAdapter {

	@Autowired
	private UserDetailsService usuarioService;

	@Bean
	public BCryptPasswordEncoder passwordEncoder() {
		return new BCryptPasswordEncoder();
	}

	@Override
	@Autowired
	protected void configure(AuthenticationManagerBuilder auth) throws Exception {
		auth.userDetailsService(this.usuarioService).passwordEncoder(passwordEncoder());
	}

	@Bean("authenticationManager")
	@Override
	protected AuthenticationManager authenticationManager() throws Exception {
		return super.authenticationManager();
	}

	@Override
	public void configure(HttpSecurity http) throws Exception {
		http.authorizeRequests()
		.antMatchers(HttpMethod.POST,"/oauth/**").permitAll()
		.antMatchers(HttpMethod.POST, "/user/**").permitAll()
		.anyRequest().authenticated()
		.and()
		.csrf().disable()
		.sessionManagement().sessionCreationPolicy(SessionCreationPolicy.STATELESS);


	}

}
As you can see, I write two `antMatchers`, the second to create a new user.
The problem is when I test it with *Postman* (path
`localhost:8005/user`with data JSON parsed to POST method). The output is:{ "error": "unauthorized", "error_description": "Full authentication is required to access this resource" }I don’t understand it because I have a
`permitAll`to`/user/** path`.Thanks.
hiii,
Could you please explain me how you have resolved the isssue. I’m getting the same error.
how do resource server verify scope needed to access the resource from access token. how can we specify that the particular resource needs specific scope to be accessed
Hi Lokesh how to generate access token using refresh token after expires the access-token?
just sent the refresh token
How to run Authorization server and Resource server on different ports?
Hi Lokesh – Any idea why i get login error Bad Credentials on the url http://localhost:8080/oauth/authorize?client_id=clientapp&response_type=code&scope=read_profile_info
I used the same credentials as shown in the code
I am to able to access resource via access token i.e if I am trying to pass token via postman it takes me to authentication page & if I pass token via curl it is not giving any output.
I have the same problem, after so much search and try, I solved it. After added @Order(10) on OAuth2AuthorizationServer,@Order(20) on OAuth2ResourceServer, @Order(30) on SecurityConfig, I finally could get resource via access token. in @Order, Lower values have higher priority, so the reason why we can’t get resource via access token must be that SecurityConfig has higher priority than OAuth2ResourceServer
This didn’t resolve my issue. @Anwar Mulla, could you please let me know if you find solution?
Is your issue solved? If yes how?
Did you resolve this error?