In JUnit 5, the test lifecycle is driven by four primary annotations i.e. @BeforeAll, @BeforeEach, @AfterEach and @AfterAll. Along with it, each test method must be marked with @Test annotation from package org.junit.jupiter.api.
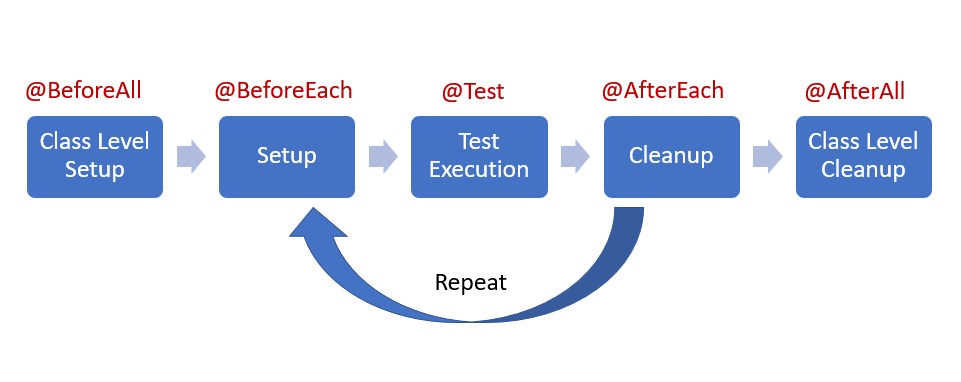
1. Test Lifecyle Phases
Normally, a test class contains multiple test methods. JUnit manages the execution of each test method in form of a lifecycle.
The complete lifecycle of a test case can be seen in three phases with the help of annotations.
- Setup: This phase puts the the test infrastructure in place. JUnit provides class level setup (@BeforeAll) and method level setup (@BeforeEach). Generally, heavy objects like databse comnections are created in class level setup while lightweight objects like test objects are reset in the method level setup.
- Test Execution: In this phase, the test execution and assertion happen. The execution result will signify a success or failure.
- Cleanup: This phase is used to cleanup the test infrastructure setup in the first phase. Just like setup, teardown also happen at class level (@AfterAll) and method level (@AfterEach).
2. Before And After Annotations
As shown above, in the test life cycle, we will primarily need to have some annotated methods to setup and cleanup the test environment or test data on which the tests run.
- In JUnit, by default, for each test method – a new instance of test is created.
- @BeforeAll and @AfterAll annotations – clear by their name – should be called only once in the entire tests execution cycle. So they must be declared
static. @BeforeEachand@AfterEachare invoked for each instance of test so they should not bestatic.- If there are multiple methods annotated with the same annotation (e.g. two methods with
@BeforeAll) then their execution order is not determined.
public class AppTest {

	@BeforeAll
	static void setup(){
		System.out.println("@BeforeAll executed");
	}

	@BeforeEach
	void setupThis(){
		System.out.println("@BeforeEach executed");
	}

	@Test
    void testCalcOne()
	{
		System.out.println("======TEST ONE EXECUTED=======");
		Assertions.assertEquals( 4 , Calculator.add(2, 2));
    }

    @Test
    void testCalcTwo()
   {
		System.out.println("======TEST TWO EXECUTED=======");
		Assertions.assertEquals( 6 , Calculator.add(2, 4));
    }

	@AfterEach
	void tearThis(){
		System.out.println("@AfterEach executed");
	}

	@AfterAll
	static void tear(){
		System.out.println("@AfterAll executed");
	}
}
Test Output:
@BeforeAll executed

@BeforeEach executed
======TEST ONE EXECUTED=======
@AfterEach executed

@BeforeEach executed
======TEST TWO EXECUTED=======
@AfterEach executed

@AfterAll executed
3. Disabling Tests
To disable a test in JUnit 5, you will need to use @Disabled annotation. It is equivalent to JUnit 4’s @Ignored annotation.
@Disabled annotation can be applied over test class (disables all test methods in that class) or individual test methods as well.
@Disabled
@Test
void testCalcTwo()
{
	System.out.println("======TEST TWO EXECUTED=======");
	Assertions.assertEquals( 6 , Calculator.add(2, 4));
}
4. Assertions
In any test method, we will need to determine whether it passes or fails. We can do it using Assertions.
Assertions help in validating the expected output with the actual output of a test. To keep things simple, all JUnit Jupiter assertions are static methods in the org.junit.jupiter.Assertions class.
@Test
public void test()
{
    //Test will pass
    Assertions.assertEquals(4, Calculator.add(2, 2));

    //Test will fail
    Assertions.assertEquals(3, Calculator.add(2, 2), "Calculator.add(2, 2) test failed");

    //Test will fail
    Supplier<String> messageSupplier  = ()-> "Calculator.add(2, 2) test failed";
    Assertions.assertEquals(3, Calculator.add(2, 2), messageSupplier);
}
To fail a test, simply use Assertions.fail() method.
@Test
void testCase() {

    Assertions.fail("not found good reason to pass");
}
5. Assumptions
Assumptions provide static methods to support conditional test execution based on assumptions. A failed assumption results in a test being aborted.
Assumptions are typically used whenever it does not make sense to continue the execution of a given test method. In the test report, these tests will be marked as passed.
Assumptions class has three methods with many overloaded forms:
assumeFalse():validates the given assumption to be false.assumeTrue(): validates the given assumption to be true.assumingThat(): executes the suppliedExecutable, but only if the supplied assumption is valid.
@Test
void testOnDev()
{
    System.setProperty("ENV", "DEV");
    Assumptions.assumeTrue("DEV".equals(System.getProperty("ENV")));
    //remainder of test will proceed
}

@Test
void testOnProd()
{
    System.setProperty("ENV", "PROD");
    Assumptions.assumeFalse("DEV".equals(System.getProperty("ENV")));
    //remainder of test will be aborted
}
All above annotations and classes for the JUnit test life cycle.
Happy Learning !!
Thanks Guy! May I signal a small probably error: on testOnProd() the good call is Assumptions.assumeFalse(“DEV”.equals(System.getProperty(“ENV”))) and not assumeTrue().
Thanks for the feedback.