
Learn to execute JUnit 5 tests in Eclipse IDE. Maven has been used to import dependencies in this JUnit 5 example.
1. Add JUnit 5 Maven Dependencies
To run JUnit 5 tests in Eclipse, at minimum, we will need the latest versions of the following dependencies.
junit-platform-runner(test scope) : provides API and tools used by the IDEs.junit-jupiter-api(test scope) : provides classes and annotations for writing tests, including the@Testannotation. It is transitively included when we include junit-jupiter-engine.junit-jupiter-engine(test scope) : implementation of the Engine API for JUnit Jupiter.
<project xmlns="http://maven.apache.org/POM/4.0.0"
	xmlns:xsi="http://www.w3.org/2001/XMLSchema-instance"
	xsi:schemaLocation="http://maven.apache.org/POM/4.0.0 https://maven.apache.org/xsd/maven-4.0.0.xsd">
	<modelVersion>4.0.0</modelVersion>
	<groupId>com.howtodoinjava</groupId>
	<artifactId>JUnit5Examples</artifactId>
	<version>0.0.1-SNAPSHOT</version>
	<packaging>jar</packaging>

	<properties>
		<project.build.sourceEncoding>UTF-8</project.build.sourceEncoding>
		<maven.compiler.source>1.8</maven.compiler.source>
		<maven.compiler.target>${maven.compiler.source}</maven.compiler.target>
		<junit.jupiter.version>5.8.1</junit.jupiter.version>
		<junit.platform.version>1.8.1</junit.platform.version>
	</properties>

	<dependencies>
		<dependency>
			<groupId>org.junit.jupiter</groupId>
			<artifactId>junit-jupiter-engine</artifactId>
			<version>${junit.jupiter.version}</version>
			<scope>test</scope>
		</dependency>
		<dependency>
			<groupId>org.junit.jupiter</groupId>
			<artifactId>junit-jupiter-api</artifactId>
			<version>${junit.jupiter.version}</version>
			<scope>test</scope>
		</dependency>

		<dependency>
			<groupId>org.junit.platform</groupId>
			<artifactId>junit-platform-runner</artifactId>
			<version>${junit.platform.version}</version>
			<scope>test</scope>
		</dependency>

	</dependencies>
	<build>
		<plugins>
			<plugin>
				<artifactId>maven-compiler-plugin</artifactId>
				<version>3.8.1</version>
			</plugin>
			<plugin>
				<groupId>org.apache.maven.plugins</groupId>
				<artifactId>maven-surefire-plugin</artifactId>
				<version>2.22.2</version>
				<configuration>
					<argLine>
						--illegal-access=permit
					</argLine>
				</configuration>
			</plugin>
			<plugin>
				<groupId>org.apache.maven.plugins</groupId>
				<artifactId>maven-failsafe-plugin</artifactId>
				<version>2.22.2</version>
				<configuration>
					<argLine>
						--illegal-access=permit
					</argLine>
				</configuration>
			</plugin>
		</plugins>
	</build>
</project>
2. Use @Test Annotation on Test Methods
Use the org.junit.jupiter.api.Test class for adding @Test annotation on test methods. Also, add the lifecycle methods as required.
import org.junit.jupiter.api.AfterAll;
import org.junit.jupiter.api.AfterEach;
import org.junit.jupiter.api.Assertions;
import org.junit.jupiter.api.BeforeAll;
import org.junit.jupiter.api.BeforeEach;
import org.junit.jupiter.api.Disabled;
import org.junit.jupiter.api.Tag;
import org.junit.jupiter.api.Test;

public class AppTest {

    @BeforeAll
    static void setup(){
        System.out.println("@BeforeAll executed");
    }

    @BeforeEach
    void setupThis(){
        System.out.println("@BeforeEach executed");
    }

    @Tag("DEV")
    @Test
    void testCalcOne()
    {
        System.out.println("======TEST ONE EXECUTED=======");
        Assertions.assertEquals( 4 , Calculator.add(2, 2));
    }

    @Tag("PROD")
    @Disabled
    @Test
    void testCalcTwo()
    {
        System.out.println("======TEST TWO EXECUTED=======");
        Assertions.assertEquals( 6 , Calculator.add(2, 4));
    }

    @AfterEach
    void tearThis(){
        System.out.println("@AfterEach executed");
    }

    @AfterAll
    static void tear(){
        System.out.println("@AfterAll executed");
    }
}
3. Demo
Now run the tests as JUnit 5 test cases in Eclipse.
If it asks you to choose the runtime configuration, select JUnit 5 from the drop down.
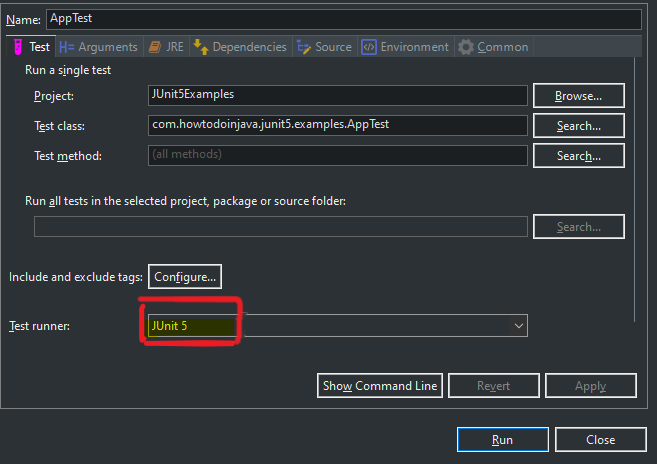
Once we run the tests, notice the output.

Happy Learning !!
How to run the Same suite using maven command.
mvn -Dtest=>testsuiteName> testI got below error: