Swagger is an open source software to build standard documentation in a human readable format for REST APIs. This provides a UI to easily understand service contract and consumer can interact with service without any detailed knowledge of underlying logic.
Swagger is developed by SmartBear software and comes with tools like Swagger Editor, Swagger CodeGen, Swagger UI & Swagger Inspector. Swagger has provided it’s specification known as OpenAPI specification to follow while documenting REST API.
Swagger can be integrated with REST APIs in below ways:
- A top-down approach – First API specification and then code generation
- A botton-up approach – First API code and then Swagger integration. This is quite familiar and mostly useful when there is already an existing REST APIs built in and Swagger documentation needs to be integrated.
In this post we will learn how to go ahead with top-down approach.
Read More: Swagger bottom up approach example
Table of Contents

1. Overview
2. Technology stack
3. Creating API contract
4. Generating API Code
5. Executing API Code
6. Resources
1. Overview
While consuming SOAP services we usually get the WSDL contract and generate fully annotated JAVA code. Like so if we are able to specify REST contract following OpenAPI specification then we could use Swagger CodeGen to create server stubs and client SDKs.
We will see how this can be done to have basic implementation of intended REST service.
2. Technology stack or development environment
- Java 1.7 +
- Swagger Editor
- Swagger CodeGen
- Spring tool suite
- Spring boot
- Spring Rest
- Maven
3. Create REST API contract
To create API contract, let’s use online Swagger Editor for the sake of simplicity. You can also download and install the same.
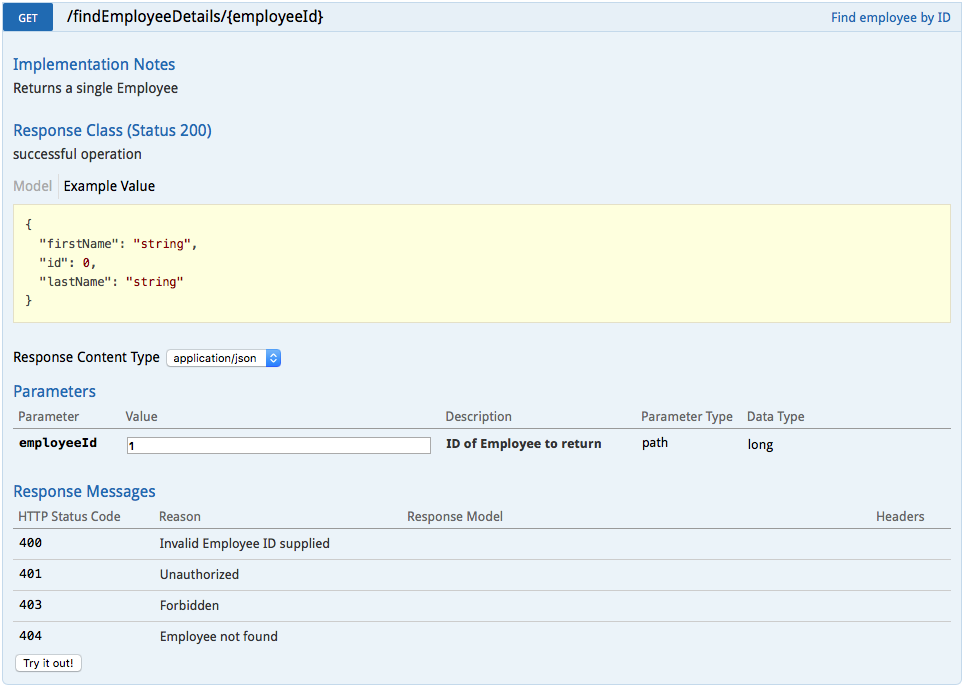
To create contract first have some understanding of OpenAPI specification. In this demo an Employee service contract has been created which will find employee details based on ID.
In the left pane of Swagger Editor write down the specification. Based on the specification outcome, right pane will show the UI documentation of Swagger.
- Please follow the inline comments to understand below specification.
swagger: '2.0' #version of Swagger info: # High Level information of API description: Sample Swagger Demo #Give the description of API version: 1.0.0 #API version title: Swagger Employee Demo # API title license: #Swagger license info name: Apache 2.0 url: 'http://www.apache.org/licenses/LICENSE-2.0.html' host: localhost # Host Name basePath: /v1 #Basepath when there are multiple versions of API running tags: # Tag information for each API operation. Multiple tags for multiple API operation - name: employee #Tag name description: Everything about your Employee #Tag description of API operation schemes: - http #security schemes paths: '/findEmployeeDetails/{employeeId}': #Request Mapping path of REST API get: #Request method type, GET,POST etc. tags: # Refer to created tag above - employee summary: Find employee by ID #Summary description: Returns a single Employee #Description of API operation operationId: getEmployeeDetails #Method name produces: - application/json #Response content type parameters: - name: employeeId #Input parameter in: path #path variable description: ID of Employee to return #description of parameter required: true #Is mandatory type: integer #data type format: int64 #data type format, signed 64 bits responses: # API response '200': #Successful status code description: successful operation #Successful status description schema: $ref: '#/definitions/Employee' #Response object details '400': #Unsuccessful response code description: Invalid Employee ID supplied #Unsuccessful response description '404': #Unsuccessful response code description: Employee not found #Unsuccessful response description definitions: # Object definition Employee: #Employee Object type: object properties: #Object properties id: #Id attribute type: integer format: int64 firstName: #Firstname attribute type: string description: Employee First Name #data type description lastName: #Lastname attribute type: string #Data type description: Employee Last Name #Data type description xml: name: employee #xml root element when returning xml - Put the above specification in Swagger editor left pane and see the Swagger documentation visually.
- Save the specification as yaml file from editor
File>Save as YAML. It will be saved asswagger.yaml.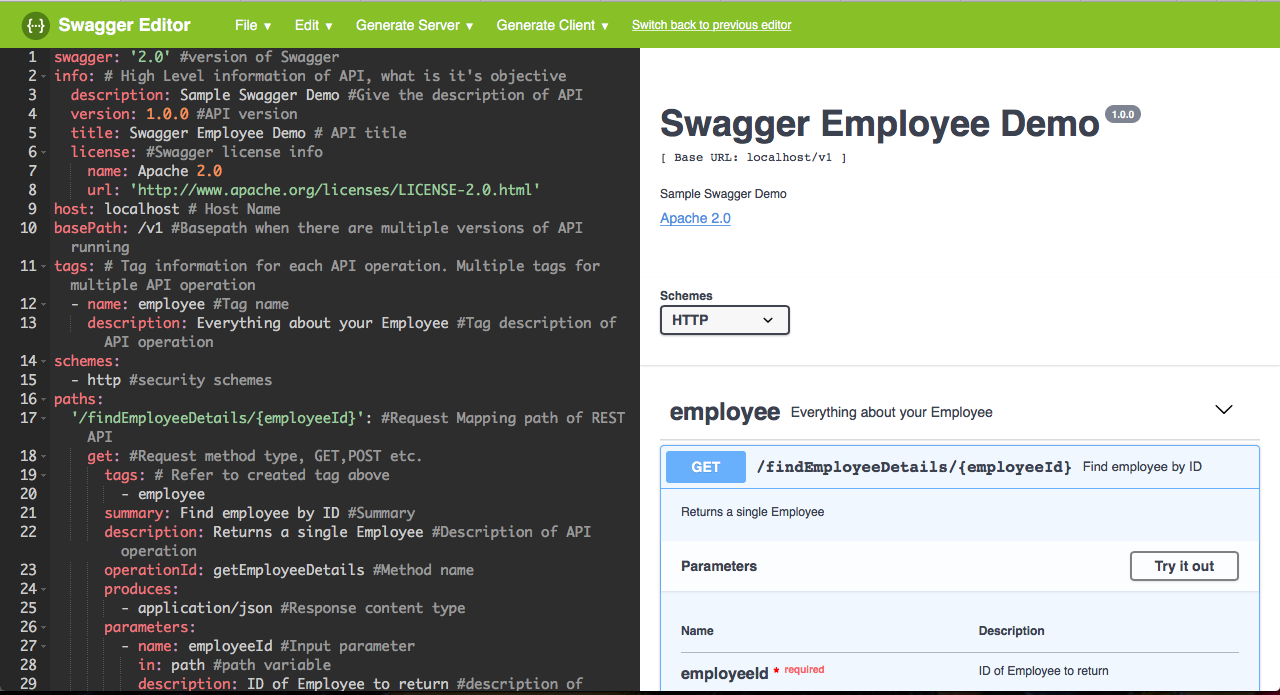
4. Generate API code with swagger codegen tool
In earlier step,we have saved the specification in yaml format. To further generate source code, this swagger.yaml file will be the source of input. To facilitate it, Swagger CodeGen tool is used.
Swagger provides utility jar to generate client REST clients for different programming languages and framework. The latest stable version jar can be downloaded from Swagger Codegen.
To generate client execute below command with swagger cli.
java -jar swagger-codegen-cli-2.3.1.jar generate \
  -i swagger.yaml \
  --api-package com.howtodoinjava.example.employee.api \
  --model-package com.howtodoinjava.example.employee.model \
  --group-id com.howtodoinjava.example \
  --artifact-id spring-swagger-codegen-employee \
  --artifact-version 0.0.1-SNAPSHOT \
  -l spring \
  -o spring-swagger-codegen-employee
Description of arguments:
- i: Swagger specification source file
- api-package: Package information for generated API class
- model-package: Package information for generated model class
- group-id: Maven properties
- artifact-id: Maven properties
- artifact-version: Maven properties
- l: Implementation framework, here Spring is used, which by default provides spring-boot
- o: Output directory
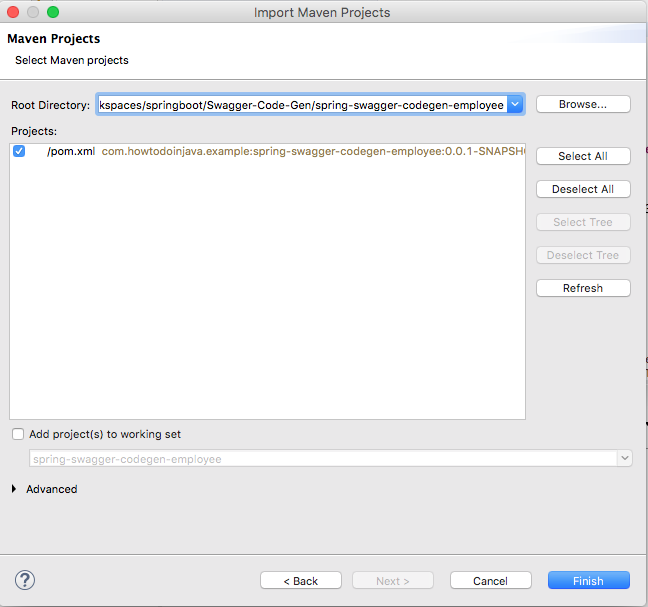
After successful execution of above command, a Spring boot maven projectspring-swagger-codegen-employee will be created.
5. Publish REST API
- Open Spring tool suite and import as maven project we created in last step.
- Once imported and project is build successfully, you can find swagger configuration classes are automatically created.
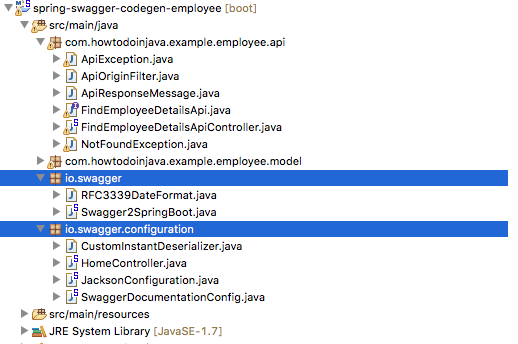
- Verify the API controller
FindEmployeeDetailsApiController.javaand associated interfaces, you will see all Swagger annotations are already added.
@javax.annotation.Generated(value = "io.swagger.codegen.languages.SpringCodegen", date = "2018-03-14T07:52:19.544+05:30")

@Api(value = "findEmployeeDetails", description = "the findEmployeeDetails API")
public interface FindEmployeeDetailsApi {

    @ApiOperation(value = "Find employee by ID", nickname = "getEmployeeDetails", notes = "Returns a single Employee", response = Employee.class, tags={ "employee", })
    @ApiResponses(value = {
        @ApiResponse(code = 200, message = "successful operation", response = Employee.class),
        @ApiResponse(code = 400, message = "Invalid Employee ID supplied"),
        @ApiResponse(code = 404, message = "Employee not found") })
    @RequestMapping(value = "/findEmployeeDetails/{employeeId}",
        produces = { "application/json" },
        method = RequestMethod.GET)
    ResponseEntity<Employee> getEmployeeDetails(@ApiParam(value = "ID of Employee to return",required=true) @PathVariable("employeeId") Long employeeId);

}
@javax.annotation.Generated(value = "io.swagger.codegen.languages.SpringCodegen", date = "2018-03-14T07:52:19.544+05:30") @Controller public class FindEmployeeDetailsApiController implements FindEmployeeDetailsApi { private static final Logger log = LoggerFactory.getLogger(FindEmployeeDetailsApiController.class); private final ObjectMapper objectMapper; private final HttpServletRequest request; @org.springframework.beans.factory.annotation.Autowired public FindEmployeeDetailsApiController(ObjectMapper objectMapper, HttpServletRequest request) { this.objectMapper = objectMapper; this.request = request; } public ResponseEntity<Employee> getEmployeeDetails(@ApiParam(value = "ID of Employee to return",required=true) @PathVariable("employeeId") Long employeeId) { String accept = request.getHeader("Accept"); if (accept != null && accept.contains("application/json")) { try { return new ResponseEntity<Employee>(objectMapper.readValue("{ \"firstName\" : \"firstName\", \"lastName\" : \"lastName\", \"id\" : 0}", Employee.class), HttpStatus.NOT_IMPLEMENTED); } catch (IOException e) { log.error("Couldn't serialize response for content type application/json", e); return new ResponseEntity<Employee>(HttpStatus.INTERNAL_SERVER_ERROR); } } return new ResponseEntity<Employee>(HttpStatus.NOT_IMPLEMENTED); } } - Next run the project and open Swagger UI accessible at
http://localhost:8080/v1/swagger-ui.html. You can check all API details in Swagger UI.@Controller public class HomeController { @RequestMapping(value = "/") public String index() { System.out.println("swagger-ui.html"); return "redirect:swagger-ui.html"; } }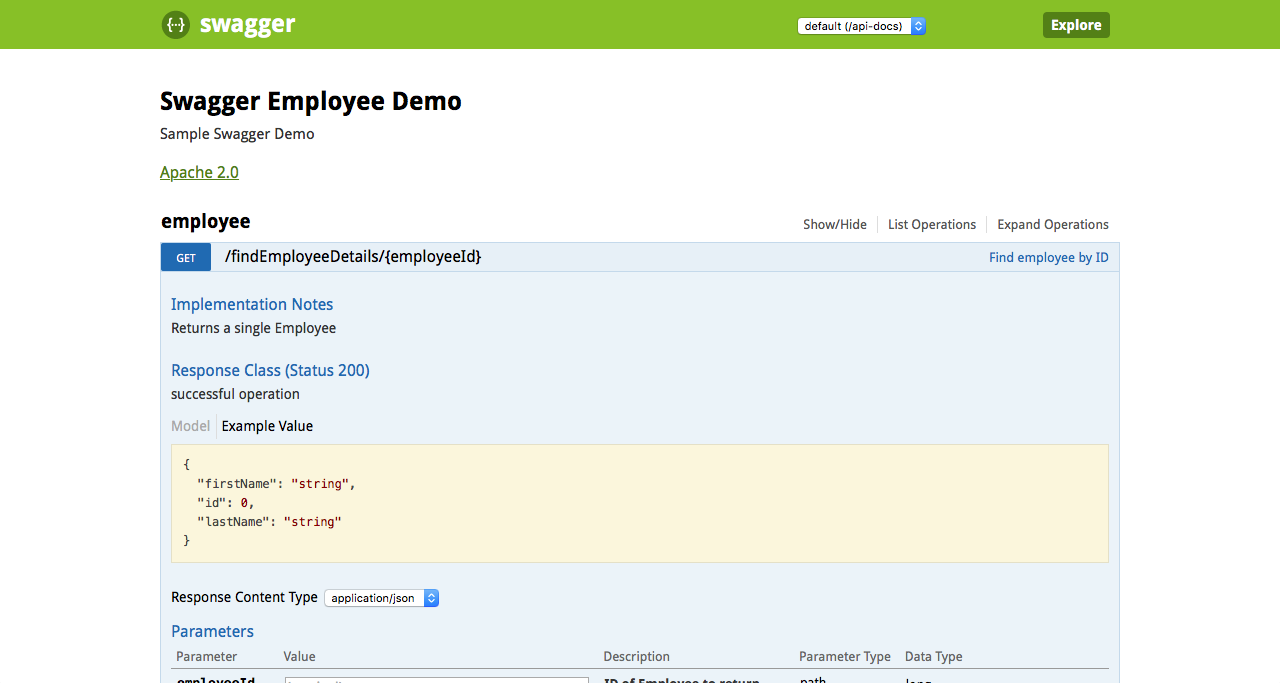
- Now let’s access the default implemented service –
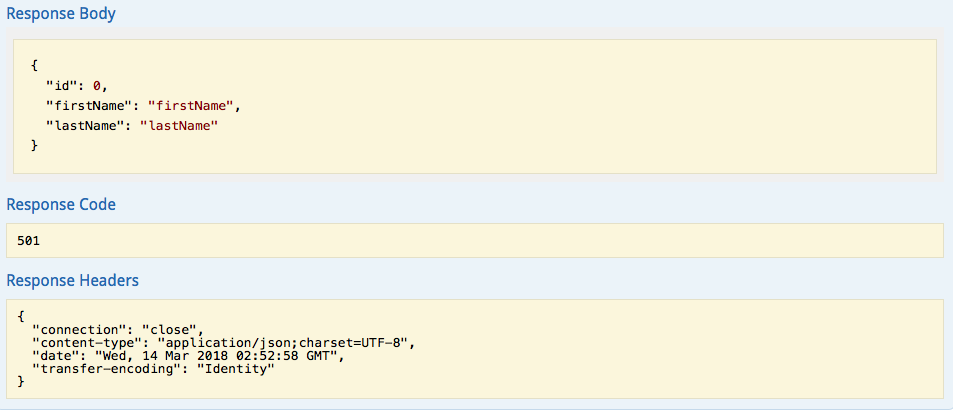
findEmployeeDetails/{employeeid}. As there is no business logic implemented in controller class, you will seeHTTP status code 501 (Not Implemented).Let’s access the REST service through Swagger and REST client to see the default response.

- Swagger UI Request:
- Swagger UI Response:
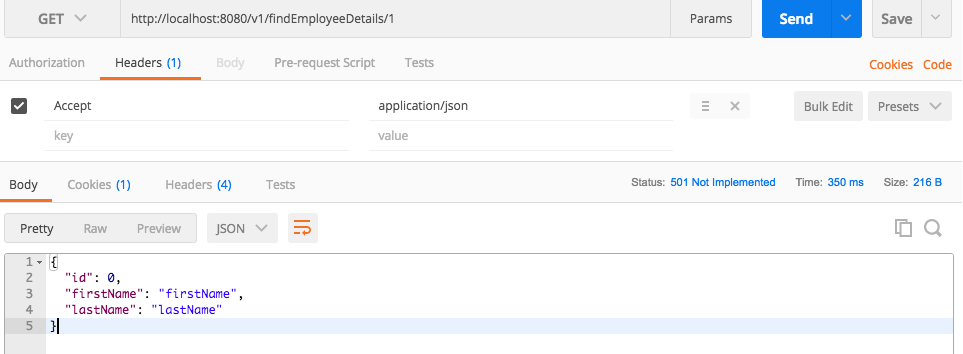
- REST Client Response: Snapshot of Postman client
- Now customise the service method as per business need while actual implementation. Notice the effort it is saving to integrate Swagger, also this is quite useful to get structured code ready during implementation of any new API.
6. Resources
- https://swagger.io/specification/
- https://swagger.io/docs/specification/about/
- https://github.com/swagger-api/swagger-codegen
- https://swagger.io/docs/swagger-tools/#installation-11
- https://github.com/OAI/OpenAPI-Specification/blob/master/versions/2.0.md
Added the generated project for easy reference in download section. Drop me your questions if you have any query.
Happy Learning !!
Can we create code for Swagger-3 also?
Hi,
Thanks for the nice explanation!
I also tried to create a server stub from the swagger-codegen-cli and from the swagger -ui and I am able to see request/ respose when posted a application/json request.
But unfortunately when I try to use application/xml, I get org.springframework.web.HttpMediaTypeNotAcceptableException” HTTP error cod 406.
I already checked my swagger-yaml file the api definitions has consumes and produces both application/xml and application/json present. Do we need to do something extra to support application/xml while generating stub?
Thanks in advance!
How to add data from json file ?
I thought you could be interrested in our new tool that generates swagger from mindmappings. We chose this top-down approach because mindmaps are easier to work with business people. You have a free swagger when you sign up
Hi ,
How can I generate swagger documentation for the code which is located outside the project. I mean I have rest sprint boot rest api source classes in
another directory. Where can I specify this like.. from this directory scan the code for document generation.
Is it possible to this.
from any jars [swagger annotation are added in source code] can we generate documentation.
Thanks in advance.
I suggest that you change the adblock detector, i disabled all the adblocker on this domain but it still remove the sources link…