ChatGPT is an advanced AI language model developed by OpenAI, and it has been trained on a massive dataset of diverse texts, including books, articles, and web pages. With its ability to generate human-like text, ChatGPT has become a go-to tool for many NLP applications, including chatbots, language translation, and content generation.
We can access the generative AI feature of chatGPT using its web interface at chat.openai.com or we can access it programmatically using the APIs. The APIs are intended for developing 3rd-party applications that can utilize its capabilities to create usecase focused applications.
In this tutorial, we will learn how to start with the ChatGPT API, including creating an account and generating API keys. After that, we will walk through setting up your development environment to work with the ChatGPT API. Finally, we will see an example of a simple ChatGPT API response to understand the basic functionalities of the tool.
1. Prerequisites
To get the most out of this tutorial, you will require the following:
- Python 3.7 or later installed on your computer
- An OpenAI API key, which can be obtained by signing up for an OpenAI account
- A code editor, such as PyCharm (recommended), to write and run Python code
2. Obtaining an OpenAI API Key
The ChatGPT API is an application programming interface developed by OpenAI allowing the developers to interact with Generative Pre-trained Transformer (GPT) models for Natural Language Processing (NLP) tasks. This API provides an easy-to-use interface for generating text, completing prompts, answering questions, and carrying out other NLP tasks using any one of its LLM models.
The ChatGPT API is primarily intended for chatbots, virtual assistants, and automated content generation. It can also be used for language translation, sentiment analysis, and content classification. The API is flexible and customizable which allows developers to fine-tune the model’s performance for their specific use case.
To use the ChatGPT API, first, we must obtain an API key. The API key allows us to authenticate our requests to the system and ensures that only authorized users can access our account.
To obtain an API key, we must access the OpenAI Platform at https://platform.openai.com using our ChatGPT credentials. The OpenAI Platform page provides a central hub for managing our OpenAI resources. Once signed up, navigate to the API access page: https://platform.openai.com/account/api-keys. We can manage our API keys for the ChatGPT API and other OpenAI services on the API access page.
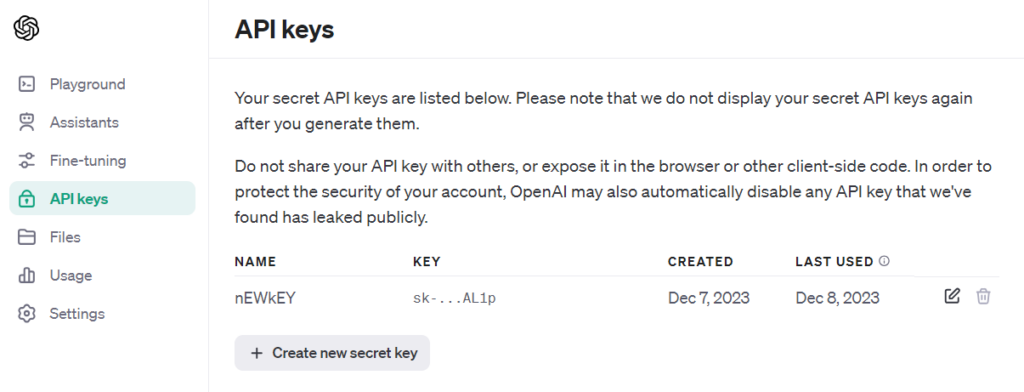
On the API keys page, we can generate new API keys, view and edit the permissions associated with each key, and monitor your usage of the APIs. The page provides a clear overview of all the API keys and allows us to easily revoke or regenerate keys as needed.
Click on the +Create new secret key button and your API key will be created:
After creating the API key, we will only have one chance to copy it. It’s important to keep the API key secure and confidential, as anyone who has access to the key could potentially access our account and use our resources. We should also be careful not to share the key with unauthorized users and avoid committing the key to public repositories or sharing it in plain text over insecure channels.
3. Setting Up the Python Development Environment
To utilize the ChatGPT API, you will need to set up the Python development environment. This section will guide you through the necessary steps to get started, including the following:
- Installing Python
- Installing the PyCharm IDE
- Installing pip
- Setting up a virtual environment
- Installing the required Python packages
3.1. Installing Python
To install Python, you can download and install the latest version of Python from the official website https://www.python.org/downloads/. Once you have downloaded the Python installer, simply follow the instructions to install Python on your computer.
3.2. Installing PyCharm IDE
Next, we need to choose an IDE. Although you can use any IDE of your choice, PyCharm is also a good option. It is a powerful and user-friendly IDE developed by JetBrains. PyCharm provides a wide range of features that make it easy to develop Python applications, including code completion, debugging tools, and project management capabilities.
To install PyCharm, you can download the Community Edition for free from the JetBrains website https://www.jetbrains.com/pycharm/download/. Once you have downloaded the installer, simply follow the instructions to install PyCharm on your computer.
3.3. Setting Up a Python Virtual Environment
By creating a virtual environment, you can install specific versions of Python packages and dependencies without causing disruptions to other projects on your system. This ensures that all packages and dependencies are confined within your project folder, preventing unnecessary clutter in the global Python installation on your computer. Adopting this approach offers a more systematic and isolated environment for both the development and execution of your project.
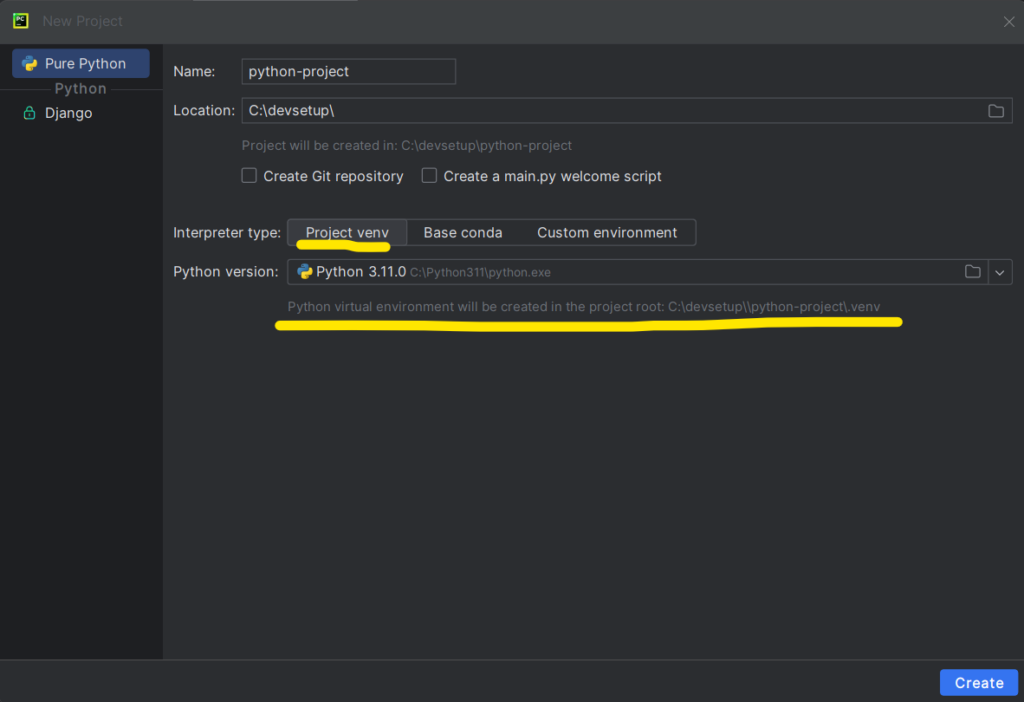
PyCharm facilitates the creation of a Python virtual environment directly within the project initiation process. By default, the Interpreter type is selected as Project venv so each new project is created with Python virtual environment.
Once the project has been created, you can see the /venv folder created in the project directory. It confirms that the Python virtual environment is correctly installed and activated.
3.4 The pip Package Installer
pip is a package installer for Python that allows you to easily install and manage third-party Python libraries and packages such as openai.
If you are using a recent version of Python, pip should already be installed. To confirm, open a command prompt or terminal and enter “pip” followed by the Enter key. If pip is installed, you’ll see output describing its usage and commands.
In case pip is not installed on your system, you can install it by following these steps:
- Download the get-pip.py script from the official Python website: https://bootstrap.pypa.io/get-pip.py.
- Save the file to a location on your computer, such as your desktop or downloads folder.
- Open a command prompt or terminal and navigate to the directory where you saved the get-pip.py file.
- Execute the following command in the terminal to install pip: python get-pip.py
- Once the installation is complete, you can verify that pip is installed by typing pip into the command prompt or terminal and pressing Enter.
Now, you should have pip installed on your system and easily install packages and libraries for Python.
4. Getting Started with ChatGPT API
To begin experimenting with chatGPT API, start with creating a new PyCharm project. Next, open a new Terminal in PyCharm, make sure that you are in your project folder, and install the openai package:
pip install openaiNext, do the following steps to create a very basic simple program that interacts with the LLM with chatGPT API:
- Create a new Python file in your PyCharm project.
- In the file, import the openai library. Also, you’ll need to provide your OpenAI API key.
import os
from openai import OpenAI

client = OpenAI(
  api_key=os.environ.get("OPENAI_API_KEY")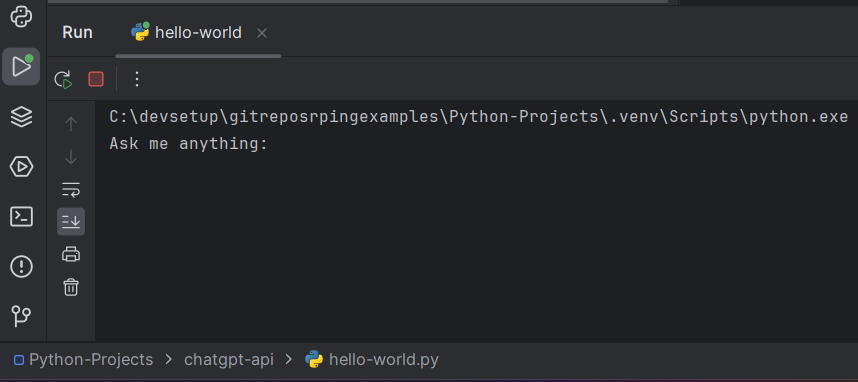
)- Ask the user for a question using the input() function. The input() function is used to prompt the user to input a question they would like to ask the ChatGPT API. When the user types their question and presses Enter the input() function will return the string that the user typed. This string is then assigned to the question variable.
question = input("Ask me anything: ")- To pass the user question from your Python script to ChatGPT, you will need to use the ChatGPT API Completion function. The client.chat.completions.create() function sends a request to the ChatGPT API to generate the completion of the user’s input prompt.
- The model parameter allows us to specify the specific variant or version of the GPT model we want to utilize for the request, and in this case, it is set to “gpt-3.5-turbo”.
- The temperature parameter controls the creativity of the generated response. It ranges from 0 to 1. Higher values will result in more creative but potentially less coherent responses, while lower values will result in more predictable but potentially less interesting responses.
- The max_tokens parameter specifies the maximum number of tokens the request and the response should contain together.
- The n parameter specifies the number of completions to generate for the prompt.
- The stop parameter specifies the sequence where the API should stop generating the response.
- The function returns a JSON object containing the generated response from the ChatGPT API which then can be accessed and printed to the console in the next line of code:
response = client.chat.completions.create(
  messages=[
    {
      "role": "user",
      "content": question
    }
  ],
  model="gpt-3.5-turbo",
  temperature=0,
  max_tokens=1024,
  n=1,
  stop=None
)

print(response)
The complete program looks like this:
import os
from openai import OpenAI

client = OpenAI(
  api_key=os.environ.get("OPENAI_API_KEY")
)

question = input("Ask me anything: ")

response = client.chat.completions.create(
  messages=[
    {
      "role": "user",
      "content": question
    }
  ],
  model="gpt-3.5-turbo",
  temperature=0,
  max_tokens=1024,
  n=1,
  stop=None
)

print(response)
5. Run the Program
In the project pane on the left-hand side of the screen, locate the Python file you created in the previous step. Right-click on the app.py file and select Run app.py from the context menu.
You should receive a message in the Run window that asks you to write a question to ChatGPT.
Once you have entered your question, press the Enter key to submit your request to the ChatGPT API. The response (ChatCompletion object) generated by the ChatGPT API model will be displayed in the Run window:
ChatCompletion (id='chatcmpl-8TRL77QbIuITjDXKpR5DJGs0jLoaw', choices=[Choice(finish_reason='stop',
index=0, message=ChatCompletionMessage(content="Sure, here's a classic one for you:\n\nWhy don't scientists trust atoms?\n\nBecause they make up everything!",
role='assistant', function_call=None, tool_calls=None))], created=1702027297,
model='gpt-3.5-turbo-0613', object='chat.completion', system_fingerprint=None,
usage=CompletionUsage(completion_tokens=23, prompt_tokens=11, total_tokens=34))
This response consists of the following fields:
- The choices field contains an array of objects with the generated responses, which in this case only contains one response object as the parameter n=1.
- The message field within the response object contains the actual response generated by the GPT model.
- The finish_reason field indicates the reason why the response was generated; in this case, it was because the model reached the stop condition provided in the request. Since in our case stop=None, the full response from the ChatGPT API was returned.
- The created field specifies the Unix timestamp of when the response was created.
- The id field is a unique identifier for the API request that generated this response.
- The model field specifies the GPT-3 model that was used to generate the response.
- The object field specifies the type of object that was returned, which in this case is text_completion.
- The usage field provides information about the resource usage of the API request. It contains information about the number of tokens used for the completion, the number of tokens in the prompt, and the total number of tokens used.
The most important parameter from the response is the message field, which contains the answer to the question asked to the ChatGPT API. You can easily separate the text from the main body as follows:
answer = response.choices[0].message.content
print(answer)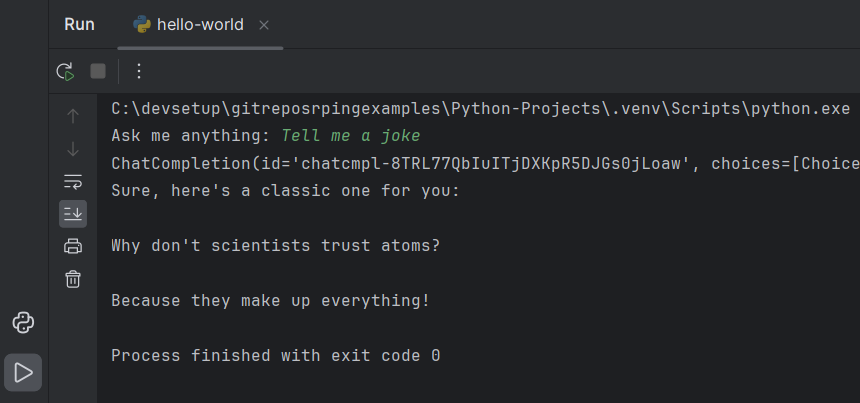
By following this approach, you can guarantee that the answer variable will hold the complete ChatGPT API text response, which you can then print to verify.
6. Summary
In this tutorial, we learned the basics of getting started with the ChatGPT API. We dived into the details of creating and using the ChatGPT API. We learned to set up a Python development environment, using the PyCharm IDE, and creating a virtual environment. Then we walked through a simple example of obtaining a ChatGPT API response.
Happy Learning !!