
JWT is an open standard (RFC 7519) for defining JSON objects shared between multiple systems and representing a user’s identity or specific permission associated with that identity. JWT tokens are commonly used in authentication and authorization processes to prove a user’s identity or grant access to specific protected resources or actions.
1. Traditional Client-Server Interaction in HTTP Protocol
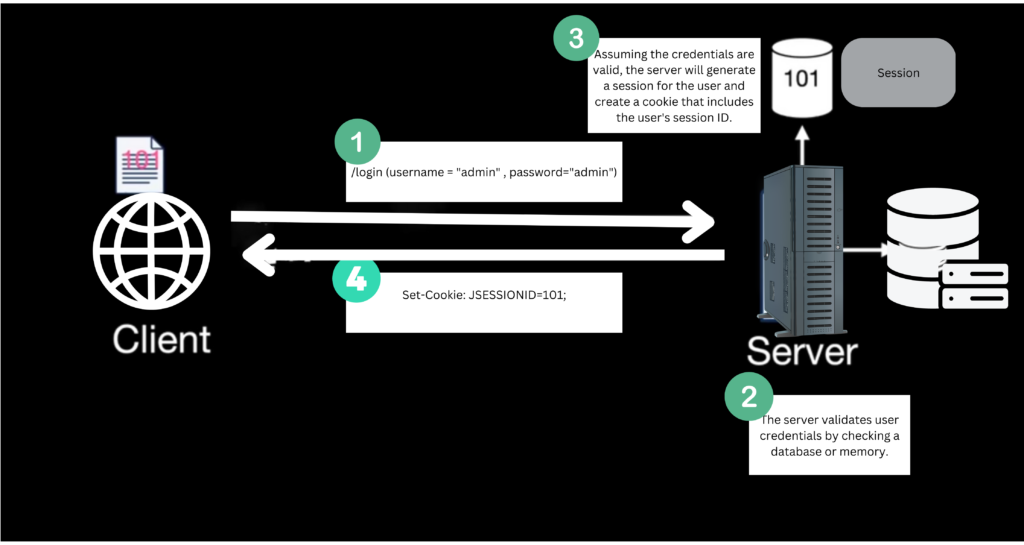
HTTP (Hypertext Transfer Protocol) is a stateless protocol which means each request sent by the client to the server is independent of any previous requests or responses. In other words, the server does not keep track of previous interactions, and each request is treated as a new request. This is why when we refresh a webpage, the server doesn’t remember any of the previous content, and the entire page is reloaded from scratch. So how can I track user actions on my website without repeatedly asking for their username and password? One solution is to store a unique identifier on the user’s computer so that when they send a request to the server with this identifier, the server can identify the user and their actions.
To maintain state across multiple requests, web developers often use cookies, session tokens or other techniques that allow them to store and retrieve data from the client or server as needed. Cookies are small pieces of data that are stored on the client side, typically in the browser, and sent to the server with every request.
When a user logs in to a web application, the server sets a session cookie that contains a unique identifier(JSESSIONID), which is used to associate requests with the user’s session. The server maintains the session state, which includes information about the user and their session, on the server side.
However, the cookie-based approach had several drawbacks.
- Firstly, it required server-side storage to maintain the session state, which could be a scalability issue for large web applications with many users.
- Secondly, cross-domain problems could arise when cookies are used with different domains.
- Finally, cookies could be vulnerable to certain types of attacks, such as cross-site scripting (XSS) and cross-site request forgery (CSRF).
Session management can become even more challenging when an application is deployed across multiple servers with a load balancer to distribute incoming requests. For instance, when a user logs into the application and their request is handled by Server A, all requests from the same user must also be routed to Server A. If the user’s requests are directed to Server B instead, Server B cannot access the session data that was stored by Server A, which can result in the user having to log in again.
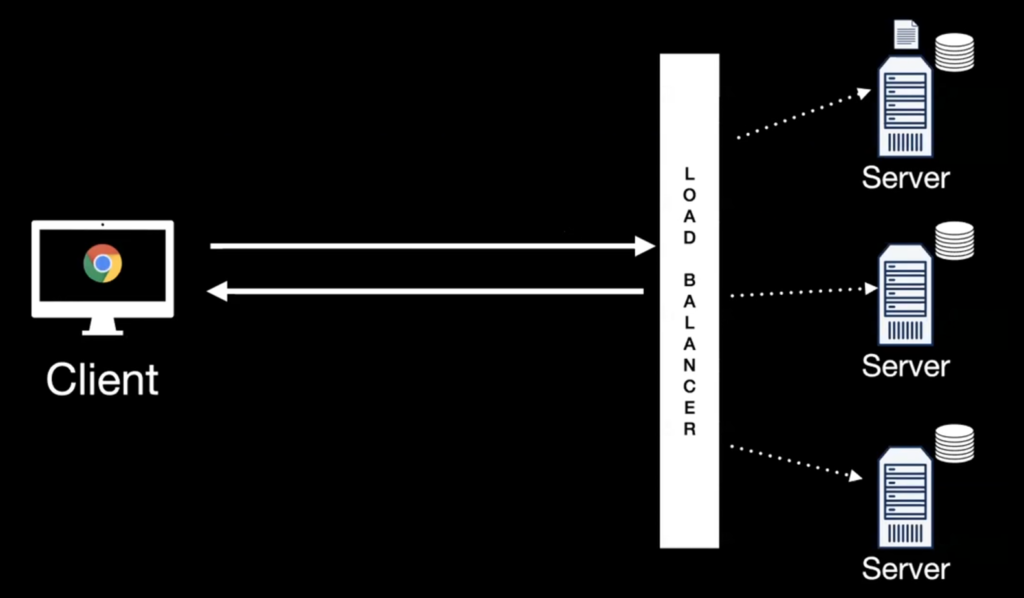
One common solution to address the issue of session management across multiple servers is to use a load balancer that supports session affinity, also known as sticky sessions.
Or another helpful approach is to use JSON Web Tokens (JWTs). With JWTs, session-related data can be stored within the token itself and validated by any server in the application.
2. How does JWT Solve Our Problems?
JWT solves above problems by providing a stateless mechanism for authentication and authorization. When a user logs in to a web application, the server generates a JWT token, which contains all the necessary information to authenticate and authorize the user. This token is then sent to the client, typically as a JSON object, and stored on the client-side, such as in local storage.
From that point onwards, the client sends the JWT token with every request to the server. The server validates the token, extracts the information it needs to authenticate and authorize the user, and responds accordingly. Because the JWT token is self-contained and contains all the necessary information, the server does not need to maintain any session state, making it much more scalable than traditional cookie-based approaches.
In addition, because the JWT token is sent with every request, it can be used across multiple domains without any cross-domain issues. This is because the JWT token is not tied to a specific domain or server, but instead contains all the necessary information to authenticate and authorize the user statelessly.

3. JWT Token Structure
A typical JWT token resembles an encoded string separated by two dots i.e. xxxx.yyyy.zzzz. An example could be the following string:
eyJhbGciOiJIUzI1NiIsInR5cCI6IkpXVCJ9.eyJzdWIiOiIxMjM0NTY3ODkwIiwibmFtZSI6IkpvaG4gRG9lIiwiaWF0IjoxNTE2MjM5MDIyfQ.SflKxwRJSMeKKF2QT4fwpMeJf36POk6yJV_adQssw5cWhen decoded, the token consists of three parts:
- Token header
- Token payload
- Token signature
3.1. Token Header
The header is a JSON object that contains information about the token, such as the type of token and the algorithm used to sign it. The header is base64 encoded to make it URL-safe and easy to transmit.
{
  "alg": "HS256",
  "typ": "JWT"
}
In above example, alg stands for the algorithm used for signing the token, which is HMAC-SHA256 (HS256) in this case, and typ stands for the type of token, which is JWT.
3.2. Token Payload
The payload contains the claims or information about the user and other related data. The claims are a set of key-value pairs that are also base64 encoded to make them URL-safe and easy to transmit.
{
  "sub": "11223344",
  "name": "HowToDoInJava",
  "iat": 543654656,
  "roles": ["admin", "super-admin"]
}
JWT specification defines some standard claims that can be used in most applications:
- “iss” (Issuer): Identifies the entity that issued the token.
- “sub” (Subject): Identifies the subject of the token, typically a user or a client.
- “aud” (Audience): Identifies the recipients that the token is intended for.
- “exp” (Expiration Time): Identifies the token’s expiration time, after which it should not be accepted.
- “nbf” (Not Before): Identifies the time before the token should not be accepted.
- “iat” (Issued At): Identifies the time at which the token was issued.
- “jti” (JWT ID): Provides a unique identifier for the token.
In addition to these standard claims, custom claims (e.g. roles) can also be included in the payload to provide additional information that is specific to the application.
3.3. Token Signature
The signature ensures the token’s integrity and prevents tampering or modification of its contents.
When a JWT is created, the header and payload are first encoded as base64 strings. Then, these encoded strings are concatenated together, with a period (“.”) character between them. This concatenated string is then signed using a secret key, using a cryptographic algorithm such as HMAC or RSA. The resulting signature is then appended to the encoded header and payload to create the final token.
4. Characteristics of JWT Tokens
JWT tokens have several characteristics that make them useful for implementing authentication and authorization in web applications:
- Stateless: JWT tokens are stateless, meaning the server does not need to maintain any session state for each client. This makes them scalable and easier to manage in distributed environments.
- Portable: JWT tokens can be effortlessly sent between different systems or domains, as they are self-contained and do not require server-side storage.
- Secure: JWT tokens can be signed to ensure their integrity. The use of a signature also provides protection against token tampering and forgery.
- Customizable: JWT tokens can be customized to include any data that is needed for a specific use case. Custom claims can be included in the token payload to provide user’s additional information or support specific authorization requirements.
- Efficient: JWT tokens are typically small, making them efficient for transmitting over the network. The use of JSON also makes them easy to parse and work with in many programming languages.
5. JWT in Java
To use JWT in a Java application, we can use a library like jjwt (Java JWT). Here’s an example of how to generate, sign, and validate a JWT token using jjwt library.
5.1. Maven
Start with importing the latest version of jjwt in the project runtime:
<dependency>
    <groupId>io.jsonwebtoken</groupId>
    <artifactId>jjwt-api</artifactId>
    <version>0.11.5</version>
</dependency>
5.2. Generate a JWT Token
To generate a JWT, we can use the Jwts.builder() method and chain some of its methods to set the claims, expiration time, and sign the token:
String subject = "user123";
String issuer = "myApp";
Date now = new Date();
Date expiration = new Date(now.getTime() + 3600000); // 1 hour
String secretKey = "mySecretKey";

String token = Jwts.builder()
                .setSubject(subject)
                .setIssuer(issuer)
                .setIssuedAt(now)
                .setExpiration(expiration)
                .signWith(SignatureAlgorithm.HS256, secretKey.getBytes())
                .compact();
5.3. Validate a JWT Token
To validate a JWT on the server side, we can use the Jwts.parser() method and chain some of its methods to set the expected claims and secret key:
try {
    Claims claims = Jwts.parser()
                        .setSigningKey(secretKey.getBytes())
                        .parseClaimsJws(token)
                        .getBody();

    String subject = claims.getSubject();
    String issuer = claims.getIssuer();
    Date issuedAt = claims.getIssuedAt();
    Date expiration = claims.getExpiration();
} catch (SignatureException e) {

    // Invalid signature
}
6. Using JWT with OAuth2
In real-world applications, it is preferred to use JWT with OAuth2 to implement a secure and scalable authentication and authorization system. By using JWT with OAuth2, the application can avoid storing sensitive information (such as passwords) and reduce the overhead of authentication and authorization. It also allows for the delegation of authorization decisions to the authorization server, which can simplify the application logic and increase security.
The following diagram depicts the sequence of events when users access protected resources such as photos in Google Photos. The application needs to obtain authorization from the user via OAuth 2.0.
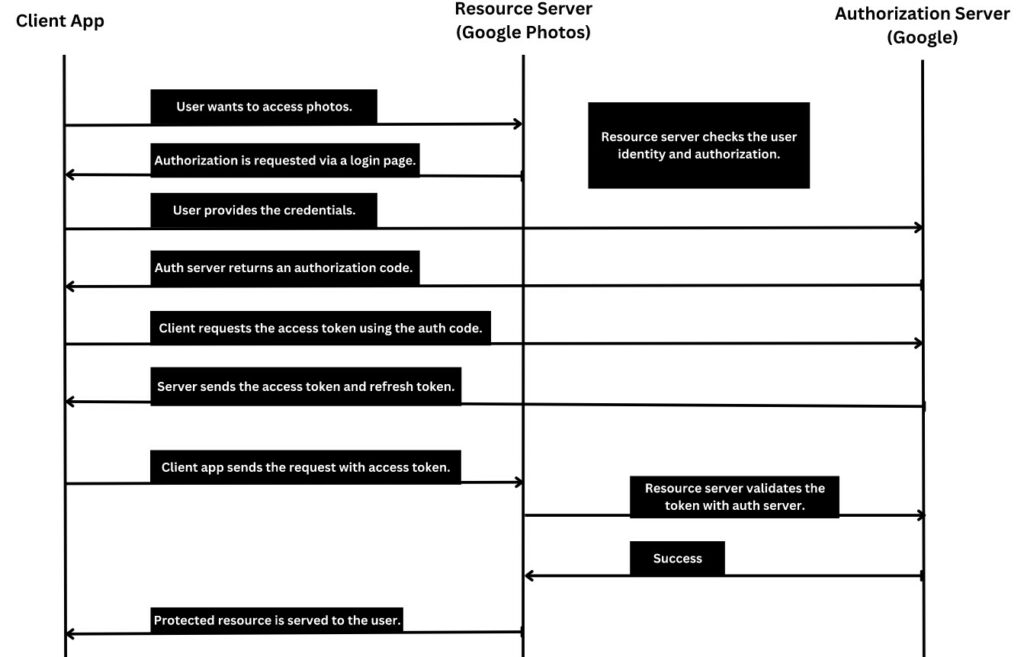
- The user attempts to access a protected resource in the application, which requires authorization to access Google Photos.
- The application redirects the user to the Google Photos authorization server to authenticate and authorize the requested scopes.
- If the user is not already authenticated, they will be prompted to login using their Google account credentials.
- Once the user is authenticated, the authorization server presents a consent screen that lists the requested scopes and prompts the user to grant or deny access to those scopes.
- If the user grants access, the authorization server issues an access token to the application( OAuth2 Implicit Flow) or a code that will be changed with an Access Token (OAuth2 Authorization code grant ), which can be used to access the protected resource in Google Photos.
- The application can then use the access token to retrieve the requested photos from Google Photos.
The following is a sample code snippet from the client application to authenticate the user and obtain the JWT token:
export class AuthService {

  constructor(private http: HttpClient) {}

  signIn(user: User) {
    return this.http
      .post<any>(`${this.endpoint}/signin`, user)
      .subscribe((res: any) => {

        localStorage.setItem('access_token', res.token);

        //Update view model
      });
  }

}
Once the token is received, the client can send the Authorization header as follows in the subsequent requests to the protected resources. The following code snippet uses the Angular interceptor to inject the auth header in each outgoing request.
import { Injectable } from "@angular/core";
import { HttpInterceptor, HttpRequest, HttpHandler } from "@angular/common/http";

@Injectable()
export class AuthInterceptor implements HttpInterceptor {

    intercept(req: HttpRequest<any>, next: HttpHandler) {

        const authToken = localStorage.getItem('access_token');
        req = req.clone({
            setHeaders: {
                Authorization: "Bearer " + authToken
            }
        });
        return next.handle(req);
    }
}
7. FAQs
7.1. What is the difference between a JWT token and a Cookie?
- Structure: A JWT token is a self-contained JSON object that contains information about the user and the permissions they have, while a cookie is a small text file that is stored on the client-side and contains information about the user’s session ( server side ).
- Security: JWT tokens are generally considered more secure than cookies because they are signed with a secret key or a public/private key pair, making it more difficult for attackers to tamper with or forge the token.
- Storage: JWT tokens are usually stored on the client-side, typically in the browser’s local storage or session storage. Cookies are also stored on the client-side, but they can be either stored in memory (session cookies) or on disk (persistent cookies).
- Usage: JWT tokens are often used for stateless authentication and authorization in web applications, particularly in Single-Page Applications (SPAs) and APIs, with no server-side session management. Cookies, on the other hand, can be used for both stateless and stateful authentication and authorization in web applications, and they are often used to store session information and user preferences.
7.2. What is the difference between a token and a renewal token?
In the context of authentication and authorization, a token is a piece of data that is used to verify the identity of a user and grant them access to a protected resource. A renewal token, also known as a refresh token, is a special type of token that is used to obtain a new token without requiring the user to log in again.
Suppose we have a web application that requires users to log in before accessing certain features. When a user logs in, the server generates a JSON Web Token (JWT) that contains information about the user’s identity and the permissions they have. This token is then sent to the client-side, where it is stored in a cookie or local storage. Whenever the user makes a request to the server, the token is included in the request header to verify their identity and authorize their access to the requested resource.
Note that the JWT token has a limited lifespan, after which it will expire and become invalid. In this case, the server can issue a renewal token, also known as a refresh token, along with the JWT token. The renewal token is a long-lived token that is used to obtain a new JWT token when the current token expires. This means that the user can continue to use the application without having to log in again, as long as they have a valid renewal token.
Renewal tokens are typically issued to clients that have been authenticated by the server, and they are used to provide a seamless user experience by preventing the user from having to log in again after the token expires.
8. Conclusion
Today, JSON Web Tokens (JWT) have emerged as a popular choice for authentication and authorization in modern web applications. However, it’s worth noting that JWT also has some potential disadvantages and risks that developers should be aware of. For instance, since JWTs are stateless, it’s harder to revoke them once they’ve been issued. Additionally, JWTs can be vulnerable to attacks such as token theft, tampering, and replay attacks if not implemented and validated correctly.
Happy Learning !!