Lombok is a very handy tool for minimizing the boilerplate code and providing lots of other features such as lazy loading, thread safety and immutability. This is the reason it is becoming very popular among the developer community.
In this Lombok tutorial, we will learn about project Lombok in detail, including its usage with examples.
1. What is Project Lombok
Lombok is an open-source library (basically a standalone jar) capable of doing magic in automating the boilerplate code generation for any java class. So if Lombok is in the classpath, it can quickly get rid of all the getters & setters methods, class constructors, hashcode and equals methods and many more by adding a couple of annotations to the class.
Is it not a cool feature? Let’s start learning it to use it extensively in our next project.
2. Using Lombok Annotations
Now let’s see some examples of using Lombok in project source code.
2.1. Generating Setters and Getters
We all have to generate java beans heavily in day-to-day work, and it has become so popular that all the IDEs have given features to generate the Getters and Setters.
But once IDE generates these methods, what’s next? We need to carry this code in the whole lifetime of the project, and we need to maintain this. It also increases the line of code of the entire project.
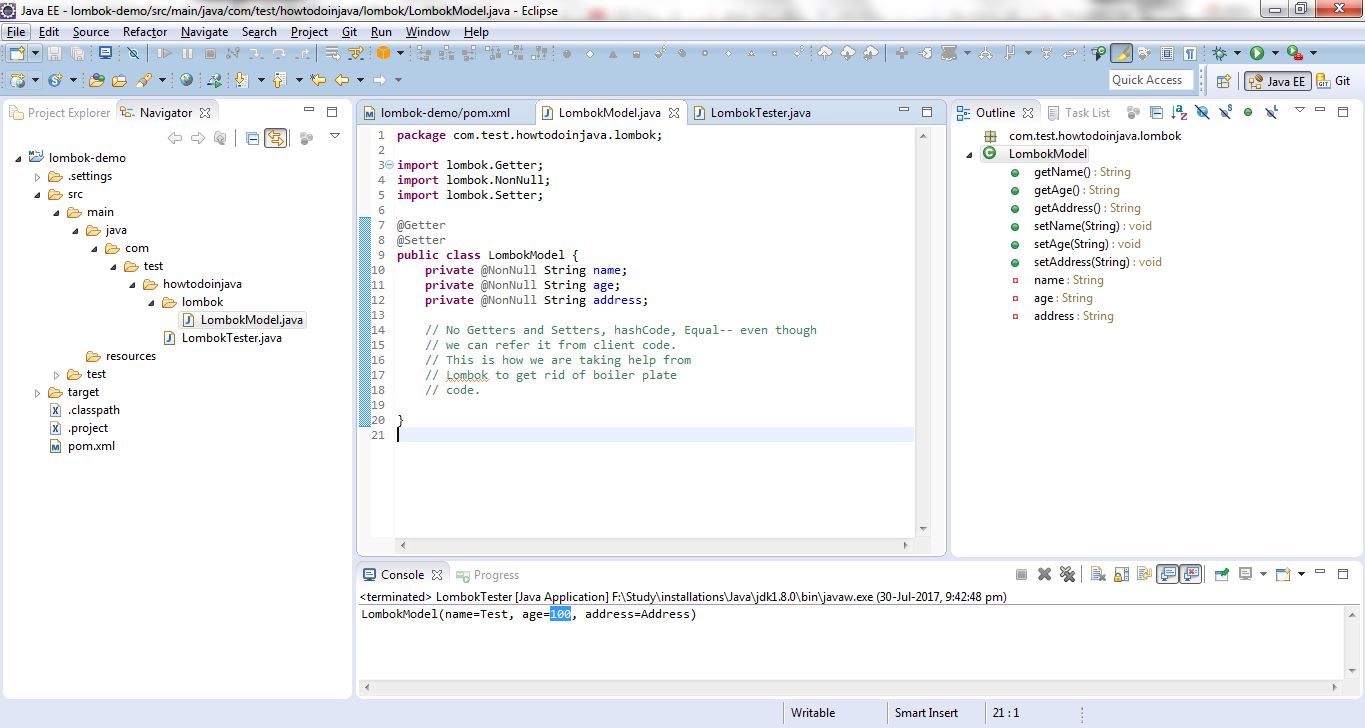
With Lombok, we need to add a few annotations in the class, and we are done. To generate setters and getters we need to add @Getter and @Setter at the class level like this.
mport lombok.Getter;
import lombok.NonNull;
import lombok.Setter;

@Getter
@Setter
public class LombokModel {

    private @NonNull String name;
    private @NonNull String age;
    private @NonNull String address;

    // No Getters and Setters, hashCode, Equal-- even though we can refer it from client code.
    // This is how we are taking help from Lombok to get rid of boilerplate code.
} 
See Also: Omit Lombok @Getter and @Setter
2.2. Generating Constructors
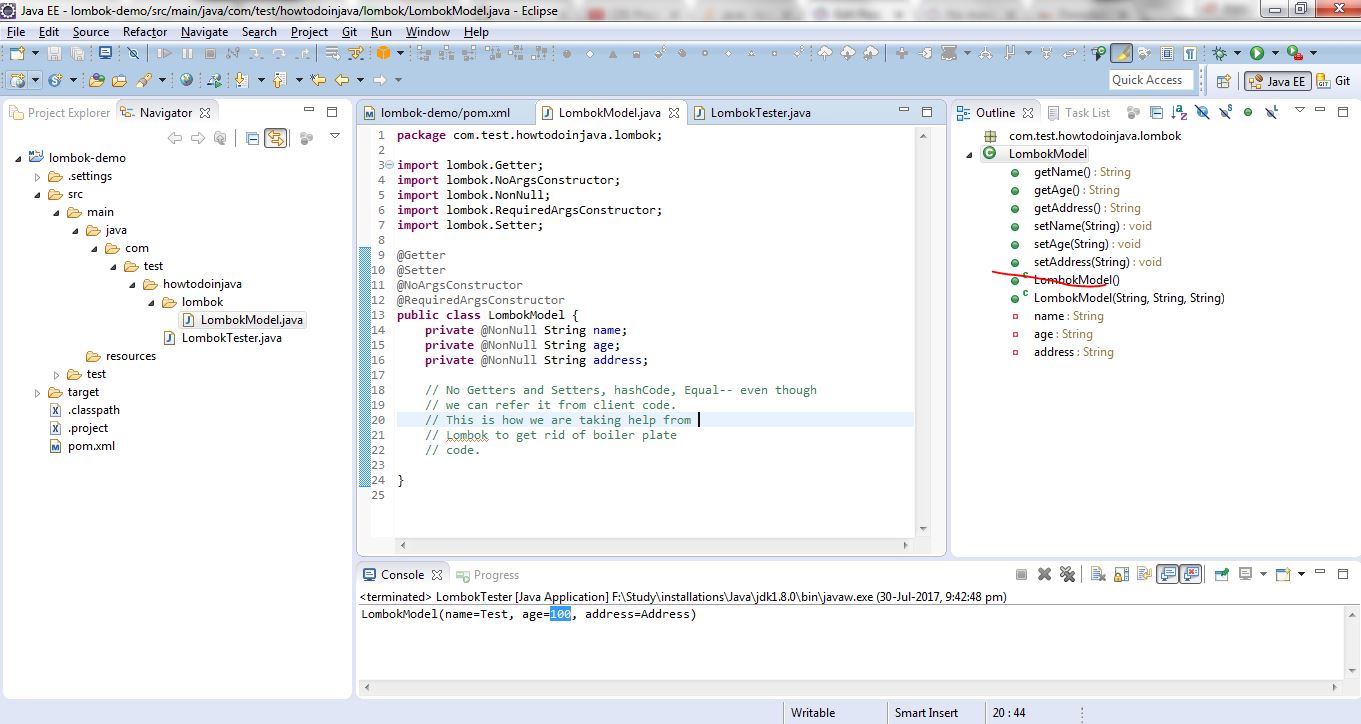
Lombok can easily generate the constructors with no arguments and fields. We need to add annotation @NoArgsConstructor to generate the implicit no-argument constructor and @RequiredArgsConstructor to add the required field constructor.
Also, to make a field required, we need to add @NonNull in the field itself like below.
import lombok.Getter;
import lombok.NoArgsConstructor;
import lombok.NonNull;
import lombok.RequiredArgsConstructor;
import lombok.Setter;

@Getter
@Setter
@NoArgsConstructor
@RequiredArgsConstructor
public class LombokModel {

    private @NonNull String name;
    private @NonNull String age;
    private @NonNull String address;
}
Also, look at the outline window on the right, Lombok has already added the constructor as we wished.
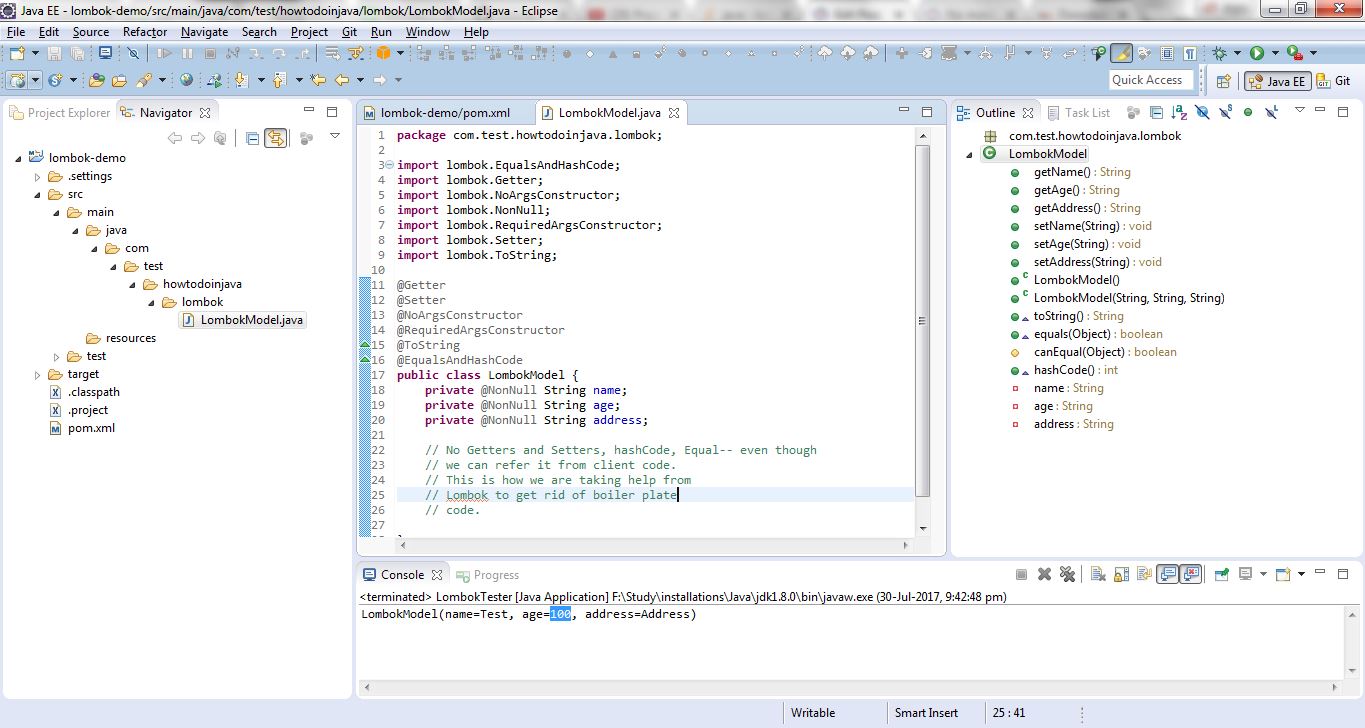
2.3. Generating hashCode(), equals() and toString() Methods
We can easily add default implementation of these methods by adding annotations @ToString and @EqualsAndHashCode in the class level.
import lombok.EqualsAndHashCode;
import lombok.Getter;
import lombok.NoArgsConstructor;
import lombok.NonNull;
import lombok.RequiredArgsConstructor;
import lombok.Setter;
import lombok.ToString;

@Getter
@Setter
@NoArgsConstructor
@RequiredArgsConstructor
@ToString
@EqualsAndHashCode
public class LombokModel {

    private @NonNull String name;
    private @NonNull String age;
    private @NonNull String address;

}
Also, we can see the generated methods by looking at the outline window.
2.4. Conventional Object Builder Pattern
We can easily add builder pattern in our code using Lombok. We don’t have to write separate builder classes. Lombok will generate the builder along with fluent setter-like methods by simply adding the @Builder annotation in the class level like this.
import lombok.Builder;
import lombok.EqualsAndHashCode;
import lombok.NonNull;
import lombok.ToString;

@ToString
@EqualsAndHashCode
@Builder
public class LombokModel
{
    private @NonNull String name;
    private @NonNull String age;
    private @NonNull String address;

    public static void main(String[] args)
    {
        LombokModel lombokModel = new LombokModelBuilder()
                                    .name("Sajal")
                                    .address("India")
                                    .age("100")
                                    .build();

        System.out.println(lombokModel);
    }
}2.5. Other Lombok Annotations
We have a few more annotations, which are also very useful. Those are left for you to try and play with. e.g.
@Data@Delegate@Synchronized@Slf4j@Cleanup
3. Installing Lombok in Eclipse
Though Lombok will work if we put Lombok on the project classpath, but to make it work with eclipse, we need first to do a couple of steps to install it in eclipse.
3.1. Download Lombok Jar File
First, we need to download the Lombok jar. We can directly download it from the Maven repository page.
Here we are using maven, so let’s maven do the download and maintain its version for us. To do this, we will create a maven project in eclipse and add Lombok dependency in pom.xml.
The latest version at the time of writing this article is 1.18.22 which supports Java 17 as well.
<dependency>
    <groupId>org.projectlombok</groupId>
    <artifactId>lombok</artifactId>
    <version>1.18.22</version>
    <scope>provided</scope>
</dependency>
3.2. Installing Lombok
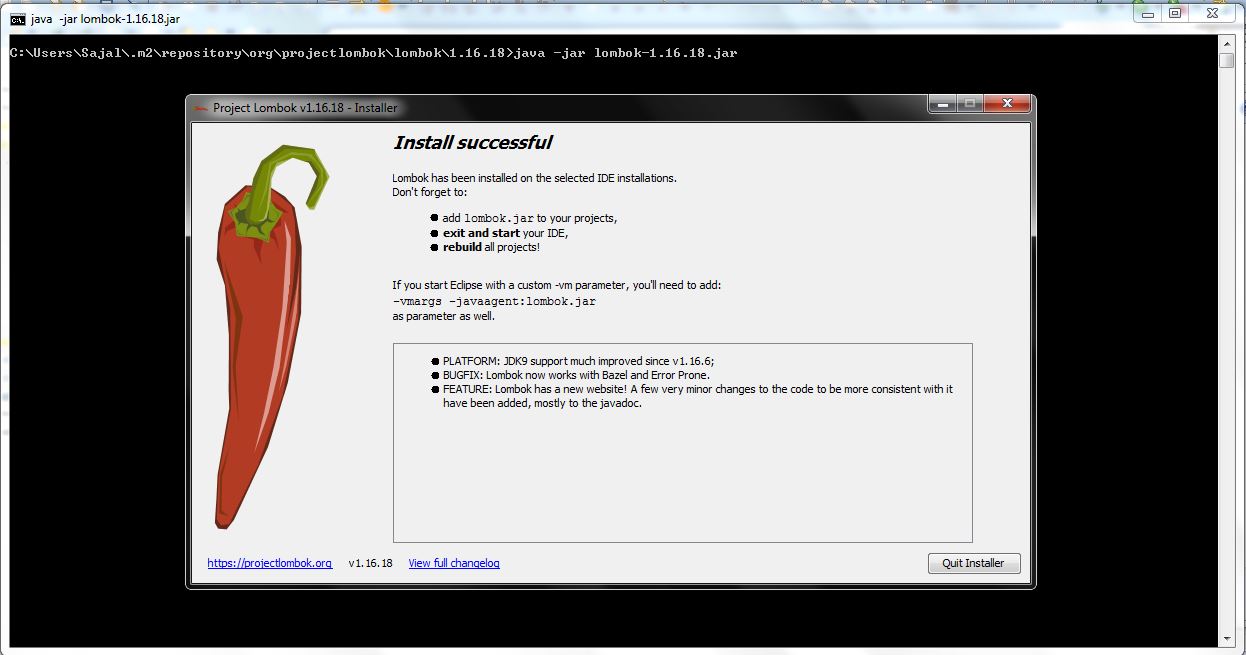
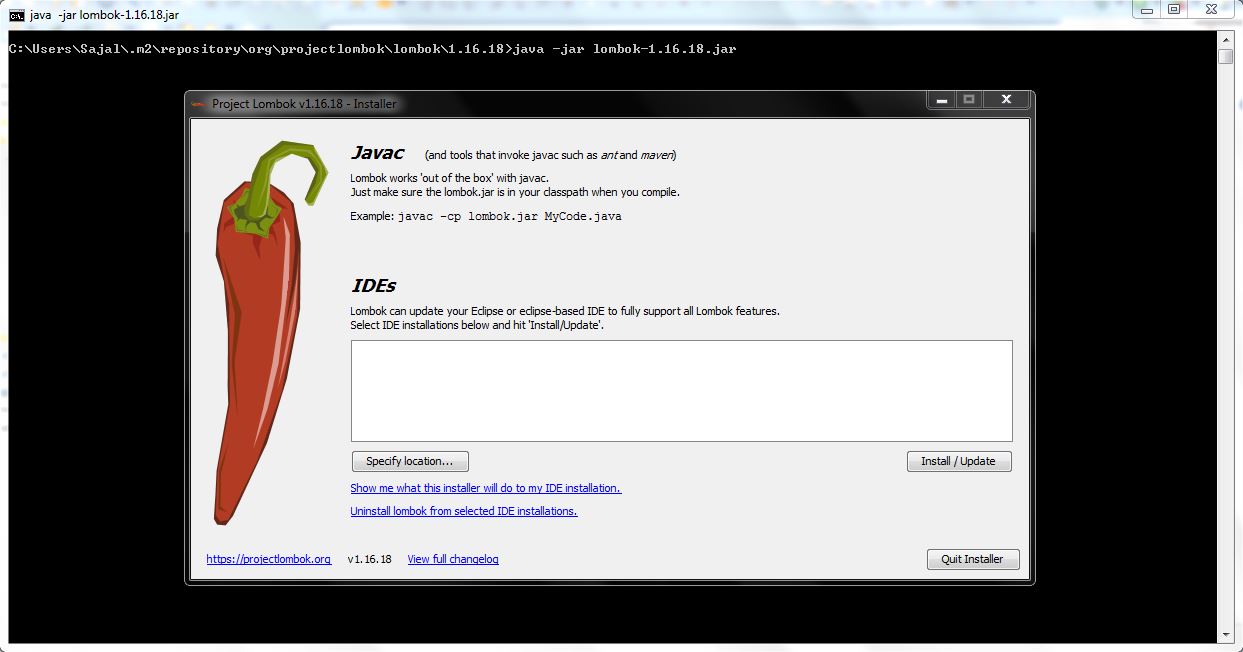
Once the jar is downloaded in the Local repository, go to the jar location from the command prompt and run the following command.
java -jar lombok-1.18.22.jarWe should be greeted by the Lombok installation window provided by Lombok like this.
3.3. Select Lombok Installation Path
Now click on the “Specify Location” button and locate the eclipse.exe path under the eclipse installation folder like this.

3.4. Finish Lombok Installation
Now we need to finally install this by clicking the “Install/Update” button and we should finish installing Lombok in eclipse and we are ready to use its hidden power.

4. Delomboking – Rollback Lombok from Project
Sometimes all great things are not always accepted by all. Think about this scenario where you had decided to take advantage of Lombok and already added lots of annotations. Now suddenly due to some changes in the decision-making people for the project, we have been asked to stop using Lombok and need to go with the old way of doing things!!!
Now it would not be an easy task to revert all the annotations that have been added with the boilerplate code. To do that Lombok itself has provided some steps, by which we can easily replace the annotated source code with the Lombok-generated classes.
To get the Lombok-generated classes, Lombok has already documented its steps here. This process is called delomboking.

To use it, all you need to run on the command line is:
java -jar lombok-1.18.22.jar delombok src -d src-delombokedThe above command will duplicate the contents of the src directory into the src-delomboked directory, which will be created if it doesn’t already exist but delomboked, of course.
Note
Delombok tries to preserve the original source code as much as possible, but comments may move around a little bit, especially comments in the middle of a syntax node.
5. Conclusion
In this Lombok tutorial, we saw how we can use Lombok to assist us in getting rid of some repetitive code and also, it can do some extra things as well. So you can now use this tool whenever applicable, and I will suggest you start using it in your daily work.
Happy learning !!
How to do this in Ubuntu Focal Fossa 20.04LTS??
I installed lombok for eclipse, i can see the getter and setter functions in the outline view for the class with the appropriate annotations. But at the places where the class/object of the class, eclipse still complains that it can’t find the appropriate functions (in this case, it was an autogenerate getter function). What am i missing here ?
(Posting for a friend without good internet access.)
She would like to start using Lombok with Eclipse on a Linux computer. (She had already been using it on a MS Windows computer before). Eclipse on that Linux machine has been installed using the “snap” system, which means that most of the Eclipse files, including “eclipse.ini”, are not modifiable. In order to enable Lombok to modify that eclipse.ini file, she has copied the eclipse.ini file into her own directory tree, and tried to run
$ eclipse –launcher.ini ~/snap/eclipse/current/eclipse.ini
However, she receives this error message:
Error opening zip file or JAR manifest missing : ~/.m2/repository/org/projectlombok/lombok/1.18.6/lombok-1.18.6.jar
Error occurred during initialization of VM
agent library failed to init: instrument
Gtk-Message: 11:57:48.939: GtkDialog mapped without a transient parent. This is discouraged
The JAR file does exits:
s -l ~/.m2/repository/org/projectlombok/lombok/1.18.6/lombok-1.18.6.jar
-rwxrwxr-x vmenkov vmenkov 1718523 Mar 15 11:54 /home/vmenkov/.m2/repository/org/projectlombok/lombok/1.18.6/lombok-1.18.6.jar
Any suggestions on how to handle this problem?
Clearly jar is missing. Can you please download the file lombok-1.18.6.jar and place it in given path. Ideally it should get downloaded through maven, still if you place it manually, it will work.
hi,
thanks for the stuff provided. howwever, on adding dependency in pom.xml, on doing mvn clean install, it gives me complilation failure :
and ‘java -jar lombok-1.16.18.jar’ in terminal gives me no such jar found.
Please help if possible
Please navigate to folder in command prompt where jar has been downloaded.
Thank you for being comprehensive, and including delomboking as well.
Gives assurance that I can drop lombok in the rare event that I have to leave it.
Installing Lombok in Eclipse/spring tool etc.. takes some processing time which may or may not accept in companies (production deployment). Instead this should be part of maven dependency as plug and play I feel.
I read your builder pattern – https://howtodoinjava.com/design-patterns/creational/builder-pattern-in-java/
So If I want to substitute it with lombok, I can use @Builder. But how will I force the user to pass required parameters using lombok @Builder annotation?
Using proxy getters and setters gets generated internally. Thats fine. But how does it show all getter and setter method during compile as we can show in right pane of eclipse is wonder ?
That’s why lombok installation step is needed :-) It inform the eclipse java compiler about it’s classes. lombok.jar contains a file named
/META-INF/services/javax.annotation.processing.Processor. When javac sees this file in a compilation classpath, it runs annotation processors defined there during compilation.why it is not a simple jar which we can use in our project as simple maven dependency.
For them I feel it is easy as to generate getter/setter in proxy.