
This spring mvc example demonstrate the use of multiple file upload functionality with progress bar while the server side code is written in spring MVC. I have modified the code written for previous post on spring MVC multiple file upload example which didn’t had progress bar feature, rather that displayed the uploaded image and data in new display page.
This example uses pure javascript code and HTML5 controls to build client side code. If you want to use any javascript library e.g. jQuery then please modify the code accordingly.
1. Client view for file upload and progress bar
Below given productForm.jsp is a JSP file in spring MVC project – but it contains only HTML code so you can easily place the same code if you want it that way.
This file has onUploadProgress() function which displays the progress of uploaded files. There are other functions to display completion of upload process and supporting activities.
<!DOCTYPE html>
<html>
<head>
<script>
	var totalFileLength, totalUploaded, fileCount, filesUploaded;

	//To log everything on console
	function debug(s) {
		var debug = document.getElementById('debug');
		if (debug) {
			debug.innerHTML = debug.innerHTML + '<br/>' + s;
		}
	}

	//Will be called when upload is completed
	function onUploadComplete(e) {
		totalUploaded += document.getElementById('files').files[filesUploaded].size;
		filesUploaded++;
		debug('complete ' + filesUploaded + " of " + fileCount);
		debug('totalUploaded: ' + totalUploaded);
		if (filesUploaded < fileCount) {
			uploadNext();
		} else {
			var bar = document.getElementById('bar');
			bar.style.width = '100%';
			bar.innerHTML = '100% complete';
			alert('Finished uploading file(s)');
		}
	}

	//Will be called when user select the files in file control
	function onFileSelect(e) {
		var files = e.target.files; // FileList object
		var output = [];
		fileCount = files.length;
		totalFileLength = 0;
		for (var i = 0; i < fileCount; i++) {
			var file = files[i];
			output.push(file.name, ' (', file.size, ' bytes, ', file.lastModifiedDate.toLocaleDateString(), ')');
			output.push('<br/>');
			debug('add ' + file.size);
			totalFileLength += file.size;
		}
		document.getElementById('selectedFiles').innerHTML = output.join('');
		debug('totalFileLength:' + totalFileLength);
	}

	//This will continueously update the progress bar
	function onUploadProgress(e) {
		if (e.lengthComputable) {
			var percentComplete = parseInt((e.loaded + totalUploaded) * 100	/ totalFileLength);
			var bar = document.getElementById('bar');
			bar.style.width = percentComplete + '%';
			bar.innerHTML = percentComplete + ' % complete';
		} else {
			debug('unable to compute');
		}
	}

	//the Ouchhh !! moments will be captured here
	function onUploadFailed(e) {
		alert("Error uploading file");
	}

	//Pick the next file in queue and upload it to remote server
	function uploadNext() {
		var xhr = new XMLHttpRequest();
		var fd = new FormData();
		var file = document.getElementById('files').files[filesUploaded];
		fd.append("multipartFile", file);
		xhr.upload.addEventListener("progress", onUploadProgress, false);
		xhr.addEventListener("load", onUploadComplete, false);
		xhr.addEventListener("error", onUploadFailed, false);
		xhr.open("POST", "save-product");
		debug('uploading ' + file.name);
		xhr.send(fd);
	}

	//Let's begin the upload process
	function startUpload() {
		totalUploaded = filesUploaded = 0;
		uploadNext();
	}

	//Event listeners for button clicks
	window.onload = function() {
		document.getElementById('files').addEventListener('change', onFileSelect, false);
		document.getElementById('uploadButton').addEventListener('click', startUpload, false);
	}
</script>
</head>
<body>
	<div style="width:55%">
		<h1>HTML5 Ajax Multi-file Upload With Progress Bar</h1>
		<div id='progressBar' style='height: 20px; border: 2px solid green; margin-bottom: 20px'>
			<div id='bar' style='height: 100%; background: #33dd33; width: 0%'>
			</div>
		</div>
		<form style="margin-bottom: 20px">
			<input type="file" id="files" multiple style="margin-bottom: 20px"/><br/>
			<output id="selectedFiles"></output>
			<input id="uploadButton" type="button" value="Upload" style="margin-top: 20px"/>
		</form>
		<div id='debug' style='height: 100px; border: 2px solid #ccc; overflow: auto'></div>
	</div>
</body>
</html>
2. Discussion on upload progress feature
Above code is enough self explanatory and you should not face any problem in understanding. But let’s summarize the points :
- The “Upload” button is not a submit button. So, clicking it will not submit the containing form. In fact, the script uses the
XMLHttpRequestobject to do the upload. - The
totalFileLengthvariable holds the total length of the files to be uploaded.totalUploadedis the number of bytes uploaded so far.fileCountcontains the number of files to be uploaded, andfilesUploadedindicates the number of files that have been uploaded. window.onload()maps the files input element’s change event with theonFileSelectfunction and the button’s click event withstartUpload.- When the user clicks the Upload button, the
startUploadfunction is called and it in turns calls theuploadNextfunction.uploadNextuploads the next file in the selected file collection. It starts by creating anXMLHttpRequestobject and aFormDataobject to which the file to be uploaded next is appended to. - The
uploadNextfunction then attaches the progress event of theXMLHttpRequestobject to theonUploadProgressand theloadevent and theerrorevent toonUploadCompleteandonUploadFailed, respectively. - During the upload progress, the
onUploadProgressfunction is called repeatedly, giving it the opportunity to update the progress bar. - At the completion of an upload, the
onUploadCompletefunction is invoked.
3. Multiple File Upload Controller and Model Class
The Spring MVC file upload controller and model classes are given below:
3.1. Spring MVC multiple file upload controller
package com.howtodoinjava.demo.controller;

import java.io.File;
import java.io.IOException;

import javax.servlet.http.HttpServletRequest;

import org.springframework.stereotype.Controller;
import org.springframework.ui.Model;
import org.springframework.validation.BindingResult;
import org.springframework.web.bind.annotation.ModelAttribute;
import org.springframework.web.bind.annotation.RequestMapping;
import org.springframework.web.multipart.MultipartFile;

import com.howtodoinjava.demo.model.UploadedFile;

@Controller
public class DemoProductController
{
	@RequestMapping("/save-product")
    public void saveFile(HttpServletRequest servletRequest,
            @ModelAttribute UploadedFile uploadedFile,
            BindingResult bindingResult, Model model) {

        MultipartFile multipartFile = uploadedFile.getMultipartFile();
        String fileName = multipartFile.getOriginalFilename();
        try {
            File file = new File(servletRequest.getServletContext().getRealPath("/image"), fileName);
            multipartFile.transferTo(file);
        } catch (IOException e) {
            e.printStackTrace();
        }
    }

	@RequestMapping(value = "/product-input-form")
    public String inputProduct(Model model) {
        return "productForm";
    }
}
3.2. Spring MVC multiple file model class
package com.howtodoinjava.demo.model;

import org.springframework.web.multipart.MultipartFile;

public class UploadedFile {
	private static final long serialVersionUID = 1L;
    private MultipartFile multipartFile;
    public MultipartFile getMultipartFile() {
        return multipartFile;
    }
    public void setMultipartFile(MultipartFile multipartFile) {
        this.multipartFile = multipartFile;
    }
}
4. Other files used to build example
4.1. web.xml
<?xml version="1.0" encoding="UTF-8"?>
<web-app version="3.1"
    xmlns="http://xmlns.jcp.org/xml/ns/javaee"
    xmlns:xsi="http://www.w3.org/2001/XMLSchema-instance"
    xsi:schemaLocation="http://xmlns.jcp.org/xml/ns/javaee
	http://www.oracle.com/webfolder/technetwork/jsc/xml/ns/javaee/web-app_3_1.xsd%22>


	<display-name>Spring Web MVC Hello World Application</display-name>

	<servlet>
		<servlet-name>spring</servlet-name>
		<servlet-class>
			org.springframework.web.servlet.DispatcherServlet
		</servlet-class>
		<multipart-config>
	        <max-file-size>20848820</max-file-size>
	        <max-request-size>418018841</max-request-size>
	        <file-size-threshold>1048576</file-size-threshold>
	    </multipart-config>
	</servlet>

	<servlet-mapping>
		<servlet-name>spring</servlet-name>
		<url-pattern>/</url-pattern>
	</servlet-mapping>

</web-app>
4.2. spring-servlet.xml
<beans xmlns="http://www.springframework.org/schema/beans"
	xmlns:xsi="http://www.w3.org/2001/XMLSchema-instance" xmlns:context="http://www.springframework.org/schema/context" xmlns:mvc="http://www.springframework.org/schema/mvc"
	xsi:schemaLocation="http://www.springframework.org/schema/beans
        http://www.springframework.org/schema/beans/spring-beans-3.0.xsd
        http://www.springframework.org/schema/context/
        http://www.springframework.org/schema/context/spring-context-3.0.xsd
        http://www.springframework.org/schema/mvc/
        http://www.springframework.org/schema/mvc/spring-mvc-3.0.xsd">

	<context:component-scan base-package="com.howtodoinjava.demo" />

	<mvc:resources mapping="/image/**" location="/image/" />

	<bean class="org.springframework.web.servlet.mvc.annotation.AnnotationMethodHandlerAdapter" />
	<bean class="org.springframework.web.servlet.mvc.annotation.DefaultAnnotationHandlerMapping" />

	<bean class="org.springframework.web.servlet.view.InternalResourceViewResolver">
		<property name="prefix" value="/WEB-INF/views/" />
		<property name="suffix" value=".jsp" />
	</bean>

	<bean id="messageSource" class="org.springframework.context.support.ResourceBundleMessageSource">
	    <property name="basename" value="messages" />
	</bean>

	<bean id="multipartResolver" class="org.springframework.web.multipart.support.StandardServletMultipartResolver"></bean>

</beans>
5. Spring mvc multiple file upload with progress bar demo
- Hit the URL:
http://localhost:8080/springmvcexample/product-input-formBelow screen will load on browser.
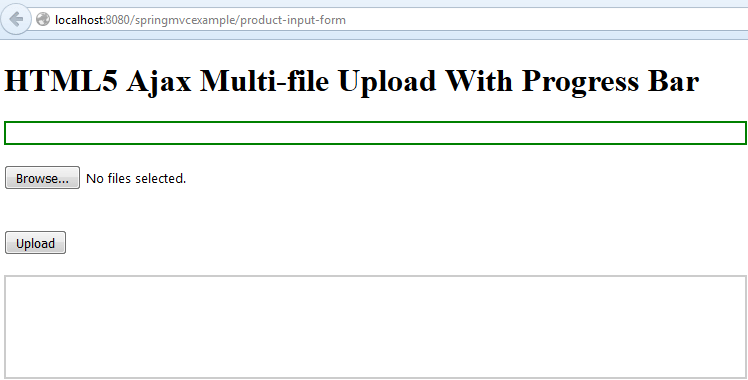
Multi-file Upload With Progress Bar – Input Form - Select Files and Click Upload Button
- If everything goes right, then you will get upload progress bar and uploaded file information as below.
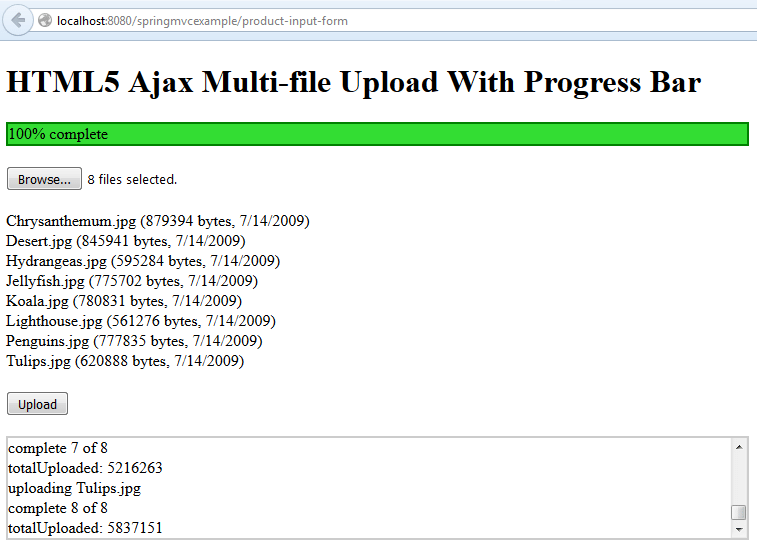
Multi-file Upload With Progress Bar – Upload Success


Drop me your queries and questions related to Spring mvc multiple file upload with progress bar example.
Happy Learning !!
Hi thank you for your post . please help me out if i want to raise an error event from the controller method if the file is not uploaded to the directory.Also if possible please help me in understanding how to send an error or string response or any response from the controller method in the above article.
where this file get uploaded
Hi! Good tutorial! How I can download source code?
Yes, I want download the source code.