In this Spring MVC and Hibernate annotation example, learn the following concepts:
- Create a Spring MVC web application from scratch
- Handle form submission
- Integrate hibernate to connect to the H2 database
- Add hibernate validator for input form fields validation
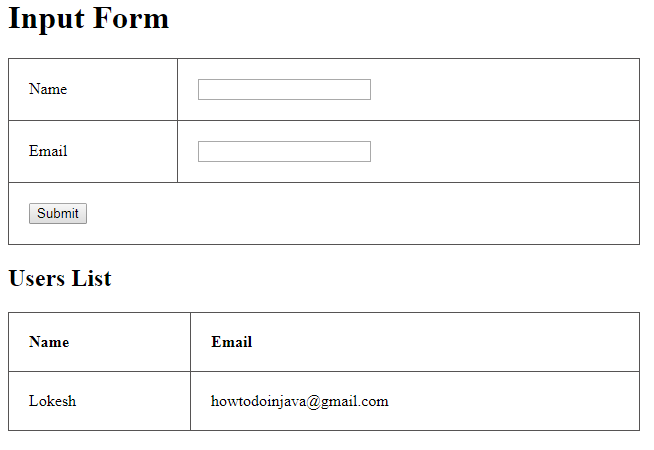
We will create a simple application where we can create user information (name and email). The user details will be first validated and then stored in H2 database using hibernate. Another page will list all stored users in the database.
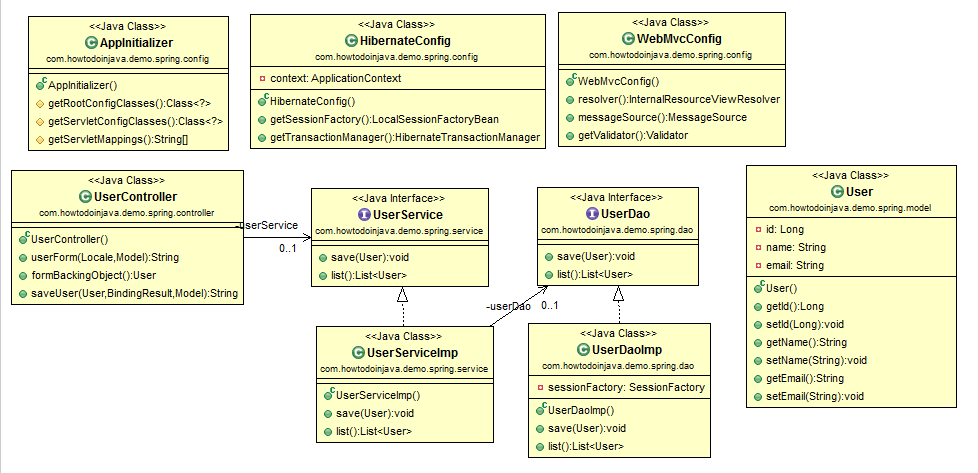
1. Class Diagram
The class diagram of the application is as follows. It lists all the important classes, methods and interactions between them.
2. Maven
Start with adding the latest version of spring-webmvc, spring-orm, hibernate-core, hibernate-validator, jakarta.persistence-api and jakarta.servlet-api dependencies. Note that we are using Spring Framework 6 so the baseline Java version is Java 17.
<properties>
  <java.version>17</java.version>
  <failOnMissingWebXml>false</failOnMissingWebXml>
  <spring.version>6.0.6</spring.version>
  <hibernate.version>6.2.2.Final</hibernate.version>
  <hibernate.validator>8.0.0.Final</hibernate.validator>
  <c3p0.version>0.9.5.5</c3p0.version>
  <jakarta.persistence.version>3.1.0</jakarta.persistence.version>
  <jakarta.servlet.version>3.1.0</jakarta.servlet.version>
  <h2.version>2.1.214</h2.version>
</properties>

<dependencies>

  <!-- Spring MVC Dependency -->
  <dependency>
    <groupId>org.springframework</groupId>
    <artifactId>spring-webmvc</artifactId>
    <version>${spring.version}</version>
  </dependency>

   <dependency>
    <groupId>jakarta.servlet</groupId>
    <artifactId>jakarta.servlet-api</artifactId>
    <version>${jakarta.servlet.version}</version>
    <scope>provided</scope>
  </dependency>

  <!-- Spring ORM and Hibernate -->
  <dependency>
    <groupId>org.springframework</groupId>
    <artifactId>spring-orm</artifactId>
    <version>${spring.version}</version>
  </dependency>

  <dependency>
    <groupId>jakarta.persistence</groupId>
    <artifactId>jakarta.persistence-api</artifactId>
    <version>${jakarta.persistence.version}</version>
  </dependency>

  <dependency>
    <groupId>org.hibernate.orm</groupId>
    <artifactId>hibernate-core</artifactId>
    <version>${hibernate.version}</version>
  </dependency>

  <!-- Hibernate-C3P0 Integration -->
  <dependency>
    <groupId>org.hibernate.orm</groupId>
    <artifactId>hibernate-c3p0</artifactId>
    <version>${hibernate.version}</version>
  </dependency>

  <!-- Hibernate Validator -->
  <dependency>
    <groupId>org.hibernate.validator</groupId>
    <artifactId>hibernate-validator</artifactId>
    <version>${hibernate.validator}</version>
  </dependency>

  <!-- H2 Dependency -->
  <dependency>
    <groupId>com.h2database</groupId>
    <artifactId>h2</artifactId>
    <version>${h2.version}</version>
    <scope>runtime</scope>
  </dependency>
</dependencies>
3. DispatcherServlet
Beginning with Servlet 3, it became possible to configure the Servlet Container with (almost) no XML. For this, there is the ServletContainerInitializer in the Servlet specification. In this class, we can register filters, listeners, servlets etc. as we would traditionally do in a web.xml.
Spring provides SpringServletContainerInitializer that knows how to handle WebApplicationInitializer classes. AbstractAnnotationConfigDispatcherServletInitializer class implements WebMvcConfigurer which internally implements WebApplicationInitializer. It registers a ContextLoaderlistener (optionally) and a DispatcherServlet and allows you to easily add configuration classes to load for both classes and to apply filters to the DispatcherServlet and provide the servlet mapping.
public class AppInitializer extends AbstractAnnotationConfigDispatcherServletInitializer {

   @Override
   protected Class<?>[] getRootConfigClasses() {
      return new Class[] { HibernateConfig.class };
   }

   @Override
   protected Class<?>[] getServletConfigClasses() {
      return new Class[] { WebMvcConfig.class };
   }

   @Override
   protected String[] getServletMappings() {
      return new String[] { "/" };
   }
}
4. Configuring Spring MVC
Spring MVC configuration using annotations is as follows.
@Configuration
@EnableWebMvc
@ComponentScan(basePackages = { "com.howtodoinjava.demo.spring"})
public class WebMvcConfig implements WebMvcConfigurer {

   @Bean
   public InternalResourceViewResolver resolver() {
      InternalResourceViewResolver resolver = new InternalResourceViewResolver();
      resolver.setViewClass(JstlView.class);
      resolver.setPrefix("/WEB-INF/views/");
      resolver.setSuffix(".jsp");
      return resolver;
   }

   @Bean
   public MessageSource messageSource() {
      ResourceBundleMessageSource source = new ResourceBundleMessageSource();
      source.setBasename("messages");
      return source;
   }

   @Override
   public Validator getValidator() {
      LocalValidatorFactoryBean validator = new LocalValidatorFactoryBean();
      validator.setValidationMessageSource(messageSource());
      return validator;
   }
}WebMvcConfigurerdefines options for customizing or adding to the default Spring MVC configuration enabled through the use of@EnableWebMvc.@EnableWebMvcenables default Spring MVC configuration and registers Spring MVC infrastructure components expected by theDispatcherServlet.@Configurationindicates that a class declares one or more@Beanmethods and may be processed by the Spring container to generate bean definitions and service requests for those beans at runtime.@ComponentScanannotation is used to specify the base packages to scan. Any class which is annotated with @Component and @Configuration will be scanned.InternalResourceViewResolverhelps in mapping the logical view names to view files under a certain pre-configured directory directly.ResourceBundleMessageSourceaccesses resource bundles using specified basenames (here it is messages).LocalValidatorFactoryBeanbootstraps ajavax.validation.ValidationFactoryand exposes it through the SpringValidatorinterface as well as through the JSR-303Validatorinterface and theValidatorFactoryinterface itself.
5. Configuring Hibernate
Hibernate configuration used in the example is based on hibernate Java-based configuration.
@Configuration
@EnableTransactionManagement
@ComponentScans(value = {@ComponentScan("com.howtodoinjava.demo.spring")})
public class HibernateConfig {

  @Bean
  public LocalSessionFactoryBean getSessionFactory() {

    LocalSessionFactoryBean factoryBean = new LocalSessionFactoryBean();
    factoryBean.setPackagesToScan("com.howtodoinjava.demo.spring.model");
    factoryBean.setConfigLocation(context.getResource("classpath:hibernate.cfg.xml"));
    return factoryBean;
  }

  @Bean
  public HibernateTransactionManager getTransactionManager() {

    HibernateTransactionManager transactionManager = new HibernateTransactionManager();
    transactionManager.setSessionFactory(getSessionFactory().getObject());
    return transactionManager;
  }
}LocalSessionFactoryBeancreates a HibernateSessionFactory. This is the usual way to set up a shared Hibernate SessionFactory in a Spring application context.EnableTransactionManagementenables Spring’s annotation-driven transaction management capability.HibernateTransactionManagerbinds a Hibernate Session from the specified factory to the thread, potentially allowing for one thread-bound Session per factory. This transaction manager is appropriate for applications that use a single HibernateSessionFactoryfor transactional data access, but it also supports directDataSourceaccess within a transaction i.e. plain JDBC.
<hibernate-configuration>
  <session-factory>
    <property name="hibernate.connection.provider_class">org.hibernate.connection.C3P0ConnectionProvider</property>
    <property name="hibernate.archive.autodetection">class,hbm</property>
    <property name="hibernate.dialect">org.hibernate.dialect.H2Dialect</property>
    <property name="hibernate.show_sql">true</property>
    <property name="hibernate.connection.driver_class">org.h2.Driver</property>
    <property name="hibernate.connection.username">sa</property>
    <property name="hibernate.connection.password">password</property>
    <property name="hibernate.connection.url">jdbc:h2:mem:testdb</property>
    <property name="hibernate.hbm2ddl.auto">create-drop</property>
    <property name="hibernate.packageToScan">com.howtodoinjava.demo.spring.model</property>

    <property name="hibernate.c3p0.min_size">5</property>
    <property name="hibernate.c3p0.max_size">20</property>
    <property name="hibernate.c3p0.acquire_increment">2</property>
    <property name="hibernate.c3p0.acquire_increment">1800</property>
    <property name="hibernate.c3p0.max_statements">150</property>
  </session-factory>
</hibernate-configuration>
6. Controller and Request Mappings
The controller class has two simple REST mappings for GET and POST operations.
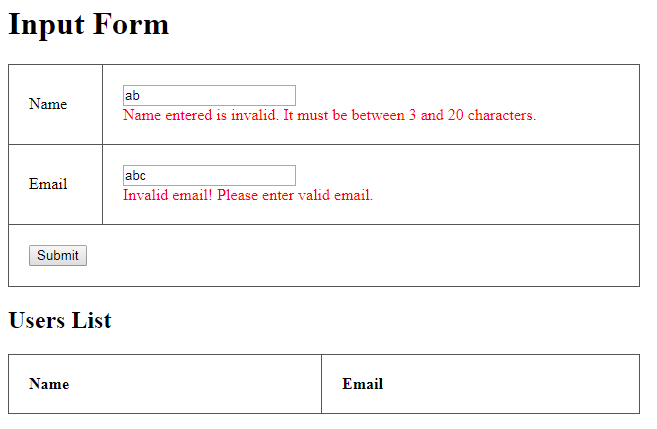
We have added the request body validation using hibernate validator. If input fields are not validated, then return the same form bean to display error messages. Else return refreshed view.
@Controller
public class UserController {

  @Autowired
  private UserService userService;

  @GetMapping("/")
  public String userForm(Locale locale, Model model) {
    model.addAttribute("users", userService.list());
    return "editUsers";
  }

  @ModelAttribute("user")
    public User formBackingObject() {
        return new User();
    }

  @PostMapping("/addUser")
  public String saveUser(@ModelAttribute("user") @Valid User user, BindingResult result, Model model) {

    if (result.hasErrors()) {
      model.addAttribute("users", userService.list());
      return "editUsers";
    }

    userService.save(user);
    return "redirect:/";
  }
}
7. Persistence
Service and DAO layers are normal service components annotated with @Service and @Repository stereo-type annotations. @Transactional annotation is applied at the service layer for transaction support.
public interface UserService {
   void save(User user);

   List<User> list();
}

@Service
public class UserServiceImp implements UserService {

   @Autowired
   private UserDao userDao;

   @Transactional
   public void save(User user) {
      userDao.save(user);
   }

   @Transactional(readOnly = true)
   public List<User> list() {
      return userDao.list();
   }
}
public interface UserDao {
void save(User user);
List<User> list();
}
@Repository
public class UserDaoImp implements UserDao {
@Autowired
private SessionFactory sessionFactory;
@Override
public void save(User user) {
sessionFactory.getCurrentSession().save(user);
}
@Override
public List<User> list() {
TypedQuery<User> query = sessionFactory.getCurrentSession().createQuery("from User");
return query.getResultList();
}
}@Entity
@Table(name = "TBL_USERS")
public class User {
@Id
@GeneratedValue
@Column(name = "USER_ID")
private Long id;
@Column(name = "USER_NAME")
@Size(max = 20, min = 3, message = "{user.name.invalid}")
@NotEmpty(message="Please Enter your name")
private String name;
@Column(name = "USER_EMAIL", unique = true)
@Email(message = "{user.email.invalid}")
@NotEmpty(message="Please Enter your email")
private String email;
//Getters and Setters
}8. Views and Message Resources
Finally, the JSP files and messages resource bundle is given below.
<%@ page language="java" contentType="text/html; charset=ISO-8859-1"
  pageEncoding="ISO-8859-1"%>
<%@taglib uri="http://www.springframework.org/tags/form" prefix="form"%>
<%@taglib uri="http://java.sun.com/jsp/jstl/core" prefix="c"%>
<!DOCTYPE html>
<html>
    <head>
    <meta http-equiv="Content-Type" content="text/html; charset=ISO-8859-1">
    <title>Spring5 MVC Hibernate Demo</title>
    <style type="text/css">
      .error {
        color: red;
      }
      table {
        width: 50%;
        border-collapse: collapse;
        border-spacing: 0px;
      }
      table td {
        border: 1px solid #565454;
        padding: 20px;
      }
    </style>
  </head>
  <body>
    <h1>Input Form</h1>
    <form:form action="addUser" method="post" modelAttribute="user">
      <table>
        <tr>
          <td>Name</td>
          <td>
            <form:input path="name" /> <br />
            <form:errors path="name" cssClass="error" />
          </td>
        </tr>
        <tr>
          <td>Email</td>
          <td>
            <form:input path="email" /> <br />
            <form:errors path="email" cssClass="error" />
          </td>
        </tr>
        <tr>
          <td colspan="2"><button type="submit">Submit</button></td>
        </tr>
      </table>
    </form:form>

    <h2>Users List</h2>
    <table>
      <tr>
        <td><strong>Name</strong></td>
        <td><strong>Email</strong></td>
      </tr>
      <c:forEach items="${users}" var="user">
        <tr>
          <td>${user.name}</td>
          <td>${user.email}</td>
        </tr>
      </c:forEach>
    </table>
  </body>
</html>
user.name.invalid = Name must be between {2} and {1} characters.
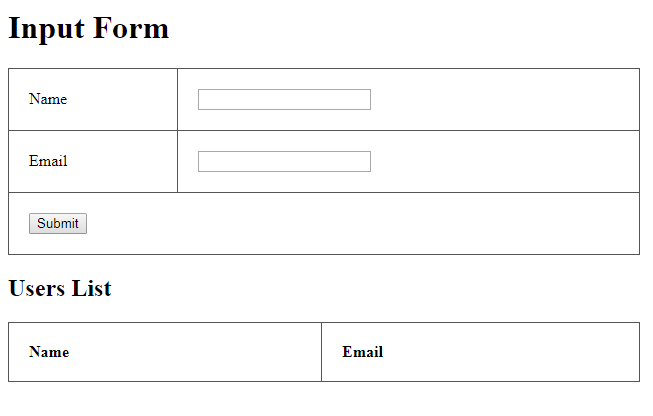
user.email.invalid = Please enter valid email address.9. Demo
Let’s run the application using maven jetty plugin. Execute maven goal : jetty:run.
mvn cleanm install jetty:runURL: http://localhost:8080
Check Server logs.
Hibernate: call next value for hibernate_sequence
Hibernate: insert into TBL_USERS (USER_EMAIL, USER_NAME, USER_ID) values (?, ?, ?)
Hibernate: select user0_.USER_ID as USER_ID1_0_, user0_.USER_EMAIL as USER_EMA2_0_,
			user0_.USER_NAME as USER_NAM3_0_ from TBL_USERS user0_
I hope that you have found this spring hibernate web application example to set you to start for developing your own application. This is primarily for beginners, yet it will help you build any Spring MVC and hibernate with annotation configuration.
Happy Learning !!