
Spring MVC is a popular framework for building web applications in Java. One of its key features is the request payload validation, which helps ensure user input is valid according to application requirements. Spring MVC provides several built-in annotations to help developers validate requests.
However, in some cases, developers may need to create their own custom validation annotations. In this article, we will discuss why custom validation annotations are needed and how to create them in Spring MVC.
1. Need for a Custom Validation Annotation
Spring MVC provides a variety of built-in validation annotations such as @NotNull, @Size, and @Pattern, among others. However, in some cases, these annotations may not meet the specific requirements of a project.
For example, suppose we need to validate a field such that it only accepts a string value not containing a few specific characters. In that case, the existing validation annotations may not provide a solution, and a custom validation annotation would be required.
In the following snippet, User class contains a few fields and username field is not allowed to contain 3 special characters.
@AllArgsConstructor
@Getter
@Setter
@NoArgsConstructor
public class User {

    @DoesNotContain(chars = {"#" , "%" , "@"})
    private  String  username  ;
    private String email ;
    private String password ;
}
2. Building a Custom Validation Annotation
To start, make sure that you have a basic understanding of annotations in Java.
Here are the general steps to create a custom constraint validation annotation:
- Define the annotation interface: Define a new annotation interface using the
@interfacekeyword. - Define the attributes of the annotation: Define the attributes that the annotation will take, such as message, groups, and payload.
- Define the validation logic: Implement the validation logic in a separate Validator class. The Validator class should implement the
ConstraintValidatorinterface and provide the implementation for theisValid()method. - Wire up the validator: Use the
@Constraintannotation to specify the validator class that should be used for validating the annotation.
In this section, we will develop the @DoesNotContain annotation.
2.1. Annotation Interface
@Target({ElementType.FIELD})
@Retention(RetentionPolicy.RUNTIME)
@Documented
@Constraint(validatedBy = DoesNotContainValidator.class)
public @interface DoesNotContain {

      String message() default "The field contains invalid characters";
      Class<?>[] groups() default {};
      Class<? extends Payload>[] payload() default {};
      String[] chars();
}message(): defines the error message to be displayed when the validation fails. It is an optional attribute that defaults to a generic error message if not specified.chars(): is used to specify the characters that should not be present in the validated field. It is a mandatory attribute that takes an array of strings as input. The strings in the array represent the characters that should not be present in the validated field.@Constraint(validatedBy = DoesNotContainValidator.class): specifies the validator class that implements the validation logic for this annotation. In this case, theDoesNotContainValidatorclass will handle the validation logic for this annotation.
After defining our annotation, let’s proceed to the validation logic and develop the DoesNotContainValidator class.
2.2. Validator Class
Now that we have our custom validation constraint annotation, we need to create the validator class that will perform the validation. The validator class must implement the jakarta.validation.ConstraintValidator interface and specify the annotation type it will validate.
public class DoesNotContainValidator implements ConstraintValidator<DoesNotContain, String> {

    private String[] chars;

    @Override
    public void initialize(DoesNotContain constraintAnnotation) {
        this.chars = constraintAnnotation.chars();
    }

    @Override
    public boolean isValid(String value, ConstraintValidatorContext context) {
        if (value == null) {
            return true;
        }
        for (String c : chars) {
            if (value.contains(c)) {
                return false;
            }
        }
        return true;
    }
}
Here is how it works:
- The
initialize()is called when the validator is initialized. It receives the annotation instance as a parameter and initializes thecharsarray with the characters to be excluded from the validated field. - The
isValid()is called to validate the field value against the defined constraint. It takes two parameters: the value to be validated and the context object.- The implementation first checks if the value is null, and if so, returns
truesince null values are always considered valid. - Then, iterates over the
charsarray and checks if the value contains any of the characters. If it does, it returnsfalseto indicate that the validation has failed. - If the implementation completes the iteration over the
charsarray and doesn’t find any of the excluded characters, it returnstrueto indicate that the validation has passed.
- The implementation first checks if the value is null, and if so, returns
3. Demo
To keep the example focused on the validation part only, we have created a very simple UserController that has validateUserInfo() method to validate the user information.
@RestController
public class UserController {
@PostMapping("/validate")
public ResponseEntity<?> validateUserInfo(
@Valid @RequestBody User user,
BindingResult bindingResult) {
List<String> errors = null;
if (bindingResult.hasErrors()) {
errors = bindingResult.getAllErrors()
.stream()
.map(objectError -> objectError.getDefaultMessage())
.collect(Collectors.toList());
}
if (errors != null && errors.size() > 0) {
return ResponseEntity.badRequest().body(errors);
}
return ResponseEntity.ok().body(user);
}
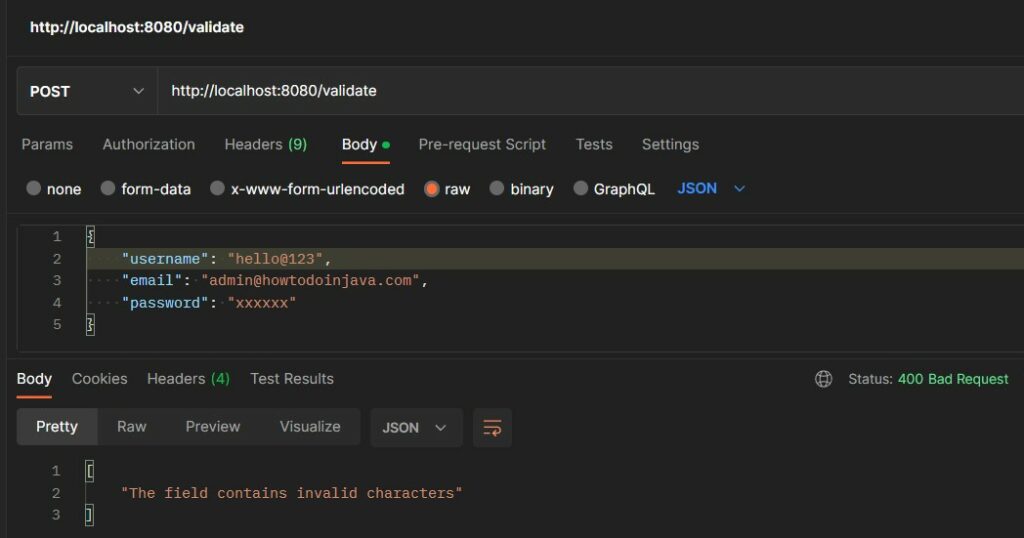
}We can test the validation by sending a request to the controller using a tool such as Postman. For an invalid request, we get 400 status with the error message.
4. Unit Testing the Custom Validation Annotation
Unit testing is an essential aspect of software development, including when it comes to custom validation constraints. Unit tests ensure that the validation logic is working correctly and as expected, and can help catch any potential bugs or issues before they become a problem in production.
To write unit tests for our custom validation constraint, we can create a test class that tests the DoesNotContainValidator class.
@SpringBootTest
public class DoesNotContainValidatorTest {

    private DoesNotContainValidator validator;
    private ConstraintValidatorContext context;

    @BeforeEach
    public void setUp() {
        validator = new DoesNotContainValidator();
        context = mock(ConstraintValidatorContext.class);
    }

    @Test
    public void testIsValidWithValidValue() {
        DoesNotContain doesNotContain = mock(DoesNotContain.class);
        when(doesNotContain.chars()).thenReturn(new String[]{"@", "#"});
        validator.initialize(doesNotContain);

        String value = "abcde";
        boolean result = validator.isValid(value, context);
        assertTrue(result);
    }

    @Test
    public void testIsValidWithInvalidValue() {
        DoesNotContain doesNotContain = mock(DoesNotContain.class);
        when(doesNotContain.chars()).thenReturn(new String[]{"@", "#"});
        validator.initialize(doesNotContain);

        String value = "abc@de";
        boolean result = validator.isValid(value, context);

        assertFalse(result);
    }

    @Test
    public void testIsValidWithNullValue() {
        DoesNotContain doesNotContain = mock(DoesNotContain.class);
        when(doesNotContain.chars()).thenReturn(new String[]{"@", "#"});
        validator.initialize(doesNotContain);

        String value = null;
        boolean result = validator.isValid(value, context);

        assertTrue(result);
    }

    @Test
    public void testIsValidWithEmptyValue() {
        DoesNotContain doesNotContain = mock(DoesNotContain.class);
        when(doesNotContain.chars()).thenReturn(new String[]{"@", "#"});
        validator.initialize(doesNotContain);

        String value = "";
        boolean result = validator.isValid(value, context);

        assertTrue(result);
    }
By writing these unit tests, we can be confident that our custom validation constraint works as expected and can catch any potential issues before they make their way into production.
5. Conclusion
Custom validation constraints are an important aspect of web application development, and Spring MVC provides a simple and effective way to create custom validation annotations. By following the steps outlined in this article, you can create your own custom validation annotations that meet the specific requirements of your project.
Happy Learning !!