In this post, we will learn how to configure and manage multiple datasources using properties configuration and defining custom beans using Java annotations in Spring Boot. Note that this requirement differs from having separate datasource in test, dev and prod environments. Here, we are using multiple datasources in the same environment and each datasource can connect to a different database.
1. How to Configure a DataSource in Spring Boot?
To configure a datasource in the spring boot application, we need to provide the following properties:
spring.datasource.url=jdbc:h2:mem:user
spring.datasource.username=sa
spring.datasource.password=password
The above properties configuration is sufficient if we are using only a single datasource. But when it’s required to connect to multiple datasources, we must manually write configuration classes for each datasource.
2. Extending the Configuration to use Second DataSource
Consider there is a requirement to create an ETL application using Spring Boot and we need to connect and fetch data from various databases and execute the business logic on that data. In the following sections, we will modify the default configuration to use two datasources. We can follow a similar pattern to configure more datasources if needed.
2.1. Add DataSource Properties
To use a second datasource, start by adding the properties to the application.properties file.
# User Database
spring.datasource.url=jdbc:h2:mem:user
spring.datasource.username=sa
spring.datasource.password=password

# Order Database
spring.datasource.order.url=jdbc:h2:mem:order
spring.datasource.order.username=sa
spring.datasource.order.password=password

spring.h2.console.enabled=true
spring.jpa.generate-ddl=true
spring.jpa.hibernate.ddl-auto=update
spring.jpa.properties.hibernate.show_sql=true
spring.jpa.properties.hibernate.dialect=org.hibernate.dialect.H2Dialect
2.2. DataSource Configuration for User Database
Next, we will load the configuration properties using DataSourceProperties class of Spring which automatically loads Database related properties such as URL, username, and password based on the prefix provided in @ConfigurationProperties and use this to create a DataSource bean.
@Configuration
public class UserDatasourceConfiguration {

    @Primary
    @Bean(name="userProperties")
    @ConfigurationProperties("spring.datasource")
    public DataSourceProperties dataSourceProperties() {

        return new DataSourceProperties();
    }
}
Then, we will configure the datasource using the configuration properties loaded by spring as follows:
@Primary
@Bean(name="userDatasource")
@ConfigurationProperties(prefix = "spring.datasource")
public DataSource datasource(@Qualifier("userProperties") DataSourceProperties properties){

    return properties.initializeDataSourceBuilder().build();
}
Look at the method parameter – “@Qualifier(“userProperties”) DataSourceProperties properties“. We used @Qualifier annotation to let Spring know which bean properties to use while constructing the datasource.
2.3. DataSource Configuration for Order Database
Similarly, we configure the second datasource for the order database.
@Configuration
public class OrderDatasourceConfiguration {

    @Bean(name="orderProperties")
    @ConfigurationProperties("spring.datasource.order")
    public DataSourceProperties dataSourceProperties() {
        return new DataSourceProperties();
    }

    @Bean(name="orderDatasource")
    @ConfigurationProperties(prefix = "spring.datasource.order")
    public DataSource datasource(@Qualifier("orderProperties") DataSourceProperties properties){
        return properties.initializeDataSourceBuilder().build();
    }
}
2.4. EntityManager Configuration
Applications using Spring Data JPA for accessing data through repository interfaces use EntityManager. We use the EntityManagerFactory bean to get instances of EntityManager and interact with the JPA entities.
Since we are using two datasources, we need to create an EntityManager for each datasource, which is done by referencing the datasource bean and base package of entities to the EntityManagerFactory builder class.
EntityManager configuration for the first datasource:
@Primary
@Bean(name="userEntityManagerFactory")
public LocalContainerEntityManagerFactoryBean entityManagerFactoryBean
        (EntityManagerFactoryBuilder builder, @Qualifier("userDatasource") DataSource dataSource){

    return builder.dataSource(dataSource)
            .packages("com.example.model.user")
            .persistenceUnit("users").build();
}
Similarly, the EntityManager configuration for the second datasource –
@Bean(name="orderEntityManagerFactory")
public LocalContainerEntityManagerFactoryBean entityManagerFactoryBean
        (EntityManagerFactoryBuilder builder,  @Qualifier("orderDatasource") DataSource dataSource){

    return builder.dataSource(dataSource)
            .packages("com.example.model.order")
            .persistenceUnit("order").build();
}
2.5. TransactionManager Configuration
Creating a TransactionManager bean requires reference to the EntityManagerFactory bean. We will use the @Qualifier annotation to autowire the EntityManager specific to the data source TransactionManager.
@Primary
@Bean(name = "userTransactionManager")
@ConfigurationProperties("spring.jpa")
public PlatformTransactionManager transactionManager(
    @Qualifier("userEntityManagerFactory") EntityManagerFactory entityManagerFactory) {

    return new JpaTransactionManager(entityManagerFactory);
}

@Bean(name = "orderTransactionManager")
@ConfigurationProperties("spring.jpa")
public PlatformTransactionManager transactionManager(
        @Qualifier("orderEntityManagerFactory") EntityManagerFactory entityManagerFactory) {

    return new JpaTransactionManager(entityManagerFactory);
}
2.6. @EnableJpaRepositories
Since we are going to have multiple datasources, we must provide specific information for each datasource repository using Spring’s @EnableJpaRepositories annotation. In this annotation, we will set the reference to the EntityManager, the repository path, and the TransactionManager to use.
@Configuration
@EnableTransactionManagement
@EnableJpaRepositories(
        entityManagerFactoryRef = "userEntityManagerFactory",
        transactionManagerRef = "userTransactionManager",
        basePackages = { "com.example.repositories.user" })
public class UserDatasourceConfiguration {
    ....
    ....
}
@Configuration
@EnableTransactionManagement
@EnableJpaRepositories(
entityManagerFactoryRef = "orderEntityManagerFactory",
transactionManagerRef = "orderTransactionManager",
basePackages = { "com.example.repositories.order" })
public class OrderDatasourceConfiguration {
....
....
}3. Complete Configuration
The final code for both datasources configured above is as follows –
@Configuration
@EnableTransactionManagement
@EnableJpaRepositories(
        entityManagerFactoryRef = "userEntityManagerFactory",
        transactionManagerRef = "userTransactionManager",
        basePackages = { "com.example.repositories.user" })
public class UserDatasourceConfiguration {

    @Primary
    @Bean(name="userProperties")
    @ConfigurationProperties("spring.datasource")
    public DataSourceProperties dataSourceProperties() {

        return new DataSourceProperties();
    }

    @Primary
    @Bean(name="userDatasource")
    @ConfigurationProperties(prefix = "spring.datasource")
    public DataSource datasource(@Qualifier("userProperties") DataSourceProperties properties){

        return properties.initializeDataSourceBuilder().build();
    }

    @Primary
    @Bean(name="userEntityManagerFactory")
    public LocalContainerEntityManagerFactoryBean entityManagerFactoryBean
            (EntityManagerFactoryBuilder builder,
             @Qualifier("userDatasource") DataSource dataSource){

        return builder.dataSource(dataSource)
                .packages("com.example.model.user")
                .persistenceUnit("users").build();
    }

    @Primary
    @Bean(name = "userTransactionManager")
    @ConfigurationProperties("spring.jpa")
    public PlatformTransactionManager transactionManager(
            @Qualifier("userEntityManagerFactory") EntityManagerFactory entityManagerFactory) {

        return new JpaTransactionManager(entityManagerFactory);
    }
}
@Configuration
@EnableTransactionManagement
@EnableJpaRepositories(
entityManagerFactoryRef = "orderEntityManagerFactory",
transactionManagerRef = "orderTransactionManager",
basePackages = { "com.example.repositories.order" })
public class OrderDatasourceConfiguration {
@Bean(name="orderProperties")
@ConfigurationProperties("spring.datasource.order")
public DataSourceProperties dataSourceProperties() {
return new DataSourceProperties();
}
@Bean(name="orderDatasource")
@ConfigurationProperties(prefix = "spring.datasource.order")
public DataSource datasource(@Qualifier("orderProperties") DataSourceProperties properties){
return properties.initializeDataSourceBuilder().build();
}
@Bean(name="orderEntityManagerFactory")
public LocalContainerEntityManagerFactoryBean entityManagerFactoryBean
(EntityManagerFactoryBuilder builder,
@Qualifier("orderDatasource") DataSource dataSource){
return builder.dataSource(dataSource)
.packages("com.example.model.order")
.persistenceUnit("order").build();
}
@Bean(name = "orderTransactionManager")
@ConfigurationProperties("spring.jpa")
public PlatformTransactionManager transactionManager(
@Qualifier("orderEntityManagerFactory") EntityManagerFactory entityManagerFactory) {
return new JpaTransactionManager(entityManagerFactory);
}
}4. Demo
For reference, below is the list of Maven dependencies used for this project:
<dependencies>
        <dependency>
            <groupId>org.springframework.boot</groupId>
            <artifactId>spring-boot-starter-data-jpa</artifactId>
        </dependency>
        <dependency>
            <groupId>org.springframework.boot</groupId>
            <artifactId>spring-boot-starter-web</artifactId>
        </dependency>
        <dependency>
            <groupId>com.h2database</groupId>
            <artifactId>h2</artifactId>
            <scope>runtime</scope>
        </dependency>
        <dependency>
            <groupId>org.projectlombok</groupId>
            <artifactId>lombok</artifactId>
            <optional>true</optional>
        </dependency>
        <dependency>
            <groupId>org.springframework.boot</groupId>
            <artifactId>spring-boot-starter-test</artifactId>
            <scope>test</scope>
        </dependency>
    </dependencies>
4.2. JPA Entities
Since we will store and fetch information related to the User and Order objects, we must declare them as JPA entities using @Entity annotation. The @Entity annotation helps JPA to map the entities to a database table.
@Data
@Entity
@Table(name = "users")
public class Users {

    @Id
    @GeneratedValue(strategy = GenerationType.IDENTITY)
    @Column(name = "id")
    private Integer id;

    @Column(name = "first_name")
    private String firstName;

    @Column(name = "last_name")
    private String lastName;

    @Column(name = "email")
    private String email;
}
@Data
@Entity
@Table(name = "orders")
public class Orders {
@Id
@GeneratedValue(strategy = GenerationType.IDENTITY)
@Column(name = "id")
private Integer id;
@Column(name = "product_name")
private String productName;
@Column(name = "order_amount")
private Integer orderAmount;
@Column(name = "user_id")
private Integer userId;
}4.3. Repository Interfaces
The JpaRepository interface is a specific extension of Repository interface that provides APIs for basic CRUD operations on the entities.
@Repository
public interface UserRepository extends JpaRepository<User, Integer> {
}
@Repository
public interface OrderRepository extends JpaRepository<Order, Integer> {
}4.4. Test the Application
The test class below contains methods to create, persist and fetch an object to and from each data source configured above.
import com.howtodoinjava.app.model.order.Order;
import com.howtodoinjava.app.model.user.User;
import com.howtodoinjava.app.repositories.order.OrderRepository;
import com.howtodoinjava.app.repositories.user.UserRepository;
import org.junit.jupiter.api.Test;
import org.springframework.beans.factory.annotation.Autowired;
import org.springframework.boot.test.context.SpringBootTest;
import java.util.Optional;
import static org.junit.jupiter.api.Assertions.assertTrue;
@SpringBootTest
public class AppTest {
@Autowired
private UserRepository userRepository;
@Autowired
private OrderRepository orderRepository;
@Test
void saveUserDataInDB() {
User user = new User();
user.setEmail("johndoe@gmail.com");
user.setFirstName("John");
user.setLastName("DOe");
User savedUser = userRepository.save(user);
Optional<User> userData = userRepository.findById(savedUser.getId());
assertTrue(userData.isPresent());
}
@Test
void saveOrderDataInDB() {
Order order = new Order();
order.setProductName("Mobile");
order.setOrderAmount(200);
order.setUserId(1);
Order savedOrder = orderRepository.save(order);
Optional<Order> orderData = orderRepository.findById(savedOrder.getId());
assertTrue(orderData.isPresent());
}
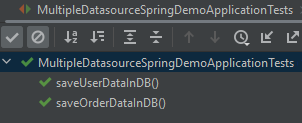
}Now we can run our test cases and verify that all our test cases passed (screenshots below).
5. Conclusion
Connecting with multiple databases is an important aspect of building modern applications and Spring Boot provides a simple way to create such Database connections. By following the steps outlined in this article, we can create the configuration classes and connect with any number of databases that are required by our project.
Happy Learning !!
It works perfectly thanks a lot for your work !