Learn to install and configure Jenkins on the local machine. Also, learn to setup a Jenkins pipeline and configure job steps for a Spring boot application including executing the unit tests and archiving the old builds.
1. Creating a Spring Boot Application
Spring Boot is a java-based framework developed by the Pivotal team to create stand-alone, production-grade application. Spring boot is also used to develop applications based on microservices architecture where multiple services run independently and are loosely coupled with each other.
In this tutorial, we are using the application developed for Spring boot hello world example.
2. Setting Up Jenkins
2.1. Installing Jenkins
We can go to the Jenkins download link: https://www.jenkins.io/download/ and download the package suitable for your operating system.
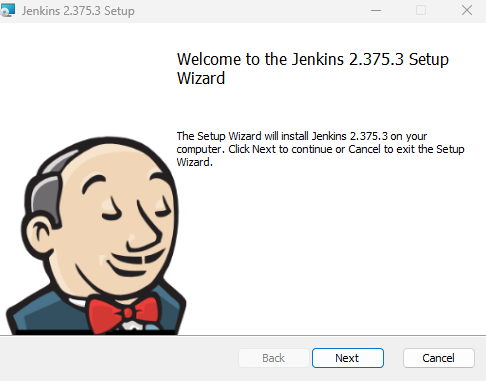
Once the package is downloaded, double-click on it to start installing and follow the below steps:
- Double-click the installer and click Next.
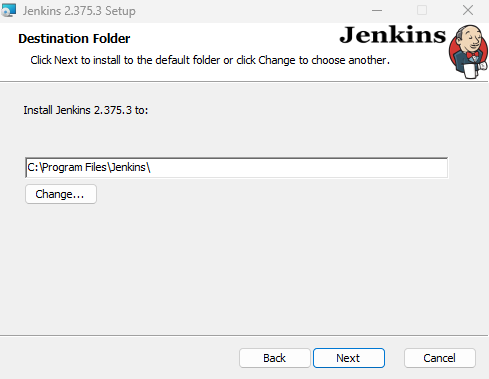
- Choose the directory where we want to install Jenkins and click Next.
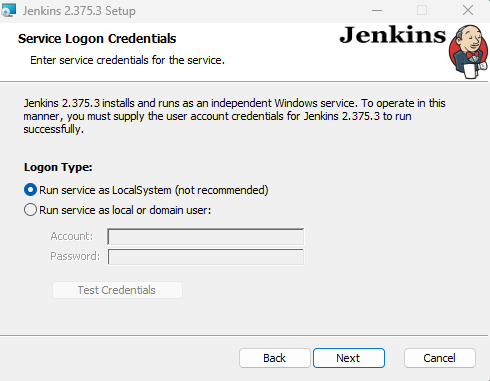
- Next, select the “Logon Type” as “Run service as LocalSystem” which will grant Jenkins full access to our machine and services. Click on Next to continue.
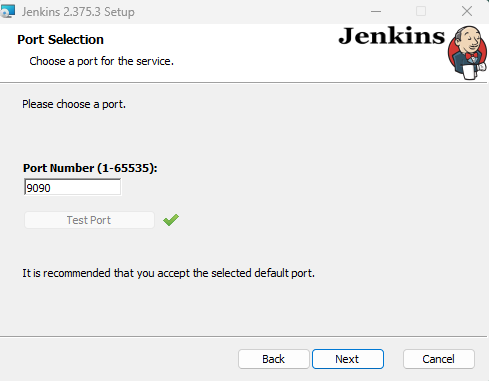
- The next step is port selection. We can specify any HTTP port and click on Test Port to check if the port is available or not. We have used port 9090.
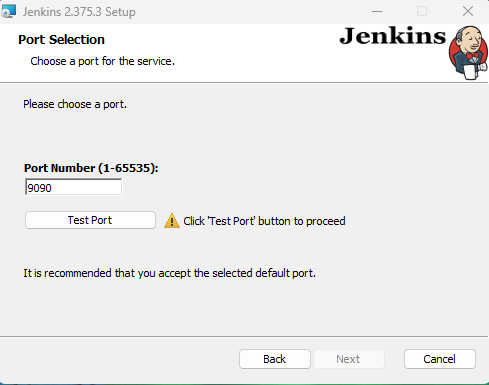
If the mentioned port is available, then we will see a “Green Tick” beside the “Test Port” button like below. Click on Next to continue.
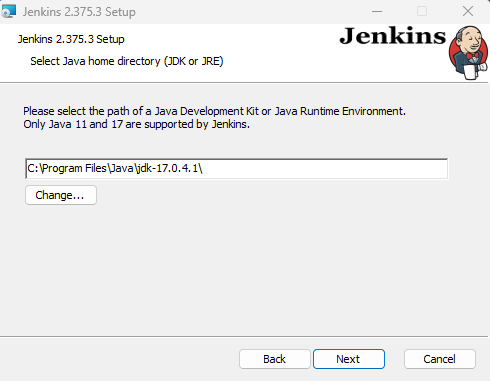
- If we have downloaded the latest version of Jenkins, we need to have java 11 or 17 installed. If we don’t have the required version, we need to install it else we have to select the path of the JDK in the system and click Next.
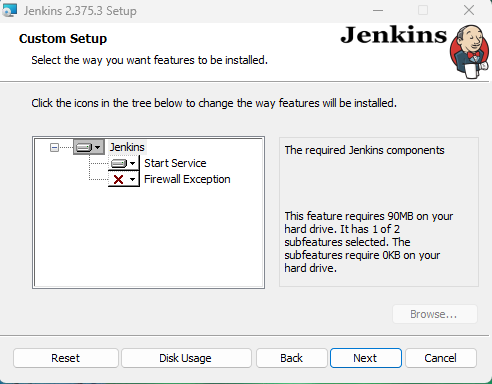
- We don’t have to do anything in this step; simply click Next to continue. We are testing locally, so firewall selection can be omitted.
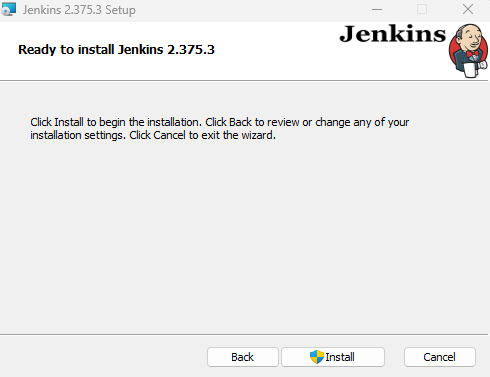
- Finally, click on Install to complete the installation process. It may take some time to complete the installation.
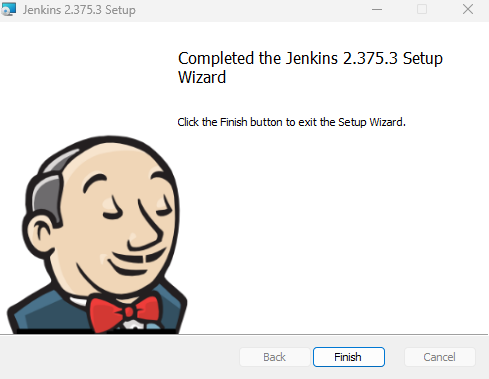
- Once the installation is completed, we will see this page; now we click on Finish and are done with the installation.
2.2 Configuring Jenkins
Once Jenkins is installed, Let’s open a browser and go to http//localhost:9090/ or whatever port we used while installing. We will see a web page something like this –
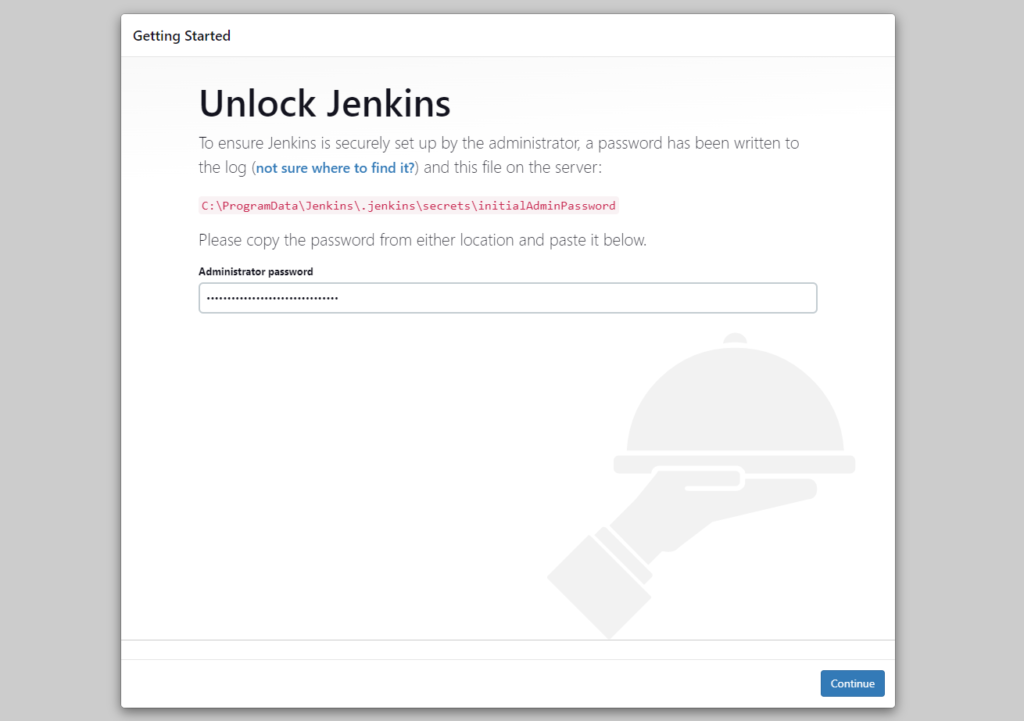
On this page, we need to specify a temporary administrative password, to get the password go to the path mentioned in the browser. In my case, it is, C:\ProgramData\Jenkins\.jenkins\secrets\initialAdminPassword
Copy and paste the password in the password field and click on Continue. On the next page, we will see something like this-
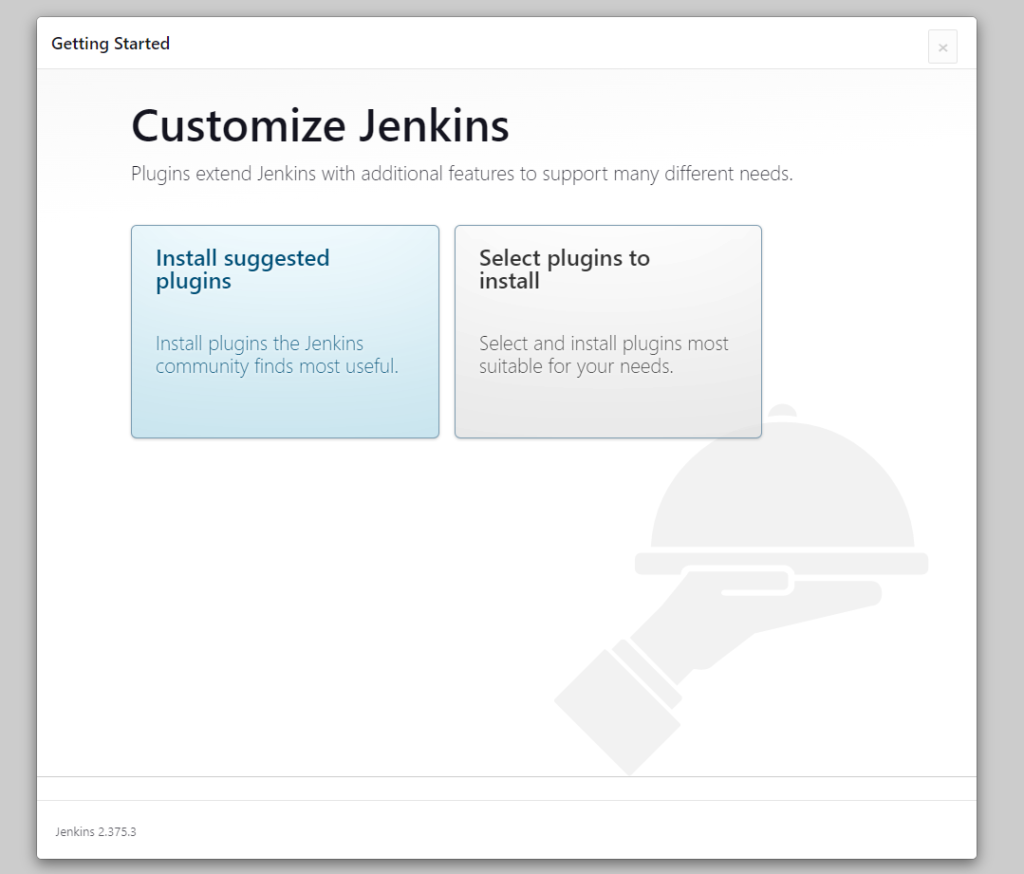
Here we click on “Install suggested plugins” to let Jenkins download and configure some necessary plugins for us. We wait till the download is completed, this may take a while.
Once the download is completed, we click on Continue. The next step is where we need to create an admin user, which we will use while login into Jenkins.
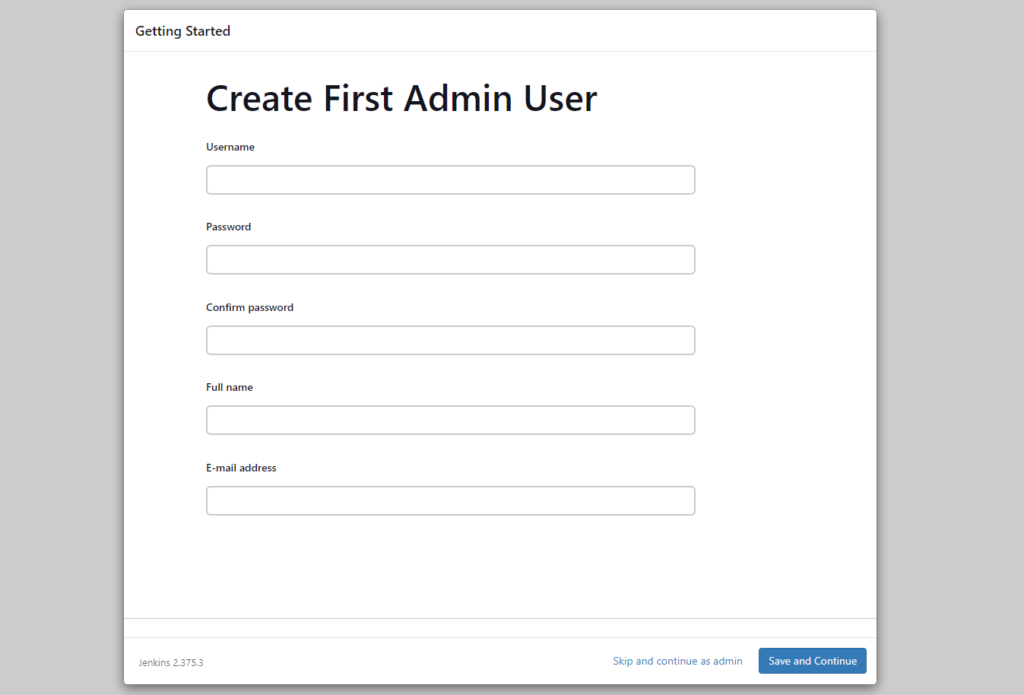
Let’s fill out the form, and remember the username and password, as these will be our admin credentials, and click Save and Continue.
In the next step, we will be asked if you want to change the URL, but don’t change anything click Continue and then click Finish to complete the Jenkins configuration.
2.3. Install Maven Plugin
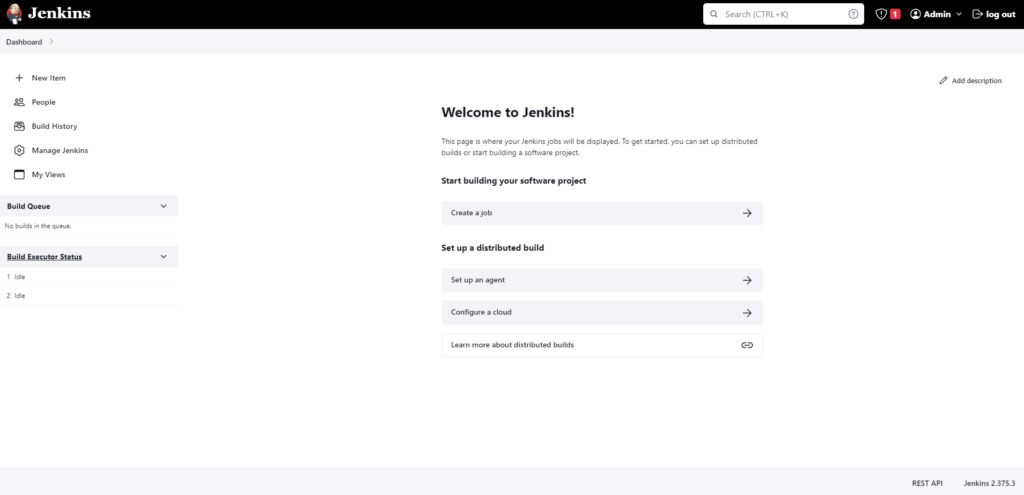
Once we are done with the initial Jenkins configuration, we should land on the Jenkins home page –
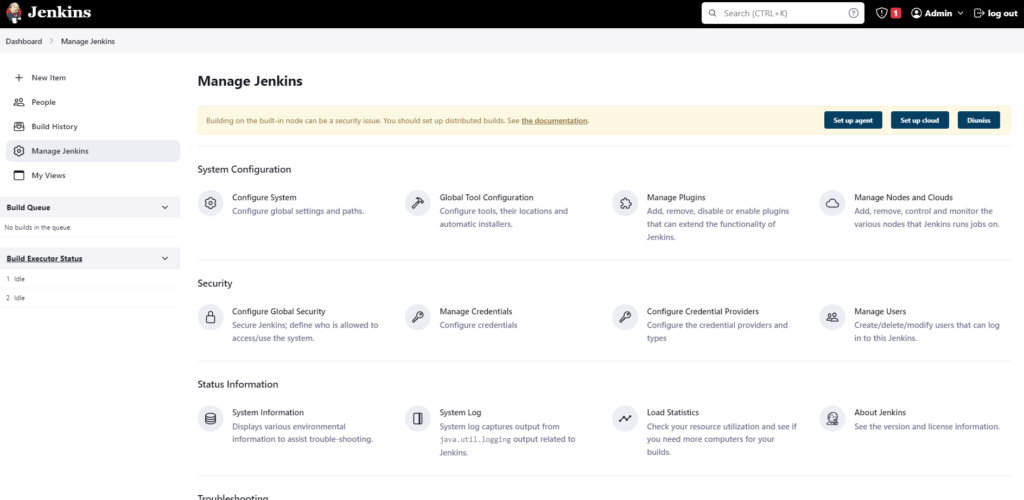
Click on the “Manage Jenkins” option on the left side of the screen. Then we should see something like this on your screen –
Next, we click on the “Manage Plugins” option to install/remove/view the plugins.
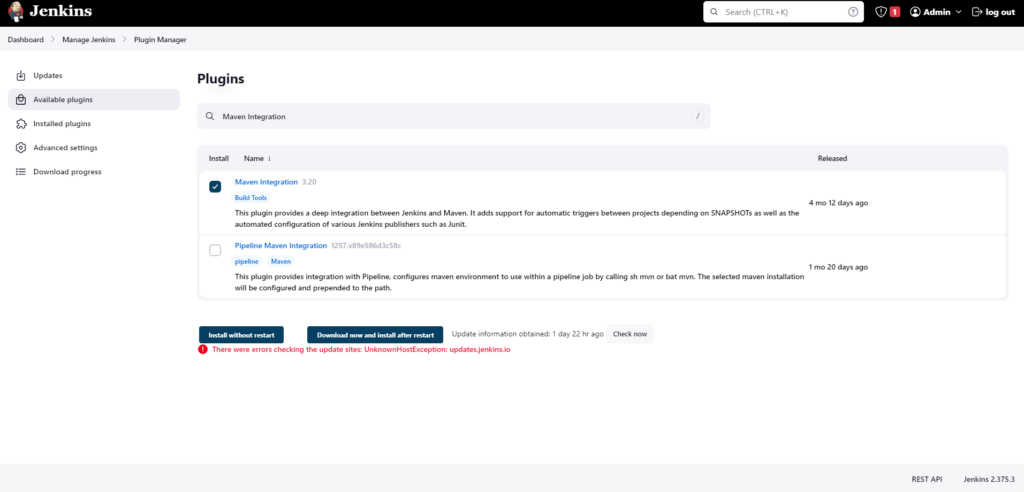
Under Manage plugins we click on “Available Plugins” and search for the “Maven Integration” plugin. We selected the option shown in the screenshot below. Then we click on the “Install without restart” button.
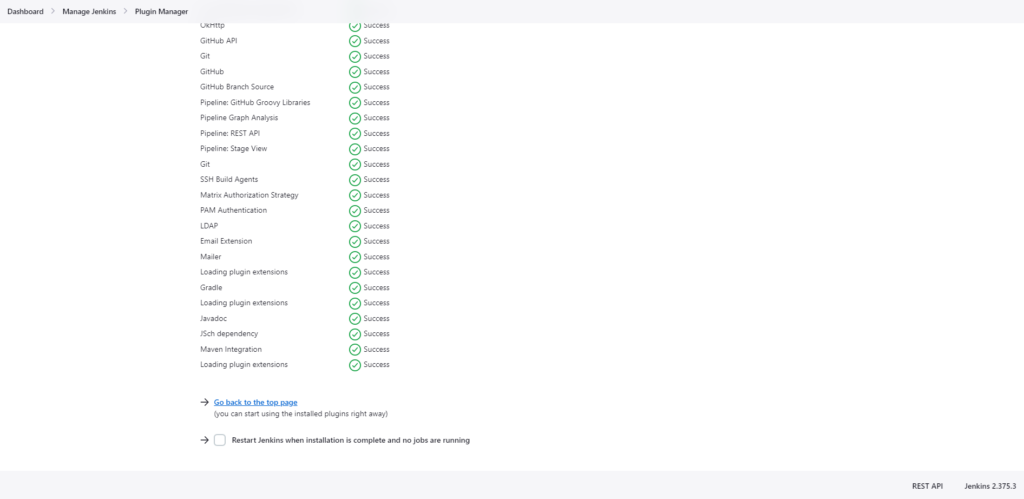
Once the downloading starts we will see something like this –
We will wait for the processes to complete. Optionally if we want we can select the option “Restart Jenkins when installation is complete and no jobs are running”.
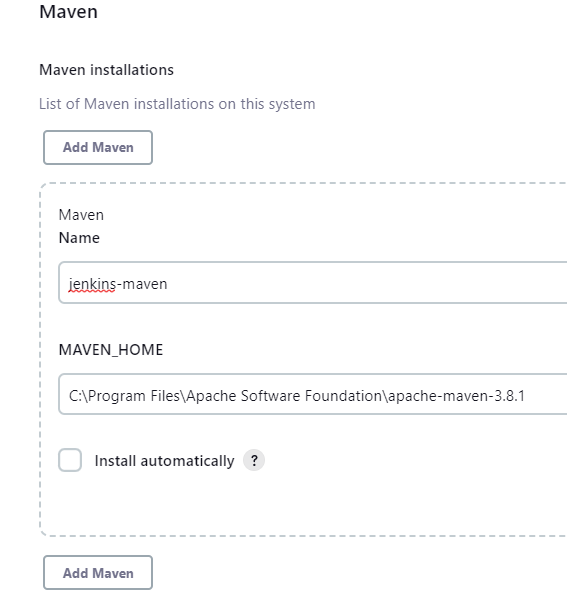
Now go to Jenkins Dashboard -> Manage Jenkins -> Global Tool Configuration.
Under this scroll down and we find a section for Maven. We click on the Add Maven button. Under Name, we mention a unique name, uncheck “Install automatically” and in the MAVEN_HOME section mention the path to the location of maven installed in our system, and click on Save.
We can also add multiple versions of maven by specifying a unique name for each one of them.
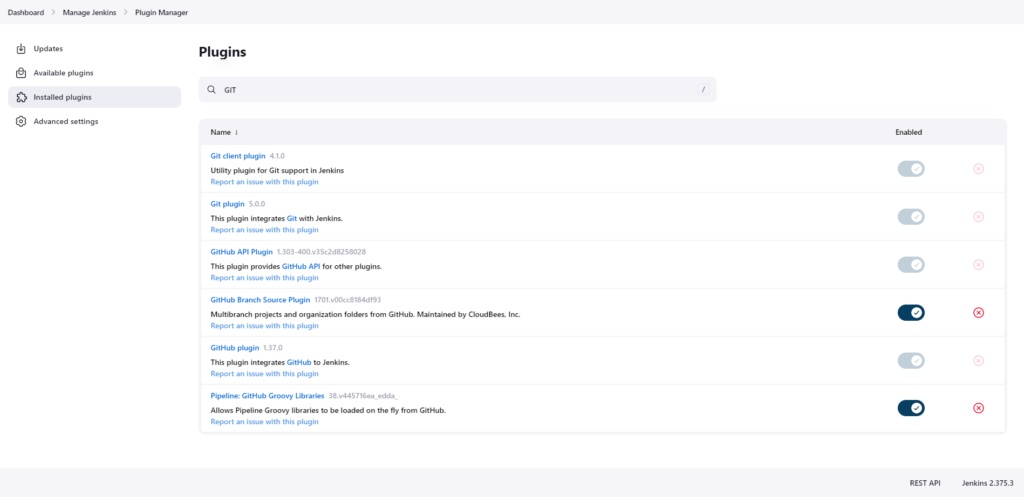
2.4. Installing the Git Plugin
The next step involves installing Git plugin. Jenkins installs the plugin in the initial configuration. From the Jenkins Dashboard, go to Manage Jenkins -> Manage Plugins -> Installed Plugins and search for “GIT”, we should have a bunch of git plugins already installed, If it is not available, then we need to install it the way we installed the Maven Plugin.
3. Building a Maven Project
In this section, we will learn how to create a job, clone a git repository and build a jar using Jenkins.
3.1. Creating a Jenkins job
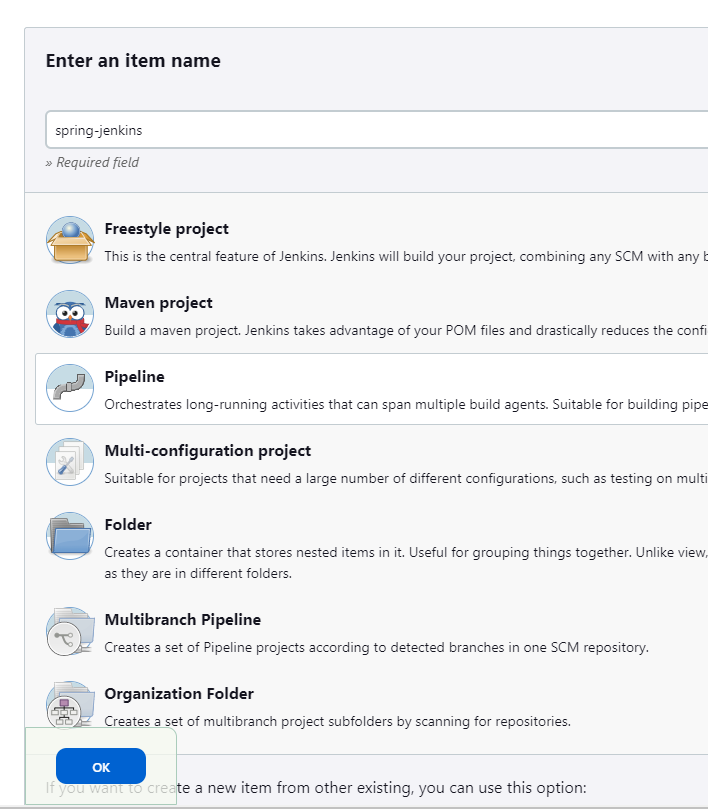
To create a Jenkins job, log in to Jenkins and go to Jenkins Dashboard, then click on “New Item” to create a new job.

Once we click on “New Item”, you should see a page like this –
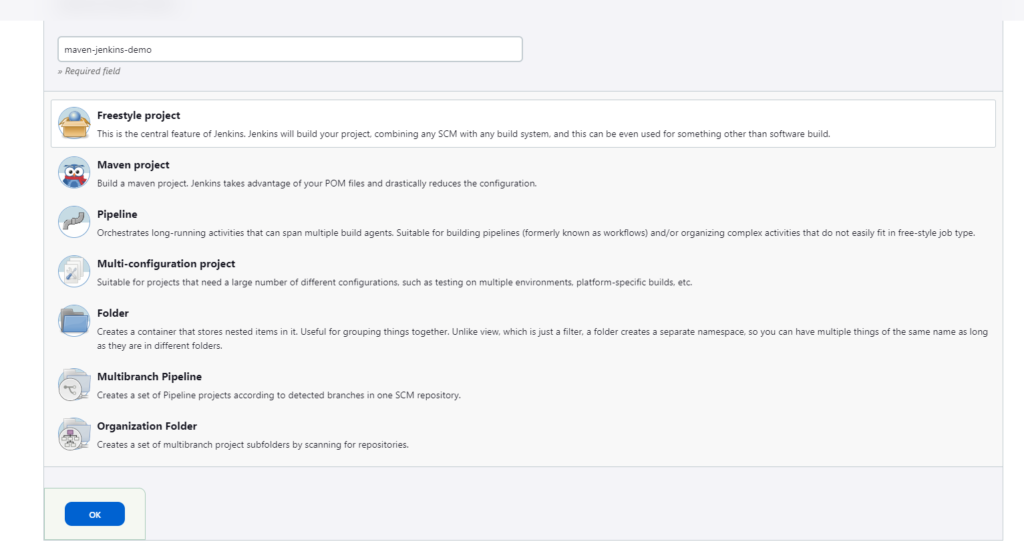
On this page, we enter the name of our job. It can be anything, but the best practice is to enter the job name the same as the project/repository name for which we are building the job.
After entering the job name, select “Freestyle project” as we want to have a granular controller over everything that we configure.
Next click OK to continue.
3.2. Cloning Git/GitHub Repository in Jenkins
Once the job configuration is successful, we will see a page like this –
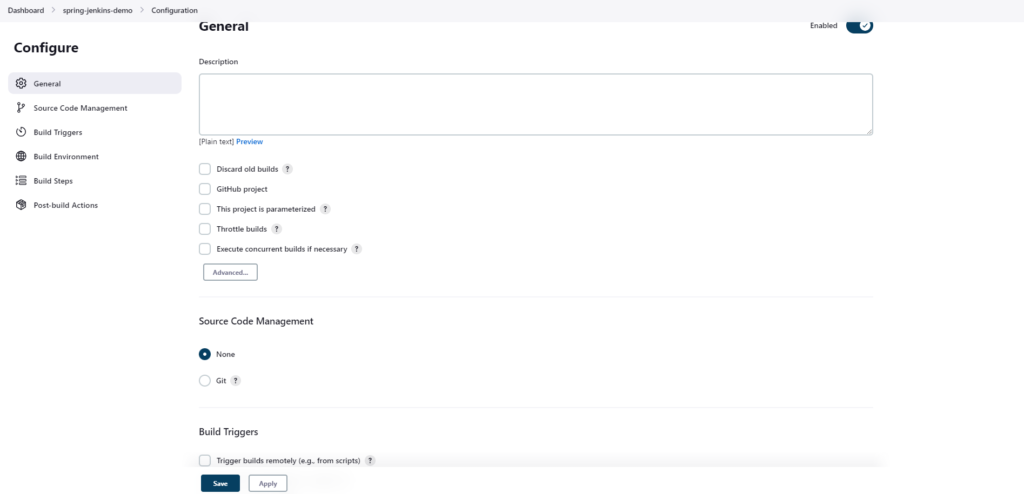
On this page, click on “Source Code Management” (SCM), a tool used by developers/organizations to manage application code. E.g. GitHub, GitLab. Under Source Code Management, we select Git and enter the Repository URL.
Under the “Branches to Build” section, we specify the default branch for which we want to trigger the pipeline. If our repository is a public repository, then we don’t need to set any credentials, else we need to mention our GitHub credentials.
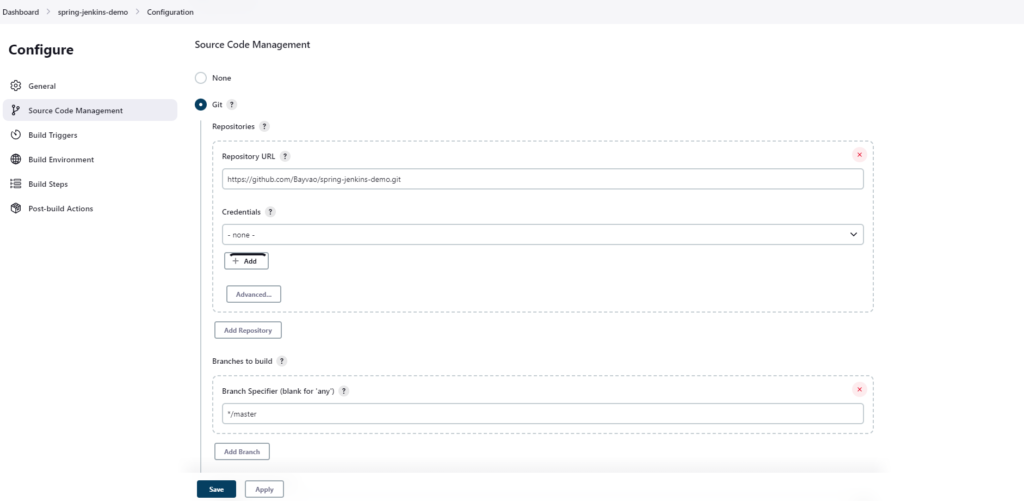
Finally, click on Save.
3.3. Build a Jar file
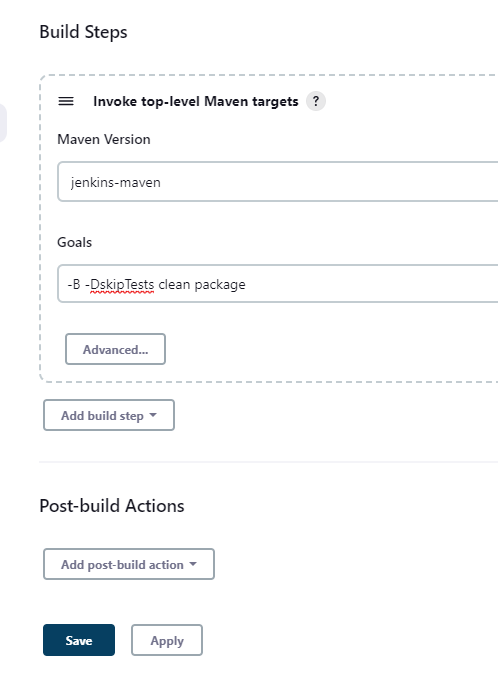
Now under our Jenkins job, we click on configure to continue further configuration.
We go to Build Steps section, click on Add Build Steps, and select “Invoke top-level Maven targets”.

Now under Maven Version, we select the one which we created earlier, i.e. jenkins-maven.
Under Goals, we write maven command -B -DskipTests clean package. Finally, click on Save.
3.4. Executing Unit Tests
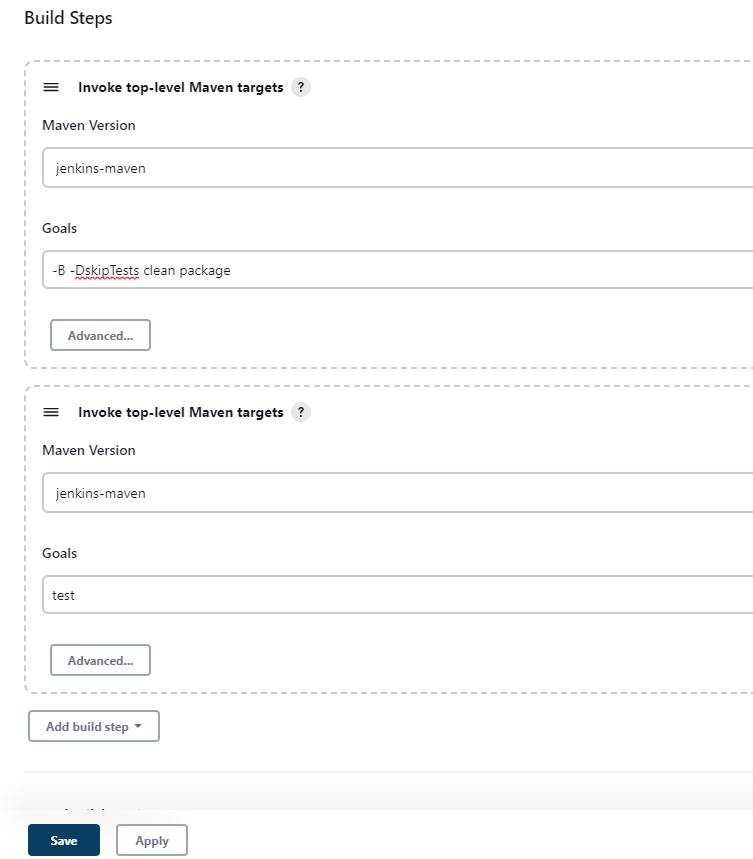
We repeat the same steps again, we go to Build Steps, click on Add Build Steps to add another step, and select “Invoke top-level Maven targets”.
Now under Maven Version, we select the one which we created earlier, but now in this Goal write “test”, and click on Save to continue.
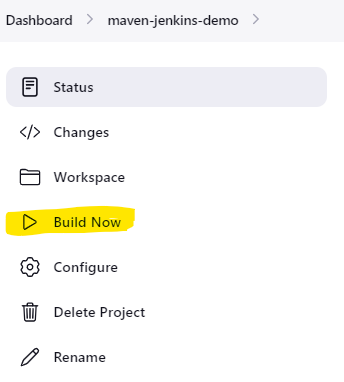
3.5. Executing the Job
Once we complete the above configuration, we go to our job in Jenkins job, and click on Build Now.
Once we click on Build Now, our build will start, which we can check in the “Build History” section as shown below.
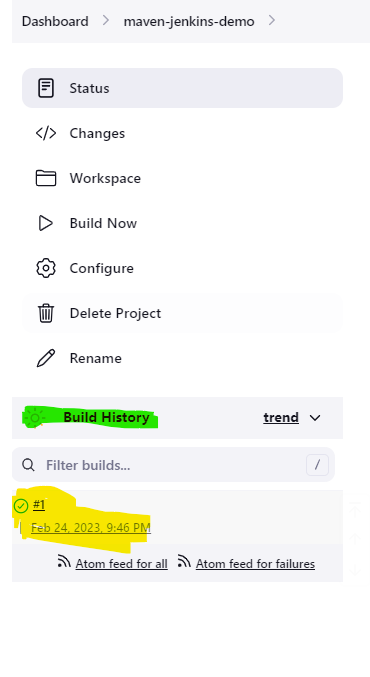
If our build is a success, we will see a green checkbox, beside our build number, else we will see a red cross mark if the build fails.
3.6. Verify Build Logs
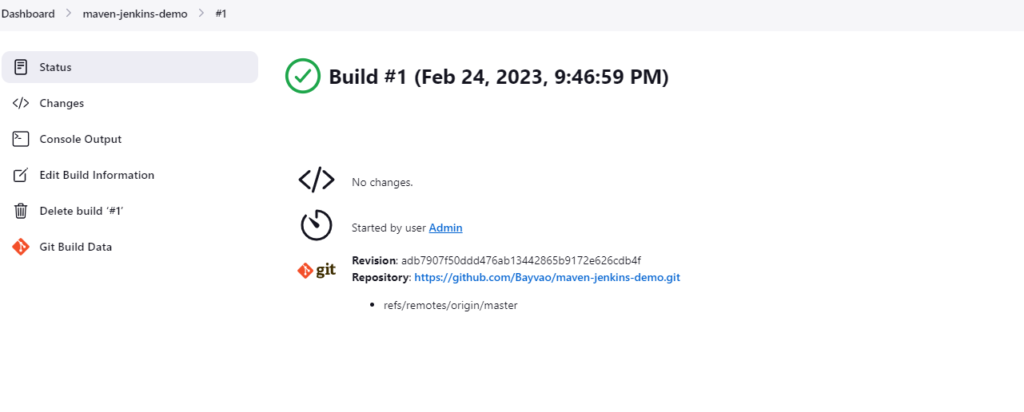
To check logs of the build, we just click on the build number, and we will see a page like this –
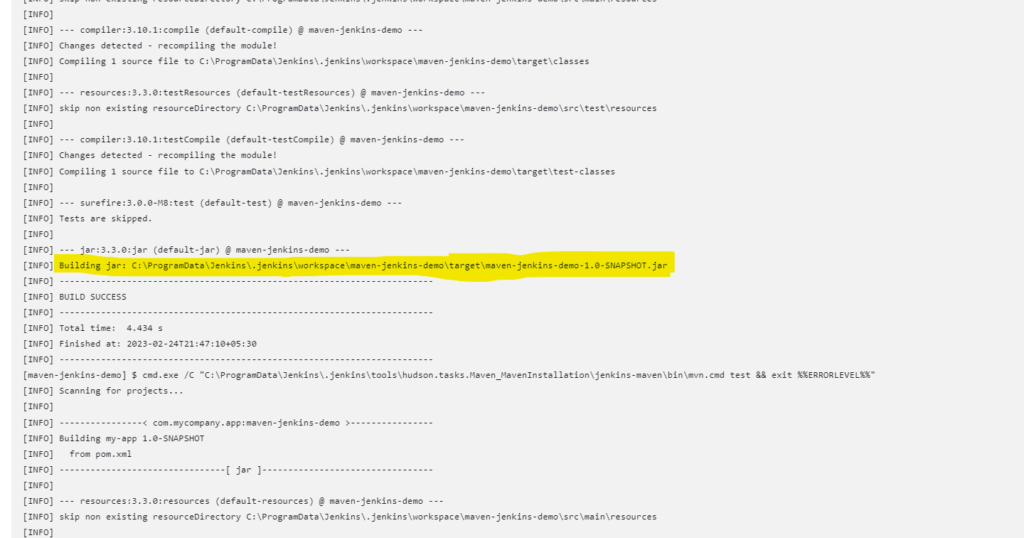
Now we click on “Console Output”, and we will see all the logs generated for this build.
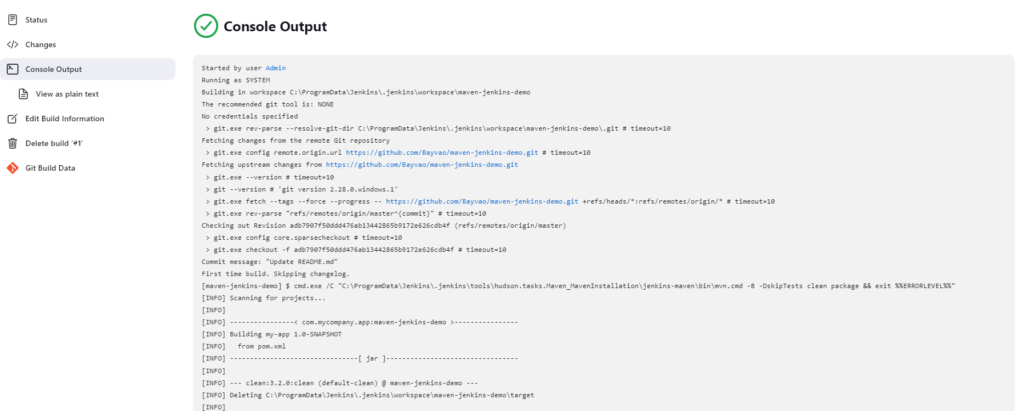
Now if we look closely at the logs, we will see after the build is a success, a jar file is created and stored in your system. Copy this path
3.7. Archiving the Artifact
In DevOps, the output of the build i.e. jar file/war file etc., is called the artifact and it needs to be archived because once the artifact is built and deployed, it has no use and is consuming memory in our system, so after a successful build and deployment we have to archive the jar from the local memory.
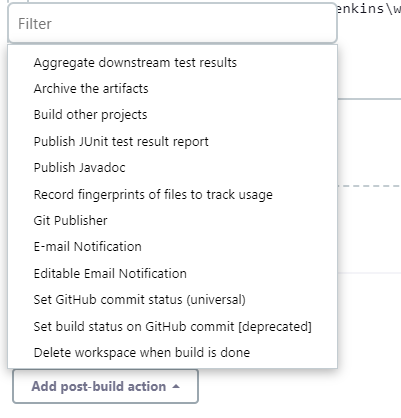
To archive the artifact, we would be adding “Post-build Actions”. So inside our Jenkins job, we go to configure and add a Post-build Action.
A drop-down will appear, there we will select “Archive the artifacts”.
Once done, specify the name of the file to archive i.e the jar file, we can use wildcards to avoid specifying the exact name, like – target/*.jar. Then we click on advanced and select the checkbox for “Archive artifacts only if the build is successful”, as the name mentions we archive once a build is success and deployed successfully, like below –
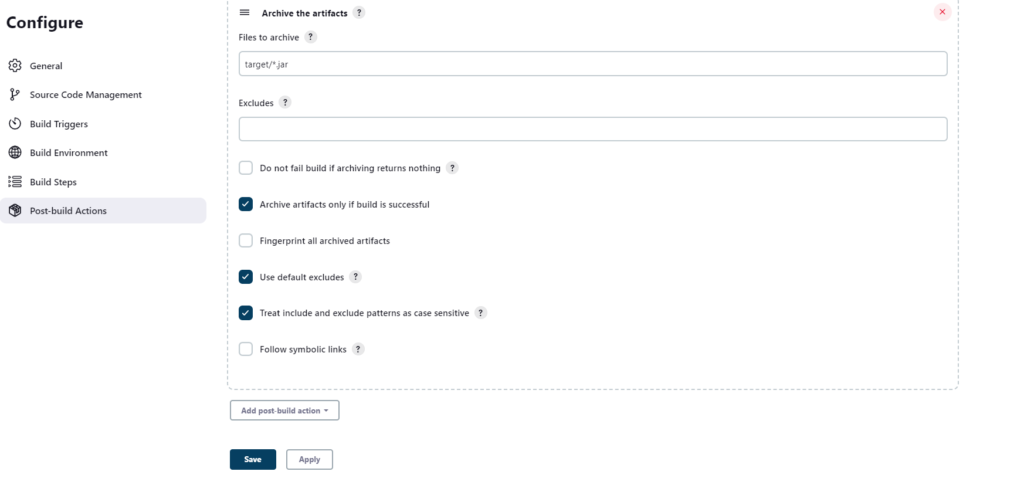
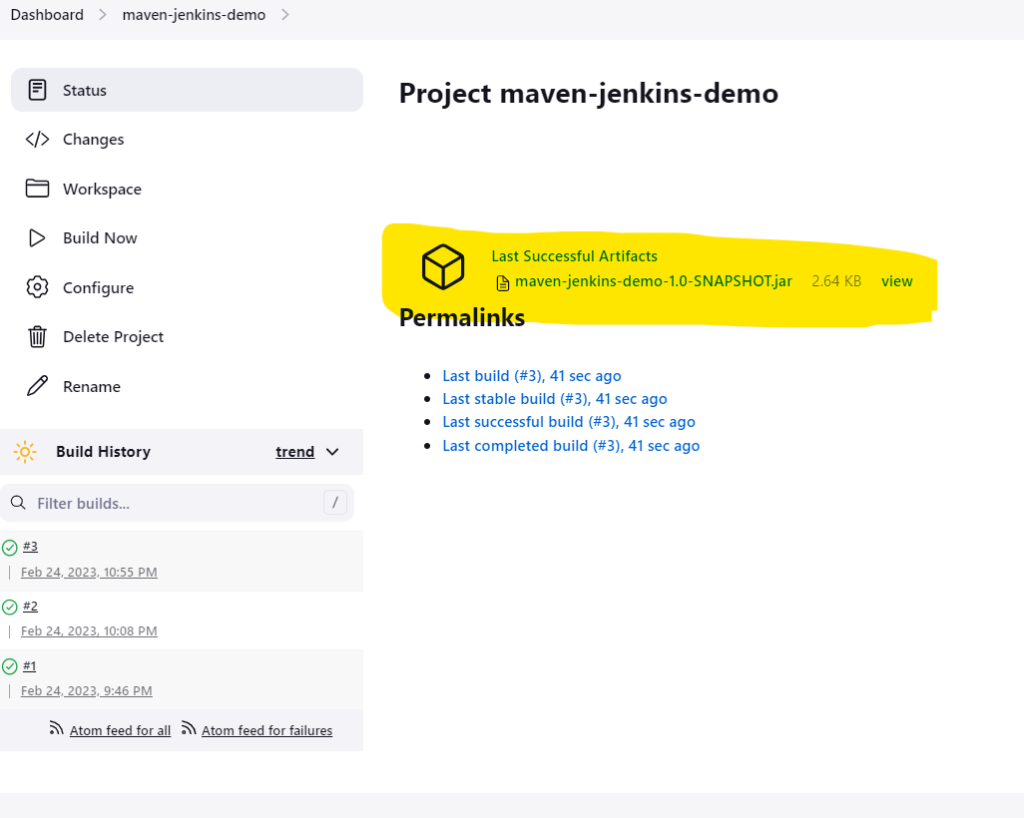
Click on Save. and hit Build Now, Once the build is successful, we will see the last success jar file displayed on the home page of our job.
4. Jenkins Pipeline and Jenkinsfile
4.1. Jenkins Pipeline
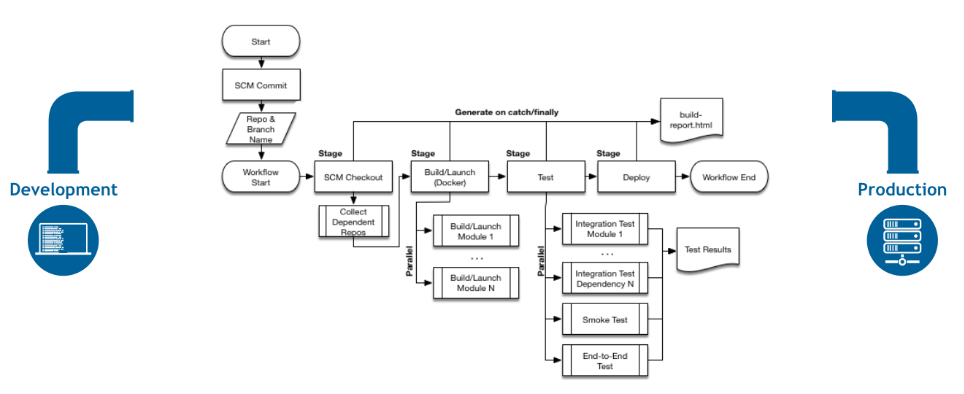
A pipeline is a collection of steps/stages executed in the Continuous Integration and Continuous Deployment (CI/CD) process. A pipeline step consists of checkout, build, test, and deployment of your code. A Sample pipeline diagram is below.
4.2. Jenkinsfile
A Jenkinsfile is a text file where we define our pipeline as a code. The Jenkinsfile exists within our project repository.
There are 2 types of JenkinsFile:
- Declarative pipeline
- Scripted Pipeline
We are going to use the Declarative pipeline in our tutorial. An example of such a Declarative pipeline JenkinsFile with 3 stages is shown below:
- Build
- Test
- Deploy
pipeline {
    agent any
    stages {
        stage('Build') {
            steps {
                //
            }
        }
        stage('Test') {
            steps {
                //
            }
        }
        stage('Deploy') {
            steps {
                //
            }
        }
    }
}- pipeline – keyword, with which every Jenkinsfile must start with.
- agent – this means using which Jenkins environment will the entire pipeline or a particular stage will run, examples of agents can be maven, docker, etc. The agent any means, run the pipeline on any available agent.
- stages – consists of one more stage.
- stage – a task of our workflow.
- steps – It is where we define what to do as part of the task.
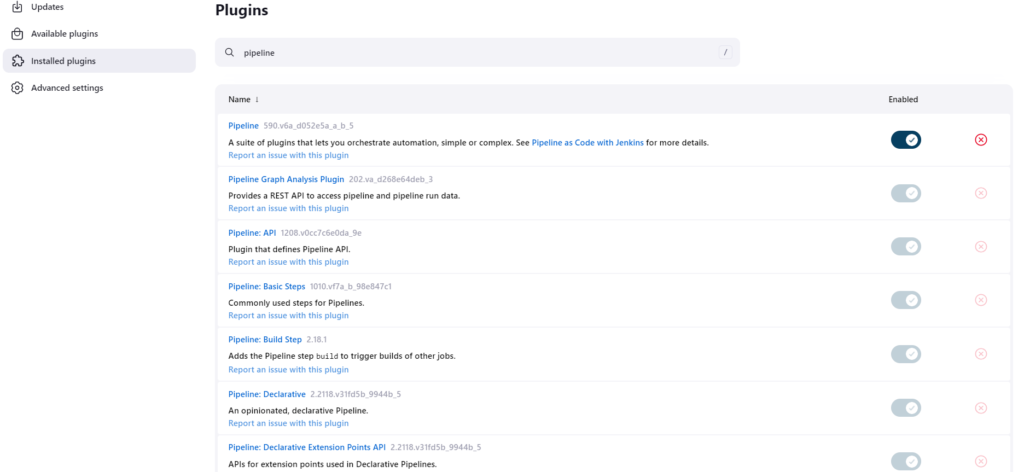
4.3. Installing the Jenkins Pipeline Plugin
If we have installed Jenkins suggested plugin during the installation process, then pipeline plugins should already be installed for us by Jenkins.
To verify this, go to Dashboard -> Manage Jenkins -> Manage Plugins -> Installed Plugins, and search for “pipeline”, we should see them here.
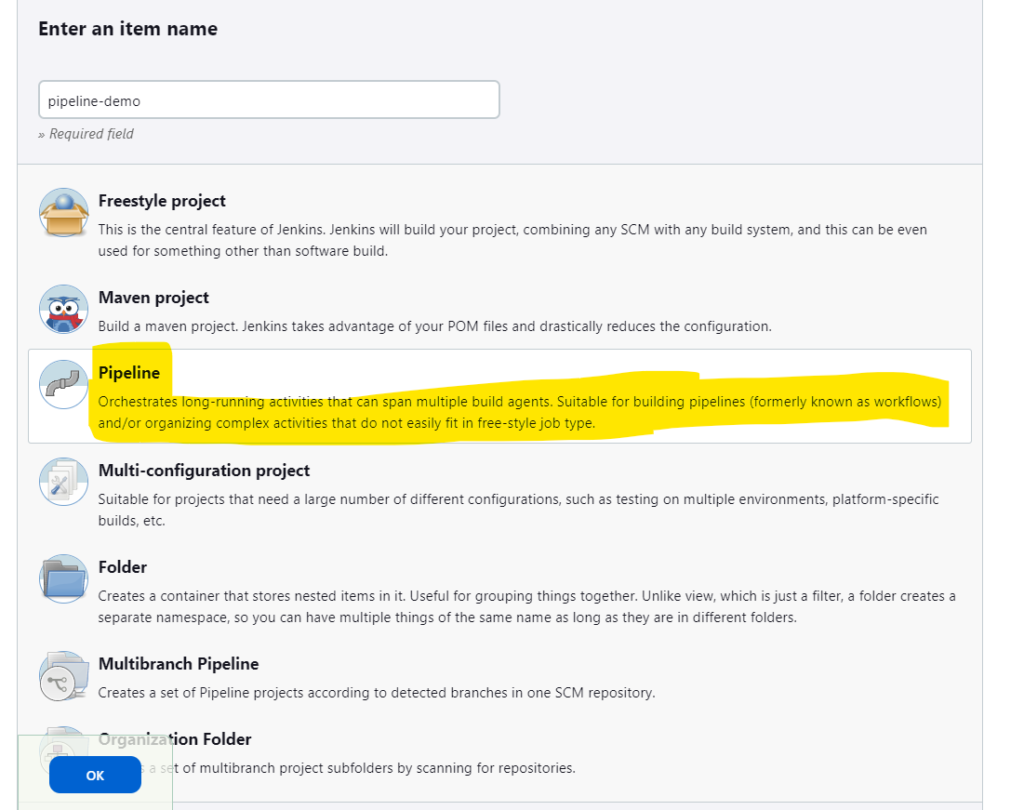
4.4. Building a Simple Pipeline
To create a pipeline project, we go to Dashboard -> New Item, enter a project name, and select the type as a pipeline. Then we Click OK to continue.
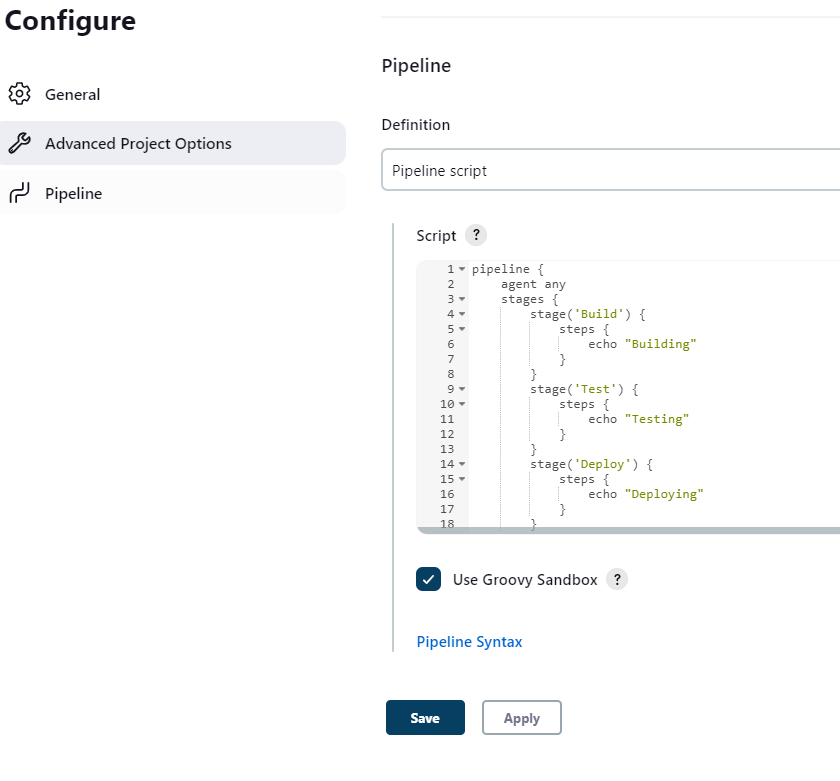
Now on the project configuration page, we go to the Pipeline section. We select the Definition as “pipeline script” and copy-paste the below script –
pipeline {
    agent any
    stages {
        stage('Build') {
            steps {
                echo "Building"
            }
        }
        stage('Test') {
            steps {
                echo "Testing"
            }
        }
        stage('Deploy') {
            steps {
                echo "Deploying"
            }
        }
    }
}
Here we have written a simple pipeline script, which will just print a string in the console during the execution of each stage.
Click on Save.
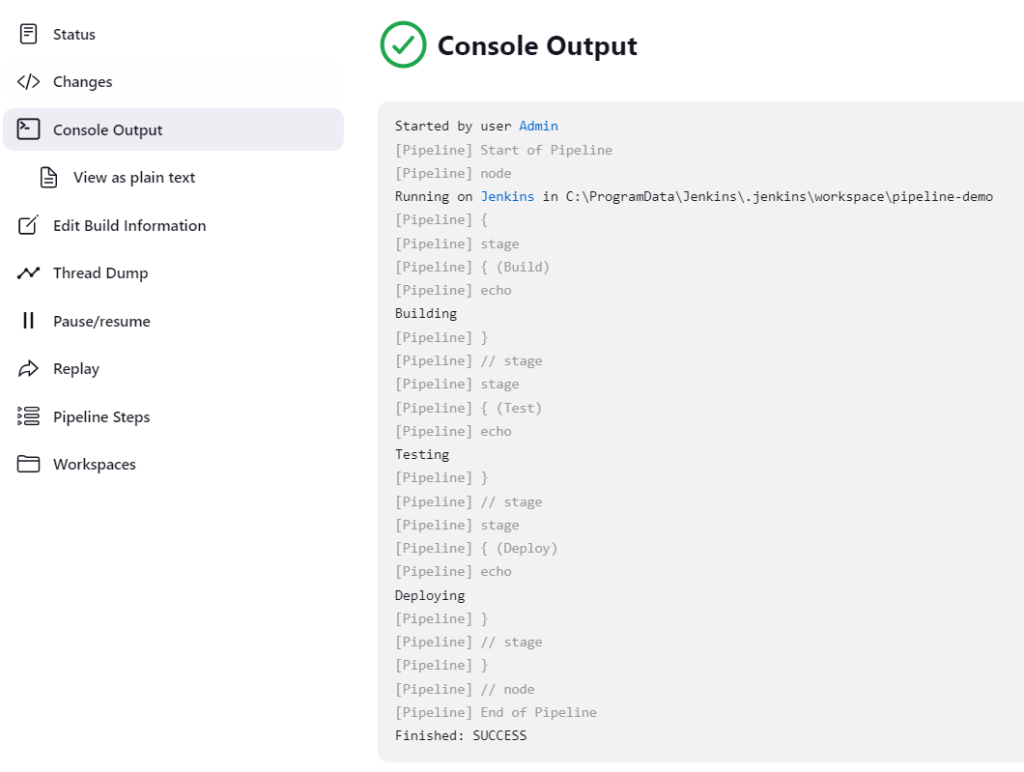
Next we click on “Build Now” to run the pipeline. Then check the console output, and we would see the pipeline stages running sequentially and printing the values that we specified.
4.5. Adding Steps to Jenkins Pipeline
Each step of our pipeline can consist of more than one task which has to be done, and it may be that we need to execute a batch (bat) script or a shell (sh) script (depending on the system being used) in the pipeline.
To do that, we can just modify the pipeline script like the below –
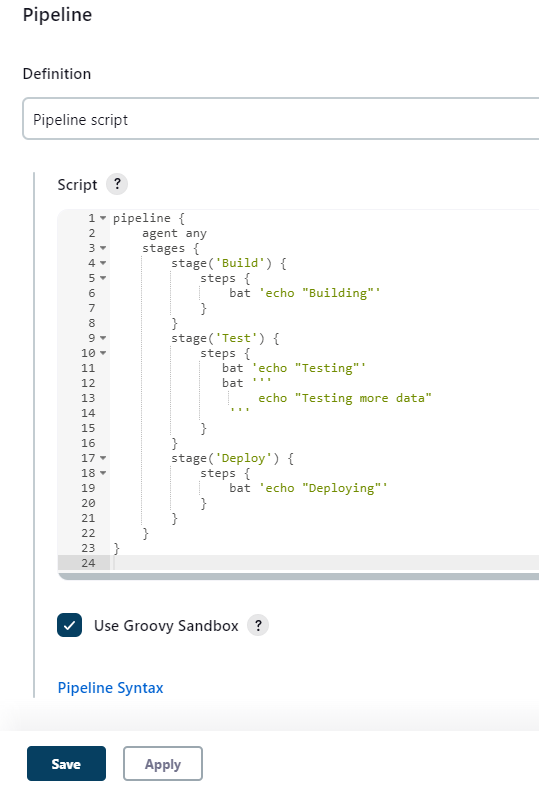
Click Save. and do Build Now. We can check the console to see the output.
4.6. Retry and Timeouts
Consider some failure that happens while executing a stage of our pipeline and before failing the entire job, we want to retry the steps of stage a certain number of times before we consider it to be a failure. To do that we use the retry(n) function.
Below code, sample illustrates the use of retry(n) –
stage('Deploy') {
steps {
retry(3) {
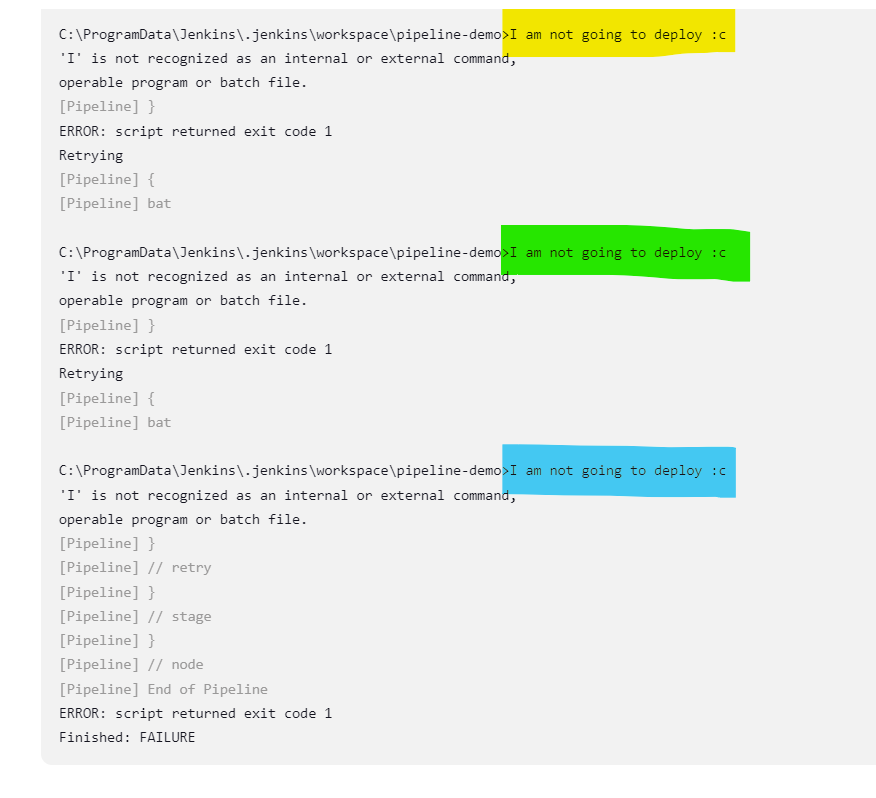
bat 'I am not going to deploy :c'
}
}
}Update the pipeline script and Save.
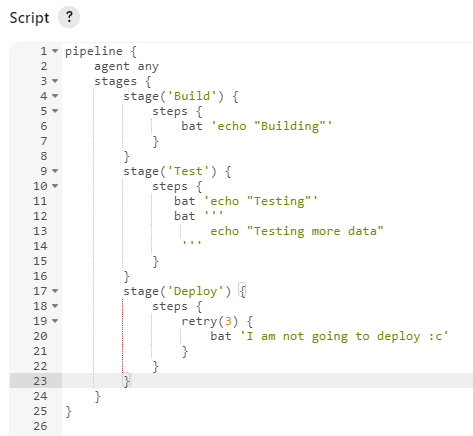
Now hit “Build Now” and check the console output, we would see the deployment stage executing 3 times before the job is considered a failure.
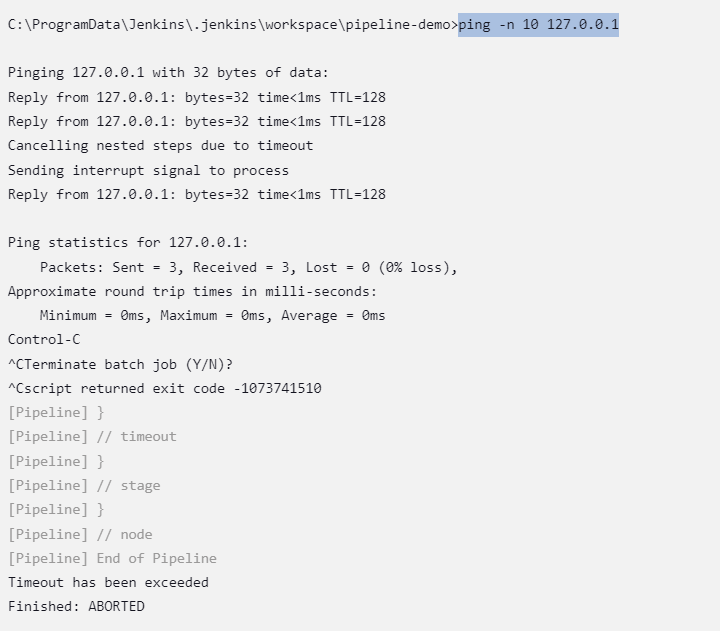
Under how many seconds should a process be completed before considering it a failure? To do that we use the timeout (time: n, unit: ‘SECONDS’) function, inside our stage.
Below code, sample illustrates the use of timeout –
stage('Deploy') {
            steps {
                retry(3) {
                    bat 'echo "Deploying"'
                }
                timeout(time: 3, unit: 'SECONDS') {
                    bat 'ping -n 10 127.0.0.1'
                }
            }
        }
Now let’s update out script to as shown below –
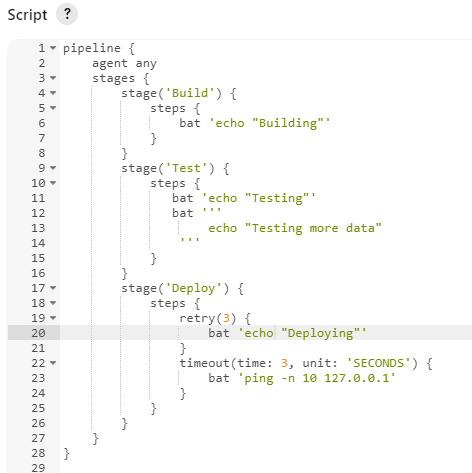
Click Save and Build Now. Then we check the console output, we would see ping -n 10 127.0.0.1 process waited for 3 seconds to finish before aborting and failing the pipeline.
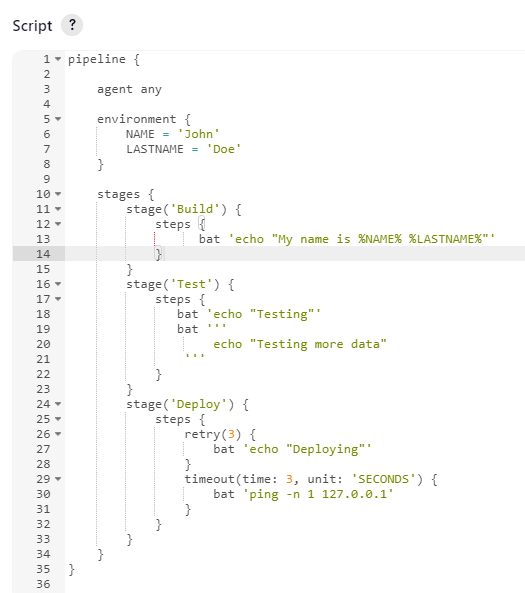
4.7. Environment Variables and Credentials
In a Jenkins pipeline, we write the below command to specify environment variables.
environment {
        NAME = 'John'
        LASTNAME = 'Doe'
    }
To use this we simply specify $NAME $LASTNAME (if using sh command) or %NAME% %LASTNAME% (for bat command) inside our pipeline code.
The complete pipeline code would look like the below –
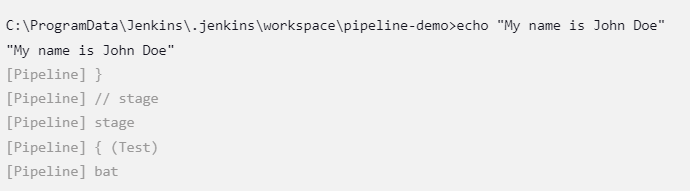
We click on Save, hit Build Now, then check the output, we would see the name is printed in the logs.
There are times when we need to use secrets inside our pipeline code, in those scenarios we use the credentials(name) function.
Code sample –
environment {
       secretValue = credentials(‘SECRET_TEXT’)
    }
Basically, this credentials (‘’) function will fetch credentials whose id is a SECRET_TEXT and store it in the variable secretValue.
To create a credential in Jenkins, we follow the below steps –
Dashboard -> Manage Jenkins -> Manage credentials -> system -> Global Credentials -> Add Credentials

We select kind as the secret text, enter any random value as secret, and we give a unique id for this secret.
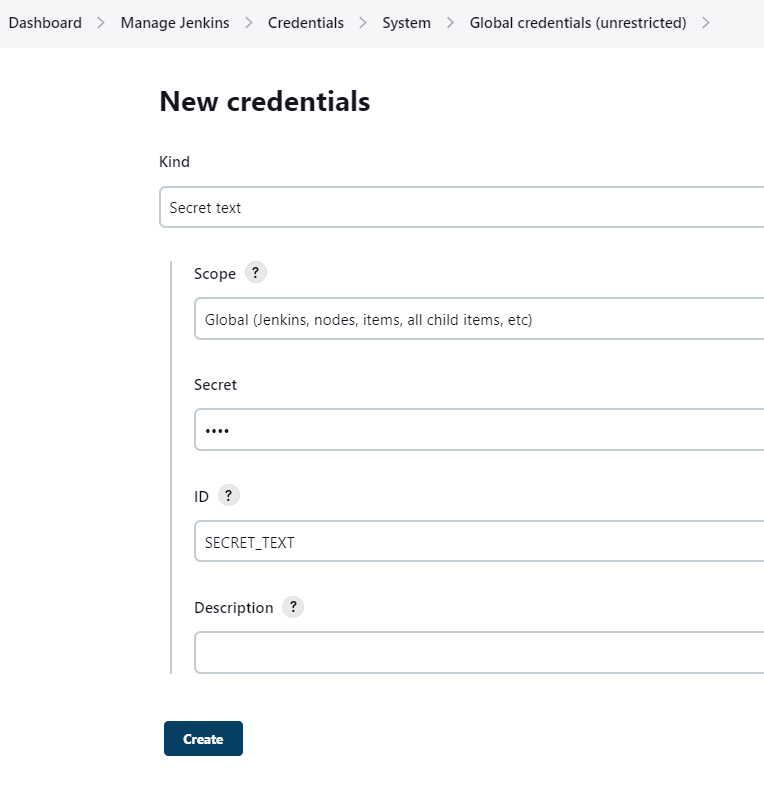
We click on “Create” to create the credentials.
Now let us modify the pipeline script as shown below –
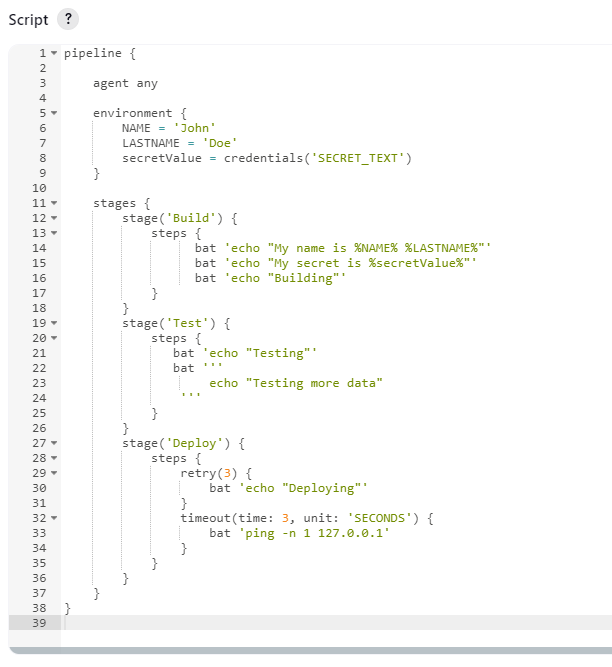
We click on Save and hit Build Now. Then we check the console, and we will see the “My secret is ****” line, since it is a secret it will hide it while printing the value in the logs.
4.7. Post Actions
It is a part of Jenkinsfile which will run at the end of the pipeline depending on the output of the build. Post Action command is always written after the stages section in the pipeline.
A sample Post Action command is as follows –
post {
        always {
            echo "I will always get executed"
        }
        success {
            echo "I will be executed if the build is success"
        }
        failure {
            echo "I will be executed if the build fails"
        }
        unstable {
            echo "I will be executed if the build is unstable"
        }
    }
A complete pipeline code will look like the below –
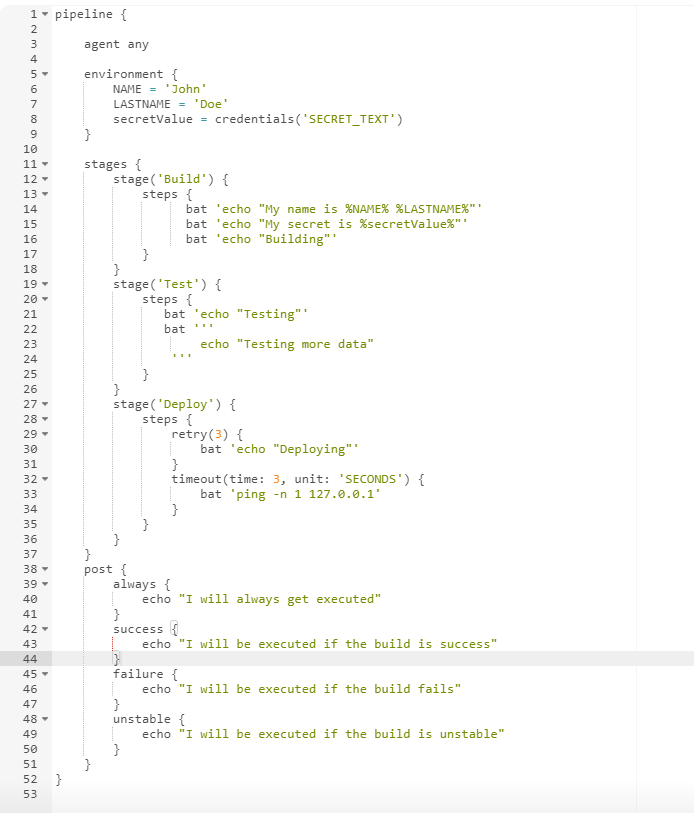
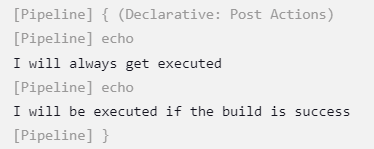
Once the script is modified, we click Save and hit Build Now, then we check the output. We will see “always” and the “success” section will be executed.
5. Jenkins Pipeline Example for Spring Boot Application
In this section, we are going to build a Jenkinsfile for the Spring Boot project and publish the build artifact to the Nexus OSS repository.
5.1. Pipeline Steps
Our Jenkins pipeline would consist of the following steps –
- Checkout
- Build
- Test
- Deploy
5.2. Job Setup
Go to Dashboard -> New Item. Let’s give our Jenkins job a name, and select Pipeline as the type.
Now let’s go to the Configuration section of our project.
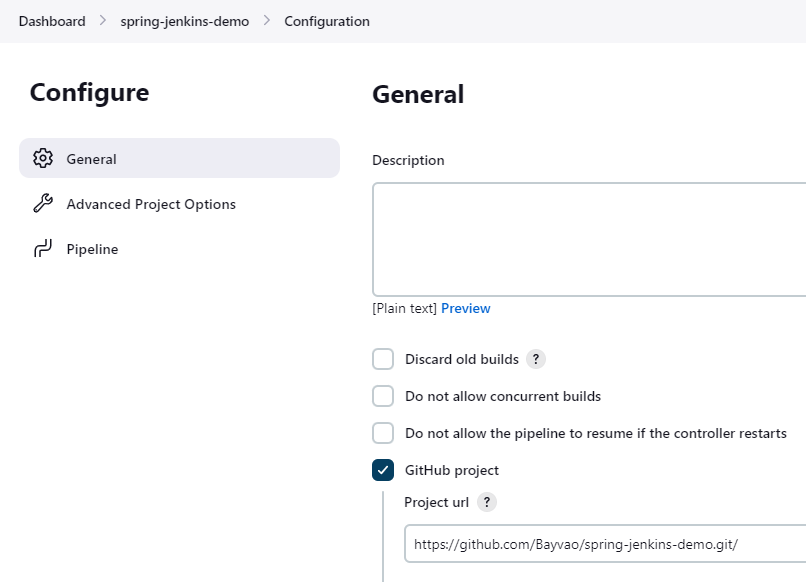
Under General, -> select GitHub project and specify the URL of our git repository.
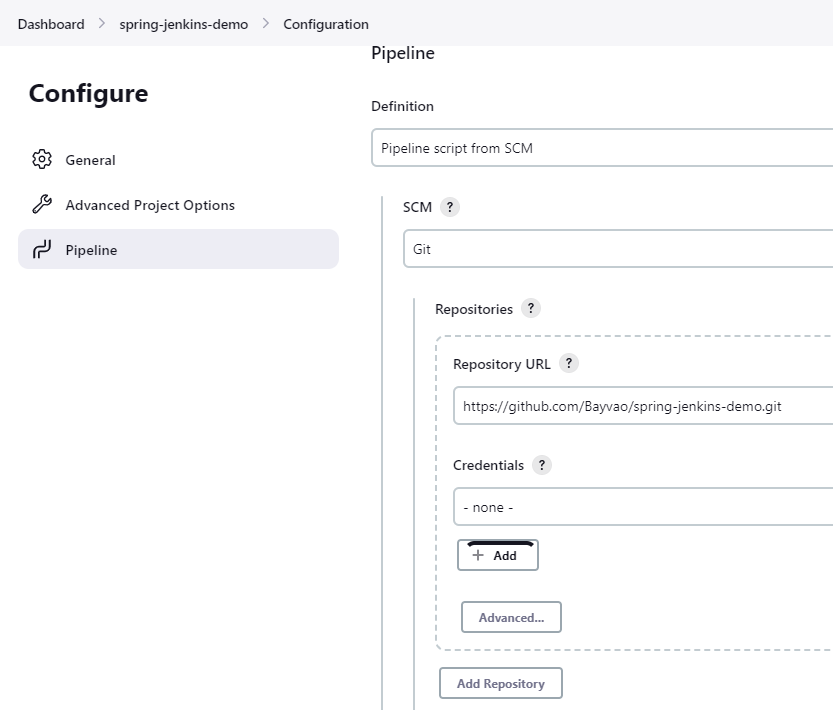
Now, under the pipeline section, we will select “Pipeline script from SCM”, under SCM we will select git, and specify the git repository URL from where it should fetch the Jenkinsfile because there are scenarios in real-world projects where we keep the Jenkinsfile in a separate repository.
If the Jenkinsfile repository and project repository are the same, then we mention the same URL.
Click on Save to continue.
5.3. Creating the Jenkins File for Spring Boot App
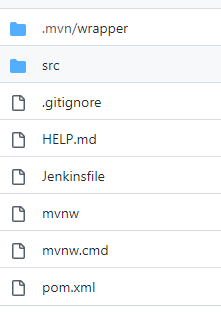
Jenkinsfile should be present at the root path of our spring boot project.
Jenkinsfile would contain below pipeline code –
pipeline {
	agent any

	environment {
		mavenHome = tool 'jenkins-maven'
	}

	tools {
		jdk 'java-17'
	}

	stages {

		stage('Build'){
			steps {
				bat "mvn clean install -DskipTests"
			}
		}

		stage('Test'){
			steps{
				bat "mvn test"
			}
		}

		stage('Deploy') {
			steps {
			    bat "mvn jar:jar deploy:deploy"
			}
		}
	}
}
5.4. Deploying the Jar File to the Nexus Maven Repository
Lets create a Maven 2 hosted repository in Nexus OSS where we will upload our artifacts. Go to the Sonatype download page (https://help.sonatype.com/repomanager3/product-information/download ) to download, install and run Nexus on your system.
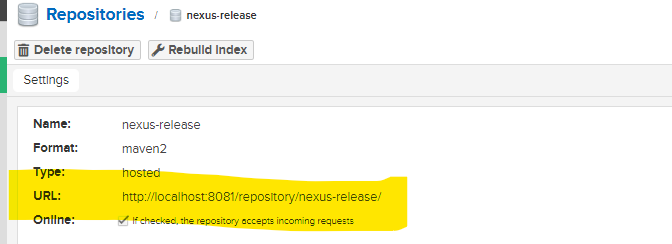
We are creating a nexus repository named “nexus-release” where we will deploy the generated artifacts. Use the below image to create a repository –
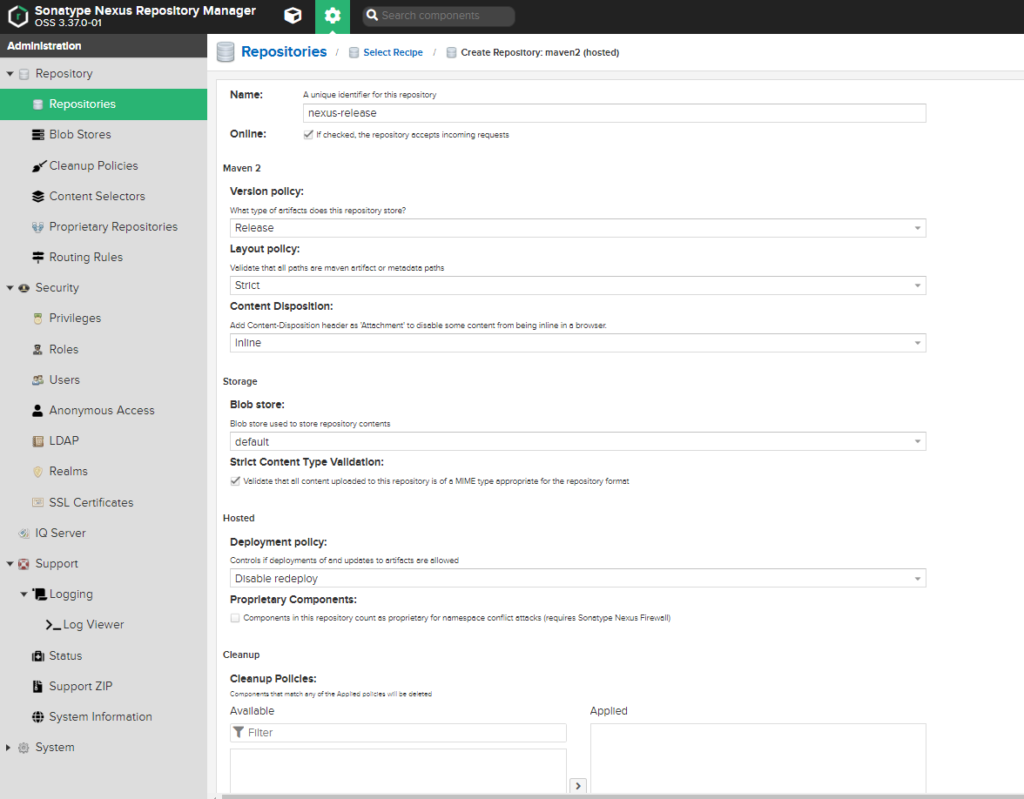
In the Deployment Policy we have used the “Disable redeploy” option which basically means that once a version of the artifact has been published/deployed in Nexus, the same version won’t be deployed again, nexus won’t allow it. Once the above-shown configuration is done, click “Create Repository”.
The next configuration is configuring the settings.xml file present in the maven folder to point to the nexus server inside your local machine “maven/conf/settings.xml” file. Inside the <server></server> tag we will specify our nexus username, password and id for use in your application.
<?xml version="1.0" encoding="UTF-8"?>

<settings xmlns="http://maven.apache.org/SETTINGS/1.2.0"
          xmlns:xsi="http://www.w3.org/2001/XMLSchema-instance"
          xsi:schemaLocation="http://maven.apache.org/SETTINGS/1.2.0 https://maven.apache.org/xsd/settings-1.2.0.xsd">


  <pluginGroups>

  </pluginGroups>


  <proxies>
  </proxies>


  <servers>
        <server>
            <id>nexus-release</id>
            <username>admin</username>
            <password>admin</password>
        </server>
  </servers>

  <mirrors>
    <mirror>
      <id>maven-default-http-blocker</id>
      <mirrorOf>external:http:*</mirrorOf>
      <name>Pseudo repository to mirror external repositories initially using HTTP.</name>
      <url>http://0.0.0.0/</url>
      <blocked>true</blocked>
    </mirror>
  </mirrors>

  <profiles>
  </profiles>
    <activeProfiles>
    </activeProfiles>
</settings>
Once the above configuration is done, next is configuring the repository manager in the project pom.xml file.
<distributionManagement>
   <repository>
       <uniqueVersion>false</uniqueVersion>
       <id>nexus-release</id>
       <name>nexus-release</name>
       <url>http://localhost:8081/repository/nexus-release/</url>
   </repository>
</distributionManagement>
Here inside <distributionManagement> tag we specify the id which we used in the settings.xml <server> tag, and then we specify the repository URL to where it should deploy.
Using the id of the server, it will fetch the username and password for nexus during the deployment phase of the pipeline.
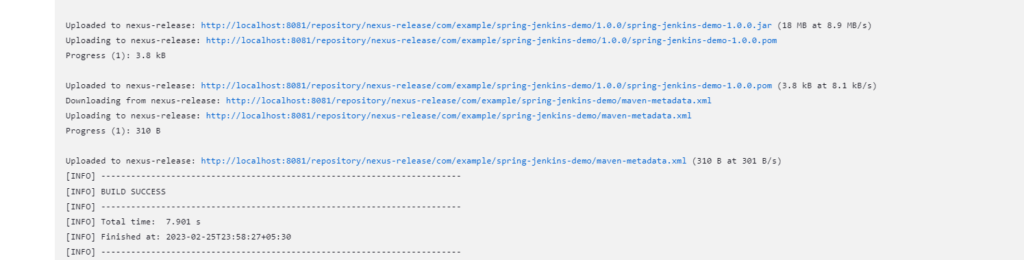
The repository URL will be found here –
Once all the final configuration is done.
When we hit Build Now, and check the console output, we will see the jar file has been built, test cases are executed and finally if the build is successful, we will see the generated jar is uploaded to the nexus repository.
5.4. Verify the Deployed Jar
Finally, let’s go to the Nexus OSS, and let’s check the uploaded jar file.
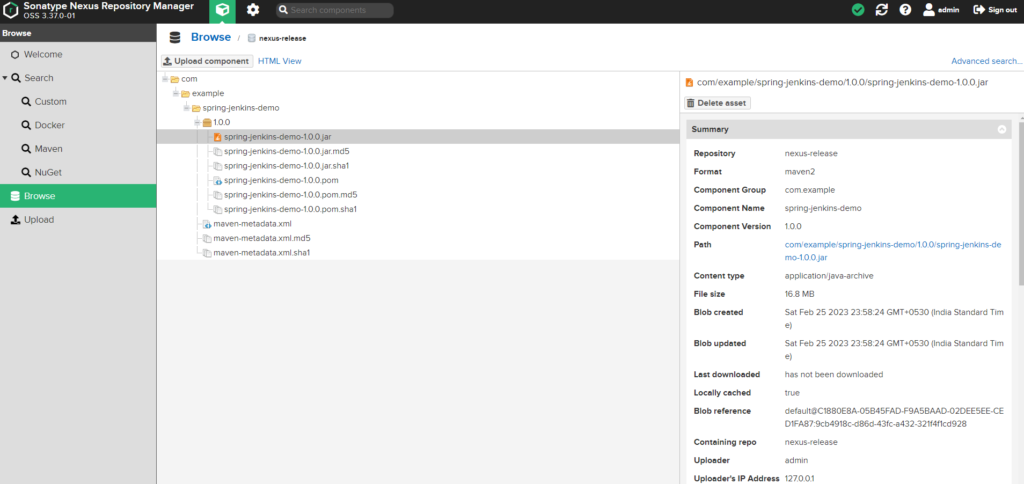
We see that the jar file and the pom.xml file has been successfully uploaded in the Nexus Repository Manager.
6. Conclusion
In this Jenkins and Spring boot tutorial, we learned:
- how to build jar/artifacts manually through Jenkins UI.
- Learned about Pipeline and how to write a pipeline in Jenkins.
- Learned about Nexus OSS repository and how to deploy build artifacts in nexus.
- Finally, we learned about Jenkinsfile and we wrote an end-to-end Jenkinsfile for a Spring boot project.
Happy Learning !!
great Article , very good one
Great article. Those below lines are confusing, you should specify the settings.xml path so that anyone can understand easily.
May be this can be done like this:
Thanks for the feedback. Article has been updated.