
In this article, we will learn to build an online Python editor – a tool that allows users to write and run Python code directly from the browser, syntax highlighting, and display program outputs and error messages. We’ll explore how Flask, Docker, and Kubernetes (K8s) can be combined to develop this powerful application.
Note that we can use this information to create an online code editor for any programming language e.g. Java, PHP etc. Only the third step (interpreter) will be different for each programming language.
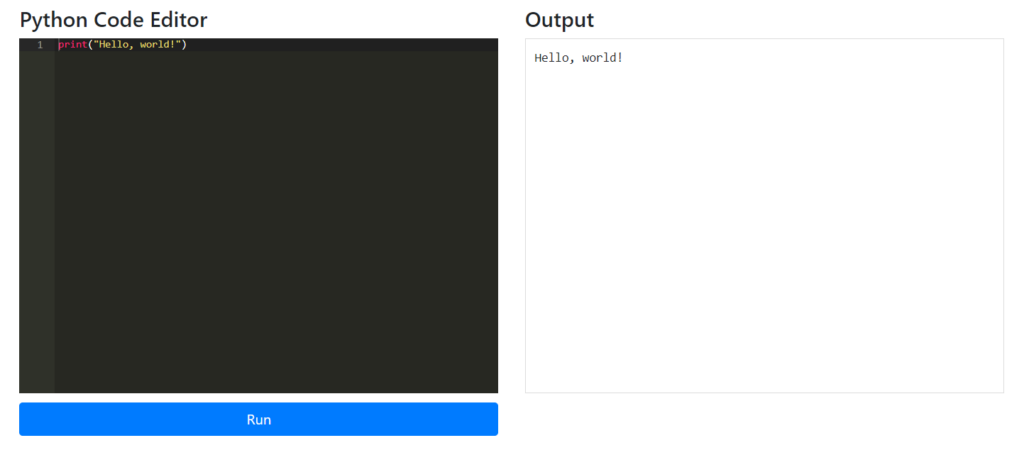
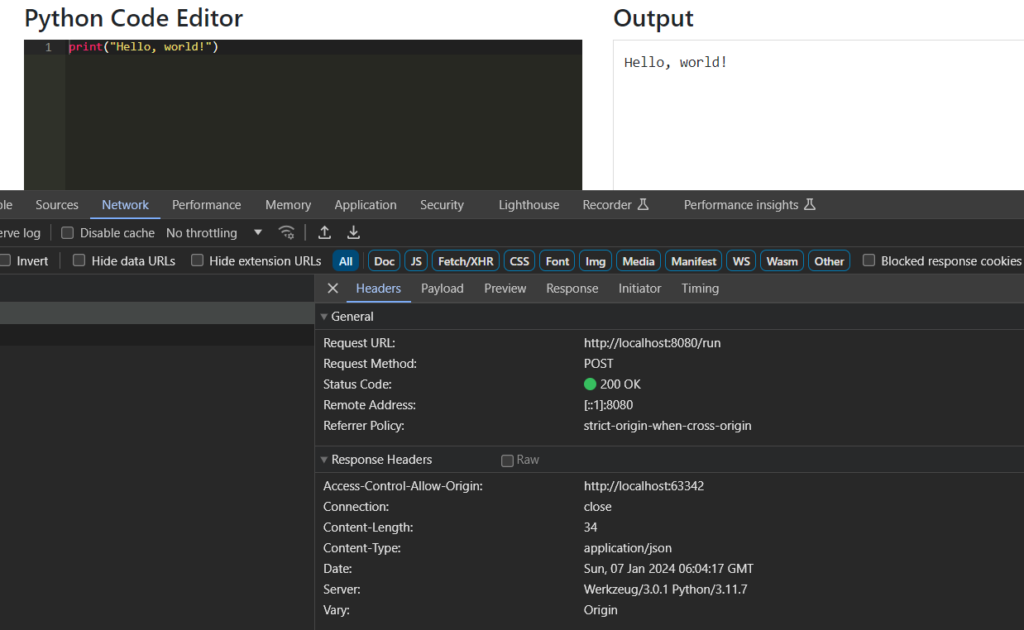
1. Preview of Final Online Code Editor
At the end of this article, we will make the following code editor as displayed in the browser. The UI is not that fancy, and it is out of scope too. The goal is to have a functional IDE that can accept the Python code as input, submit the code to a remote endpoint for execution, and display the program output/error in the output window.
You are free to make modifications as per your requirements.
2. Architecture of Online Python Editor
Let us look at the major components of the online code editor we are developing.
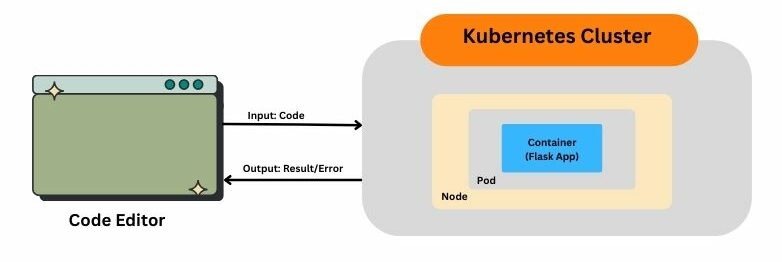
At the high level, we will perform the following actions:
- Create a basic UI that will allow the user to submit any Python program and later display the result of program execution.
- Create a Flask App that will interpret the submitted Python code and execute it using the installed Python runtime. It will also capture the output and return it as the API response.
- Containerize the Flask App using Docker so we can publish it in public/private repositories and deploy it later in K8s clusters.
- Using the locally installed Docker Desktop to run the docker container in the K8s cluster that is also locally deployed. You can choose to deploy it on remote servers or cloud environments. This will allow the application to scale horizontally in case of increased workload.
3. Development Environment
To follow along, we’ll need a basic development environment with Python, Docker, Docker Desktop, and Kubernetes installed. For coding purposes, I am using IntelliJ Idea. You can select an IDE of your choice.
The UI is a simple HTML page that submits the code to the Flask application endpoint and displays the output whatever is returned from the App. Creating a feature-rich UI is out of the scope of this article.
Installed software are:
- Python (We are using version 3.11)
- Docker and Docker Desktop
- Kubernetes
- IntelliJ Idea (or any other IDE)
4. Creating the Flask App (Interpreter) That Compiles the Program
The very first step is to create the Flask App that will be running on a remote server and will accept the submitted for execution. To do so, we will need to install a few modules first:
 pip install flask
 pip install flask_cors
After installing the required modules, we have written the following Flask App.
from flask import Flask, request, abort
from flask_cors import CORS

import subprocess
import base64
import ast

app = Flask(__name__)

CORS(app)

# ALLOWED_ORIGIN = 'https://mywebsite.com'


# @app.before_request
# def check_origin():
#  if request.headers.get('Origin') != ALLOWED_ORIGIN:
#    abort(403)


# Prevent malicious code such as module installations
def contains_install_commands(code):
  keywords = ['pip', 'install', 'sys.executable', 'subprocess', 'os.system', 'Popen']
  try:
    parsed_code = ast.parse(code)
    for node in ast.walk(parsed_code):
      if isinstance(node, ast.Call) and hasattr(node.func, 'id') and node.func.id in keywords:
        return True
      if isinstance(node, ast.Import) or isinstance(node, ast.ImportFrom):
        for n in node.names:
          if n.name in ['os', 'subprocess']:
            return True
  except SyntaxError:
    return True
  return False


# The Flask App
@app.route('/run', methods=['POST'])
def run_code():
  encoded_code = request.json['code']
  try:
    decoded_code = base64.b64decode(encoded_code).decode('utf-8')

    # Security check for installation commands
    if contains_install_commands(decoded_code):
      return {'error': 'Installation of packages is not allowed'}, 403

    # Proceed with code execution if the check passes
    output = subprocess.run(['python', '-c', decoded_code], capture_output=True, text=True, timeout=5)
    if output.returncode != 0:
      return {'output': output.stdout, 'error': output.stderr}, 200
    return {'output': output.stdout}, 200

  except (base64.binascii.Error, UnicodeDecodeError) as e:
    return {'error': 'Invalid input: Unable to decode base64 string.'}, 400
  except subprocess.TimeoutExpired:
    return {'error': 'Execution Timeout: Code took longer than 5 seconds to execute.'}, 408
  except subprocess.SubprocessError as e:
    return {'error': f'Subprocess error: {str(e)}'}, 500
  except Exception as e:
    return {'error': f'Unknown error: {str(e)}'}, 500


# For now allow traffic from all hosts and set debugging on

if __name__ == '__main__':
  app.run(host='0.0.0.0', port=5000, debug=True)
Let us understand this program:
- The flask framework is used to create the web server.
- The flask_cors extension handles Cross-Origin Resource Sharing, allowing requests from a different domain, if needed.
- The subprocess has been used for running external commands – in this case, Python code.
- The last (Abstract Syntax Trees) module is used for safely parsing Python code.
- The base64 module is used for encoding/decoding data in base64 format. Note that we are submitting the code to the server after ending the program in base64 format.
- The ‘
app = Flask(__name__)‘ initializes the Flask application and ‘CORS(app)‘ enables CORS for all routes in the app. - The ‘
contains_install_commands‘ function checks the submitted Python code for potentially malicious commands, like attempts to install packages or execute system commands. If such patterns are found, or if there’s a syntax error, the function returnsTrue, indicating a security risk. The security check is rudimentary and might not catch all potentially dangerous operations. - The ‘
/run‘ route handles POST requests where the Python code to be executed is received. The received code is base64-encoded, so it’s first decoded. If the security check is passed, the ‘subprocess.run‘ executes the Python code. It captures the output and any errors, with a timeout of 5 seconds. - The execution output or errors are returned to the client. Different HTTP status codes represent different outcomes (e.g., success, error, timeout).
- The application is configured to run on all interfaces (
host='0.0.0.0') and on port 5000. Debug mode is enabled. Note that running in debug mode (debug=True) is not recommended for production environments.
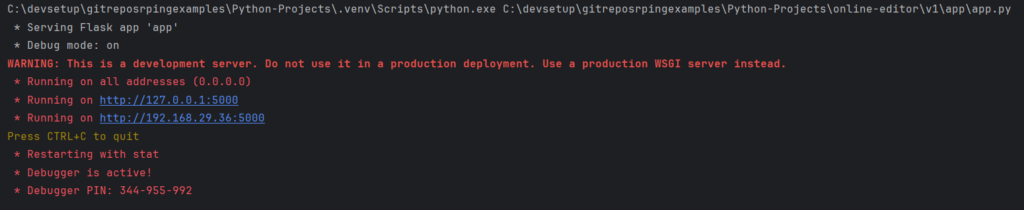
Run the program from the console to verify it does not contain any syntax errors and that the server is started successfully.
5. Creating the Editor (Basic) UI
The next logical step is to create the HTML UI that will submit the code and display output or errors. We have used the following HTML file designed to function as an online Python compiler, featuring a web-based code editor, a button to execute the code, and an area to display the output.
<!DOCTYPE html>
<html>
<head>
    <title>Online Python Compiler</title>
    <link rel="stylesheet" href="https://maxcdn.bootstrapcdn.com/bootstrap/4.5.2/css/bootstrap.min.css">
    <script src="https://cdnjs.cloudflare.com/ajax/libs/ace/1.4.12/ace.js"></script>
    <style>
        #editor {
            height: 400px;
        }
        #output {
            height: 400px;
            background-color: #fff;
            border: 1px solid #ddd;
            padding: 10px;
            overflow-y: auto;
            white-space: pre-wrap;
        }
        .run-button {
            width: 100%;
            margin-top: 10px;
        }
    </style>
</head>
<body>
    <div class="container mt-4">
        <div class="row">
            <div class="col-md-6 mb-4">
                <h4>Python Code Editor</h4>
                <div id="editor">print("Hello, world!")</div>
                <button onclick="runCode()" class="btn btn-primary run-button">Run</button>
            </div>
            <div class="col-md-6">
                <h4>Output</h4>
                <pre id="output"></pre>
            </div>
        </div>
    </div>

    <script>
        var editor = ace.edit("editor");
        editor.setTheme("ace/theme/monokai");
        editor.session.setMode("ace/mode/python");

        function runCode() {
            var xhr = new XMLHttpRequest();
            xhr.open("POST", "http://localhost:5000/run", true);
            xhr.setRequestHeader('Content-Type', 'application/json');

            var code = editor.getValue();
            var encodedData = btoa(code); // Base64 encode the code

            var data = {
                code: encodedData
            };

            xhr.onload = function () {
                var result = JSON.parse(xhr.responseText);
                document.getElementById("output").innerText = result.output || result.error;
            };

            xhr.send(JSON.stringify(data));
        }
    </script>
</body>
</html>
- The HTML file uses Bootstrap for styling and layout and uses Ace Editor, a high-performance code editor for features like syntax highlighting and line numbering. The editor uses the “Monokai” theme and is configured for Python syntax highlighting (
mode/python). - The
runCode()JavaScript function is responsible for handling code execution. It usesXMLHttpRequestto send the code to a server endpoint (http://localhost:5000/run) via a POST request. - The code from the editor is base64 encoded before being sent. This ensures the safe transmission of the code to the server.
- Upon receiving a response, the function updates the
outputpretag with either the output or the error message from the server.
Overall, when a user writes Python code in the Ace Editor and clicks the “Run” button, the code is sent to a backend server (the Flask application running on localhost:5000) for execution. The server’s response is then displayed in the Output area.
At this step, we can test the application by launching the HTML file in the browser and testing any Python code. It should work just fine.
If you face any error in functionality, fix the error here itself. From this step onwards, we will package the application as a docker container and deploy it K8s cluster for scalability.
6. Containerizing the Interpreter with Docker
The next step is to containerize the Flask application as a Docker container image. For this purpose, we have used the following Dockerfile.
- We start with specifying the base image ‘
python:3.11-slim‘ for the container. It is an official Python runtime image, version 3.11, with a slim variant. The slim variant is a smaller version of the standard Python image, containing only the minimal packages needed to run Python. - The WORKDIR sets the working directory inside the container to
/usr/src/app. All subsequent commands will be run from this directory in the container. - The COPY command copies everything from the current directory (where the Dockerfile is located) on the host machine into the
/usr/src/appdirectory inside the container. - The RUN command installs the runtime Python dependencies as listed in ‘
requirements.txt‘. The--no-cache-diroption is used to reduce the image size by not storing the cache data. - The EXPOSE command informs Docker that the container listens on network port 5000 at runtime.
- The CMD command sets the default command to execute when the container starts. In this case, it runs
app.pywhich is the Flask application file.
# Use an official Python runtime as a parent image
FROM python:3.11-slim

# Set the working directory in the container
WORKDIR /usr/src/app

# Copy the current directory contents into the container at /usr/src/app
COPY . /usr/src/app

# Install any needed packages specified in requirements.txt
RUN pip install --no-cache-dir -r requirements.txt

# Make port 5000 available to the world outside this container
EXPOSE 5000

# Run app.py when the container launches
CMD ["python", "app.py"]
The dependencies have been listed in the requirements.txt as follows:
flask
flask-cors
Finally, we the docker command to create the image of the application:
docker build -t python-flask-app .After the image has been created, we can tag the image and push the image in the official DockerHub repository using the following commands:
docker tag python-flask-app howtodoinjava/python-flask-app:latest

docker push howtodoinjava/python-flask-app:latest
The ‘howtodoinjava/python-flask-app:latest‘ is the new tag for your image.
howtodoinjava: is the Docker Hub username. You should replace this with your own Docker Hub username./python-flask-app: is the repository name on Docker Hub where the image will be stored.:latest: is the tag for the image. Thelatesttag is commonly used to indicate the most recent version of an image.
Note that you must be logged in to Docker Hub (or another Docker registry) on your machine where you’re running the ‘push‘ command. You can log in using ‘docker login‘.
docker loginAfter running these commands, the container image will be uploaded to your Docker Hub repository. It can then be pulled from any machine with Docker installed, using the command docker pull image-name.
7. Orchestrating with Kubernetes
Deploying a dockerized application (like python-flask-app) in Kubernetes involves several steps, including creating Kubernetes manifests for deployment and service. Let’s understand the steps one by one.
7.1. Deployment YAML
We start with creating the Deployment YAML script that manages the creation of Pods that run your application.
apiVersion: apps/v1
kind: Deployment
metadata:
  name: python-flask-app-deployment
spec:
  replicas: 1
  selector:
    matchLabels:
      app: python-flask-app
  template:
    metadata:
      labels:
        app: python-flask-app
    spec:
      containers:
      - name: python-flask-app
        image: howtodoinjava/python-flask-app:latest
        readinessProbe:
          tcpSocket:
            port: 5000
          initialDelaySeconds: 10
          periodSeconds: 30
        livenessProbe:
          tcpSocket:
            port: 5000
          periodSeconds: 30
        ports:
        - containerPort: 5000
      imagePullSecrets:
        - name: howtodoinjava-docker-hub-secret
Note that we need to create the imagePullSecrets containing the necessary credentials to pull images from a private Docker registry (such as Docker Hub).
kubectl create secret docker-registry howtodoinjava-docker-hub-secret \

  --docker-username=<your-docker-username> \
  --docker-password=<your-docker-password> \
  --docker-email=<your-email>
7.2. Service YAML
The service script defines a Kubernetes service, which exposes your application to the internet or other parts of the cluster.
- The following service definition exposes the port 8080 (the standard port for HTTP traffic) and the port on the Pod (5000) to which the service request will be forwarded.
- The LoadBalancer is the type of service that exposes the service externally using a load balancer. This makes the service accessible from outside the Kubernetes cluster. Now the external traffic can access the service through this load balancer.
- The sessionAffinity directs all requests from a specific client IP to the same Pod as long as it is running. It’s useful in scenarios where you want to maintain a sticky session.
After this configuration, we should send our requests to ‘http://hostname:8080‘ instead of using the port ‘5000‘ from the Code Editor UI.
apiVersion: v1
kind: Service
metadata:
  name: python-flask-app-service
spec:
  selector:
    app: python-flask-app
  ports:
    - protocol: TCP
      port: 80
      targetPort: 5000
  type: LoadBalancer
  sessionAffinity: ClientIP
7.3. Horizontal Pod Autoscaler
The hpa.yaml file is used to automatically scale the number of Pods in a Deployment based on observed CPU utilization or other select metrics.
In the following configuration, if the average CPU utilization exceeds 80%, it will automatically scale the number of Pods in the Deployment to meet demand, up to a maximum of 5 Pods. If the utilization drops, it will scale down the number of Pods, but not below 1 Pod.
apiVersion: autoscaling/v1
kind: HorizontalPodAutoscaler
metadata:
  name: python-flask-app-hpa
spec:
  scaleTargetRef:
    apiVersion: apps/v1
    kind: Deployment
    name: python-flask-app-deployment
  minReplicas: 1
  maxReplicas: 5
  targetCPUUtilizationPercentage: 80
7.4. Deny Engress Traffic
The purpose of deny-egress network policy is to restrict all outbound network traffic from Pods. When this policy is applied, these Pods will not be able to initiate or send traffic to any external services or other Pods outside of the allowed policies. This is especially helpful as a security measure so that our app cannot be used for malicious purposes such as Bitcoin mining.
We have used an empty egress rule list which means that no egress (outbound) traffic is allowed.
apiVersion: networking.k8s.io/v1
kind: NetworkPolicy
metadata:
  name: deny-egress
spec:
  podSelector:
    matchLabels:
      app: python-flask-app
  policyTypes:
  - Egress
  egress: []
7.5. Delete Evicted Pods
The next YAML file defines a Kubernetes CronJob designed to regularly clean up Pods that have been evicted but not yet deleted. Evicted Pods can occur due to resource constraints and may need manual cleanup. This automated job handles that cleanup process on an hourly basis, ensuring that evicted Pods don’t persist unnecessarily in the cluster.
apiVersion: batch/v1
kind: CronJob
metadata:
  name: delete-evicted-python-flask-app-pods
spec:
  schedule: "0 * * * *"  # Run every hour
  jobTemplate:
    spec:
      template:
        spec:
          containers:
          - name: kubectl-container
            image: bitnami/kubectl
            command:
            - "/bin/bash"
            - "-c"
            - >
              kubectl get pods --all-namespaces --field-selector 'status.phase==Failed' -o json |
              jq -r '.items[] | select(.status.reason=="Evicted") | select(.metadata.labels.app=="python-flask-app") | .metadata.name + " " + .metadata.namespace' |
              xargs -n 2 kubectl delete pod
          restartPolicy: OnFailure
7.6. Run the Scripts
Next, we run all the scripts in the Kubernetes terminal as follows and let Kubernetes do its magic.
kubectl apply -f deployment.yaml
kubectl apply -f service.yaml
kubectl apply -f hpa.yaml
kubectl apply -f delete-evicted-app.yaml
kubectl apply -f deny-egress-network-policy.yaml
8. Online Python Editor Demo
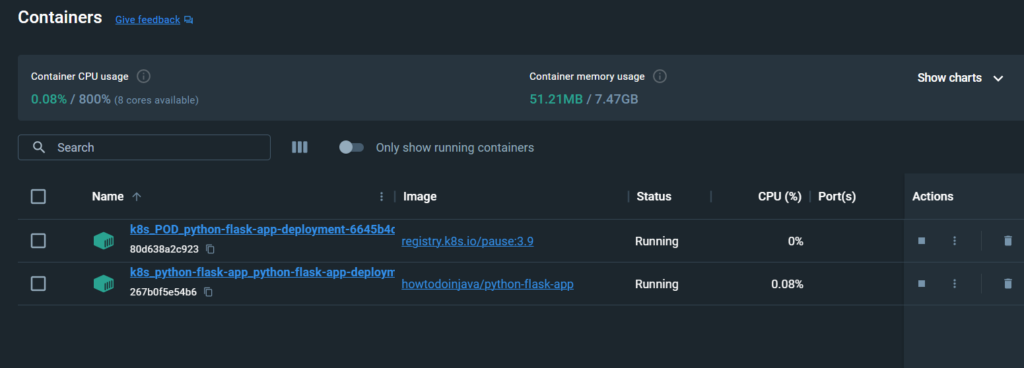
Head over to Docker desktop, or your configured Kubernetes environment manager, and check out the deployment service as well as the Flask app running in it.
Now we can access the application in the browser and hit the API at localhost:8080 port.
If you face any problem in connectivity then you can check for the Kubernetes logs and any problem that occurred in deploying the pods using the following command:
kubectl describe pods9. What’s Next from Here?
The Online Python editor created in this demo is a very basic one, and there are lots of improvement areas. For example, we can allow for interactive sessions similar to terminals in traditional IDEs that can accept the program inputs.
Or, we can design a fully functional attractive UI that can be served to your website users. Or we can add more security measures based on our past learnings and the ongoing learnings we observe in the debug logs.
There are so many things to take from here, and I will leave them to your preferences.
10. Conclusion
In this detailed article, we learned to build an online code editor from scratch. The built editor has been designed to compile the Python programs and display the output and errors. But we can use the same approach for building editors for other programming languages as well.
Happy Learning !!