
In this spring boot example, learn to configure web application to run on SSL (HTTPS) with self-signed certificate. Also learn to create SSL cert, as well.
SSL Configuration for Impatients
Spring boot HTTPS Config
server.port=8443
server.ssl.key-alias=selfsigned_localhost_sslserver
server.ssl.key-password=changeit
server.ssl.key-store=classpath:ssl-server.jks
server.ssl.key-store-provider=SUN
server.ssl.key-store-type=JKS
Redirect from HTTP to HTTPS
private Connector redirectConnector() {
  Connector connector = new Connector("org.apache.coyote.http11.Http11NioProtocol");
  connector.setScheme("http");
  connector.setPort(8080);
  connector.setSecure(false);
  connector.setRedirectPort(8443);
  return connector;
}
For detailed tutorial on how to setup whole thing, continue reading.
Table of Contents

Terminology
Create your own self signed SSL certificate
Create Spring-boot application and configure SSL
Redirect to HTTPS from HTTP
Terminology
Before moving further, let’s understand what specific terms such as SSL or TLS means.
SSL – stands for Secure Sockets Layer. It is the industry standard protocol for keeping an internet connection secure by safeguarding all sensitive data that is being sent between two systems, preventing hackers from reading and modifying any information transferred.
TLS – (Transport Layer Security) is an updated, more secure, version of SSL. It adds more features. Today, certificates provided by certificate authorities are based on TLS only. But regarding secured communication over network, the term SSL is still common as it is the old and just become popular among community.
HTTPS – (Hyper Text Transfer Protocol Secure) appears in the URL when a website is secured by an SSL certificate. It is the secured version of HTTP protocol.
Truststore and Keystore – Those are used to store SSL certificates in Java but there is little difference between them. truststore is used to store public certificates while keystore is used to store private certificates of client or server.
Create your own self signed SSL certificate
To get SSL digital certificate for our application we have two options –
- to create a self-signed certificate
- to obtain SSL certificate from certification authority(CA) we call it CA certificate.
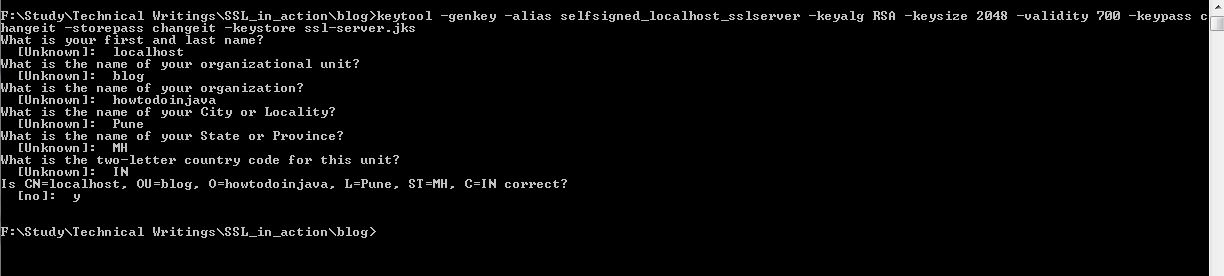
For today’s demo purpose we will create self-signed certificate generated by java keytool command. We need to run the keytool -genkey command from command prompt.
Here is the exact command we will use –
keytool -genkey -alias selfsigned_localhost_sslserver -keyalg RSA -keysize 2048 -validity 700 -keypass changeit -storepass changeit -keystore ssl-server.jks
Let’s understand above command –
-genkey– is the keytool command to generate the certificate, actually keytool is a multipurpose and robust tool which has several options-alias selfsigned_localhost_sslserver– indicates the alias of the certificate, which is used by SSL/TLS layer-keyalg RSA -keysize 2048 -validity 700– are self descriptive parameters indicating the crypto algorithm, keysize and certificate validity.-keypass changeit -storepass changeit– are the passwords of our truststore and keystore-keystore ssl-server.jks– is the actual keystore where the certificate and public/private key will be stored. Here we are using JKS fromat – Java Key Store, there are other formats as well for keystore.
Once we execute above command, it will ask for certain information and finally this will look like this.
That’s all we need at this point regarding certification generation. This will generate the ssl-server.jks keystore file containing our self signed certificates in the directory from where keytool command has been executed.
To view what is inside this keystore we can again use the keytool -list command as bellow.
keytool -list -keystore ssl-server.jks
Output will be something like –

Create Spring-boot project and configure SSL
Generate spring boot project
Create one spring boot project from SPRING INITIALIZR site with dependencies Web and Rest Repositories. After selecting the dependencies and giving the proper maven GAV coordinates, we will get download option in zipped format. Download the skeleton project, unzip and then import that in eclipse as maven project.

Add REST endpoint
For testing purpose we will use one simple REST endpoint. To do that open the already generated spring boot application class annotated with @SpringBootApplication and add this code. This will expose one rest endpoint with relative URL /secured in the server.
@RestController
class SecuredServerController{

	@RequestMapping("/secured")
	public String secured(){
		System.out.println("Inside secured()");
		return "Hello user !!! : " + new Date();
	}
}
That’s all we need to add web contents in our application. You can add more like adding pages, images to create a fully functional web application.
Spring boot SSL Configuration
First we need to copy the generated keystore file (ssl-server.jks) into the resources folder and then open the application.properties and add the below entries.
server.port=8443
server.ssl.key-alias=selfsigned_localhost_sslserver
server.ssl.key-password=changeit
server.ssl.key-store=classpath:ssl-server.jks
server.ssl.key-store-provider=SUN
server.ssl.key-store-type=JKS
That’s all we need to enable https. It’s pretty easy, right? Thanks to spring boot for making everything possible very easily.
Demo
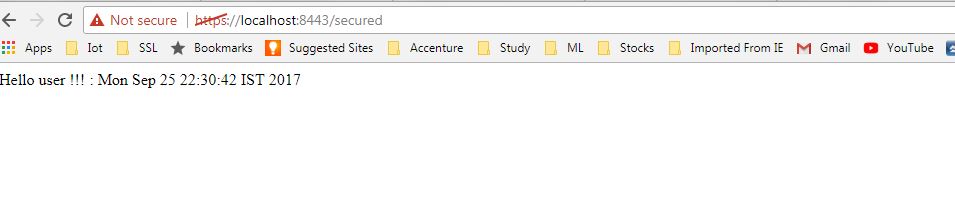
Now it is time to do a final maven build by command mvn clean install and start the application by java -jar target\ssl-server-0.0.1-SNAPSHOT.jar command. This will start our secured application in localhost 8443 port and our end point url will be https://localhost:8443/secured.
Since our REST endpoint is exposed over GET, we can test it through browser only. Go to https://localhost:8443/secured and you will get some browser warning like certificate is not issued from trusted certificate authorities, add exception to that in browser and you will get response from HTTPS server just created by you.
Redirect HTTP requests to HTTPS
This is an optional step in case you want to redirect your HTTP traffic to HTTPS, so that the full site becomes secured. To do that in spring boot, we need to add HTTP connector at 8080 port and then we need to set redirect port 8443. So that any request in 8080 through http, it would be automatically redirected to 8443 and https.
To do that you just need to add below configuration.
@Bean
public EmbeddedServletContainerFactory servletContainer() {
  TomcatEmbeddedServletContainerFactory tomcat = new TomcatEmbeddedServletContainerFactory() {
      @Override
      protected void postProcessContext(Context context) {
        SecurityConstraint securityConstraint = new SecurityConstraint();
        securityConstraint.setUserConstraint("CONFIDENTIAL");
        SecurityCollection collection = new SecurityCollection();
        collection.addPattern("/*");
        securityConstraint.addCollection(collection);
        context.addConstraint(securityConstraint);
      }
    };

  tomcat.addAdditionalTomcatConnectors(redirectConnector());
  return tomcat;
}

private Connector redirectConnector() {
  Connector connector = new Connector("org.apache.coyote.http11.Http11NioProtocol");
  connector.setScheme("http");
  connector.setPort(8080);
  connector.setSecure(false);
  connector.setRedirectPort(8443);

  return connector;
}
Do a final maven build by command mvn clean install and start the application. Test http://localhost:8080/secured. It would be automatically redirected to HTTPS secured URL.
Summary
So today we learned, how we can enable HTTPS in spring boot application and also we have seen how we can redirect HTTP traffic to HTTPS. We also learned to create self signed SSL certificate.
Drop me your questions in comments section.
Happy Learning !!
I am not able to make a POST/PUT call , getting error as Forbidden. However Get works as expected.
Literally thank you so much! Wasted hours on this one.. Keep it up!
“Go to https://localhost:8443/secured and you will get some browser warning like certificate is not issued from trusted certificate authorities, add exception to that in browser and you will get response from HTTPS server just created by you.”
How to overcome the browser warning? What next I need to perform to overcome browser warning.
Thanks
https://github.com/hdineth/spring-boot-ssl-https-example
Hello, I got this error:
IllegalArgumentException: Private key must be accompanied by certificate chain
Any help?
Using: Spring Tool Suite 4
Version: 4.2.1.RELEASE
Build Id: 201904170946
Java 1.8
Thanks
replace server.ssl.key-password with server.ssl.key-store-password in application.properties
I can confirm this is correct.
How to run this same project on jdk 1.7?
Hi,
Thank you for sharing your knowledge.
I wonder where I should put the configuration code for “Redirect HTTP requests to HTTPS”?
Is it a separate configuration file ? Does it require a class for these code?
Thank you so much for your sharing.
Dew
Just paste the code in main class. no need to create separate configuration file
i want clarity on SSL and TLS what was the ssl and what is the TLS so, i want to make two project configuring with SSL certificate protocol and another one with TLS protocol certificate so, i will be able to see clearly , what are features in the ssl and what are in TLS
How can I avoid getting not secure exception? Is there a way to sign certificate and make it trusted?
when trying added POST on http://localhost:8080/… , it handles the POST (sent through postman), as GET — as if a GET was sent. it returns the same response as GET request.
Qi Shen
This example redirect me to a login page with URL : https://localhost:8098/login
I have not added the “Redirect HTTP requests to HTTPS” part yet.
Remove any spring security dependencies if any…
Many Thanks for such a great tutorials. Could you please create some tutorials for the Spring Boot 2.0?
You can find some at https://howtodoinjava.com/spring-boot/spring-boot-log4j2-properties/
This page isn’t working
localhost didn’t send any data.
I am getting this error, when hitting “http://localhost:8443/secured”. Please suggest.
Plrease use “https” in place of “http” in URL.
The class has been removed and replaced by org.springframework.boot.web.embedded.tomcat.TomcatServletWebServerFactory
Use the below code for Spring boot 2.0.0 release.
______________________________________________________________________________________________________________
@Bean
public ServletWebServerFactory servletContainer() {
TomcatServletWebServerFactory tomcat = new TomcatServletWebServerFactory() {
@Override
protected void postProcessContext(Context context) {
SecurityConstraint securityConstraint = new SecurityConstraint();
securityConstraint.setUserConstraint(“CONFIDENTIAL”);
SecurityCollection collection = new SecurityCollection();
collection.addPattern(“/*”);
securityConstraint.addCollection(collection);
context.addConstraint(securityConstraint);
}
};
tomcat.addAdditionalTomcatConnectors(redirectConnector());
return tomcat;
}
private Connector redirectConnector() {
Connector connector = new Connector(“org.apache.coyote.http11.Http11NioProtocol”);
connector.setScheme(“http”);
connector.setPort(8080);
connector.setSecure(false);
connector.setRedirectPort(8443);
return connector;
}
Hi, did you find any solution for this? I have the same problem
What problem?
This code works on version 1.5.7.RELEASE, however it doesn’t compile on the current 2.0.1.RELEASE of SpringBoot.
I need HTTPS using TLS 1.2 in Spring boot. How can I achieve that
Hi can you tell how about integrating a Apache ssl certified that is issued from gadaddy? They give 3 different files. Any help on it.
Thanks
In My case it asks for some username/password , what would be the default username/password for TLS ?