
In Spring 6.1, one notable advancement takes center stage – the Programmatic Validator Implementation. While Spring has long supported declarative validation through annotations, Spring 6.1 introduces this powerful enhancement by providing a dedicated programmatic approach to validation.
The programmatic validation allows developers to exercise fine-grained control over the validation process, enabling dynamic and conditional validation scenarios that go beyond the capabilities of declarative approaches. In this tutorial, we delve into the details of implementing programmatic validation and seamlessly integrating them with Spring MVC controllers.
1. Difference between Declarative and Programmatic Validation
For data validation, Spring framework has two main approaches: declarative validation and programmatic validation.
“Declarative validation” involves specifying validation rules through metadata or annotations on the domain objects. Spring leverages JavaBean Validation (JSR 380) annotations, such as @NotNull, @Size, and @Pattern, to declare validation constraints directly within the class definition.
Validation is automatically triggered by Spring during the data binding process (e.g., in Spring MVC form submissions). The developer doesn’t need to explicitly call validation logic in the code.
public class User {

  @NotNull
  private String username;

  @Size(min = 6, max = 20)
  private String password;
  // ...
}“Programmatic validation“, on the other hand, involves writing custom validation logic in code, typically using a Validator interface provided by Spring. This approach allows for more dynamic and complex validation scenarios.
The developer is responsible for invoking the validation logic explicitly, typically within the service layer or controller.
public class UserValidator implements Validator {

  @Override
  public boolean supports(Class<?> clazz) {
    return User.class.isAssignableFrom(clazz);
  }

  @Override
  public void validate(Object target, Errors errors) {
    User user = (User) target;
    // Custom validation logic, potentially involving multiple fields
  }
}
2. When to Use Programmatic Validation
The choice between declarative and programmatic validation depends on the specific requirements of the use case.
Declarative validation is often preferred for simpler scenarios where validation rules can be clearly expressed through annotations. It’s convenient and aligns well with the principles of convention over configuration.
Programmatic validation provides greater flexibility and control and is suitable for complex validation scenarios that go beyond what can be expressed declaratively. Programmatic validation is especially useful when validation logic depends on dynamic conditions or involves interactions between multiple fields.
We can employ a combination of both approaches. We can leverage the simplicity of declarative validation for common scenarios and resort to programmatic validation when facing more intricate requirements.
3. Introduction to Programmatic Validator API
At its core, the Programmatic Validator API in Spring allows for the creation of custom validator classes and defines the validation rules that may not be easily captured through annotations alone.
The following are the general steps for creating a custom Validator object.
- Create a class that implements the org.springframework.validation.Validator interface.
- Override the supports() method to specify which classes this validator supports.
- Implement the validate() or validateObject() methods to define the actual validation logic.
- Use the ValidationUtils.rejectIfEmpty() or ValidationUtils.rejectIfEmptyOrWhitespace() utility methods to reject the given field with the given error code.
- We can call Errors.rejectValue() method directly to add errors of other types.
import org.springframework.validation.Errors;
import org.springframework.validation.ValidationUtils;
import org.springframework.validation.Validator;

@Component
public class UserValidator implements Validator {

  @Override
  public boolean supports(Class<?> clazz) {
      return User.class.isAssignableFrom(clazz);
  }

  @Override
  public void validate(Object target, Errors errors) {

    User user = (User) target;

    // Example: Validate username is not empty
    ValidationUtils.rejectIfEmptyOrWhitespace(errors,
      "username", "field.required", "Username must not be empty.");

    // Add more custom validation logic as needed
  }
}
To use the custom Validator, we can either inject it into Spring components like controllers or services, or instantiate it directly. Then we invoke the validate methods, passing the object to be validated and an Errors object to collect validation errors.
public class UserService {

  private Validator userValidator;

  public UserService(Validator userValidator) {
    this.userValidator = userValidator;
  }

  public void someServiceMethod(User user) {

    Errors errors = new BeanPropertyBindingResult(user, "user");
    userValidator.validate(user, errors);

    if (errors.hasErrors()) {
      // Handle validation errors
    }
  }
}
4. Initial Setup
4.1. Maven
To demonstrate the implementation and usage of the programmatic validator, we need to include the Spring Framework 6.1 or Spring Boot 3.2, as these are the minimum supported versions. The API is part of Spring Core, so no additional dependencies are needed.
<parent>
  <groupId>org.springframework.boot</groupId>
  <artifactId>spring-boot-starter-parent</artifactId>
  <version>3.2.0</version>
  <relativePath/>
</parent>
4.2. Domain Objects
The domain objects for this tutorial are Employee and Department objects. We are not creating a complex structure so we can focus on the core concept.
@Data
@Builder
public class Employee {

  Long id;
  String firstName;
  String lastName;
  String email;
  boolean active;

  Department department;
}
@Data
@Builder
public class Department {
Long id;
String name;
boolean active;
}5. Implementing the Programmatic Validator
The following EmployeeValidator class implements the org.springframework.validation.Validator interface and implement the necessary methods. It adds the validation rules to the employee fields, as necessary.
import com.howtodoinjava.app.customValidator.model.Employee;
import org.springframework.validation.Errors;
import org.springframework.validation.ValidationUtils;
import org.springframework.validation.Validator;

public class EmployeeValidator implements Validator {

  @Override
  public boolean supports(Class<?> clazz) {
    return Employee.class.isAssignableFrom(clazz);
  }

  @Override
  public void validate(Object target, Errors errors) {

    ValidationUtils.rejectIfEmpty(errors, "id", ValidationErrorCodes.ERROR_CODE_EMPTY);
    ValidationUtils.rejectIfEmptyOrWhitespace(errors, "firstName", "First name cannot be empty");
    ValidationUtils.rejectIfEmptyOrWhitespace(errors, "lastName", "Last name cannot be empty");
    ValidationUtils.rejectIfEmptyOrWhitespace(errors, "email", "Email cannot be empty");

    Employee employee = (Employee) target;

    if (employee.getFirstName() != null && employee.getFirstName().length() < 3) {
      errors.rejectValue("firstName", "First name must be greater than 2 characters");
    }

    if (employee.getLastName() != null && employee.getLastName().length() < 3) {
      errors.rejectValue("lastName", "Last name must be greater than 3 characters");
    }
  }
}
Similarly, we have defined the validator for Department class. You can add more complex validation rules if necessary.
import com.howtodoinjava.app.customValidator.model.Department;
import org.springframework.validation.Errors;
import org.springframework.validation.ValidationUtils;
import org.springframework.validation.Validator;

public class DepartmentValidator implements Validator {

  @Override
  public boolean supports(Class<?> clazz) {
    return Department.class.equals(clazz);
  }

  @Override
  public void validate(Object target, Errors errors) {

    ValidationUtils.rejectIfEmpty(errors, "id", ValidationErrorCodes.ERROR_CODE_EMPTY);
    ValidationUtils.rejectIfEmptyOrWhitespace(errors, "name", "Department name cannot be empty");

    Department department = (Department) target;

    if(department.getName() != null && department.getName().length() < 3) {
      errors.rejectValue("name", "Department name must be greater than 3 characters");
    }
  }
}
Now we can validate the instances of Employee and Department objects, as follows:
Employee employee = Employee.builder().id(2L).build();
//Aurowire if needed
EmployeeValidator employeeValidator = new EmployeeValidator();

Errors errors = new BeanPropertyBindingResult(employee, "employee");
employeeValidator.validate(employee, errors);

if (!errors.hasErrors()) {
  System.out.println("Object is valid");
} else {
  for (FieldError error : errors.getFieldErrors()) {
    System.out.println(error.getCode());
  }
}
The program output.
First name cannot be empty
Last name cannot be empty
Email cannot be empty
Similar validation can be done for Department object.
6. Chaining Multiple Validators
If the above custom validators, if we validate the Employee object then API will not validate the Department object. Ideally, the validation should be performed for all associated objects when a specific object is validated.
The programmatic validation API allows for invoking other validators, aggregating all the errors, and then finally returning the result. This is done using the ValidationUtils.invokeValidator() method as follows:
public class EmployeeValidator implements Validator {

  DepartmentValidator departmentValidator;

  public EmployeeValidator(DepartmentValidator departmentValidator) {
    if (departmentValidator == null) {
      throw new IllegalArgumentException("The supplied Validator is null.");
    }
    if (!departmentValidator.supports(Department.class)) {
      throw new IllegalArgumentException("The supplied Validator must support the Department instances.");
    }
    this.departmentValidator = departmentValidator;
  }

  @Override
  public void validate(Object target, Errors errors) {

    //...

    try {
      errors.pushNestedPath("department");
      ValidationUtils.invokeValidator(this.departmentValidator, employee.getDepartment(), errors);
    } finally {
      errors.popNestedPath();
    }
  }
}- The pushNestedPath() method allows to set the temporary nested paths for subobjects. In the above example, when the validation for the department object happens, the path is set to ’employee.department’.
- The popNestedPath() method resets the path to the original path before calling the pushNestedPath() method. In the above example, it resets the path to ’employee’ again.
Now when we validate the employee object, we can see the validation errors for department objects as well.
Department department = Department.builder().id(1L).build();
Employee employee = Employee.builder().id(2L).department(department).build();

EmployeeValidator employeeValidator = new EmployeeValidator(new DepartmentValidator());

Errors errors = new BeanPropertyBindingResult(employee, "employee");
employeeValidator.validate(employee, errors);

if (!errors.hasErrors()) {
  System.out.println("Object is valid");
} else {
  for (FieldError error : errors.getFieldErrors()) {
    System.out.println(error.getField());
    System.out.println(error.getCode());
  }
}
The program output:
firstName
First name cannot be empty

lastName
Last name cannot be empty

email
Email cannot be empty

department.name
Department name cannot be emp
Notice the field name printed as ‘department.name’. The ‘department.‘ prefix has been added because of the pushNestedPath() method.
7. Using MessageSource with Message Resolution
Using hardcoded messages is not a good idea, so we can further improve this code by adding the messages into a resource file (e.g. messages.properties) and later using the MessageSource.getMessage() to resolve the messages in the desired locale.
For example, let us add the following messages in the resource file:
error.field.empty={0} cannot be empty
error.field.size={0} must be between 3 and 20
For uniform access, add the following codes in a constant file. Note that these error codes are added in the custom validator implementations.
public class ValidationErrorCodes {

  public static String ERROR_CODE_EMPTY = "error.field.empty";
  public static String ERROR_CODE_SIZE = "error.field.size";
}
Now when we resolve the messages, we get the messages for the properties file.
MessageSource messageSource;

//...

if (!errors.hasErrors()) {
  System.out.println("Object is valid");
} else {
  for (FieldError error : errors.getFieldErrors()) {

    System.out.println(error.getCode());
    System.out.println(messageSource.getMessage(
      error.getCode(), new Object[]{error.getField()}, Locale.ENGLISH));
  }
}
The program output:
error.field.empty
firstName cannot be empty

error.field.empty
lastName cannot be empty

error.field.empty
email cannot be empty

error.field.empty
department.name cannot be empty
8. Integrating Programmatic Validator with Spring MVC/WebFlux Controller
Integrating Programmatic Validators with Spring MVC controllers involves injecting Programmatic Validators into controllers, configuring them in the Spring context, and leveraging annotations like @Valid and BindingResult for streamlined validation.
As a big relief, this integration also addresses Ajax form submissions and unit testing controllers.
Below is a simplified example of a Spring MVC controller that uses the EmployeeValidator object we created in the previous sections.
import com.howtodoinjava.app.customValidator.model.Employee;
import com.howtodoinjava.app.customValidator.model.validation.DepartmentValidator;
import com.howtodoinjava.app.customValidator.model.validation.EmployeeValidator;
import org.springframework.stereotype.Controller;
import org.springframework.ui.Model;
import org.springframework.validation.BindingResult;
import org.springframework.validation.annotation.Validated;
import org.springframework.web.bind.WebDataBinder;
import org.springframework.web.bind.annotation.*;

@Controller
@RequestMapping("/employees")
public class EmployeeController {

  @InitBinder
  protected void initBinder(WebDataBinder binder) {
    // Injecting Programmatic Validators
    binder.setValidator(new EmployeeValidator(new DepartmentValidator()));
  }

  @GetMapping("/registration")
  public String showRegistrationForm(Model model) {
    model.addAttribute("employee", Employee.builder().build());
    return "employee-registration-form";
  }

  @PostMapping("/processRegistration")
  public String processRegistration(
    @Validated @ModelAttribute("employee") Employee employee,
    BindingResult bindingResult) {

    if (bindingResult.hasErrors()) {
      return "employee-registration-form";
    }

    // Logic for handling a successful form submission
    // Typically involving database operations, authentication, etc.

    return "employee-registration-confirmation"; // Redirect to a success page
  }
}
Later when the form submission happens then the validation errors can be displayed in the view using the ‘${#fields.hasErrors(‘*’)}’ expressions.
In the following example, we are displaying the validation errors in two places i.e. all the errors in a list on top of the form and then individual field errors. Feel free to customize the code as per your requirements.
<!DOCTYPE html>
<html lang="en" xmlns:th="http://www.thymeleaf.org">
<head>
<meta charset="UTF-8">
<meta name="viewport" content="width=device-width, initial-scale=1.0">
<title>Employee Registration</title>
</head>
<body>
<h2>Employee Registration Form</h2>
<!-- Employee Registration Form -->
<form action="./processRegistration" method="post" th:object="${employee}">
<!-- Display validation errors, if any -->
<div th:if="${#fields.hasErrors('*')}">
<div style="color: red;">
<p th:each="error : ${#fields.errors('*')}" th:text="${error}"></p>
</div>
</div>
<!-- Employee ID (assuming it's a hidden field for registration) -->
<input type="hidden" th:field="*{id}" />
<!-- Employee First Name -->
<label for="firstName">First Name:</label>
<input type="text" id="firstName" th:field="*{firstName}" required />
<span th:if="${#fields.hasErrors('firstName')}" th:text="#{error.field.size}"></span>
<br/>
<!-- Employee Last Name -->
<label for="lastName">Last Name:</label>
<input type="text" id="lastName" th:field="*{lastName}" required />
<span th:if="${#fields.hasErrors('lastName')}" th:text="#{error.field.size}"></span>
<br/>
<!-- Employee Email -->
<label for="email">Email:</label>
<input type="email" id="email" th:field="*{email}" required />
<span th:if="${#fields.hasErrors('email')}" th:text="#{error.field.size}"></span>
<br/>
<!-- Employee Active Status -->
<label for="active">Active:</label>
<input type="checkbox" id="active" th:field="*{active}" />
<br/>
<!-- Department Information -->
<h3>Department:</h3>
<label for="department.name">Department Name:</label>
<input type="text" id="department.name" th:field="*{department.name}" required />
<span th:if="${#fields.hasErrors('department.name')}" th:text="#{error.field.size}"></span>
<br/>
<!-- Submit Button -->
<button type="submit">Register</button>
</form>
</body>
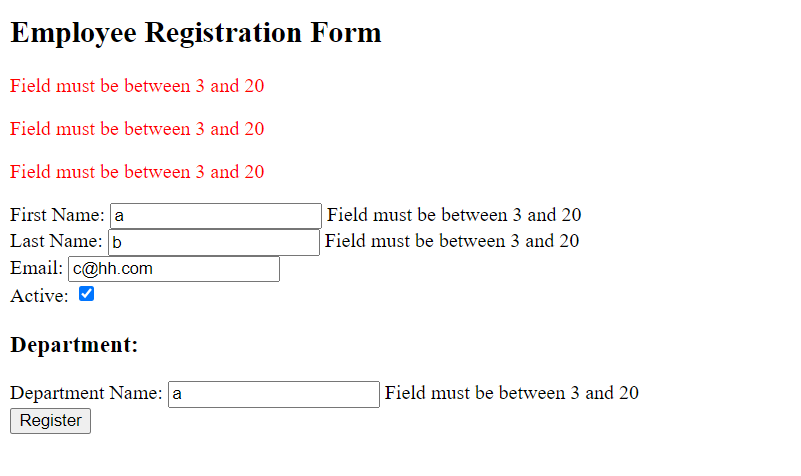
</html>When we run the application and submit an invalid form, we get the errors as displayed in the image:
9. Unit Testing Programmatic Validators
We can test the custom validators either as a mocked dependency or as an individual test subject. The following JUnit test cases test the EmployeeValidator.
We are writing two very basic simple tests for quick reference, and you can write more tests based on your requirements.
import com.howtodoinjava.app.customValidator.model.Department;
import com.howtodoinjava.app.customValidator.model.Employee;
import org.junit.jupiter.api.Assertions;
import org.junit.jupiter.api.BeforeAll;
import org.junit.jupiter.api.Test;
import org.springframework.validation.BeanPropertyBindingResult;
import org.springframework.validation.Errors;

public class TestEmployeeValidator {

  static EmployeeValidator employeeValidator;

  @BeforeAll
  static void setup() {
    employeeValidator = new EmployeeValidator(new DepartmentValidator());
  }

  @Test
  void validate_ValidInput_NoErrors() {
    // Set up a valid user
    Employee employee = Employee.builder().id(1L)
      .firstName("Lokesh").lastName("Gupta").email("admin@howtodoinjava.com")
      .department(Department.builder().id(2L).name("Finance").build()).build();

    Errors errors = new BeanPropertyBindingResult(employee, "employee");
    employeeValidator.validate(employee, errors);

    Assertions.assertFalse(errors.hasErrors());
  }

  @Test
  void validate_InvalidInput_HasErrors() {
    // Set up a valid user
    Employee employee = Employee.builder().id(1L)
      .firstName("A").lastName("B").email("C")
      .department(Department.builder().id(2L).name("HR").build()).build();

    Errors errors = new BeanPropertyBindingResult(employee, "employee");
    employeeValidator.validate(employee, errors);

    Assertions.assertTrue(errors.hasErrors());
    Assertions.assertEquals(3, errors.getErrorCount());
  }
}
As a best practice, ensure that the tests cover edge cases and boundary conditions. This includes scenarios where the input is at the minimum or maximum allowed values.
10. Conclusion
In this tutorial, we explored the Spring 6.1 Programmatic Validator API and its implementation guidelines with examples. The programmatic validation allows developers to exercise fine-grained control over the validation process.
We discussed how to create and use the custom validator classes and integrate them with Spring MVC controllers. We learned to use message resolution and later we also covered how to test these validators for more robust coding practices.
Happy Learning !!