Security is an integral part of any enterprise application. Security involves two phases i.e. authentication and authorization. Authentication verifies who you are. Authorization verifies what you are authorized to do. In this post, we will learn to build role based basic authentication/ authorization security for REST APIs.
Sections in this post:

Background information
Important classes/annotations used
Building the security interceptor
Testing authorization and authentication on REST APIs
Background information
In this post, I will attempt to solve following security problems:
- Get username and password from http request
- Fetch the applicable method security details
- Verify if user is authorized to access the API
- Return valid error codes in case of invalid access
Also, please note that I am leaving following parts on you to implement yourself:
- Access database to fetch password, to verify against password provided in request
- Fetch allowed roles from database for a valid user
I am reusing the code written for ETag usage demo. This project has 2 primary classes:
User.java : The model class which represents the user resource in system
@XmlAccessorType(XmlAccessType.NONE)
@XmlRootElement(name = "user")
public class User implements Serializable
{
	@XmlAttribute(name = "id")
	private int id;

	@XmlAttribute(name="uri")
	private String uri;

	@XmlElement(name = "firstName")
	private String firstName;

	@XmlElement(name = "lastName")
	private String lastName;

	@XmlElement(name="last-modified")
	private Date lastModified;

	//Getters and setters
}
UserService.java : This class has GET and PUT APIs to fetch/ modify the user resource.
@Path("/user-service")
public class UserService
{
    @GET
    @Path("/users/{id}")
    public Response getUserById(@PathParam("id") int id, @Context Request req)
    {
        Response.ResponseBuilder rb = Response.ok(UserDatabase.getUserById(id));
        return rb.build();
    }

    @PUT
    @Path("/users/{id}")
    public Response updateUserById(@PathParam("id") int id)
    {
        //Update the User resource
        UserDatabase.updateUser(id);
        return Response.status(200).build();
    }
}
I will be using above 2 APIs and secure them in this tutorial.
Important classes/annotations used
JAX-RS provides necessary annotations to implement security in RESTEasy based application. Important annotations are:
- javax.annotation.security.PermitAll: This annotation, when applied on an API, is used to declare that API should be accessed freely by any user. No access restrictions apply on this API.
- javax.annotation.security.DenyAll: This annotation is used to declare that nobody is allowed to access this API irrespective of the roles assigned to any user.
- javax.annotation.security.RolesAllowed: This annotation helps to identify that which roles are necessary for any user, to access this API. If user is validated by user/name and password but does not have role(s) specified by this annotation, he will not be allowed access.
- javax.ws.rs.core.HttpHeaders: An interface that provides access to HTTP header information attached with a http request.
- org.jboss.resteasy.util.Base64: This class helps in encoding and decoding to and from Base64 notations.
Apart from above classes, org.jboss.resteasy.spi.interception.PreProcessInterceptor will be used to create the security interceptor. javax.ws.rs.ext.Provider annotation will be used to register the interceptor with resteasy context.
Building the security interceptor
Before building the interceptor, lets secure the APIs. I have added @PermitAll and @RolesAllowed annotation in GET/ PUT APIs. GET API is open to all i.e. no access restriction. PUT API required a valid user with “ADMIN” capability.
@Path("/user-service")
public class UserService
{
	@PermitAll
    @GET
    @Path("/users/{id}")
    public Response getUserById(@PathParam("id") int id, @Context Request req)
    {
        Response.ResponseBuilder rb = Response.ok(UserDatabase.getUserById(id));
        return rb.build();
    }

	@RolesAllowed("ADMIN")
    @PUT
    @Path("/users/{id}")
    public Response updateUserById(@PathParam("id") int id)
    {
        //Update the User resource
        UserDatabase.updateUser(id);
        return Response.status(200).build();
    }
}
The security interceptor is build by implementing org.jboss.resteasy.spi.interception.PreProcessInterceptor interface. This interface has one method which implementing class class need to implement.
	public ServerResponse preProcess(HttpRequest request, ResourceMethod methodInvoked)
															throws Failure, WebApplicationException;
methodInvoked parameter provides access to method which will be invoked as a result of calling the REST API.
request parameter provides access to request headers and parameters passed by client.
The interceptor class is defined as below:
@Provider
@ServerInterceptor
public class SecurityInterceptor implements PreProcessInterceptor
{
	//more code
}
@Provider make the resteasy context scanning to add this class as context class.
@ServerInterceptor annotation adds this class in available interceptors list.
Now, the first step is to check whether API is open for all or closed for all. This can be done by checking @PermitAll and @DenyAll annotations.
	Method method = methodInvoked.getMethod();

	//Access allowed for all
	if(method.isAnnotationPresent(PermitAll.class))
	{
		return null; //Return null to continue request processing
	}
	//Access denied for all
	if(method.isAnnotationPresent(DenyAll.class))
	{
		return ACCESS_FORBIDDEN; //Return access denied to user
	}
Next step is fetch the authorization header from request. From authorization header, we will retrieve the username and password sent by user.
	//Get request headers
	final HttpHeaders headers = request.getHttpHeaders();

	//Fetch authorization header
	final List<String> authorization = headers.getRequestHeader(AUTHORIZATION_PROPERTY);

	//If no authorization information present; block access
	if(authorization == null || authorization.isEmpty())
	{
		return ACCESS_DENIED;
	}

	//Get encoded username and password
	final String encodedUserPassword = authorization.get(0).replaceFirst(AUTHENTICATION_SCHEME + " ", "");

	//Decode username and password
	String usernameAndPassword;
	try {
		usernameAndPassword = new String(Base64.decode(encodedUserPassword));
	} catch (IOException e) {
		return SERVER_ERROR;
	}

	//Split username and password tokens
	final StringTokenizer tokenizer = new StringTokenizer(usernameAndPassword, ":");
	final String username = tokenizer.nextToken();
	final String password = tokenizer.nextToken();
Now we will get the roles necessary to access the API from @RolesAllowed annotation.
	RolesAllowed rolesAnnotation = method.getAnnotation(RolesAllowed.class);
	Set<String> rolesSet = new HashSet<String>(Arrays.asList(rolesAnnotation.value()));
rolesSet contains all the roles which can allow the API access.
Now, in final step we have to do two things. First validate the username and password from any database service, and if user is valid then get the role assigned to him. This role will be used to check the authentication success for user.
	if(rolesSet.contains(userRole))
	{
		isAllowed = true;
	}
The complete sourcecode for SecurityInterceptor.java is as given below:
/**
 * This interceptor verify the access permissions for a user
 * based on username and passowrd provided in request
 * */
@Provider
@ServerInterceptor
public class SecurityInterceptor implements PreProcessInterceptor
{
	private static final String AUTHORIZATION_PROPERTY = "Authorization";
	private static final String AUTHENTICATION_SCHEME = "Basic";
	private static final ServerResponse ACCESS_DENIED = new ServerResponse("Access denied for this resource", 401, new Headers<Object>());;
	private static final ServerResponse ACCESS_FORBIDDEN = new ServerResponse("Nobody can access this resource", 403, new Headers<Object>());;
	private static final ServerResponse SERVER_ERROR = new ServerResponse("INTERNAL SERVER ERROR", 500, new Headers<Object>());;

	@Override
	public ServerResponse preProcess(HttpRequest request, ResourceMethod methodInvoked) throws Failure, WebApplicationException
	{
		Method method = methodInvoked.getMethod();

		//Access allowed for all
		if(method.isAnnotationPresent(PermitAll.class))
		{
			return null;
		}
		//Access denied for all
		if(method.isAnnotationPresent(DenyAll.class))
		{
			return ACCESS_FORBIDDEN;
		}

		//Get request headers
		final HttpHeaders headers = request.getHttpHeaders();

		//Fetch authorization header
	    final List<String> authorization = headers.getRequestHeader(AUTHORIZATION_PROPERTY);

	    //If no authorization information present; block access
	    if(authorization == null || authorization.isEmpty())
	    {
	    	return ACCESS_DENIED;
	    }

	    //Get encoded username and password
	    final String encodedUserPassword = authorization.get(0).replaceFirst(AUTHENTICATION_SCHEME + " ", "");

	    //Decode username and password
	    String usernameAndPassword;
		try {
			usernameAndPassword = new String(Base64.decode(encodedUserPassword));
		} catch (IOException e) {
			return SERVER_ERROR;
		}

		//Split username and password tokens
	    final StringTokenizer tokenizer = new StringTokenizer(usernameAndPassword, ":");
	    final String username = tokenizer.nextToken();
	    final String password = tokenizer.nextToken();

	    //Verifying Username and password
	    System.out.println(username);
	    System.out.println(password);

	    //Verify user access
		if(method.isAnnotationPresent(RolesAllowed.class))
		{
			RolesAllowed rolesAnnotation = method.getAnnotation(RolesAllowed.class);
			Set<String> rolesSet = new HashSet<String>(Arrays.asList(rolesAnnotation.value()));

			//Is user valid?
			if( ! isUserAllowed(username, password, rolesSet))
			{
				return ACCESS_DENIED;
			}
		}

		//Return null to continue request processing
		return null;
	}

	private boolean isUserAllowed(final String username, final String password,	final Set<String> rolesSet)
	{
		boolean isAllowed = false;

		//Step 1. Fetch password from database and match with password in argument
		//If both match then get the defined role for user from database and continue; else return isAllowed [false]
		//Access the database and do this part yourself
		//String userRole = userMgr.getUserRole(username);
		String userRole = "ADMIN";

		//Step 2. Verify user role
		if(rolesSet.contains(userRole))
		{
			isAllowed = true;
		}
		return isAllowed;
	}
}
Testing authorization and authentication on REST APIs
To test the security code, deploy the web application in any application server like Tomcat. Now, send following requests:
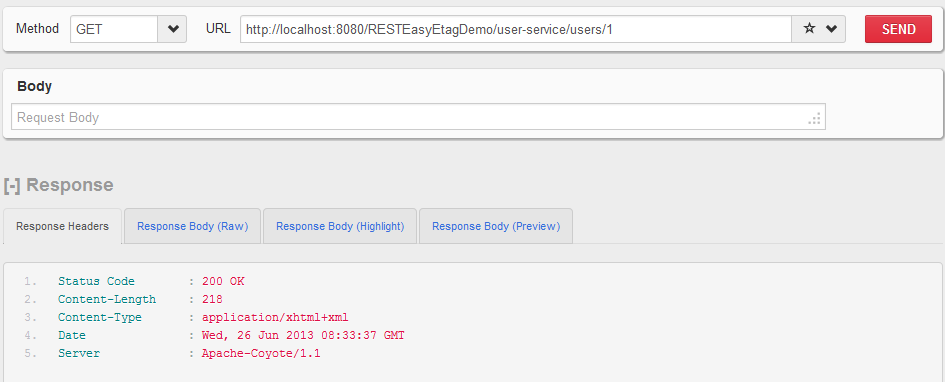
HTTP GET http://localhost:8080/RESTEasyEtagDemo/user-service/users/1 without username and password
User is able to access the API successfully.
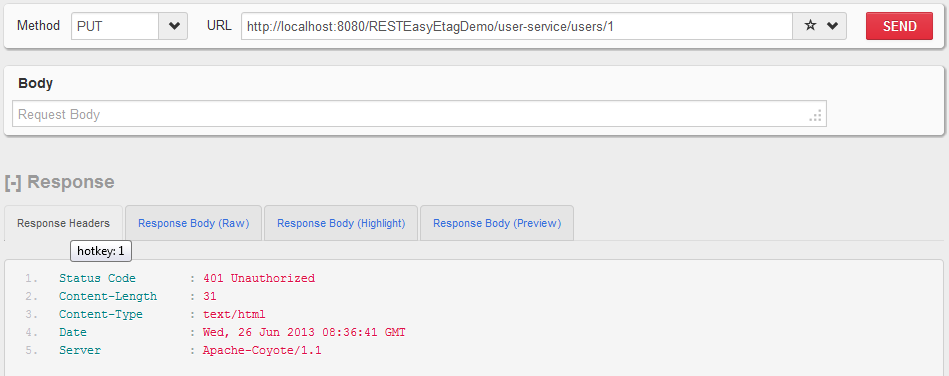
HTTP PUT http://localhost:8080/RESTEasyEtagDemo/user-service/users/1 without username and password
User is not able to access the API.
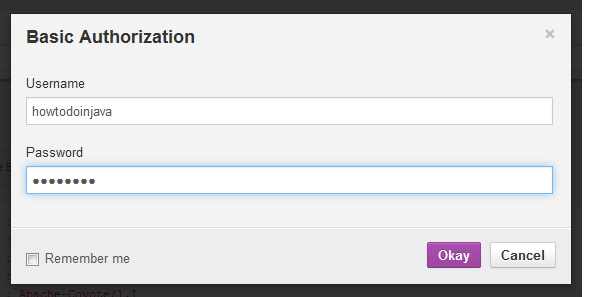
Add basic authorization credentials
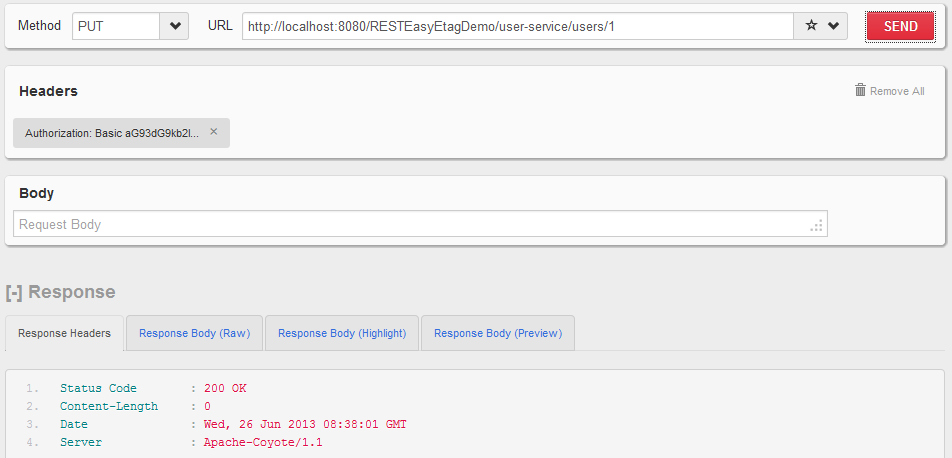
HTTP PUT http://localhost:8080/RESTEasyEtagDemo/user-service/users/1 with username and password added
User is able to access protected API
That’s all in this tutorial. If you have any query or suggestion, drop me a comment.
Happy Learning !!
Do I have to provide User and Password for every request? is there any solution for session token? is it any problem versus session token? how do I provide the user and password like in your example?
I downloaded source code and get the following error:
java.lang.NoClassDefFoundError: org/jboss/resteasy/core/ResourceMethod
………………
Caused by: java.lang.ClassNotFoundException: org.jboss.resteasy.core.ResourceMethod from [Module “deployment.RESTEasyEtagDemo.war:main” from Service Module Loader]
I tried using latter version of resteasy jars, also imported them from wildfly, used even tag in maven, or commented dependencies “resteasy-jaxrs” and “resteasy-jaxb-provider”.
I am using wildfly 10.0.1 Final
Well after that I fixed some depreciated methods. Also cleaned everyithng from maven. Here is SecurityInterceptor:
package com.howtodoinjava.demo.rest.security; import java.io.IOException; import java.lang.reflect.Method; import java.util.Arrays; import java.util.HashSet; import java.util.List; import java.util.Set; import java.util.StringTokenizer; import javax.annotation.security.DenyAll; import javax.annotation.security.PermitAll; import javax.annotation.security.RolesAllowed; import javax.ws.rs.WebApplicationException; import javax.ws.rs.container.ContainerRequestContext; import javax.ws.rs.core.HttpHeaders; import javax.ws.rs.ext.Provider; import org.jboss.resteasy.annotations.interception.ServerInterceptor; import org.jboss.resteasy.core.Headers; import org.jboss.resteasy.core.*; import org.jboss.resteasy.core.ServerResponse; import org.jboss.resteasy.spi.Failure; import org.jboss.resteasy.spi.HttpRequest; import org.jboss.resteasy.spi.interception.PreProcessInterceptor; import org.jboss.resteasy.spi.metadata.ResourceMethod; import org.jboss.resteasy.util.Base64; /** * This interceptor verify the access permissions for a user * based on username and passowrd provided in request * */ @Provider //@ServerInterceptor public class SecurityInterceptor implements /*PreProcessInterceptor*/ javax.ws.rs.container.ContainerRequestFilter { private static final String AUTHORIZATION_PROPERTY = "Authorization"; private static final String AUTHENTICATION_SCHEME = "Basic"; private static final ServerResponse ACCESS_DENIED = new ServerResponse("Access denied for this resource", 401, new Headers<Object>());; private static final ServerResponse ACCESS_FORBIDDEN = new ServerResponse("Nobody can access this resource", 403, new Headers<Object>());; private static final ServerResponse SERVER_ERROR = new ServerResponse("INTERNAL SERVER ERROR", 500, new Headers<Object>());; //@Override public ServerResponse preProcess(HttpRequest request, ResourceMethod methodInvoked) throws Failure, WebApplicationException { Method method = methodInvoked.getMethod(); //Access allowed for all if(method.isAnnotationPresent(PermitAll.class)) { return null; } //Access denied for all if(method.isAnnotationPresent(DenyAll.class)) { return ACCESS_FORBIDDEN; } //Get request headers final HttpHeaders headers = request.getHttpHeaders(); //Fetch authorization header final List<String> authorization = headers.getRequestHeader(AUTHORIZATION_PROPERTY); //If no authorization information present; block access if(authorization == null || authorization.isEmpty()) { return ACCESS_DENIED; } //Get encoded username and password final String encodedUserPassword = authorization.get(0).replaceFirst(AUTHENTICATION_SCHEME + " ", ""); //Decode username and password String usernameAndPassword; try { usernameAndPassword = new String(Base64.decode(encodedUserPassword)); } catch (IOException e) { return SERVER_ERROR; } //Split username and password tokens final StringTokenizer tokenizer = new StringTokenizer(usernameAndPassword, ":"); final String username = tokenizer.nextToken(); final String password = tokenizer.nextToken(); //Verifying Username and password System.out.println(username); System.out.println(password); //Verify user access if(method.isAnnotationPresent(RolesAllowed.class)) { RolesAllowed rolesAnnotation = method.getAnnotation(RolesAllowed.class); Set<String> rolesSet = new HashSet<String>(Arrays.asList(rolesAnnotation.value())); //Is user valid? if( ! isUserAllowed(username, password, rolesSet)) { return ACCESS_DENIED; } } //Return null to continue request processing return null; } private boolean isUserAllowed(final String username, final String password, final Set<String> rolesSet) { boolean isAllowed = false; //Step 1. Fetch password from database and match with password in argument //If both match then get the defined role for user from database and continue; else return isAllowed [false] //Access the database and do this part yourself //String userRole = userMgr.getUserRole(username); String userRole = "ADMIN"; //Step 2. Verify user role if(rolesSet.contains(userRole)) { isAllowed = true; } return isAllowed; } @Override public void filter(ContainerRequestContext arg0) throws IOException { // TODO Auto-generated method stub } }when i am authenticating it is by default taking server’s user id and pwd ?
how do i overcome it ??
I’m trying to login part REST web service but I don’t know the correct way pass the data in header, i m trying to pass some data in header like user code,Last date, user Session Id, device_id, version, build_version_code Could you please give me some hints?
Too good! Learned something useful for the project! :)
Thanks
Glad, it helps !!
Hi Lokesh, my question is quiet simple. can you please tell me which tool / plugin you are using to test RESTFUL server. (Attached in screen shot)
https://www.advancedrestclient.com/
thank you.
One more thing, how to build authentication/ authorization security for JAX-RS Jersey.
Can I use this authorization technique when my services are hosted on Jetty webserve, thanks in advance.
I think you should be able to do it. Can you please try and share with us.
For some reason my web service methods are not intercepted by SecurityInterceptor. My REST web service is hosted on Jetty and on all service methods I have placed @DenyAll, just for testing. Code for SecurityInterceptor is as follows;
@Provider @ServerInterceptor public class SecurityInterceptor implements PreProcessInterceptor { private static final ServerResponse ACCESS_DENIED = new ServerResponse("Access denied for this resource", 401, new Headers<>()); @Override public ServerResponse preProcess(HttpRequest httpRequest, ResourceMethod resourceMethod) throws Failure, WebApplicationException { Method method = resourceMethod.getMethod(); if(method.isAnnotationPresent(PermitAll.class)) { return null; //to continue request processing } else if(method.isAnnotationPresent(DenyAll.class)) { return ACCESS_DENIED; } } }Try this solution.
Hey Lokesh..I have developed some rest service using Jersey. Now need to make it secure for authentication purpose not authorization as of now.
Can you please guide me as I am new to web services security.
Do you have some token based authentication for RESTEasy APIs. I want to design some REST API URL for login and logout. On upon calling login URL with valid user name and password, the server will assign token to response header. For subsequent API call the client has to send the token to the server. Also the token has some expiery. Is there any some existing framework available? If yes then can you write one example like above? if not then how do I integrate it?
Why do I need to write custom validation code to see which method was called and what roles are allowed as per annotations? We can’t I simply protect the webservice as I would protect a servlet?
See: https://docs.oracle.com/middleware/1212/wls/RESTF/secure-restful-service.htm#BABCFJCD
Hi Lokesh,
So as per this, user will have to provide credentials for each PUT/POST/DELETE requests, which doesn’t seem viable.
What i want is user logs in only once and gets a session token, and thereafter all requests go through that session token.
Please tell me how this can be achieved using RestEasy.
Please Help.
Give me 1-2 days. I will write an example for you.
Any update on the session token?
I am on vacation for next 3-4 days.
Hi, is there an example available? I would be interested, too.
https://stackoverflow.com/questions/17594910/what-is-the-proper-replacement-of-the-resteasy-3-x-preprocessinterceptor
Look at updated post here:
https://howtodoinjava.com/resteasy/resteasy-containerrequestfilter-example/
How to resolve this error
HTTP Status 500 – Subresource for target class has no jax-rs annotations.: org.jboss.resteasy.core.ServerResponse
org.jboss.resteasy.spi.interception.PreProcessInterceptor is now deprecated in RestEasy 3.0. Do you have any idea of how this can be done without that class?
i will check and reply on this.
https://howtodoinjava.com/resteasy/resteasy-containerrequestfilter-example/
suppose that i have another web application and i want to access the url instead of using firefox plugin, what should i do?
If I am understanding your question correctly, you want to build a rest client programatically, right? Well, you can see an example here..
https://howtodoinjava.com/resteasy/resteasy-client-for-consuming-rest-apis/
yes exactly, the rest client must have authentication (i mean in rest client code). i don’t see where you place authentication code in your example. thank