
Spring MVC, part of the Spring Framework ecosystem, empowers developers to create web applications ranging from SPA (Single Page Application) to complex dashboard-based applications. It follows the MVC architectural pattern, offering a structured approach to building web applications where the data model, user interface, and application logic are neatly organized.
This Spring MVC tutorial will guide absolute beginners through the essential concepts and hands-on practices for creating a simple hello world web application. You are encouraged to explore more advanced concepts to enhance your knowledge of the specific sub-topics of Spring MVC.
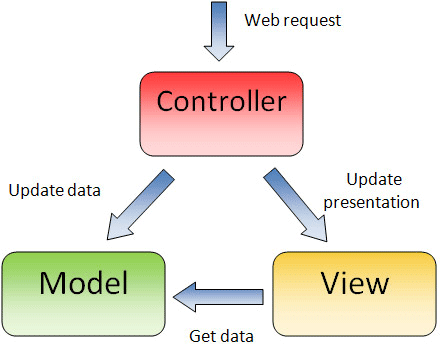
1. The MVC (Model-View-Controller) Pattern
Model-view-controller (MVC) is a well-known design pattern for designing UI-based applications. It mainly decouples the business logic (model) from the user interface (view) by separating the roles of model, view, and controller in any application.
- Models are responsible for encapsulating application data for views to present.
- Views should only present the data without including any business logic.
- Controllers are responsible for receiving requests from users and invoking back-end services (manager or dao) for business logic processing.
The core idea of the MVC pattern is to separate business logic from UIs to allow them to change independently without affecting each other.
In a typical Spring MVC application, models usually consist of POJO objects that are processed by the service layer and persisted by the persistence layer. Views are usually view templates such as JSPs, Thymleaf, Angular or React. The controller part is played by the dispatcher servlet.
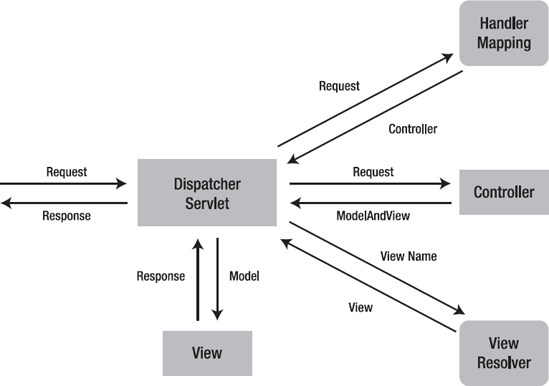
2. Spring DispatcherServlet – The Front Controller
In any simplest Spring MVC application, a controller is a servlet we need to configure in a Java web deployment descriptor (i.e., the web.xml file). In Spring MVC, the controller often referred to as a DispatcherServlet implements the front controller design pattern and every web request must go through it so that it can manage the entire request life cycle.
The DispatcherServlet is the entry point of the application, the heart of Spring Web MVC that coordinates all request handling operations.
When a web request is sent to a Spring MVC application hosted on an application server, the dispatcher servlet first receives the request. Then it organizes the different components configured in Spring’s web application context (e.g. actual request handler controller and view resolvers) or annotations present in the controller itself, all needed to handle the request.
3. Introduction to Spring MVC
Spring MVC is a web framework that uses a spring-based approach to building web applications that adhere to the MVC pattern. Spring MVC is built on top of Spring’s IOC container that utilizes the dependency injection at its core. Dependency injection allows us to couple the components within an application loosely.
3.1. Control Flow
Spring MVC consists of a variety of components that facilitate how we process user requests and serve responses to those requests. These requests can be sent by a browser, or maybe some other service consumers.
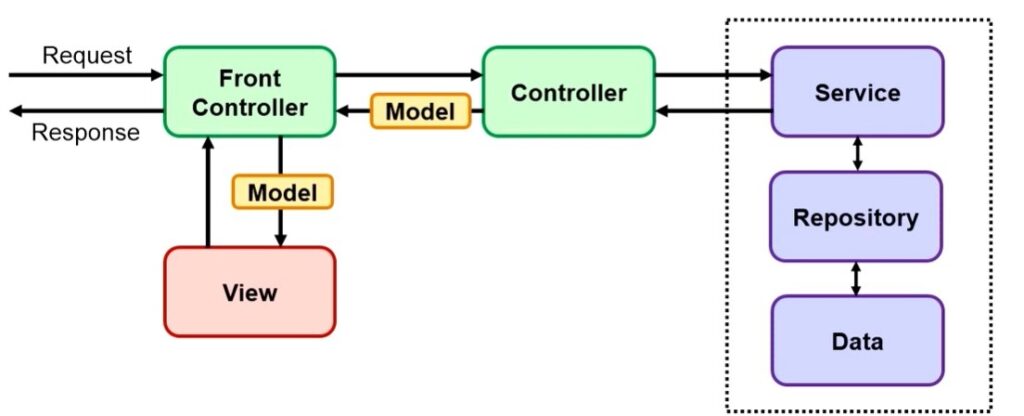
When a user sends a request, the front controller receives the request and decides which of the Spring MVC controllers should handle this request. The controller is selected, generally, by inspecting the URL and then matching it to the annotations found on controller and handler methods.
The controller then executes the application logic, mostly invoking a service method that uses a repository to read or write information to a relational database. As part of the request processing, it prepares the model containing data meant to be sent to the user views.
After processing, the controller sends the model and the view name to the front controller. The front controller then retrieves the view and passes the model to the view. Once the view has been constructed, the front controller then responds to the request with the view that is typically displayed to the user’s browser.
3.2. Additional Features and Advantages
The advantage of such request processing lifecycle is that it allows us to introduce custom components that will alter the behavior of the lifecycle without affecting the other components.
As part of request processing, Spring MVC enables the following features:
- Facilitates the request parameters binding to POJO classes by matching the request parameter names and the field names. Spring MVC also allows multiple data types and performs type conversions when necessary. It eliminates the need to fish the request parameters and their values out of the request, which is often error-prone.
- Provides support for binding the response fields with the views to render using a tag library or support for view template engines.
- Supports customizable view resolution capabilities to provide multiple view formats based on the end user’s preference such as Excel, PDF, XML and JSON.
- Support for input validation using a standardized approach. Also helps in alerting the user of that error using the error messages.
- Provides support for handling multipart uploads and downloads.
- Support for theming and internationalization.
- Integrates well with Spring security to implement the security at URL and method levels.
4. Spring MVC Hello World Example
In this demo, we will create the simplest Hello World application that consists of:
- A controller class with a handle method that sets a message in the model
- A view displaying the message passed from the handler method
4.1. Prerequisites
Before we start developing our first application, make sure we have the following:
- Java Development Kit (JDK): The Spring framework runs on Java. We are using Spring Boot 3 requiring Java 17 as the minimum supported version. Spring Boot 2 requires a minimum JDK 8 or above.
- Build Tool: A build tool such as Maven or Gradle will help in managing the project’s dependencies and build process.
- Integrated Development Environment (IDE): While it is possible to code and run the application in a text editor as well, using an IDE like IntelliJ IDEA, Eclipse, or Visual Studio Code helps with features such as code completion, automatic compilation, debugging, and project management.
Additionally, a basic knowledge of Java programming and the core features of the Spring framework is expected.
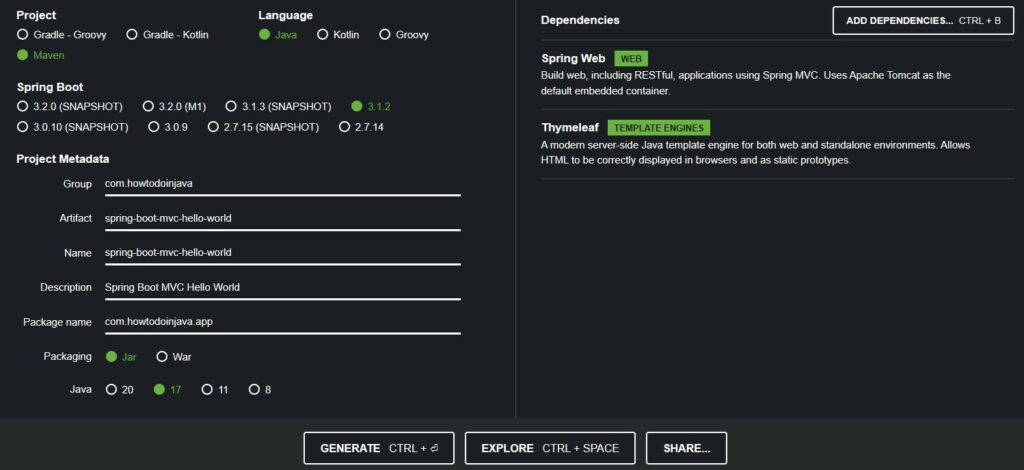
4.2. Creating a New Project
For a beginner, the easiest way to create a new Spring boot project is using the Spring Initializr website. This tool allows us to choose the preferred build tools, Java version, and project dependencies in a single screen.
For a Spring MVC application, the only mandatory dependency is ‘spring-boot-starter-web‘. The other dependencies we can include depending on the specific requirements and desired features.
Additionally, we are including the dependency for Thymeleaf templating engine because we are using it for creating the views. We are free to use any other templating engine with small configuration changes, and it is the beauty of Spring MVC framework.
The generated pom.xml file is as follows:
<?xml version="1.0" encoding="UTF-8"?>
<project xmlns="http://maven.apache.org/POM/4.0.0" xmlns:xsi="http://www.w3.org/2001/XMLSchema-instance"
	xsi:schemaLocation="http://maven.apache.org/POM/4.0.0 https://maven.apache.org/xsd/maven-4.0.0.xsd">
	<modelVersion>4.0.0</modelVersion>

	<parent>
		<groupId>org.springframework.boot</groupId>
		<artifactId>spring-boot-starter-parent</artifactId>
		<version>3.1.2</version>
		<relativePath/> <!-- lookup parent from repository -->
	</parent>

	<groupId>com.howtodoinjava</groupId>
	<artifactId>spring-boot-mvc-hello-world</artifactId>
	<version>0.0.1-SNAPSHOT</version>
	<name>spring-boot-mvc-hello-world</name>
	<description>Spring Boot MVC Hello World</description>

	<properties>
		<java.version>17</java.version>
	</properties>

	<dependencies>
		<dependency>
			<groupId>org.springframework.boot</groupId>
			<artifactId>spring-boot-starter-thymeleaf</artifactId>
		</dependency>
		<dependency>
			<groupId>org.springframework.boot</groupId>
			<artifactId>spring-boot-starter-web</artifactId>
		</dependency>

		<dependency>
			<groupId>org.springframework.boot</groupId>
			<artifactId>spring-boot-starter-test</artifactId>
			<scope>test</scope>
		</dependency>
	</dependencies>

	<build>
		<plugins>
			<plugin>
				<groupId>org.springframework.boot</groupId>
				<artifactId>spring-boot-maven-plugin</artifactId>
			</plugin>
		</plugins>
	</build>

</project>
4.3. The Default MVC Configuration
When we include the spring-boot-starter-web dependency, Spring boot does the default configuration for Spring MVC which allows us to quickly get started with building web applications.
For example, Spring Boot automatically:
- configures the DispatcherServlet, ViewResolver, and other MVC-related beans.
- serves static resources from the classpath and the
src/main/resources/staticdirectory. - sets up basic error handling, providing default error pages for common HTTP error codes.
- configures message converters that handle the conversion of request and response bodies.
- automatically scans for
@Controllerand@RestControllerannotated classes and registers them with controller classes. - provides an embedded server (default is Tomcat) including port settings and other container-specific properties.
You can check out the configurations in detail in the WebMvcAutoConfiguration class.
In a non-Spring Boot application, we must enable the Web MVC configuration using the @EnableWebMvc annotation and implementing WebMvcConfigurer on a @Configuration class.
The spring-boot-starter-thymeleaf dependency configures the necessary beans for serving the views thymeleaf template engine.
4.4. Creating Controller and Handler Methods
To define a controller class in Spring MVC, a class has to be marked with the @Controller or @RestController annotation. And to create a handler method, we annotate its methods with @RequestMapping annotation.
A handler method can accept several types of inputs as method arguments, including:
- HttpServletRequest or HttpServletResponse
- Request parameters with @RequestParam
- Model attributes with @ModelAttribute
- Cookie values with @CookieValue
- User-submitted inputs using Map or ModelMap
- Validation result for the command object using Errors or BindingResult, etc.
After a handler method has finished processing the request, it delegates control to a view, which is represented as the handler method’s return value.
import org.springframework.stereotype.Controller;
import org.springframework.ui.Model;
import org.springframework.web.bind.annotation.GetMapping;

@Controller
public class MessageController {

  @GetMapping("/message")
  public String displayMessage(Model model) {

    model.addAttribute("message", "Hello, World!");
    return "messageView";
  }
}
A handler method’s return value is void then the default logical view name is determined on the basis of a handler method’s or controller’s name.
4.5. Creating Views
When the DispatcherServlet receives a view name returned from a handler, it resolves the logical view name into a view implementation for rendering. In our demo, we are using Thymleaf as a template engine, so the views are rendered from the directory location /src/main/resources/templates.
We create the view files with the matching names that are returned from the handler methods. In our case, the file name must be messageView.html.
<!DOCTYPE HTML>
<html xmlns:th="http://www.thymeleaf.org">
<head>
<title>Display Message Page Title</title>
<meta http-equiv="Content-Type" content="text/html; charset=UTF-8"/>
</head>
<body>
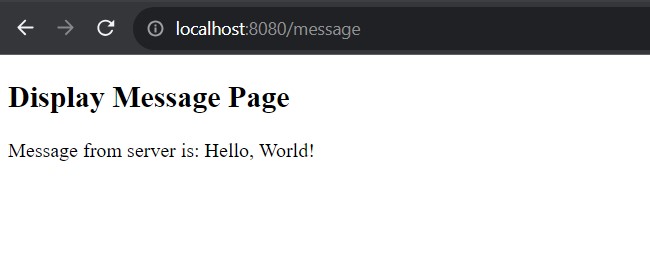
<h2>Display Message Page</h2>
<p th:text="'Message from server is: ' + ${message}"/>
</body>
</html>4.6. Demo
To start the application, we create a class annotated with @SpringBootApplication and containing a main() method as the starting point.
import org.springframework.boot.SpringApplication;
import org.springframework.boot.autoconfigure.SpringBootApplication;

@SpringBootApplication
public class App {

  public static void main(String[] args) {
    SpringApplication.run(App.class, args);
  }
}
When we run the application as a Java class, or from a Jar file, the application starts in the embedded Tomcat server. After the server is fully started, we can access the URL http://localhost:8080/message and it will display the hello world message in the browser window.
Similarly, we can create more complex handler methods and views in the application to serve the business needs.
5. Summary
This Spring MVC tutorial discussed how to develop a Java web application using the Spring MVC framework. Quite notably, the central component of Spring MVC is DispatcherServlet, which acts as a front controller, that dispatches requests to appropriate controller and handler methods.
Spring MVC combined with the power of Spring Boot presents a powerful infrastructure to create web applications with any level of complexity. This tutorial demoed a simple hello world example, but you are encouraged to explore more into each of its capabilities.
Happy Learning !!
How does Spring know where to find your Bean config file (spring-servlet.xml)? Other examples that I’ve seen specifies that location of that file with with in web.xml, or by AnnotationConfigWebApplicationContext class using pure Java configuration.
Ideally you should use contextConfigLocation as below.
spring
org.springframework.web.servlet.DispatcherServlet
contextConfigLocation
/WEB-INF/default-servlet.xml
1
If you do not specify, then spring will automatically look for +”-“+servlet.xml in the WEB-INF folder.
I really struggled very hard to get this :
It would be more useful if you specify the development environment.
I had to change the spring-servlet.xml as below to get the output.
Thanks for the feedback. Added in my TODO list.
What did you change in spring-servlet.xml ? Can you put a note on that ? I’m continue to get
“The origin server did not find a current representation for the target resource or is not willing to disclose that one exists.”
I meet same problem
I tried the above example in my own way. in that I did not know how to configure the xml file for above program it shows the error repeatedly(File not found like).
Will you please explain how to configure and what are the files need to be configured
The corresponding table in the jsp page is arriving but not displaying any data.
there is no data displayed in the .jsp because the list was not set to page/request/session/application attribute.
you need to set it in the controller
ex: request.setAttribute(“employees”, employees); or session.setAttribute(“employees”, employees);
hey i am start to use spring mvc 5.0.9 and use java based configuration , when try to access my jsp page
i get the folowing error message
Type Status Report
Message /Contactapp/WEB-INF/view/ hello.jsp
Description The origin server did not find a current representation for the target resource or is not willing to disclose that one exists.
Apache Tomcat/9.0.8
Did you checked the file name and without .jsp
the first one is to show different parts’ name,like employee or tourist
then url will be “http://localhost:8080/projectName/tourist/
the second one is to show one part’s method name. like login or logout
then url will be “http://localhost:8080/projectName/employee/login
hope to fix your problem.
Hi Lokesh,
your articles are simple to read and understand.
I have a question – what is the need of EmployeeManager and EmployeeManagerImpl classes here
Why you call ‘manager.getAllEmployees()’, instead we can call directly ‘dao.getAllEmployees()’ by using EmployeeDAO class.
Please clarify us.
Read my comments on this question : Service layer vs DAO — Why both?
How view page(jsp) gets to know about model attribute “employees” and gets iterated.?
Are we can manually configure all the request maping to handlermapping ??? Can you please elaborate this
@ModelAttributebinds a method parameter or method return value to a named model attribute, exposed to a web view. It is essentially form backing object. After controller method execution, it’s data is copied to to bothHttpServletRequestandHttpSessionand thus accessible to JSP.why thr is two @requestmapping there at class level and method level?
The class level maps to a url, and the second within the class maps to an even further extension. So class level starts it, and you can keep digging further into different pages.
So class level takes you too localhost:8080/employee-module
The method within the class takes you to localhost8080/employee-module/getAllEmployees
Hi – In the above example, can you pls add exception handling using @ExceptionHandler or @ControllerAdvice and illustrate how to handle exceptions thrown from DAO layer, via a common exception handling class in the controller layer?