Learn about Spring’s DispatcherServlet, its responsibilities and how to configure it in web applications using XML and Java configurations. The DispatcherServlet is responsible for handling incoming HTTP requests and delegating them to the appropriate controller method for processing.
1. What is DispatcherServlet?
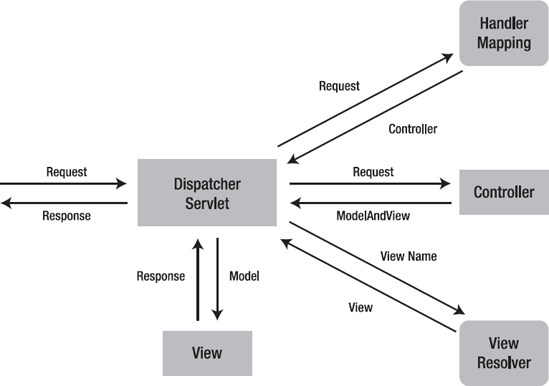
The DispatcherServlet acts as the front controller for Spring-based web applications. It provides a mechanism for request processing where actual work is performed by configurable and delegated components (usually controllers). It is inherited from HttpServlet and is typically configured in the web.xml file.
A web application can define any number of DispatcherServlet instances. Each instance will operate in its own namespace, loading its own application context with mappings, handlers, etc. Only the root application context is loaded by ContextLoaderListener, if any, will be shared. In most cases, applications have only a single DispatcherServlet with the context-root URL(/), that is, all requests coming to that domain will be handled by it.
The DispatcherServlet uses Spring configuration classes to discover the delegate components it needs for request mapping, view resolution, exception handling etc.
2. How DispatcherServlet uses WebApplicationContext?
Let’s understand how the dispatcher servlet works internally? In a Spring-based application, our application objects live within a Java bean container. This container creates objects and associations between objects and manages their complete life cycle. These objects are called Spring-managed beans (or simply beans), and the container is called an application context (via class ApplicationContext).
TheWebApplicationContext is an extension of a plain ApplicationContext and is web-aware. It has ServletContext information. When DispatcherServlet is loaded, it looks for the bean configuration file (XML configuration) or @Configuration classes (Java configuration) and initializes it.
By having access to the Servlet context, any spring bean which implements ServletConextAware interface – can get access to ServletContext instance and do many things with it. For example, it can get context init parameters, get context root information and get resources location inside web application folders.
3. DispatcherServlet XML Configuration
Let’s see how a typical DispatcherServlet declaration and initialization looks. The following code initializes the DispatcherServlet for URL pattern “/*” and loads the bean definitions from the file ‘/WEB-INF/dispatcher-servlet-context.xml‘.
<web-app>

  <listener>
    <listener-class>org.springframework.web.context.ContextLoaderListener</listener-class>
  </listener>

  <context-param>
    <param-name>contextConfigLocation</param-name>
    <param-value>/WEB-INF/dispatcher-servlet-context.xml</param-value>
  </context-param>

  <servlet>
    <servlet-name>dispatcher-servlet</servlet-name>
    <servlet-class>org.springframework.web.servlet.DispatcherServlet</servlet-class>
    <init-param>
      <param-name>contextConfigLocation</param-name>
      <param-value></param-value>
    </init-param>
    <load-on-startup>1</load-on-startup>
  </servlet>

  <servlet-mapping>
    <servlet-name>dispatcher-servlet</servlet-name>
    <url-pattern>/*</url-pattern>
  </servlet-mapping>

</web-app>
The following dispatcher-servlet-context.xml file demonstrates bean definitions and associations that will be available to DispatcherServlet.
<beans xmlns="http://www.springframework.org/schema/beans"
  xmlns:xsi="http://www.w3.org/2001/XMLSchema-instance"
  xsi:schemaLocation="http://www.springframework.org/schema/beans
  http://www.springframework.org/schema/beans/spring-beans-2.5.xsd">

    <bean id="viewResolver"
      class="org.springframework.web.servlet.view.InternalResourceViewResolver" >
        <property name="prefix">
            <value>/WEB-INF/views/</value>
        </property>
        <property name="suffix">
            <value>.jsp</value>
        </property>
    </bean>

</beans>
These bean definitions may override any bean definition defined with the same name in the global scope.
4. DispatcherServlet Java Configuration
Starting from Servlet 3.0, in addition to the declarative configuration in the web.xml file, DispatcherServlet can be configured programmatically by implementing or extending either of these three support classes provided by Spring –
- WebApplicationInitializer interface
- AbstractDispatcherServletInitializer abstract class
- AbstractAnnotationConfigDispatcherServletInitializer abstract class
4.1. Using WebApplicationInitializer
In the below class, WebApplicationInitializer interface ensures that class ApplicationInitializer is detected by SpringServletContainerInitializer (which itself is bootstrapped automatically) and used to initialize any Servlet 3 container.
In the following example, ApplicationInitializer loads the bean definitions from an XML file.
public class ApplicationInitializer implements WebApplicationInitializer {
  @Override
  public void onStartup(ServletContext servletContext) throws ServletException  {

    XmlWebApplicationContext appContext = new XmlWebApplicationContext();
    appContext.setConfigLocation("/WEB-INF/dispatcher-servlet-context.xml");

    ServletRegistration.Dynamic registration
        = servletContext.addServlet("rootDispatcher", new DispatcherServlet(appContext));

    registration.setLoadOnStartup(1);
    registration.addMapping("/");
  }
}
In the following example, ApplicationInitializer loads the bean definitions from annotated Java configuration class.
public class ApplicationInitializer implements WebApplicationInitializer {

  @Override
  public void onStartup(ServletContext container) {

    AnnotationConfigWebApplicationContext rootContext = new AnnotationConfigWebApplicationContext();
    rootContext.register(AppConfig.class);

    container.addListener(new ContextLoaderListener(rootContext));

    AnnotationConfigWebApplicationContext dispatcherContext = new AnnotationConfigWebApplicationContext();
    dispatcherContext.register(DispatcherConfig.class);

    ServletRegistration.Dynamic dispatcher
        = container.addServlet("dispatcher", new DispatcherServlet(dispatcherContext));

    dispatcher.setLoadOnStartup(1);
    dispatcher.addMapping("/");
  }
}
In the above code, AppConfig and DispatcherConfig classes define the spring-managed beans which will be in the web application context.
4.2. Using AbstractDispatcherServletInitializer
This is the base class for WebApplicationInitializer implementations that register a DispatcherServlet in the servlet context.
public class ApplicationInitializer extends AbstractDispatcherServletInitializer {

  @Override
  protected WebApplicationContext createRootApplicationContext() {
          return null;
  }

  @Override
  protected WebApplicationContext createServletApplicationContext() {
          XmlWebApplicationContext cxt = new XmlWebApplicationContext();
          cxt.setConfigLocation("/WEB-INF/dispatcher-servlet-context.xml");
          return cxt;
  }

  @Override
  protected String[] getServletMappings() {
          return new String[] { "/" };
  }

  //Register filters
  @Override
    protected Filter[] getServletFilters() {
        return new Filter[] { new HiddenHttpMethodFilter(), new CharacterEncodingFilter() };
    }
}
Please note that if we need to customize the DispatcherServlet, we can override the createDispatcherServlet() method.
4.3. Using AbstractAnnotationConfigDispatcherServletInitializer
This class extends AbstractDispatcherServletInitializer and does a few things implicitly which otherwise you could be doing yourself. An added advantage is that you can now use the convenience classes provided by Spring instead of manually configuring the DispatcherServlet and/or ContextLoaderListener.
It is the preferred approach for applications that use Java-based Spring configuration. It enables you to start the servlet application context as well as the root application context.
public class AppInitializer extends AbstractAnnotationConfigDispatcherServletInitializer {

   @Override
   protected Class<?>[] getRootConfigClasses() {
      return new Class[] { RootConfig.class };
   }

   @Override
   protected Class<?>[] getServletConfigClasses() {
      return new Class[] { WebMvcConfig.class };
   }

   @Override
   protected String[] getServletMappings() {
      return new String[] { "/" };
   }
}
Here RootConfig and WebMvcConfig classes are used to configure beans in root and servlet context scope.
Read More: Spring MVC Example
5. Beans Supported by DispatcherServlet
Upon receiving a web request, DispatcherServlet performs a set of operations for request processing. It used a set of supporting beans for this. This table lists these default configured beans and their responsibilities –
| Bean | Responsibilities |
|---|---|
HandlerMapping | Maps incoming web requests to handlers and pre- and post-processors |
HandlerAdapter | Invokes the handler which resolves arguments and dependencies, such as annotated arguments for URL-mapped controller method endpoints |
HandlerExceptionResolver | Allows programmatic handling of exceptions and maps exceptions to views |
ViewResolver | Resolves logical view names to view instances |
LocaleResolver | Resolves the client’s locale in order to enable internationalization |
LocaleContextResolver | A richer extension of LocaleResolver, with timezone information |
ThemeResolver | Resolves themes configured in your app for enhanced user experience |
MultipartResolver | Handles multipart file uploads as part of HTTP requests |
FlashMapManager | Manages FlashMap instances that store temporary Flash attributes between requests redirected from one another |
If you want to change any particular behavior of any bean, then you need to override it.
6. DispatcherServlet in Spring Boot
In a Spring Boot application, the DispatcherServlet is automatically configured and initialized when the spring-boot-starter-web dependency is found in the classpath. During startup, Spring scans the application classpath for @Controller and other related annotations. To explicitly trigger the scanning, we can use @EnableWebMvc annotation on any @Configuration class
@Configuration
 @EnableWebMvc
 @ComponentScan(basePackageClasses = MyConfiguration.class)
 public class MyConfiguration {

  //...
 }
All such annotated classes and interfaces are configured including other supported beans based on certain defaults and conventions provided by WebMvcConfigurationSupport.
To customize any default bean, implement the WebMvcConfigurer interface and override the respective method.
@Configuration
 @EnableWebMvc
 @ComponentScan(basePackageClasses = MyConfiguration.class)
 public class MyConfiguration implements WebMvcConfigurer {

     @Override
     public void configureMessageConverters(List<HttpMessageConverter<?>> converters) {
         converters.add(new MyHttpMessageConverter());
     }
 }
7. DispatcherServlet Example
To demo the use of DispatcherServlet, I have written a very minimum application that just configures the dispatcher servlet and overrides the view resolver bean.
AppInitializer.java
package com.howtodoinjava.demo.spring.config;

public class AppInitializer extends AbstractAnnotationConfigDispatcherServletInitializer {

   @Override
   protected Class<?>[] getRootConfigClasses() {
      return new Class[] { };
   }

   @Override
   protected Class<?>[] getServletConfigClasses() {
      return new Class[] { WebMvcConfig.class };
   }

   @Override
   protected String[] getServletMappings() {
      return new String[] { "/" };
   }
}
WebMvcConfig.java
@Configuration
@EnableWebMvc
@ComponentScan(basePackages = { "com.howtodoinjava.demo.spring"})
public class WebMvcConfig implements WebMvcConfigurer {

   @Bean
   public InternalResourceViewResolver resolver() {
      InternalResourceViewResolver resolver = new InternalResourceViewResolver();
      resolver.setViewClass(JstlView.class);
      resolver.setPrefix("/WEB-INF/views/");
      resolver.setSuffix(".jsp");
      return resolver;
   }
}
HomeController.java
@Controller
public class HomeController
{
@GetMapping("/")
public String homeInit(Locale locale, Model model) {
return "home";
}
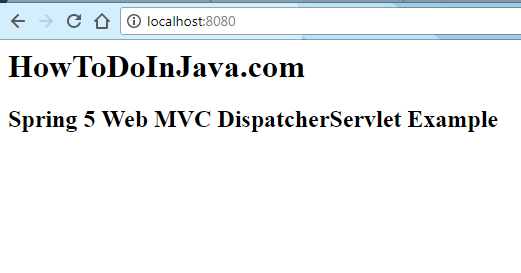
}home.jsp
<html>
<head>
  <title>Spring 5 Web MVC Example</title>
</head>
<body>
  <h1>HowToDoInJava.com</h1>
  <h2>Spring 5 Web MVC DispatcherServlet Example</h2>
</body>
</html>
pom.xml
<project xmlns="http://maven.apache.org/POM/4.0.0" xmlns:xsi="http://www.w3.org/2001/XMLSchema-instance"
  xsi:schemaLocation="http://maven.apache.org/POM/4.0.0 https://maven.apache.org/xsd/maven-4.0.0.xsd;
  <modelVersion>4.0.0</modelVersion>
  <groupId>com.howtodoinjava.spring5.mvc</groupId>
  <artifactId>spring5-webmvc-demo</artifactId>
  <packaging>war</packaging>
  <version>0.0.1-SNAPSHOT</version>
  <name>spring5-webmvc-demo Maven Webapp</name>
  <url>http://maven.apache.org</url>
  <properties>
    <failOnMissingWebXml>false</failOnMissingWebXml>
    <spring.version>5.2.0.RELEASE</spring.version>
    <jstl.version>1.2.1</jstl.version>
    <tld.version>1.1.2</tld.version>
    <servlets.version>3.1.0</servlets.version>
    <jsp.version>2.3.1</jsp.version>
  </properties>
  <dependencies>
    <!-- Spring MVC Dependency -->
    <dependency>
      <groupId>org.springframework</groupId>
      <artifactId>spring-webmvc</artifactId>
      <version>${spring.version}</version>
    </dependency>

    <!-- JSTL Dependency -->
    <dependency>
      <groupId>javax.servlet.jsp.jstl</groupId>
      <artifactId>javax.servlet.jsp.jstl-api</artifactId>
      <version>${jstl.version}</version>
    </dependency>

    <dependency>
      <groupId>taglibs</groupId>
      <artifactId>standard</artifactId>
      <version>${tld.version}</version>
    </dependency>

    <!-- Servlet Dependency -->
    <dependency>
      <groupId>javax.servlet</groupId>
      <artifactId>javax.servlet-api</artifactId>
      <version>${servlets.version}</version>
      <scope>provided</scope>
    </dependency>

    <!-- JSP Dependency -->
    <dependency>
      <groupId>javax.servlet.jsp</groupId>
      <artifactId>javax.servlet.jsp-api</artifactId>
      <version>${jsp.version}</version>
      <scope>provided</scope>
    </dependency>
  </dependencies>
  <build>
    <sourceDirectory>src/main/java</sourceDirectory>
    <resources>
      <resource>
        <directory>src/main/resources</directory>
      </resource>
    </resources>
    <plugins>
      <plugin>
        <artifactId>maven-compiler-plugin</artifactId>
        <version>3.5.1</version>
        <configuration>
          <source>1.8</source>
          <target>1.8</target>
        </configuration>
      </plugin>
      <plugin>
        <groupId>org.apache.tomcat.maven</groupId>
        <artifactId>tomcat7-maven-plugin</artifactId>
        <version>2.2</version>
        <configuration>
          <path>/</path>
        </configuration>
      </plugin>
    </plugins>
  </build>
</project>
To run the application execute maven goal : tomcat7:run. Now open http://localhost:8080 in browser.
Happy Learning !!
I just upgraded Spring 5.0.8.Release to 5.3.21, and my dispatcherServlet is not initializing leading to initialize the context.
Any Suggestion?
Not sure what could be the error. Do you see any error logs?
The world “ServletConextAware ” is wrong on this sentence:
By having access to Servlet context, any spring bean which implement ServletConextAware interface…
I updated Spring from 4.x to 5.7 just now
I noticed the java code doesn’t have the annotation @Bean anywhere in the code, and the web app boots up looking for the xml config file. This was not an issue when using Spring 4.x
Any suggestions?
What dependecies in pom.xml, you are having?