

The jpackage tool is a JDK command that turns a Java application into a native installer, such as an .exe or .msi file for Windows, a .dmg or .pkg file for macOS, or a .deb or .rpm file for Linux, with a Java runtime bundled inside. The users install our app like any other program and do not need to install Java first.
We use jpackage to ship desktop apps (Swing or JavaFX) and command-line tools to people who are not Java developers. The installer can also create Start Menu and desktop shortcuts and register file types that open with our app.
The following example packages a small app as a Debian package on Linux. The app jar and its dependency jar are in the folder target/jpackage-input.
jpackage --type deb --name KitchenTimer --app-version 1.0.0 \
  --input target/jpackage-input \
  --main-jar kitchen-timer-1.0.0.jar \
  --main-class com.howtodoinjava.timer.KitchenTimer \
  --dest target/dist
# creates target/dist/kitchentimer_1.0.0_amd64.deb
Notice that the –type value depends on the operating system. On Windows, we pass –type exe or –type msi, and on macOS, –type dmg or –type pkg, and we run the command on that operating system.
Next, we check the prerequisites for each operating system and build the installer with the jpackage command and with a Maven plugin. After that, we list the important options and make the installer smaller by bundling only the Java modules the app needs.
1. Prerequisites
The jpackage tool came as an incubator module in Java 14 and became a standard JDK tool in Java 16. It builds packages only for the operating system it runs on, so a Windows installer needs a Windows machine, and a .deb file needs Linux. A CI server with one build agent per operating system builds all three.
Before using jpackage, we check that the build machine has a current JDK and the packaging tools of its operating system.
- We need JDK 16 or later. We use the latest JDK, because each release fixes jpackage bugs, for example JDK 24 added support for WiX Toolset v4 and v5.
- The app is packaged as one or more jar files in one input folder. A fat jar with all dependencies works, and so does the app jar next to its dependency jars.
- Windows needs the WiX Toolset (v3, or v4 and v5 since JDK 24) on the PATH for both exe and msi.
- Linux needs fakeroot for deb packages (Debian and Ubuntu) and the rpm-build package for rpm packages (Red Hat and Fedora).
- On macOS, we need the Xcode command line tools when we sign the package with –mac-sign or set a custom icon for a dmg.
When a required tool is missing, jpackage stops with a message that names it. For example, on Ubuntu without fakeroot, jpackage skips the DEB bundler and tells us to install the missing package.
Bundler DEB Bundle skipped because of a configuration problem: Can not find fakeroot.
Reason: Cannot run program "fakeroot": Exec failed, error: 2 (No such file or directory)
Advice to fix: Please install required packages
The jpackage tool works in two stages. First, it builds an application image, which is a folder with a launcher, our jars and a Java runtime. Then it wraps that folder in an installer for the current operating system, and with –type app-image it stops after the first stage.
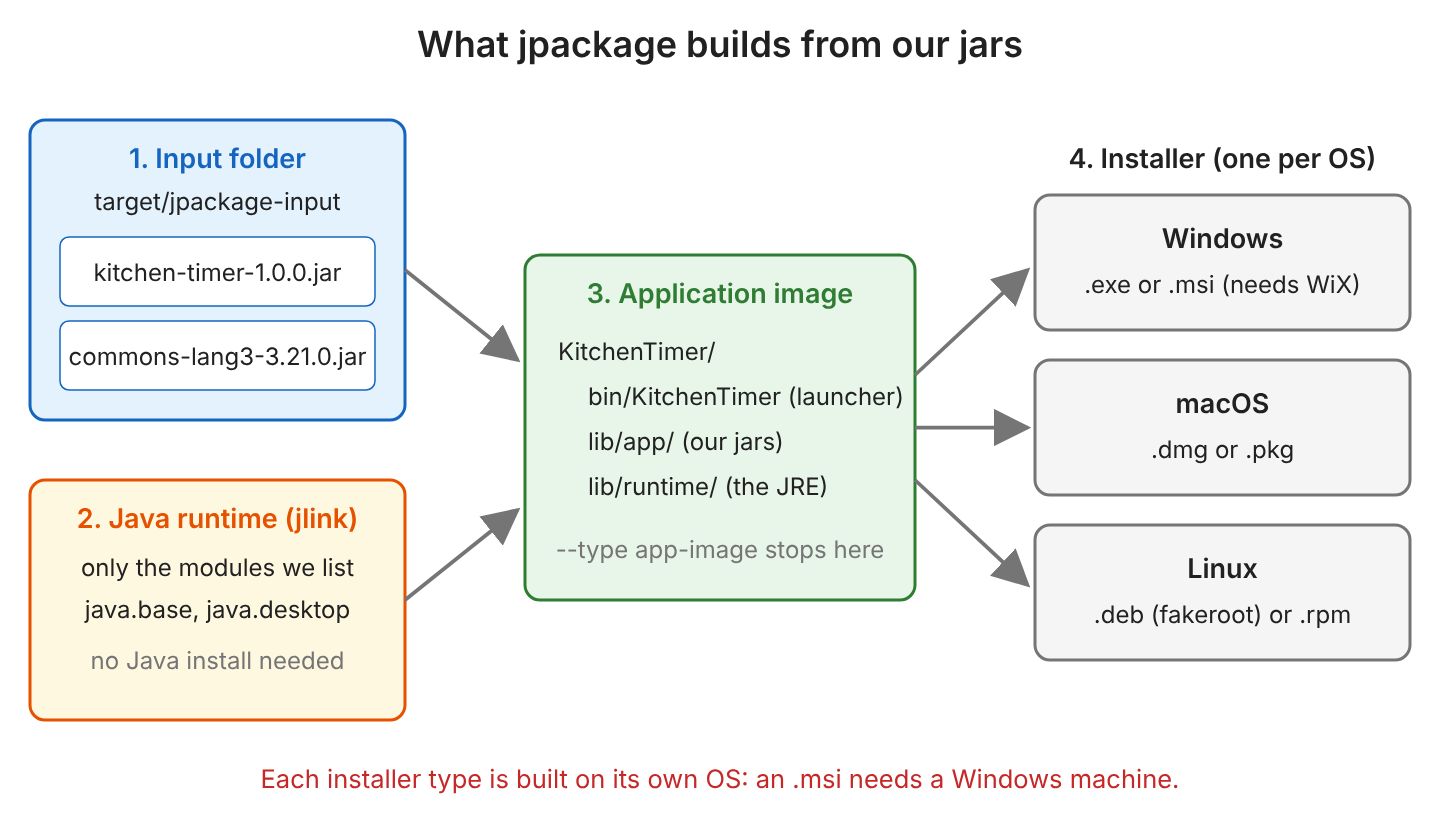
2. Steps to Use JPackage
The jpackage options are the same in both ways of calling the tool, so we can try a command in the terminal first and move it into the build later.
- We run the jpackage command in a terminal or in a build script.
- We call jpackage from Maven with a plugin, so mvn package builds the installer together with the jar.
The following example is a console app named Kitchen Timer, which prints how long a timer runs. It has one class, com.howtodoinjava.timer.KitchenTimer, and one dependency, Apache Commons Lang 3.21.0, which formats the time. We built it with JDK 25.0.4, Maven 3.9.16 and jpackage-maven-plugin 1.8.0 on Ubuntu.
long seconds = args.length > 0 ? parseSeconds(args[0]) : 90;                   // 90 when no argument
String time = DurationFormatUtils.formatDuration(seconds * 1000, "mm:ss");      // "01:30"
System.out.println("Timer set for " + time);                                     // Timer set for 01:30
The helper parseSeconds() calls Long.parseLong() inside a try-catch and returns 90 for text such as abc, so a wrong argument does not stop the installed app.
2.1. Using the jpackage Command
To use jpackage for packaging an application, we must make sure that the application jars are already built. We copy the app jar and all its dependency jars into one folder, because jpackage puts every file of the –input folder into the package.
The command for Linux is in the intro. The commands for Windows and macOS use the same options plus the options for that platform.
jpackage --type msi --name KitchenTimer --app-version 1.0.0 ^
  --input target\jpackage-input ^
  --main-jar kitchen-timer-1.0.0.jar ^
  --main-class com.howtodoinjava.timer.KitchenTimer ^
  --icon kitchen-timer.ico ^
  --win-menu --win-shortcut --win-dir-chooser ^
  --dest target\dist
The options –win-menu and –win-shortcut add a Start Menu entry and a desktop shortcut. The option –win-dir-chooser adds a dialog in which the user picks the installation folder. A console app also needs –win-console, which creates a console launcher for apps that read or print text in a console window.
jpackage --type dmg --name KitchenTimer --app-version 1.0.0 \
  --input target/jpackage-input \
  --main-jar kitchen-timer-1.0.0.jar \
  --main-class com.howtodoinjava.timer.KitchenTimer \
  --icon kitchen-timer.icns \
  --mac-package-identifier com.howtodoinjava.kitchentimer \
  --dest target/dist
On macOS, users get a warning for unsigned apps. To sign the package, we add –mac-sign and –mac-signing-key-user-name with the name of our Apple Developer ID certificate.
For Linux, the intro command creates a .deb file. We add –linux-shortcut for a menu entry and –linux-package-name kitchen-timer to choose the package name, and we pass –type rpm on Red Hat-based systems.
2.2. JPackage Maven Plugin
The most convenient way is to call jpackage from the build with the jpackage-maven-plugin by Petr Panteleyev. The plugin runs the jpackage executable of the JDK that runs Maven (or of a Maven toolchain), so we set JAVA_HOME to the JDK that we want to use for jpackage.
Older tutorials, including the first version of this article, use com.github.akman:jpackage-maven-plugin. Its last release, 0.1.5, is from 2022, so we switched to org.panteleyev:jpackage-maven-plugin, which supports JDK 25 and gets regular releases.
The plugin does not read the project’s classpath. So we collect the jars ourselves, which needs three plugins in pom.xml.
- The maven-jar-plugin writes our app jar into target/jpackage-input.
- The maven-dependency-plugin copies the runtime dependencies into the same folder.
- The jpackage-maven-plugin runs jpackage on that folder in the package phase.
<properties>
  <maven.compiler.release>25</maven.compiler.release>
</properties>

<build>
  <plugins>
    <plugin>
      <groupId>org.apache.maven.plugins</groupId>
      <artifactId>maven-jar-plugin</artifactId>
      <version>3.5.1</version>
      <configuration>
        <outputDirectory>target/jpackage-input</outputDirectory>
      </configuration>
    </plugin>

    <plugin>
      <groupId>org.apache.maven.plugins</groupId>
      <artifactId>maven-dependency-plugin</artifactId>
      <version>3.11.0</version>
      <executions>
        <execution>
          <id>copy-dependencies</id>
          <phase>package</phase>
          <goals>
            <goal>copy-dependencies</goal>
          </goals>
          <configuration>
            <includeScope>runtime</includeScope>
            <outputDirectory>target/jpackage-input</outputDirectory>
          </configuration>
        </execution>
      </executions>
    </plugin>

    <plugin>
      <groupId>org.panteleyev</groupId>
      <artifactId>jpackage-maven-plugin</artifactId>
      <version>1.8.0</version>
      <configuration>
        <name>KitchenTimer</name>
        <appVersion>1.0.0</appVersion>
        <vendor>HowToDoInJava</vendor>
        <input>target/jpackage-input</input>
        <mainJar>kitchen-timer-1.0.0.jar</mainJar>
        <mainClass>com.howtodoinjava.timer.KitchenTimer</mainClass>
        <addModules>
          <addModule>java.base</addModule>
          <addModule>java.desktop</addModule>
        </addModules>
        <destination>target/dist</destination>
        <removeDestination>true</removeDestination>
        <winMenu>true</winMenu>
        <winShortcut>true</winShortcut>
        <winDirChooser>true</winDirChooser>
        <linuxShortcut>true</linuxShortcut>
      </configuration>
      <executions>
        <execution>
          <id>create-installer</id>
          <phase>package</phase>
          <goals>
            <goal>jpackage</goal>
          </goals>
        </execution>
      </executions>
    </plugin>
  </plugins>
</build>
The plugin skips the options of the other operating systems, so the win options and the linux options can stay in one configuration. The removeDestination option deletes the old target/dist folder before each run. We explain addModules in section 4.
The package type and the icon file differ per operating system, so we set them in Maven profiles that Maven activates by the operating system family.
<profiles>
  <profile>
    <id>windows</id>
    <activation>
      <os>
        <family>windows</family>
      </os>
    </activation>
    <build>
      <plugins>
        <plugin>
          <groupId>org.panteleyev</groupId>
          <artifactId>jpackage-maven-plugin</artifactId>
          <configuration>
            <type>MSI</type>
            <icon>src/main/packaging/kitchen-timer.ico</icon>
          </configuration>
        </plugin>
      </plugins>
    </build>
  </profile>
  <profile>
    <id>linux</id>
    <activation>
      <os>
        <family>linux</family>
      </os>
    </activation>
    <build>
      <plugins>
        <plugin>
          <groupId>org.panteleyev</groupId>
          <artifactId>jpackage-maven-plugin</artifactId>
          <configuration>
            <type>DEB</type>
            <icon>src/main/packaging/kitchen-timer.png</icon>
          </configuration>
        </plugin>
      </plugins>
    </build>
  </profile>
</profiles>
The type values are APP_IMAGE, EXE, MSI, DMG, PKG, DEB and RPM. Without a type, jpackage creates the default type of the platform, for example exe on Windows.
2.3. How to Run the JPackage Maven Plugin
Because the plugin execution is bound to the package phase, one command builds the jar, copies the dependencies and creates the installer.
mvn clean packageThe plugin prints the jpackage options that it passes. On Ubuntu, the Linux profile is active, so the options contain –type deb and –linux-shortcut, but no –win-menu.
[INFO] --- jpackage:1.8.0:jpackage (create-installer) @ kitchen-timer ---
[INFO] Using: /opt/jdk-25/bin/jpackage
[INFO] jpackage options:
[INFO]   --name KitchenTimer
[INFO]   --dest /tmp/jpkg/target/dist
[INFO]   --type deb
[INFO]   --app-version 1.0.0
[INFO]   --input /tmp/jpkg/target/jpackage-input
[INFO]   --vendor HowToDoInJava
[INFO]   --main-class com.howtodoinjava.timer.KitchenTimer
[INFO]   --main-jar kitchen-timer-1.0.0.jar
[INFO]   --icon /tmp/jpkg/src/main/packaging/kitchen-timer.png
[INFO]   --add-modules java.base,java.desktop
[INFO]   --linux-shortcut
[INFO] BUILD SUCCESS
This creates the file target/dist/kitchentimer_1.0.0_amd64.deb. After sudo dpkg -i target/dist/kitchentimer_1.0.0_amd64.deb, the app is in /opt/kitchentimer, and it runs on the bundled Java 25 runtime.
$ /opt/kitchentimer/bin/KitchenTimer
Kitchen Timer 1.0.0 on Java 25
Timer set for 01:30

$ /opt/kitchentimer/bin/KitchenTimer abc
Not a number: abc, using 90 seconds
Kitchen Timer 1.0.0 on Java 25
Timer set for 01:30
To check the options without building a package, we add -Djpackage.dryRun=true, and the plugin prints the options and skips jpackage.
3. Important JPackage Parameters
Most installers need only a handful of options. The full list for each platform is in the jpackage command reference, and the Maven plugin uses the same names in camel case, e.g. –main-jar becomes mainJar.
| Parameter | Description |
|---|---|
| –type | Package type, one of app-image, exe, msi, dmg, pkg, deb or rpm |
| –input | Folder with the app jar and the dependency jars; every file in it is packaged |
| –name | Name of the application and of the package |
| –main-jar | Jar with the main class, relative to the –input folder |
| –main-class | Fully qualified name of the class with the main() method |
| –app-version | Version of the application, shown by the installer |
| –vendor | Publisher name of the application |
| –icon | Icon file, .ico on Windows, .icns on macOS and .png on Linux |
| –dest | Folder for the created package |
| –java-options | JVM options for the launcher, e.g. -Xmx512m |
| –add-modules | Java modules to put into the bundled runtime |
| –win-menu | Creates a Windows Start Menu entry |
| –win-shortcut | Creates a Windows desktop shortcut |
| –win-dir-chooser | Lets the user choose the installation folder on Windows |
| –win-console | Opens a console window for console apps on Windows |
| –linux-shortcut | Creates a Linux menu entry |
| –linux-package-name | Sets the package name for Linux installers |
| –mac-sign | Signs the macOS package (requires a signing identity) |
4. Making the Installer Smaller
By default, jpackage bundles a runtime with all the standard modules of the JDK, because it cannot know which modules a non-modular app uses. For Kitchen Timer, the installed app takes 138 MB, although the app itself is two small jars.
The jdeps tool of the JDK reads the jars and prints the modules that they use.
jdeps --print-module-deps --ignore-missing-deps --multi-release 25 target/jpackage-input/*.jar
# java.base,java.desktop
We pass the result to –add-modules (or addModules in the plugin), and jpackage calls jlink to build a runtime with only those modules. The java.desktop module comes from a Commons Lang class, not from our code.
| Bundled modules | Installed size | .deb file size |
|---|---|---|
| All modules (default) | 138 MB | 40.8 MB |
| java.base,java.desktop | 93 MB | 24.1 MB |
| java.base | 58 MB | not built |
A module that is missing from the runtime fails only when the app uses it, with a NoClassDefFoundError at run time, not during packaging. So we test every feature of the installed app after changing –add-modules. The jdeps tool cannot see classes that an app loads by reflection, which Spring Boot apps do a lot, so for those apps we keep the full runtime or add the missing modules, such as java.sql, by hand.
5. JPackage FAQs
5.1. Can jpackage Create a Windows Installer on Linux or macOS?
No. The jpackage tool builds packages only for the operating system it runs on. On Linux, the command with –type msi fails at once.
Error: Invalid or unsupported type: [msi]For all three platforms, we run the build on a Windows, a macOS and a Linux machine, for example with a CI job matrix.
5.2. What Is the Difference Between exe and msi?
Both types install the app on Windows, and both need WiX. An msi file is a Windows Installer package, which administrators can deploy with group policies or install without any dialog with the msiexec command and its /quiet option. An exe file is a launcher that wraps the same installer, which suits users who download the app from a website.
5.3. Why Does jpackage Say “A main class was not specified”?
The jar given in –main-jar has no Main-Class entry in its manifest, and the command has no –main-class option.
Bundler DEB Bundle skipped because of a configuration problem: A main class was not specified
nor was one found in the jar kitchen-timer-1.0.0.jar
Advice to fix: Specify a main class or ensure that the jar kitchen-timer-1.0.0.jar specifies one in the manifest
We fix it by passing –main-class with the fully qualified class name, as in section 2.1.
5.4. Does the Installed App Need Java on the User’s Machine?
No. The installer contains the Java runtime in the lib/runtime folder, and the launcher uses that runtime even when another Java version is installed. So the app always runs on the Java version we tested, and an update of the app also updates its runtime.
6. Conclusion
The jpackage tool turns a Java app into a native installer with its own Java runtime, so users install it like any other program. It runs on JDK 16 and later and builds packages only for the operating system it runs on.
For a Maven project, the jpackage-maven-plugin from org.panteleyev builds the installer in mvn clean package, after the jar and dependency plugins collect the jars in one folder. Maven profiles set the package type and the icon per operating system.
The default runtime contains every JDK module. With jdeps and –add-modules, the Kitchen Timer package dropped from 40.8 MB to 24.1 MB.
7. References
- jpackage command (Java 25)
- Packaging Tool User’s Guide (Java 25)
- JEP 392: Packaging Tool
- jlink command (Java 25)
- JPackage Maven Plugin documentation
- JDK 24 release notes: WiX v4 and v5 support
Happy Learning !!
