
Learn to create a Spring boot application, run a local Apache Kafka broker instance using Docker Compose, configure the Kafka to message producer as KafkaTemplate and message consumer using @KafkaListener.
1. Goals
In this tutorial, we will learn to:
- Create a Spring boot application with Kafka dependencies.
- Setup and run a local Kafka broker using an inbuilt docker-compose module.
- Configure Kafka properties for message producer and listener.
- Use
KafkaTemplateto send messages to a topic - Use
@KafkaListenerto listen to messages sent to the topic in real-time
2. Maven
Open Spring initializr and create a Spring boot application with the following dependencies:
- Spring for Apache Kafka
- Spring Web
- Docker Compose Support (Optional). It is needed if you plan to use a local Kafka installation running on a Docker container.
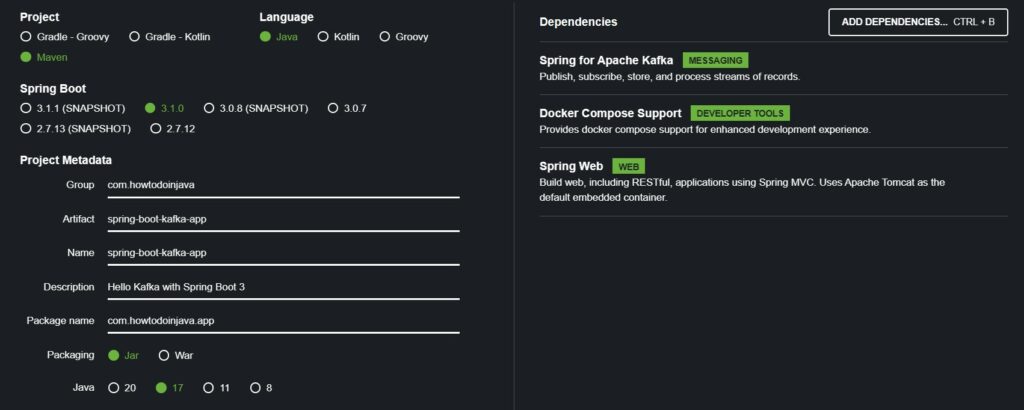
The generated project has the following dependencies in pom.xml.
<dependency>
	<groupId>org.springframework.boot</groupId>
	<artifactId>spring-boot-starter-web</artifactId>
</dependency>

<dependency>
	<groupId>org.springframework.kafka</groupId>
	<artifactId>spring-kafka</artifactId>
</dependency>

<dependency>
  <groupId>org.springframework.boot</groupId>
  <artifactId>spring-boot-docker-compose</artifactId>
  <optional>true</optional>
</dependency>
3. Docker Compose File Kafka Broker
If you are planning to use a local Kafka broker running as the Docker container in your machine, you can follow this step. Create a docker-compose.yaml file in the application root and provide the following docker cluster configuration. Note that you can change the configuration based on your specific requirements.
The following configuration will create a single-node Kafka server with 1 zookeeper and 1 broker instance. The configuration also ensures that the Zookeeper server always starts before the Kafka server (broker) and stops after it.
The best part is that spring-boot-docker-compose module will automatically detect this configuration file, download the necessary images, and run the containers before the application is fully started to accept any request.
version: '3'
services:
  zookeeper:
    image: confluentinc/cp-zookeeper:latest
    container_name: zookeeper
    environment:
      ZOOKEEPER_SERVER_ID: 1
      ZOOKEEPER_CLIENT_PORT: 2181
      ZOOKEEPER_TICK_TIME: 2000
    ports:
      - "22181:2181"

  broker:
    image: confluentinc/cp-kafka:latest
    container_name: broker
    ports:
      - "9092:9092"
    depends_on:
      - zookeeper
    environment:
      KAFKA_BROKER_ID: 1
      KAFKA_AUTO_CREATE_TOPICS_ENABLE: "true"
      KAFKA_ZOOKEEPER_CONNECT: zookeeper:2181
      KAFKA_LISTENER_SECURITY_PROTOCOL_MAP: PLAINTEXT:PLAINTEXT
      KAFKA_ADVERTISED_LISTENERS: PLAINTEXT://localhost:9092
      KAFKA_OFFSETS_TOPIC_REPLICATION_FACTOR: 1
      KAFKA_TRANSACTION_STATE_LOG_MIN_ISR: 1
      KAFKA_TRANSACTION_STATE_LOG_REPLICATION_FACTOR: 1
4. Kafka Configuration
Start with making small configuration changes and know what capability they provide.
4.1. Minimal Configuration
The Kafka configuration is controlled by the configuration properties with the prefix spring.kafka.*. For example, add the following property so Spring boot auto-configuration will create a KafkaTemplate and other necessary beans.
spring.kafka.bootstrap-servers=localhost:90924.2. Create a New Topic
If we want to create a new Topic in the Kafka broker, if it does not exist, we can provide the topic configuration as follows:
@Configuration
public class KafkaConfig {

  @Bean
  public NewTopic taskTopic() {
    return TopicBuilder.name("task-topic")
        .partitions(1)
        .replicas(1)
        .build();
  }
}
4.3. Custom Key-Value Serializer and Deserializer
By default, Kafka supports message keys and values as normal String types. We can send the custom Java type as the message value, also, after configuring the appropriate serializers and deserializers.
Suppose, we message value to send is an instance of TaskStatus class.
@Data
@AllArgsConstructor
@NoArgsConstructor
public class TaskStatus implements Serializable {

  private String taskId;
  private String taskName;
  private float percentageComplete;
  private Status status;

  public enum Status {
    SUBMITTED, STARTED, RUNNING, FINISHED, TERMINATED
  }
}
We want to send the serialized value of TaskStatus as a JSON object so that it can be used by any consumer in a technology-agnostic manner.
# consumer config

spring.kafka.consumer.key-deserializer=org.apache.kafka.common.serialization.StringDeserializer
spring.kafka.consumer.value-deserializer=org.springframework.kafka.support.serializer.JsonDeserializer

# producer config

spring.kafka.producer.key-serializer=org.apache.kafka.common.serialization.StringSerializer
spring.kafka.producer.value-serializer=org.springframework.kafka.support.serializer.JsonSerializer
5. KafkaTemplate as Message Producer
If we want to configure a Kafka message producer in the application, KafkaTemplate is an excellent choice for its Template style usage, for example, as learned in DynamoDbTemplate or RestTemplate.
KafKaProducerService class uses autowired KafkaTemplate to send messages to the specified topic name.
@Service
@Log
public class KafkaProducerService {

  private final Logger LOGGER = LoggerFactory.getLogger(KafkaProducerService.class);

  @Autowired
  KafkaTemplate<String, TaskStatus> kafkaTemplate;

  public void send(String topicName, String key, TaskStatus value) {

    var future = kafkaTemplate.send(topicName, key, value);

    future.whenComplete((sendResult, exception) -> {
      if (exception != null) {
        future.completeExceptionally(exception);
      } else {
        future.complete(sendResult);
      }
      LOGGER.info("Task status send to Kafka topic : "+ value);
    });
  }
}
We can use this service to send a message as follows:
@Autowired
KafkaProducerService kafkaProducerService;

//Using service

kafkaProducerService.send("general-task-topic", taskStatus.getTaskId(), taskStatus);
6. @KafkaListener as Message Consumer
Similarly, KafKaConsumerService class uses @KafkaListener to receive messages from the specified topic name and group id.
@Component
@Log
public class KafKaTopicListeners {

  private final Logger logger = LoggerFactory.getLogger(KafKaTopicListeners.class);

  @KafkaListener(topics = {"general-task-topic"}, groupId = "task-group")
  public void consume(TaskStatus taskStatus) {

    logger.info(String.format("Task status is updated : " + taskStatus));
  }
}
7. Demo
For demo purposes, we can use the CommandLineRunner interface to send a few messages and then check the listener class for verification of the Kafka setup.
@SpringBootApplication
public class Application implements CommandLineRunner {

  @Autowired
  KafkaTemplate kafkaTemplate;

  public static void main(String[] args) {
    SpringApplication.run(Application.class, args);
  }

  @Override
  public void run(String... args) throws Exception {

    kafkaTemplate.send("general-task-topic", "taskId", new TaskStatus("taskId", "taskName", 50.0f, Status.RUNNING));
    kafkaTemplate.send("general-task-topic", "taskId", new TaskStatus("taskId", "taskName", 100.0f, Status.FINISHED));
  }
}
Observe the console logs:
c.h.d.jms.service.KafKaTopicListeners    : Task status is updated : TaskStatus(taskId=taskId, taskName=taskName, percentageComplete=50.0, status=RUNNING)

c.h.d.jms.service.KafKaTopicListeners    : Task status is updated : TaskStatus(taskId=taskId, taskName=taskName, percentageComplete=100.0, status=FINISHED)
8. Conclusion
In this spring boot Kafka example, we learned to create a spring boot application and configure Kafka broker instance, and used Spring boot autoconfiguration provided KafkaTemplate and KafkaListener.
Additionally, we verified the application by posting some messages using KafkaTemplate and then consuming the messages using @KafkaListener.
Happy Learning !!