Learn to create load balancer and API gateway using Netflix Zuul in Spring Cloud based microservices ecosystem. Here we will mainly concentrate on API gateway pattern and it’s usage. We will build a Netflix zuul example where we will create a microservice ecosystem and test its effectiveness and applicability of Zuul API gateway in the whole ecosystem.
This is a very common microservice pattern and Netflix, creator of Zuul makes use of this heavily and intelligently, and Netflix claims that all Netflix traffic first go to a Zuul cluster which is mainly responsible for dynamic routing, monitoring, resiliency and security based on different groovy based custom filters.
1. How does Zuul fit into Microservices Ecosystem?
A common problem, when building microservices, is to provide a unique gateway to the client applications of your system. The fact that your services are split into small microservices apps that shouldn’t be visible to users otherwise it may result in substantial development/maintenance efforts. Also there are scenarios when whole ecosystem network traffic may be passing through a single point which could impact the performance of the cluster.
To solve this problem, Netflix (a major adopter of microservices) created and open-sourced its Zuul proxy server and later Spring under Pivotal has adapted this in its spring cloud stack and enabled us to use zuul easily and effectively with just few simple steps.
Zuul is an edge service that proxies requests to multiple backing services. It provides a unified “front door” to your ecosystem, which allows any browser, mobile app or other user interface to consume services from multiple hosts. You can integrate Zuul with other Netflix stack components like Hystrix for fault tolerance and Eureka for service discovery or use it to manage routing rules, filters and load balancing across your system. Most importantly all of those components are well adapted by spring framework through spring boot/cloud approach.

2. Zuul Components
Zuul has mainly four types of filters that enable us to intercept the traffic in different timeline of the request processing for any particular transaction. We can add any number of filters for a particular url pattern.
- pre filters – are invoked before the request is routed.
- post filters – are invoked after the request has been routed.
- route filters – are used to route the request.
- error filters – are invoked when an error occurs while handling the request.

3. Overview of Demo
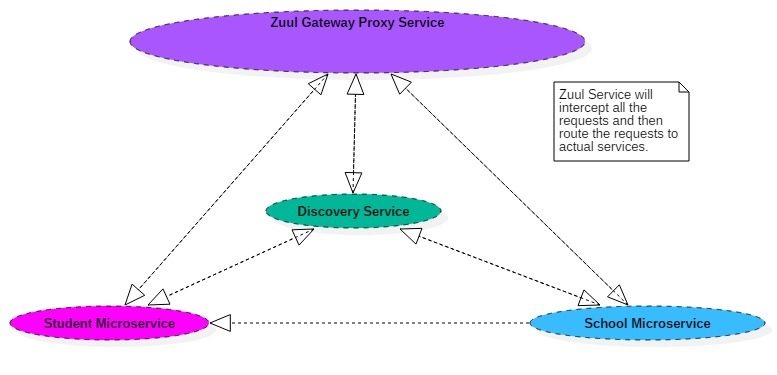
Now let us make our hands dirty by creating a simple yet meaningful ecosystem using Zuul proxy. We will create below artifacts to demonstrate the whole thing:
- Student Microservice – a spring boot based microservice which will just expose a single url to enable some search functionality. For simplicity we will just return hardcoded values, but in real world we can connect to anywhere from this service to get the data.
- Zuul gateway service proxy – It would be again a spring boot based, which will basically intercept all the traffic of student service and apply series of request filter and then route to the underlying service and again at the time of response serving, it will apply some response filtering. Since it is a gateway, we can literally take many interesting and useful action using the filters effectively.
Some of the common responsibility of gateway service are –
- Apply microservice authentication and security in the gateway layer to protect the actual services
- We can do microservices insights and monitoring of all the traffic that are going in to the ecosystem by enabling some logging to get meaningful data and statistics at the edge in order to give us an accurate view of production.
- Dynamic Routing can route requests to different backend clusters as needed.
- We can do runtime stress testing by gradually increasing the traffic to a new cluster in order to gauge performance in many scenarios e.g. cluster has new H/W and network setup or that has new version of production code deployed.
- We can do dynamic load shedding i.e. allocating capacity for each type of request and dropping requests that go over the limit.
- We can apply static response handling i.e. building some responses directly at the edge instead of forwarding them to an internal cluster for processing.
Tech Stack and Runtime
- Java 1.8 and Eclipse IDE as development environment
- Spring cloud Zuul as Gateway proxy provider
- Spring boot as application framework
- Spring Rest for exposing microservice as REST
- Maven as build tool
4. Create Student Microservice
Follow these steps to develop student microservice which will expose couple of REST endpoints which would be later accessed via zuul proxy. We will look into the zuul part later, let’s now create the student service first.
4.1. Create Spring Boot Project
Create a Spring boot project from spring initializer portal with dependencies i.e.Web and Rest Repositories. Give other maven GAV coordinates and download the project.
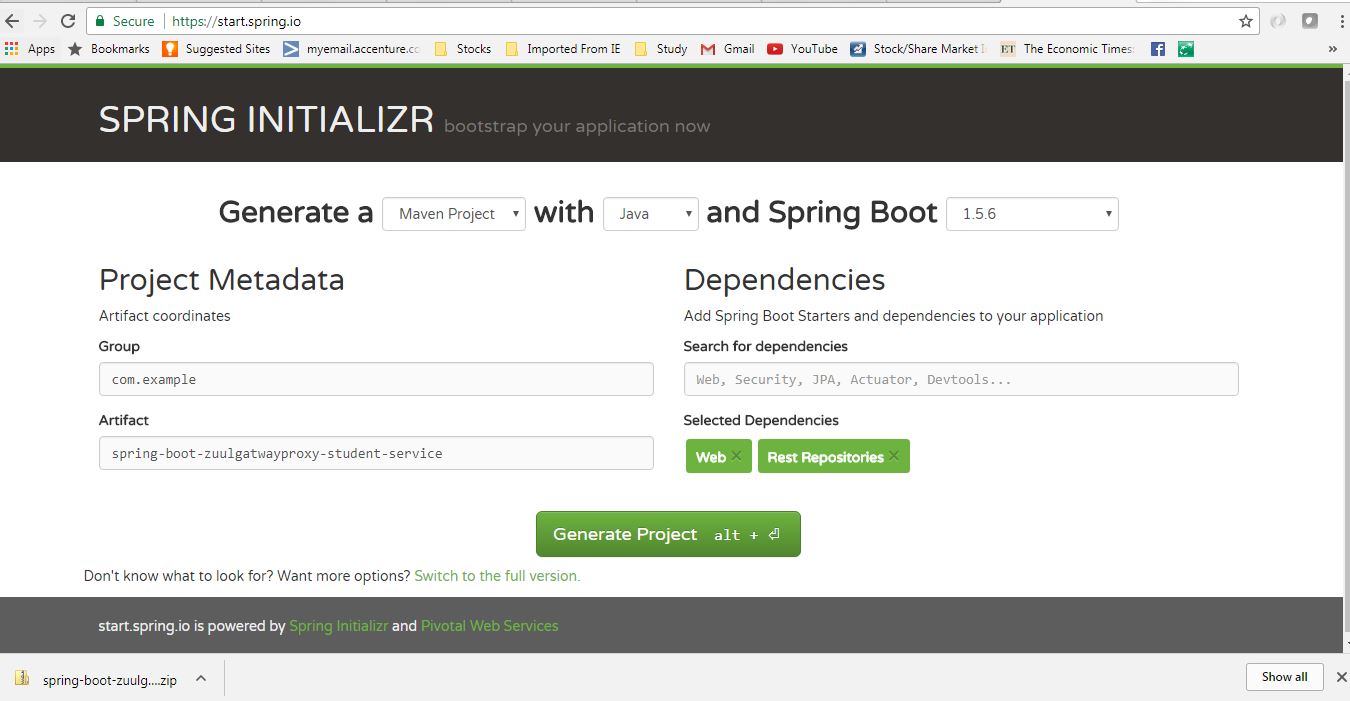
Unzip and import the project into Eclipse as existing maven project. In this step do a fresh maven build using command mvn clean install so that all maven dependencies gets download properly.
4.2. Add REST Endpoints
We will now just add few REST endpoints to this service for testing the proxy later. To do that we need to add one REST controller by adding annotation @RestController. For simplicity, we will add one model class Student.
After all changes, the class will look like below.
package com.example.springboostudentservice;
import java.util.Date;
import org.springframework.boot.SpringApplication;
import org.springframework.boot.autoconfigure.SpringBootApplication;
import org.springframework.web.bind.annotation.PathVariable;
import org.springframework.web.bind.annotation.RequestMapping;
import org.springframework.web.bind.annotation.RestController;
@RestController
@SpringBootApplication
public class SpringBootStudentServiceApplication
{
@RequestMapping(value = "/echoStudentName/{name}")
public String echoStudentName(@PathVariable(name = "name") String name)
{
return "hello <strong style=\"color: red;\">" + name + " </strong> Responsed on : " + new Date();
}
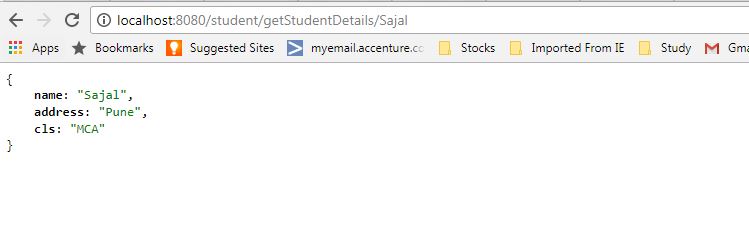
@RequestMapping(value = "/getStudentDetails/{name}")
public Student getStudentDetails(@PathVariable(name = "name") String name)
{
return new Student(name, "Pune", "MCA");
}
public static void main(String[] args)
{
SpringApplication.run(SpringBootStudentServiceApplication.class, args);
}
}
class Student
{
String name;
String address;
String cls;
//constructors, setters, getters
}4.3. Server Port and Application Name
Now open application.properties file and add those entries.
spring.application.name=student
server.port=8090
Here we are giving one name to this service by property spring.application.name=student and also we are defining the default port by server.port=8090. We need to override the default port, as we will have multiple instances of different microservices will run in localhost.
4.4. Verify Student Service
Finally do a maven build using command mvn clean install and Start this project as spring boot application by running command java -jar target\spring-boot-zuulgatwayproxy-student-service-0.0.1-SNAPSHOT.jar. Now once the server started, go to browser and test whether the endpoints are working.
http://localhost:8090/echoStudentName/Sajal
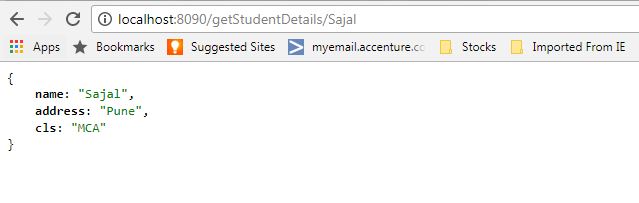
http://localhost:8090/getStudentDetails/Sajal

Now we will create the actual proxy service using Zuul.
5. Create Zuul Gateway Service Proxy
This will be again a spring boot based microservice, but it has a special feature. It will use zuul to create a API gateway proxy which will proxy the student service. Later we can add any number of microservices like student service and able to create a strong microservice ecosystem.
5.1. Create Spring Boot Project
Create a Spring boot project from spring initializer portal with Zuul dependency. Give other maven GAV coordinates and download the project.
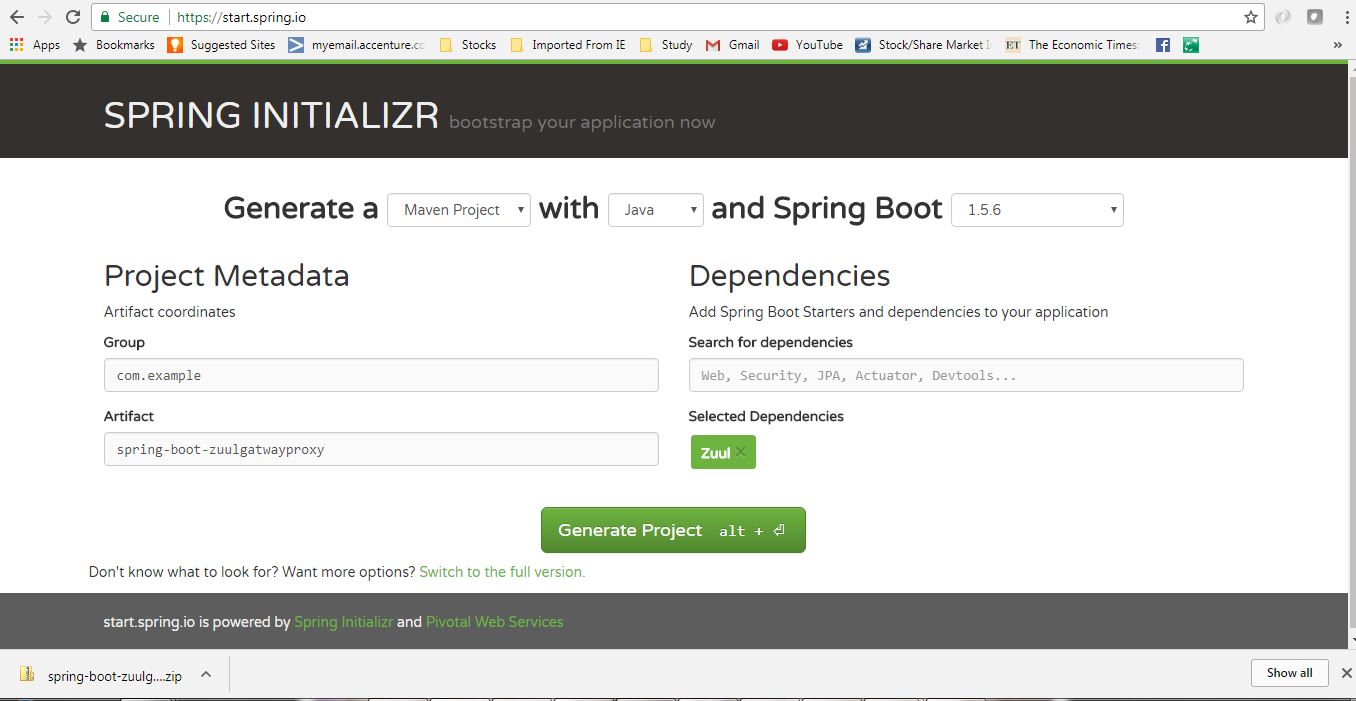
Unzip and import the project into Eclipse as existing maven project. In this step do a fresh maven build using command mvn clean install so that all maven dependencies gets download properly.
5.2. Enable Zuul Service Proxy
Now add the @EnableZuulProxy annotation on Spring boot application class present in src folder. With this annotation, this artifact will act like a Zuul service proxy and will enable all the features of a API gateway layer as described before. We will then add some filters and route configurations.
package com.example.springbootzuulgatwayproxy;

import org.springframework.boot.SpringApplication;
import org.springframework.boot.autoconfigure.SpringBootApplication;
import org.springframework.cloud.netflix.zuul.EnableZuulProxy;
import org.springframework.context.annotation.Bean;
import com.example.springbootzuulgatwayproxy.filters.ErrorFilter;
import com.example.springbootzuulgatwayproxy.filters.PostFilter;
import com.example.springbootzuulgatwayproxy.filters.PreFilter;
import com.example.springbootzuulgatwayproxy.filters.RouteFilter;

@SpringBootApplication
@EnableZuulProxy
public class SpringBootZuulgatwayproxyApplication {

	public static void main(String[] args) {
		SpringApplication.run(SpringBootZuulgatwayproxyApplication.class, args);
	}

	@Bean
	public PreFilter preFilter() {
		return new PreFilter();
	}
	@Bean
	public PostFilter postFilter() {
		return new PostFilter();
	}
	@Bean
	public ErrorFilter errorFilter() {
		return new ErrorFilter();
	}
	@Bean
	public RouteFilter routeFilter() {
		return new RouteFilter();
	}
}
5.3. Configure Zuul Routes
Open application.properties and add below entries-
#Zuul routes. Here for /student path, we are routing to localhost:8090 with extra path after that.
zuul.routes.student.url=http://localhost:8090

#Ribbon is auto integrated with Zuul and for this exercise we are not using that.
ribbon.eureka.enabled=false

#Will start the gateway server @8080
server.port=8080
Here zuul.routes.student.url will route all traffic to request for /student to the actual student service server. This way we can add route to other services as well.ribbon.eureka.enabled is auto integrated with Zuul.server.port – is needed to override the default port, as we will have multiple instances of different microservices will run in localhost.
5.4. Add Zuul Filters
We will now add few filters as we have already described, Zuul supports 4 types of filters namely pre, post, route and error. Here we will create each type of filters.
To write a filter we need to do basically those steps:
- Need to extend
com.netflix.zuul.ZuulFilter - Need to override
filterType,filterOrder,shouldFilterandrunmethods. HerefilterTypemethod can only return any one of four String –pre/post/route/error. Depedending on this value the filter will act like a particular filter. runmethod is the place where our filter logic should be placed depending on our requirement.- Also we can add any number of any particular filter based on our need, this case
filterOrderwill come into place to determine the order of that filer at the phase of execution of that type of filter.
Pre Filter
We will add the below pre filter. Currently filters are doing nothing apart from a println for testing purpose. But actually those are powerful enough to do many important aspects as mentioned before.
package com.example.springbootzuulgatwayproxy.filters;

import javax.servlet.http.HttpServletRequest;
import com.netflix.zuul.ZuulFilter;
import com.netflix.zuul.context.RequestContext;

public class PreFilter extends ZuulFilter {

  @Override
  public String filterType() {
    return "pre";
  }

  @Override
  public int filterOrder() {
    return 1;
  }

  @Override
  public boolean shouldFilter() {
    return true;
  }

  @Override
  public Object run() {
    RequestContext ctx = RequestContext.getCurrentContext();
    HttpServletRequest request = ctx.getRequest();

    System.out.println("Request Method : " + request.getMethod() + " Request URL : " + request.getRequestURL().toString());
    return null;
  }
}
Post Filter
package com.example.springbootzuulgatwayproxy.filters;

import com.netflix.zuul.ZuulFilter;

public class PostFilter extends ZuulFilter {

  @Override
  public String filterType() {
    return "post";
  }

  @Override
  public int filterOrder() {
    return 1;
  }

  @Override
  public boolean shouldFilter() {
    return true;
  }

  @Override
  public Object run() {
   System.out.println("Inside Response Filter");

    return null;
  }
}
Route Filter
package com.example.springbootzuulgatwayproxy.filters;

import com.netflix.zuul.ZuulFilter;

public class RouteFilter extends ZuulFilter {

  @Override
  public String filterType() {
    return "route";
  }

  @Override
  public int filterOrder() {
    return 1;
  }

  @Override
  public boolean shouldFilter() {
    return true;
  }

  @Override
  public Object run() {
   System.out.println("Inside Route Filter");
    return null;
  }
}
Error filter
package com.example.springbootzuulgatwayproxy.filters;

import com.netflix.zuul.ZuulFilter;

public class ErrorFilter extends ZuulFilter {

  @Override
  public String filterType() {
    return "error";
  }

  @Override
  public int filterOrder() {
    return 1;
  }

  @Override
  public boolean shouldFilter() {
    return true;
  }

  @Override
  public Object run() {
   System.out.println("Inside Route Filter");

    return null;
  }
}
5.5. Register Zuul Filters
Create the bean definition of these filters to be auto-registered and enabled.
@Bean
public PreFilter preFilter() {
	return new PreFilter();
}
@Bean
public PostFilter postFilter() {
	return new PostFilter();
}
@Bean
public ErrorFilter errorFilter() {
	return new ErrorFilter();
}
@Bean
public RouteFilter routeFilter() {
	return new RouteFilter();
}
6. Netflix Zuul API Gateway in Action
So we have enabled Zuul, added required configurations and developed Filters. So new we can do the basic testing to understand the whole thing.
Do a maven build using command mvn clean install and Start this project as spring boot application by running command java -jar target\spring-boot-zuulgatwayproxy-0.0.1-SNAPSHOT.jar. Now once the server started, go to browser and test whether the endpoints are working by accessing the student service bu it’s name i.e. /student.
http://localhost:8080/student/getStudentDetails/Sajal
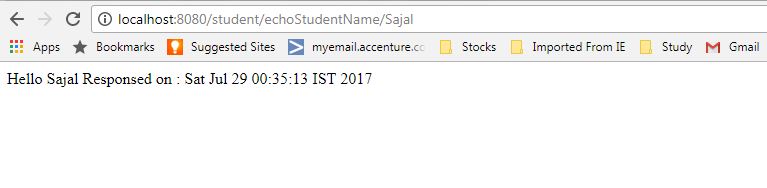
http://localhost:8080/student/echoStudentName/Sajal
7. Summary
That’s all about netflix zuul filter example. I will suggest you to do it of your own, add some more underlying services and route request through proxy, apply different types of filters and add real logic in filter.
Drop me your questions in comments section.
Happy Learning !!
Very nice demo! How would SSL be configured to work between microservices?
I will recommend installing the certificate at the server level. Let the IT team handle the infrastructure.
I have downloaded your application and tried to run it but it is not able to route to service and giving 404 error. One more thing as mentioned in the diagram there is a neeed of discover service and you havent added any code related to it.
Hi,
Your article is simply amazing for a new folk to integrate Zuul. Thank you for that.
I have a question, its related to custom routing. What if I want to route a request based on request header to some service.I understand direct mapping I can very well define in application.properties. Can you please guide here?
Using filter I am able to read the request header but unable to route the request based on same.
Thanks.
Sajal Da
Your posts on microservices have caught my attention , I have around 14 years of experience and I work in United Kingdom. The material you have on your website is self-explanatory , better than Ken Kruger’s code on Udemy (trust me as I did that ) . You should keep posting as you have done . Few feedback comments :
1.If you could put an entire project where Feign(dont think its covered) , Zuul , Eureka , Hysterix and Ribbon are covered – it would be great !
2.If you could start explaining on youtube , I think you will have more subscribers .
3.Another detailed section on Feign would immensely help .
Keep up the good work mate!
Cheers
-Raj
I want to use spring security with jwt in zuul how can i do that. Could please give a working sample it might be helpful to me.
Thanks
Prem
do you try adding required jar to class path?
did you find any?
Hai ,
My question is when iam starting the application it is showing as
The Tomcat connector configured to listen on port 8989 failed to start. The port may already be in use or the connector may be misconfigured
But i did not started the 8989 port it is in stop mode .
please change port number it will start working.
aplication.yml
server :
port : any-number
application.properties file
server.port=any-number
due to used by other process it will showing.
if you want to check port used by process fellow step
Start>>All Programs>>Accessories>>System Tools>>Resource Monitor
or Run resmon.exe, or from TaskManager performance tab
Hi,
I tried Zuul proxy server, with same code, but it gave error as below, i checked in jars this class is in classpath, i have no clue:
Caused by: java.lang.NoClassDefFoundError: com/netflix/hystrix/contrib/javanica/aop/aspectj/HystrixCommandAspect
Please help me
Thank you
Sandeep
Hi,
This error may result from maven dependency conflict.
Try by adding spring-cloud-starter-parent to avoid dependency conflict.
Thanks
Hi this is very good article and helped me lot to understand about spring cloud stack.
But I have one question. We are using these all spring cloud netflix services in production and looking for one solution. Since all requests are going through ZUUL, it may become bottleneck and single point of failure for whole system. How to handle this? Do you have any suggestion?
I have created demo application with eureka and zuul. But my zuul service is also running without a registry. I dtidn’t get any errors.
Hey Thanks for article. I am searching for articles that authorize users for requested resource with jwt. Like login page for everyone and other url for specific roles.
Glad if you can help.
Thanks.
Found any answer
its not working showing connection refused error .
com.netflix.zuul.exception.ZuulException: Connect to localhost:8090 [localhost/127.0.0.1, localhost/0:0:0:0:0:0:0:1] failed: Connection refused: connect
Hi,
I hope you are fine. I don’t know that how i give my thanks to you really. I am new in spring about 2 weeks and i read your tutorials and i learnt very very much things with you.
Thanks a lot again.
Best regards