
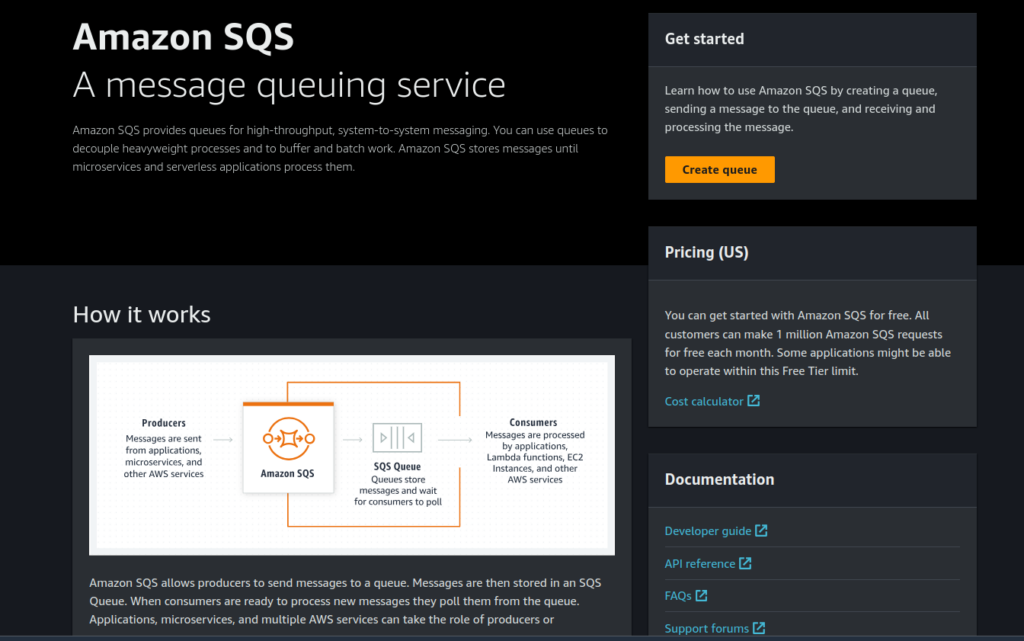
AWS SQS (Simple Queue Service) is a fully managed, distributed messaging system provided by AWS. The SQS acts as a message broker, enabling one component or service to send messages to a queue while other components or services can consume messages from that queue. This architecture allows for asynchronous communication, where messages are placed by producers in the queue and processed by consumers at their own pace, effectively decoupling the producer and consumer. To learn more about the SQS service, please visit the AWS official documentation here.
Spring Cloud AWS is part of the Spring ecosystem and is designed to simplify the integration of AWS (Amazon Web Services) services into Spring applications. It provides a set of tools and libraries that make it easier for developers to build cloud-native applications on the AWS platform using the Spring Framework. Its SQS module allows us to send and receive messages to and from SQS queues within your Spring application.
This tutorial explores using the Spring Cloud AWS module to interact with AWS SQS. Let’s start.
1. Prerequisites
Before beginning this tutorial, these are the prerequisites that must be met:
- We must have an AWS account to utilize AWS services. If you do not have an AWS account, you can sign up at aws.amazon.com/console.
- We need a user with programmatic access (secret ID and secret key) in order to access AWS services.
- A simple Spring Boot 3 application.
2. Creating an SQS Queue in AWS
To create a SQS queue using the AWS Management Console, follow these steps. We are creating a queue with the name “HowToDoInJava“.
- Open the SQS Service: Once you’re logged in, locate the “Services” menu in the top-left corner, and under “Application Integration“, click on “Simple Queue Service” or search for “SQS” and select it.

- Create a New Queue: In the SQS dashboard, click on the “Create Queue” button.
- Queue Name: Enter a unique name for your queue. FIFO queue names must end with “.fifo.”
- Choose Queue Type: You’ll be presented with two queue types: “Standard Queue” and “FIFO Queue“. Select the queue type you need. Note that FIFO queues guarantee message order and support exactly-once processing, but they have slightly lower throughput compared to standard queues.
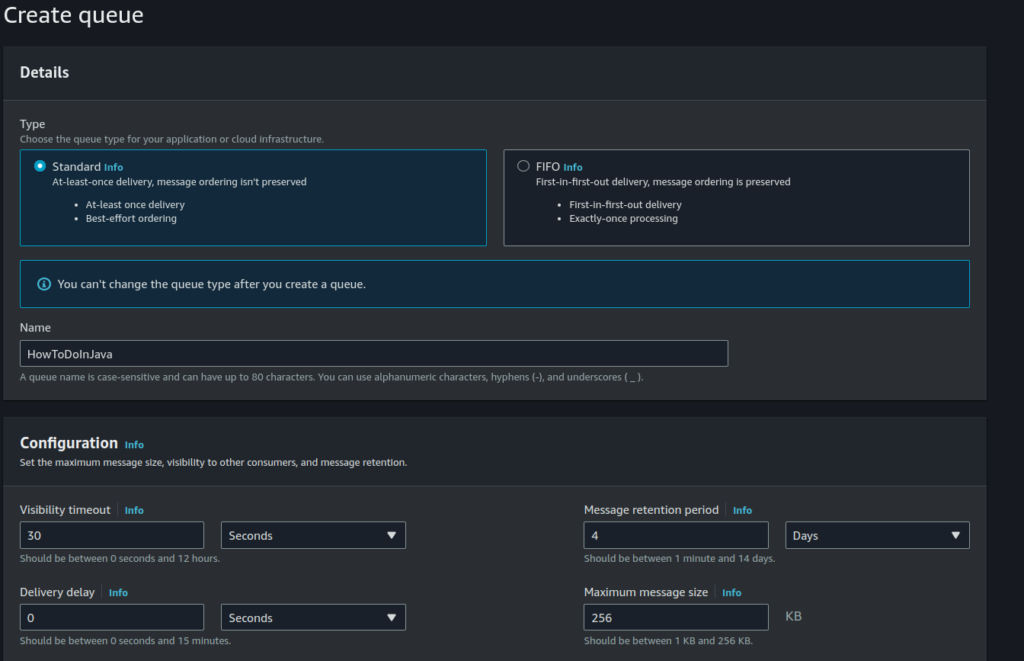
For the other configuration details (Visibility Timeout, Access Policy, Dead-letter Queue, ….), please keep the default values. We will cover them in the next section and update them if necessary.
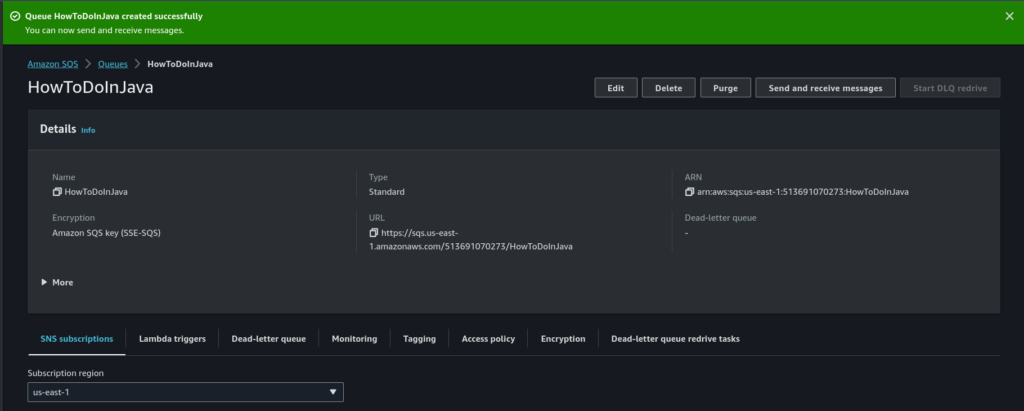
After configuring the details, click the ‘Create Queue‘ button. If everything is okay, you will receive a confirmation toast indicating that the queue has been successfully created, along with all the queue details.
3. Setting Up Spring Cloud AWS Module
3.1. Maven
To simplify dependency management, we will use Spring Cloud AWS’s Bill of Materials (BOM).
<dependencyManagement>
  <dependencies>
    <dependency>
      <groupId>io.awspring.cloud</groupId>
      <artifactId>spring-cloud-aws-dependencies</artifactId>
      <version>3.0.0</version>
      <type>pom</type>
      <scope>import</scope>
    </dependency>
  </dependencies>
</dependencyManagement>
We are currently using version 3.0.0, which is compatible with Spring Boot 3.0.0.
If you are using a lower version of Spring Cloud AWS with Spring Boot 3.0.0, you may encounter issues. Until Spring Boot v2.x, Spring boot autoconfiguration for SQS relied on ‘spring.factories‘ property. However, support for this has been removed in Spring Boot 3.0.0. [Read More]
Further, we include the latest versions of spring-cloud-aws-starter and spring-cloud-aws-starter-sqs dependencies.
<dependency>
  <groupId>io.awspring.cloud</groupId>
  <artifactId>spring-cloud-aws-starter</artifactId>
</dependency>
<dependency>
  <groupId>io.awspring.cloud</groupId>
  <artifactId>spring-cloud-aws-starter-sqs</artifactId>
</dependency>
3.2. Configuring AWS Credentials
Start by adding the access-key, secret-key, and region properties. Beginning from version 3.0.0 of Spring Cloud AWS, these properties have been prefixed with ‘spring.‘
For example, ‘cloud.aws.credentials.access-key‘ has been changed to ‘spring.cloud.aws.credentials.access-key‘.
spring.cloud.aws.credentials.access-key=AKIAXPGS7V5AWNBDMS3I
spring.cloud.aws.credentials.secret-key=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
spring.cloud.aws.region.static=us-east-1
The properties are typically defined in the application.properties file. However, to enhance the security of these sensitive values, it is recommended to use environment variables instead.
Using environment variables, we can separate the sensitive information from the application’s codebase and keep it securely stored in an environment where the application is deployed. This approach helps to prevent accidental exposure of credentials and ensures better security practices.
3.3. Configuring SQS Queue URL
There are two ways to configure the SQS Queue URL.
- The first method uses the property ‘
spring.cloud.aws.sqs.endpoint‘ which will be used by default to specify the endpoint for sending messages to a specific SQS queue.
spring.cloud.aws.sqs.endpoint=https://sqs.us-east-1.amazonaws.com/513691070273/HowToDoInJava- Alternatively, we can simply provide the queue name whenever we want to send a message. This can be done using ‘
queueUrl("")‘ when using ‘SqsAsyncClient‘ or ‘.queue("")‘ in the payload when using the ‘send()‘ method to send a message.
3.4. SqsTemplate Bean
When utilizing Spring Boot with autoconfiguration, a default SqsTemplate instance is automatically injected when no other template bean is present in the ApplicationContext. This SqsTemplate is underpinned by the autoconfigured SqsAsyncClient with any specified configurations. It’s worth noting that SqsTemplate instances are both immutable and thread-safe.
The responsibility for this autoconfiguration rests with the SqsAutoConfiguration class. We can customize the default behavior or incorporate more intricate configurations by defining the custom SqsAsyncClient and SqsTemplate beans.
@Configuration
public class AwsSQSConfig {

  @Value("${spring.cloud.aws.credentials.access-key}")
  private String accessKey;

  @Value("${spring.cloud.aws.credentials.secret-key}")
  private String secretKey;

  @Value("${spring.cloud.aws.region.static}")
  private String region;

  @Bean
  SqsAsyncClient sqsAsyncClient(){
    return SqsAsyncClient
      .builder()
      .region(Region.of(region))
      .credentialsProvider(StaticCredentialsProvider
        .create(AwsBasicCredentials.create(accessKey, secretKey)))
      .build();
   // add more Options
  }

  @Bean
  public SqsTemplate sqsTemplate(SqsAsyncClient sqsAsyncClient){
      return SqsTemplate.builder().sqsAsyncClient(sqsAsyncClient).build();
  }
}
4. Sending Messages to SQS Queue
We can send messages to SQS queues using the SqsTemplate through various methods. Here are some of the available methods:
// Send a message to the configured default endpoint.
SendResult<T> send(T payload);

// Send a message to the provided queue with the given payload.
SendResult<T> send(String queue, T payload);

// Send the given Message to the provided queue.
SendResult<T> send(String queue, Message<T> message);

// Send a message with the provided options.
SendResult<T> send(Consumer<SqsSendOptions> to);

// Send a batch of Messages to the provided queue
SendResult.Batch<T> sendMany(String queue, Collection<Message<T>> messages);
For example, after Injecting the SqsTemplate bean, let’s try to send a message to our queue “HowToDoInJava“.
sqsTemplate
 .send(sqsSendOptions ->
    sqsSendOptions
      .queue("HowToDoInJava")
      .payload("myPayload")
 );
5. Polling Messages with SqsTemplate
To receive a message, we interact with the SQS API to check for new messages. In this method, messages are not pushed from the server to us.
To implement short polling, we utilize the receive() method of the SqsTemplate within an infinite loop, consistently checking the queue’s status. If the queue is empty, the receive() method returns an empty response.
Here are some of the available methods:
// Receive a message from the configured default endpoint and options.
Optional<Message<?>> receive();

// Receive a message from the provided queue and convert the payload to the provided class.
<T> Optional<Message<T>> receive(String queue, Class<T> payloadClass);

// Receive a message with the provided options.
Optional<Message<?>> receive(Consumer<SqsReceiveOptions> from);

// Receive a message with the provided options and convert the payload to the provided class.
<T> Optional<Message<T>> receive(Consumer<SqsReceiveOptions> from, Class<T> payloadClass);

// Receive a batch of messages from the configured default endpoint and options.
Collection<Message<?>> receiveMany();

// Receive a batch of messages from the provided queue and convert the payloads to the provided class.
<T> Collection<Message<T>> receiveMany(String queue, Class<T> payloadClass);

// Receive a batch of messages with the provided options.
Collection<Message<?>> receiveMany(Consumer<SqsReceiveOptions> from);

// Receive a batch of messages with the provided options and convert the payloads to the provided class.
<T> Collection<Message<T>> receiveMany(Consumer<SqsReceiveOptions> from, Class<T> payloadClass);
For example, after Injecting the SqsTemplate bean, let’s try to receive a message from our queue “HowToDoInJava“.
Optional<Message<?>>  message = sqsTemplate
  .receive(from -> from.queue("HowToDoInJava"));
6. Message Notifications with @SqsListener
The @SqsListener is used to define methods as message listeners for SQS queues. When annotated, Spring automatically configures the method to receive and process messages from a specified SQS queue.
@SqsListener("HowToDoInJava" )
public void listen(Message<?> message) {
LOGGER.info("Message received on listen method at {}", OffsetDateTime.now());
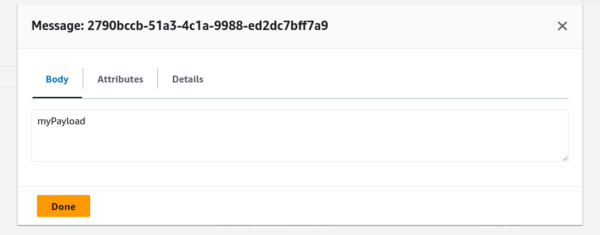
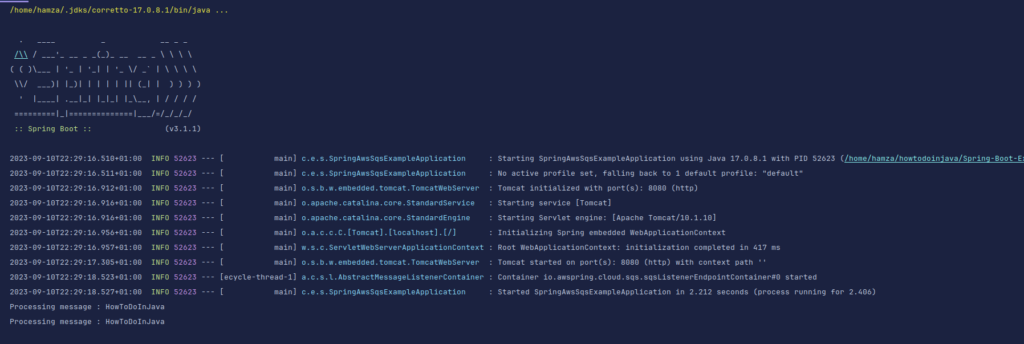
}Next, let’s try to send a message from the SQS console:
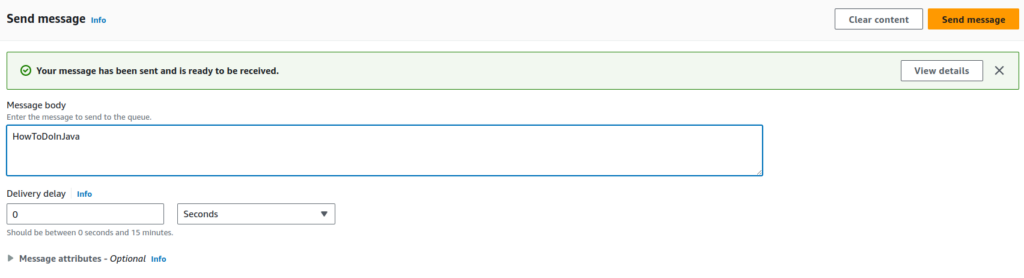
Our listener method will be executed successfully:
7. Message Acknowledgements
Acknowledging the completion of message processing is important so the message can be removed from the queue.
There are three acknowledgment modes available:
ON_SUCCESS– Acknowledges a message after successful processing.ALWAYS– Acknowledges a message after processing, regardless of success or error.MANUAL– The framework does not acknowledge messages automatically, and Acknowledgement objects can be received in the listener method. In this mode, you must send acknowledgments manually.
7.1. Automatic Acknowledgement
When using the @SqsListener annotation, message acknowledgment is automatically handled by the framework once the annotated method successfully processes the message. This simplifies the message processing flow, guaranteeing that messages are not processed multiple times, thereby reducing the risk of message loss in the application.
@SqsListener("HowToDoInJava")
public void listen(Message<?> message) {
    LOGGER.info("Message received on the listen method at {}", OffsetDateTime.now());
}
7.2. Manual Acknowledgment
To handle message acknowledgments manually, we can use the SqsMessageListenerContainerFactory bean and set the default mode to MANUAL.
@Bean
SqsMessageListenerContainerFactory<Object> defaultSqsListenerContainerFactory(SqsAsyncClient sqsAsyncClient) {

  return SqsMessageListenerContainerFactory.builder()
      .configure(options -> options.acknowledgementMode(AcknowledgementMode.MANUAL))
      .acknowledgementResultCallback(new AckResultCallback())
      .sqsAsyncClient(sqsAsyncClient)
      .build();
}
To perform manual acknowledgment, we use the static method Acknowledgement.acknowledge().
@SqsListener("HowToDoInJava")
public void listen(Message<?> message) {

    LOGGER.info("Message received on the listen method at {}", OffsetDateTime.now());
    Acknowledgement.acknowledge(message);
}
If required, we can also attach a callback to our acknowledgment with AcknowledgementResultCallback. This helps in making sure that acknowledgments have been received by AWS properly.
static class AckResultCallback implements AcknowledgementResultCallback<Object> {

  @Override
  public void onSuccess(Collection<Message<Object>> messages) {
      LOGGER.info("Ack with success at {}", OffsetDateTime.now());
  }

  @Override
  public void onFailure(Collection<Message<Object>> messages, Throwable t) {
      LOGGER.error("Ack with fail", t);
  }
}
8. Message Visibility Timeout
The visibility timeout is a configurable parameter that determines how long a message remains invisible to other consumers after it has been retrieved by a consumer. This ensures that the processing of the message is exclusive to one instance.
When a consumer successfully receives a message, the countdown for the visibility timeout starts. If the consumer does not delete or acknowledge the message within this timeout, the message becomes visible to other consumers in the queue again. This can lead to potential duplicate processing.
The recommended strategy is to set the timeout at a maximum value that corresponds to the consumer’s processing and deletion time for a message.
9. Dead-Letter Queues
Dead-letter queues are special queues designed to capture messages that cannot be processed successfully after repeated retries. Messages that exceed the maximum retry count or experience other processing errors are automatically moved to the dead-letter queue.
9.1. Simulate the Message Failures
We will simulate unexpected behavior by throwing an exception before sending the acknowledgment. As a result, the message will not be deleted from the queue, making it available for consumption once again after the visibility timeout.
@SqsListener("HowToDoInJava")
public void listen(Message<?> message) {

  LOGGER.info("Message received on listen method at {}", OffsetDateTime.now());
  LOGGER.info("Processing Failed", OffsetDateTime.now());
  int x = 5 / 0 ; // Exception
  Acknowledgement.acknowledge(message);
}
9.2. Creating a Dead-Letter Queue
To set up a DLQ, follow these step-by-step instructions:
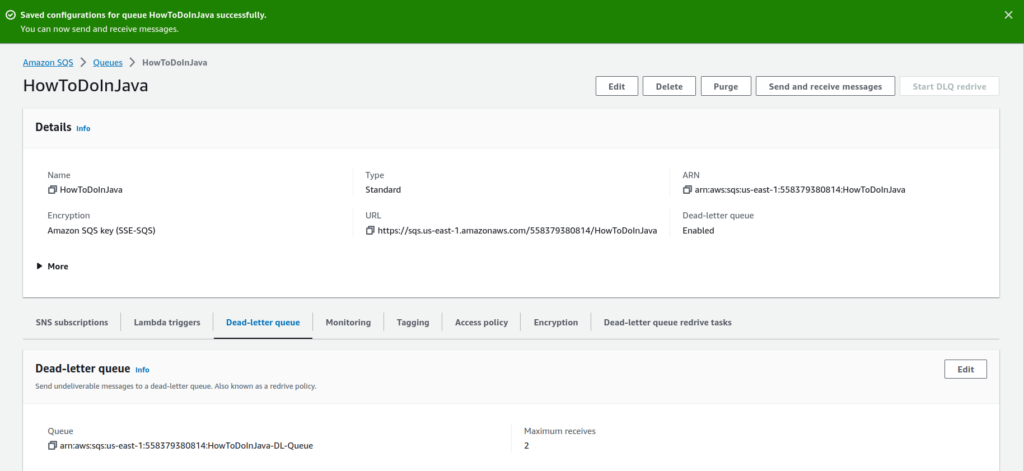
- Begin by creating the DL Queue as any ordinary queue. For reference, I will name it “HowToDoInJava-DL-Queue“.
- Return to the main queue, “HowToDoInJava,” and navigate to the Dead-Letter Queue section. Click on the “Edit” button.
- Scroll down to the “Dead Letter Queue” section.
- Enable the Dead-Letter Queue feature.
- Choose the DL Queue we created earlier as the designated DL Queue.
- Specify the “Maximum receives.” This value determines how many times a message can be received or polled from the primary queue before it’s automatically moved to the DL Queue.
- Save the changes.
9.3. Dead-Letter Queues in Action
Now we send messages to HowToDoInJava queue, and it will fail as we designed for it.

During processing, the consumer encounters an error or fails to process the message successfully, and it attempts processing multiple times. In our case, it is 2 times.

When the message exceeds the maximum receive count (2 in our case ) without successful processing, it’s automatically moved to the Dead-Letter Queue (DLQ).

10. Conclusion
In the realm of distributed systems, effective messaging is paramount, and Spring Cloud AWS is surely one great way to achieve it. In this tutorial, we learned to harness asynchronous messaging and ensured message reliability with acknowledgments.
We also learned about the dead letter queues and this dynamic duo simplifies complex messaging systems, empowering us to craft scalable, responsive, and fault-tolerant applications with ease.
Happy Learning !!
Hello , After I clone the project and modify aws configuration according to my account i got below error
2025-01-12T23:45:26.114+05:30 WARN 20148 — [ main] ConfigServletWebServerApplicationContext : Exception encountered during context initialization – cancelling refresh attempt: org.springframework.context.ApplicationContextException: Failed to start bean ‘io.awspring.cloud.messaging.internalEndpointRegistryBeanName’
Please provide the complete stack trace.
Please find below full log trace:
2025-01-16T07:00:35.302+05:30 WARN 9148 — [ main] ConfigServletWebServerApplicationContext : Exception encountered during context initialization – cancelling refresh attempt: org.springframework.context.ApplicationContextException: Failed to start bean ‘io.awspring.cloud.messaging.internalEndpointRegistryBeanName’
2025-01-16T07:00:40.319+05:30 INFO 9148 — [ main] o.apache.catalina.core.StandardService : Stopping service [Tomcat]
2025-01-16T07:00:40.366+05:30 INFO 9148 — [ main] .s.b.a.l.ConditionEvaluationReportLogger :
Error starting ApplicationContext. To display the condition evaluation report re-run your application with ‘debug’ enabled.
2025-01-16T07:00:40.410+05:30 ERROR 9148 — [ main] o.s.boot.SpringApplication : Application run failed
org.springframework.context.ApplicationContextException: Failed to start bean ‘io.awspring.cloud.messaging.internalEndpointRegistryBeanName’
at org.springframework.context.support.DefaultLifecycleProcessor.doStart(DefaultLifecycleProcessor.java:181) ~[spring-context-6.0.9.jar:6.0.9]
at org.springframework.context.support.DefaultLifecycleProcessor$LifecycleGroup.start(DefaultLifecycleProcessor.java:356) ~[spring-context-6.0.9.jar:6.0.9]
at java.base/java.lang.Iterable.forEach(Iterable.java:75) ~[na:na]
at org.springframework.context.support.DefaultLifecycleProcessor.startBeans(DefaultLifecycleProcessor.java:155) ~[spring-context-6.0.9.jar:6.0.9]
at org.springframework.context.support.DefaultLifecycleProcessor.onRefresh(DefaultLifecycleProcessor.java:123) ~[spring-context-6.0.9.jar:6.0.9]
at org.springframework.context.support.AbstractApplicationContext.finishRefresh(AbstractApplicationContext.java:958) ~[spring-context-6.0.9.jar:6.0.9]
at org.springframework.context.support.AbstractApplicationContext.refresh(AbstractApplicationContext.java:611) ~[spring-context-6.0.9.jar:6.0.9]
at org.springframework.boot.web.servlet.context.ServletWebServerApplicationContext.refresh(ServletWebServerApplicationContext.java:146) ~[spring-boot-3.1.0.jar:3.1.0]
at org.springframework.boot.SpringApplication.refresh(SpringApplication.java:733) ~[spring-boot-3.1.0.jar:3.1.0]
at org.springframework.boot.SpringApplication.refreshContext(SpringApplication.java:435) ~[spring-boot-3.1.0.jar:3.1.0]
at org.springframework.boot.SpringApplication.run(SpringApplication.java:311) ~[spring-boot-3.1.0.jar:3.1.0]
at org.springframework.boot.SpringApplication.run(SpringApplication.java:1305) ~[spring-boot-3.1.0.jar:3.1.0]
at org.springframework.boot.SpringApplication.run(SpringApplication.java:1294) ~[spring-boot-3.1.0.jar:3.1.0]
at com.example.springawssqsexample.SpringAwsSqsExampleApplication.main(SpringAwsSqsExampleApplication.java:16) ~[classes/:na]
Caused by: java.util.concurrent.CompletionException: io.awspring.cloud.sqs.QueueAttributesResolvingException: Error resolving attributes for queue HowToDoInJava with strategy CREATE and queueAttributesNames []
at java.base/java.util.concurrent.CompletableFuture.encodeRelay(CompletableFuture.java:368) ~[na:na]
at java.base/java.util.concurrent.CompletableFuture.completeRelay(CompletableFuture.java:377) ~[na:na]
at java.base/java.util.concurrent.CompletableFuture$UniCompose.tryFire(CompletableFuture.java:1152) ~[na:na]
at java.base/java.util.concurrent.CompletableFuture.postComplete(CompletableFuture.java:510) ~[na:na]
at java.base/java.util.concurrent.CompletableFuture.completeExceptionally(CompletableFuture.java:2162) ~[na:na]
at software.amazon.awssdk.utils.CompletableFutureUtils.lambda$forwardExceptionTo$0(CompletableFutureUtils.java:79) ~[utils-2.20.55.jar:na]
at java.base/java.util.concurrent.CompletableFuture.uniWhenComplete(CompletableFuture.java:863) ~[na:na]
at java.base/java.util.concurrent.CompletableFuture$UniWhenComplete.tryFire(CompletableFuture.java:841) ~[na:na]
at java.base/java.util.concurrent.CompletableFuture.postComplete(CompletableFuture.java:510) ~[na:na]
at java.base/java.util.concurrent.CompletableFuture.completeExceptionally(CompletableFuture.java:2162) ~[na:na]
at software.amazon.awssdk.core.internal.http.pipeline.stages.AsyncApiCallMetricCollectionStage.lambda$execute$0(AsyncApiCallMetricCollectionStage.java:54) ~[sdk-core-2.20.55.jar:na]
at java.base/java.util.concurrent.CompletableFuture.uniWhenComplete(CompletableFuture.java:863) ~[na:na]
at java.base/java.util.concurrent.CompletableFuture$UniWhenComplete.tryFire(CompletableFuture.java:841) ~[na:na]
at java.base/java.util.concurrent.CompletableFuture.postComplete(CompletableFuture.java:510) ~[na:na]
at java.base/java.util.concurrent.CompletableFuture.completeExceptionally(CompletableFuture.java:2162) ~[na:na]
at software.amazon.awssdk.core.internal.http.pipeline.stages.AsyncApiCallTimeoutTrackingStage.lambda$execute$2(AsyncApiCallTimeoutTrackingStage.java:67) ~[sdk-core-2.20.55.jar:na]
at java.base/java.util.concurrent.CompletableFuture.uniWhenComplete(CompletableFuture.java:863) ~[na:na]
at java.base/java.util.concurrent.CompletableFuture$UniWhenComplete.tryFire(CompletableFuture.java:841) ~[na:na]
at java.base/java.util.concurrent.CompletableFuture.postComplete(CompletableFuture.java:510) ~[na:na]
at java.base/java.util.concurrent.CompletableFuture.completeExceptionally(CompletableFuture.java:2162) ~[na:na]
at software.amazon.awssdk.utils.CompletableFutureUtils.lambda$forwardExceptionTo$0(CompletableFutureUtils.java:79) ~[utils-2.20.55.jar:na]
at java.base/java.util.concurrent.CompletableFuture.uniWhenComplete(CompletableFuture.java:863) ~[na:na]
at java.base/java.util.concurrent.CompletableFuture$UniWhenComplete.tryFire(CompletableFuture.java:841) ~[na:na]
at java.base/java.util.concurrent.CompletableFuture.postComplete(CompletableFuture.java:510) ~[na:na]
at java.base/java.util.concurrent.CompletableFuture.completeExceptionally(CompletableFuture.java:2162) ~[na:na]
at software.amazon.awssdk.core.internal.http.pipeline.stages.AsyncRetryableStage$RetryingExecutor.maybeAttemptExecute(AsyncRetryableStage.java:103) ~[sdk-core-2.20.55.jar:na]
at software.amazon.awssdk.core.internal.http.pipeline.stages.AsyncRetryableStage$RetryingExecutor.maybeRetryExecute(AsyncRetryableStage.java:184) ~[sdk-core-2.20.55.jar:na]
at software.amazon.awssdk.core.internal.http.pipeline.stages.AsyncRetryableStage$RetryingExecutor.lambda$attemptExecute$1(AsyncRetryableStage.java:159) ~[sdk-core-2.20.55.jar:na]
at java.base/java.util.concurrent.CompletableFuture.uniWhenComplete(CompletableFuture.java:863) ~[na:na]
at java.base/java.util.concurrent.CompletableFuture$UniWhenComplete.tryFire(CompletableFuture.java:841) ~[na:na]
at java.base/java.util.concurrent.CompletableFuture.postComplete(CompletableFuture.java:510) ~[na:na]
at java.base/java.util.concurrent.CompletableFuture.completeExceptionally(CompletableFuture.java:2162) ~[na:na]
at software.amazon.awssdk.utils.CompletableFutureUtils.lambda$forwardExceptionTo$0(CompletableFutureUtils.java:79) ~[utils-2.20.55.jar:na]
at java.base/java.util.concurrent.CompletableFuture.uniWhenComplete(CompletableFuture.java:863) ~[na:na]
at java.base/java.util.concurrent.CompletableFuture$UniWhenComplete.tryFire(CompletableFuture.java:841) ~[na:na]
at java.base/java.util.concurrent.CompletableFuture.postComplete(CompletableFuture.java:510) ~[na:na]
at java.base/java.util.concurrent.CompletableFuture.completeExceptionally(CompletableFuture.java:2162) ~[na:na]
at software.amazon.awssdk.core.internal.http.pipeline.stages.MakeAsyncHttpRequestStage.lambda$null$0(MakeAsyncHttpRequestStage.java:103) ~[sdk-core-2.20.55.jar:na]
at java.base/java.util.concurrent.CompletableFuture.uniWhenComplete(CompletableFuture.java:863) ~[na:na]
at java.base/java.util.concurrent.CompletableFuture$UniWhenComplete.tryFire(CompletableFuture.java:841) ~[na:na]
at java.base/java.util.concurrent.CompletableFuture.postComplete(CompletableFuture.java:510) ~[na:na]
at java.base/java.util.concurrent.CompletableFuture.completeExceptionally(CompletableFuture.java:2162) ~[na:na]
at software.amazon.awssdk.core.internal.http.pipeline.stages.MakeAsyncHttpRequestStage.lambda$executeHttpRequest$3(MakeAsyncHttpRequestStage.java:165) ~[sdk-core-2.20.55.jar:na]
at java.base/java.util.concurrent.CompletableFuture.uniWhenComplete(CompletableFuture.java:863) ~[na:na]
at java.base/java.util.concurrent.CompletableFuture$UniWhenComplete.tryFire(CompletableFuture.java:841) ~[na:na]
at java.base/java.util.concurrent.CompletableFuture$Completion.run(CompletableFuture.java:482) ~[na:na]
at java.base/java.util.concurrent.ThreadPoolExecutor.runWorker(ThreadPoolExecutor.java:1136) ~[na:na]
at java.base/java.util.concurrent.ThreadPoolExecutor$Worker.run(ThreadPoolExecutor.java:635) ~[na:na]
at java.base/java.lang.Thread.run(Thread.java:840) ~[na:na]
Caused by: io.awspring.cloud.sqs.QueueAttributesResolvingException: Error resolving attributes for queue HowToDoInJava with strategy CREATE and queueAttributesNames []
at io.awspring.cloud.sqs.QueueAttributesResolver.wrapException(QueueAttributesResolver.java:90) ~[spring-cloud-aws-sqs-3.0.0.jar:3.0.0]
at java.base/java.util.concurrent.CompletableFuture.uniExceptionally(CompletableFuture.java:990) ~[na:na]
at java.base/java.util.concurrent.CompletableFuture$UniExceptionally.tryFire(CompletableFuture.java:974) ~[na:na]
… 46 common frames omitted
Caused by: software.amazon.awssdk.core.exception.SdkClientException: Unable to execute HTTP request: Acquire operation took longer than the configured maximum time. This indicates that a request cannot get a connection from the pool within the specified maximum time. This can be due to high request rate.
Consider taking any of the following actions to mitigate the issue: increase max connections, increase acquire timeout, or slowing the request rate.
Increasing the max connections can increase client throughput (unless the network interface is already fully utilized), but can eventually start to hit operation system limitations on the number of file descriptors used by the process. If you already are fully utilizing your network interface or cannot further increase your connection count, increasing the acquire timeout gives extra time for requests to acquire a connection before timing out. If the connections doesn’t free up, the subsequent requests will still timeout.
If the above mechanisms are not able to fix the issue, try smoothing out your requests so that large traffic bursts cannot overload the client, being more efficient with the number of times you need to call AWS, or by increasing the number of hosts sending requests.
at software.amazon.awssdk.core.exception.SdkClientException$BuilderImpl.build(SdkClientException.java:111) ~[sdk-core-2.20.55.jar:na]
at software.amazon.awssdk.core.exception.SdkClientException.create(SdkClientException.java:47) ~[sdk-core-2.20.55.jar:na]
at software.amazon.awssdk.core.internal.http.pipeline.stages.utils.RetryableStageHelper.setLastException(RetryableStageHelper.java:223) ~[sdk-core-2.20.55.jar:na]
at software.amazon.awssdk.core.internal.http.pipeline.stages.utils.RetryableStageHelper.setLastException(RetryableStageHelper.java:218) ~[sdk-core-2.20.55.jar:na]
at software.amazon.awssdk.core.internal.http.pipeline.stages.AsyncRetryableStage$RetryingExecutor.maybeRetryExecute(AsyncRetryableStage.java:182) ~[sdk-core-2.20.55.jar:na]
… 22 common frames omitted
Caused by: java.lang.Throwable: Acquire operation took longer than the configured maximum time. This indicates that a request cannot get a connection from the pool within the specified maximum time. This can be due to high request rate.
Consider taking any of the following actions to mitigate the issue: increase max connections, increase acquire timeout, or slowing the request rate.
Increasing the max connections can increase client throughput (unless the network interface is already fully utilized), but can eventually start to hit operation system limitations on the number of file descriptors used by the process. If you already are fully utilizing your network interface or cannot further increase your connection count, increasing the acquire timeout gives extra time for requests to acquire a connection before timing out. If the connections doesn’t free up, the subsequent requests will still timeout.
If the above mechanisms are not able to fix the issue, try smoothing out your requests so that large traffic bursts cannot overload the client, being more efficient with the number of times you need to call AWS, or by increasing the number of hosts sending requests.
at software.amazon.awssdk.http.nio.netty.internal.utils.NettyUtils.decorateException(NettyUtils.java:69) ~[netty-nio-client-2.20.55.jar:na]
at software.amazon.awssdk.http.nio.netty.internal.NettyRequestExecutor.handleFailure(NettyRequestExecutor.java:309) ~[netty-nio-client-2.20.55.jar:na]
at software.amazon.awssdk.http.nio.netty.internal.NettyRequestExecutor.makeRequestListener(NettyRequestExecutor.java:189) ~[netty-nio-client-2.20.55.jar:na]
at io.netty.util.concurrent.DefaultPromise.notifyListener0(DefaultPromise.java:590) ~[netty-common-4.1.92.Final.jar:4.1.92.Final]
at io.netty.util.concurrent.DefaultPromise.notifyListenersNow(DefaultPromise.java:557) ~[netty-common-4.1.92.Final.jar:4.1.92.Final]
at io.netty.util.concurrent.DefaultPromise.access$200(DefaultPromise.java:35) ~[netty-common-4.1.92.Final.jar:4.1.92.Final]
at io.netty.util.concurrent.DefaultPromise$1.run(DefaultPromise.java:503) ~[netty-common-4.1.92.Final.jar:4.1.92.Final]
at io.netty.util.concurrent.AbstractEventExecutor.runTask(AbstractEventExecutor.java:174) ~[netty-common-4.1.92.Final.jar:4.1.92.Final]
at io.netty.util.concurrent.AbstractEventExecutor.safeExecute(AbstractEventExecutor.java:167) ~[netty-common-4.1.92.Final.jar:4.1.92.Final]
at io.netty.util.concurrent.SingleThreadEventExecutor.runAllTasks(SingleThreadEventExecutor.java:470) ~[netty-common-4.1.92.Final.jar:4.1.92.Final]
at io.netty.channel.nio.NioEventLoop.run(NioEventLoop.java:569) ~[netty-transport-4.1.92.Final.jar:4.1.92.Final]
at io.netty.util.concurrent.SingleThreadEventExecutor$4.run(SingleThreadEventExecutor.java:997) ~[netty-common-4.1.92.Final.jar:4.1.92.Final]
at io.netty.util.internal.ThreadExecutorMap$2.run(ThreadExecutorMap.java:74) ~[netty-common-4.1.92.Final.jar:4.1.92.Final]
… 1 common frames omitted
Caused by: java.util.concurrent.TimeoutException: Acquire operation took longer than 10000 milliseconds.
at software.amazon.awssdk.http.nio.netty.internal.HealthCheckedChannelPool.timeoutAcquire(HealthCheckedChannelPool.java:77) ~[netty-nio-client-2.20.55.jar:na]
at software.amazon.awssdk.http.nio.netty.internal.HealthCheckedChannelPool.lambda$acquire$0(HealthCheckedChannelPool.java:67) ~[netty-nio-client-2.20.55.jar:na]
at io.netty.util.concurrent.PromiseTask.runTask(PromiseTask.java:98) ~[netty-common-4.1.92.Final.jar:4.1.92.Final]
at io.netty.util.concurrent.ScheduledFutureTask.run(ScheduledFutureTask.java:153) ~[netty-common-4.1.92.Final.jar:4.1.92.Final]
… 7 common frames omitted
Please verify the followings:
There is a queue created in AWS SNS with name: HowToDoInJava
The AWS credentials or permissions are configured properly.
Double check the queue URL as defined in spring.cloud.aws.sqs.endpoint.
Thanks for reply, I haven’t configure SNS. My focus only to use sqs and IAM user accesskey,secretkey, endpoint of sqs setup correctly.
Queue name is enough? I dont see this spring.cloud.aws.sqs.endpoint.property in application.properties file could please rerun from your side once again
sqsSendOptions
.queue(“HowToDoInJava”)
.payload(message)
Yes, it is working fine. I tested again and without any code changes, it worked. The only change I made was that AWS key and secrets are now referred from environment properties.
And apologies for suggesting changes in SNS. I wanted to say SQS. Please make sure the queue exists there.
To verify that message reached in AWS SQS, use code in section 9.1. The message will not be deleted from AWS and you can verify it in aws console itself.
Many thanks. Apologies, I forgot to uncomment sqsAsyncClient in sqsconfig. Now it is working. Thank you
Hi ,
the contextLoad() test method in the application fails only when the io.awspring.cloud:spring-cloud-aws-starter-sqs is added as the dependency. any idea? i dont think any other dependency except the aws java sdk has the http clients in them.
Caused by: software.amazon.awssdk.core.exception.SdkClientException: Multiple HTTP implementations were found on the classpath. To avoid non-deterministic loading implementations, please explicitly provide an HTTP client via the client builders, set the software.amazon.awssdk.http.service.impl system property with the FQCN of the HTTP service to use as the default, or remove all but one HTTP implementation from the classpath. The multiple implementations found were: [software.amazon.awssdk.http.apache.ApacheSdkHttpService,software.amazon.awssdk.http.urlconnection.UrlConnectionSdkHttpService]