Microservices virtualization is a technique to simulate the behavior of specific components in heterogeneous component-based applications such as API-driven applications, cloud-based applications, or service-oriented architectures.
Learn about service virtualization concepts in detail and also look into a popular and useful service virtualization tool – Hoverfly. Also, see how Hoverfly can be used to capture requests/responses in proxy mode and use those captured responses while Hoverfly will run in simulation mode.
1. What is Microservice Virtualization?
Nowadays, cloud applications use lots of microservices that interact with each other to accomplish certain business capabilities. While developing this type of ecosystem, we sometimes face some common problems that generally impact the productivity of the whole team e.g.
- All the services in the ecosystem may not be available at present. Maybe those are also being developed by some other team.
- Some of the legacy services are not free to have a development environment or it might be costly and for obvious reasons, we can’t use the production version for testing.
- Some of the services can be down due to some reason.
- The problem of managing test data. Often, to write proper tests, you need fine-grained control over the data in your mocks or stubs. Managing test data across large projects with multiple teams introduces bottlenecks that impact delivery times.
So, we can easily understand that above problems will impact the development of the current product and may impact the delivery timeline also, which is directly proportional to the development cost of that product. So what are the solutions for this?
- We can think about mocking those services using some popular mocking frameworks. It has some drawbacks also e.g. mocks are generally scenario-specific and it takes lots of effort to create mocked responses for those services and also mocking is best fitted with the unit testing phase only (Junit).
- We can use stubbed services, where we will develop some fake services altogether with hardcoded responses – again those also do not make sense as we need to develop something to make this work.
- Also nowadays we need to do continuous integration while developing and in those cases, both Mocking and Stubbed services are not a very good candidate for this.
We have a very good infoq article on those types of similar techniques based on the common problem that we have discussed.
Since both mocking and stubbed service has a few problems in using effectively, so to solve the above problem, we have a technique called service virtualization where we can capture/simulate actual services. Hoverfly is one such tool which is newly developed with a fresh JVM language GO and it offers very easy and realistic steps to address the problem.
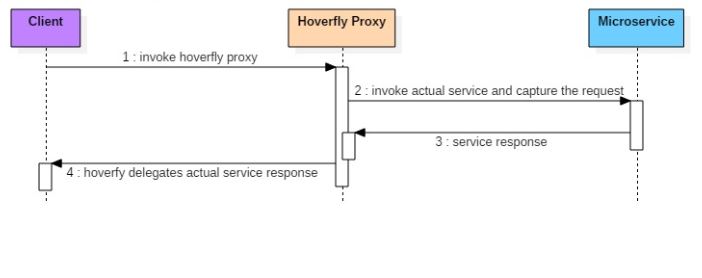
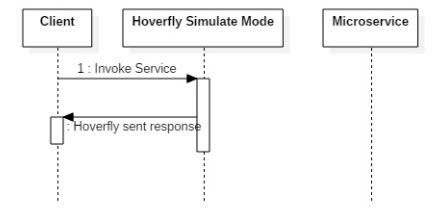
Below is the sequence diagram when we have virtualized service running for better understanding.
2. Demo Setup
We will follow the given steps to demo the usage of Hoverfly as a service virtualization tool.
- We will create a small ecosystem of microservices that will interact with each other.
- We will use Hoverfly to intercept the actual request/response when it is in capture mode.
- Finally, we will see how Hoverfly can act as a service virtualization server to send back already captured requests/responses while it is in simulation mode.
- We will also check that the underlying service downtime will not have much effect on our development.
- Also, we will see how easily we can toggle Hoverfly to go back to capture mode and can pass the request to the actual service.
Prerequisites
Before starting to demo the Hoverfly functionality, make sure you have the below prerequisites installed:
- Hoverfly [Install Guide]
- JDK 8
- Eclipse
- Maven
3. Create downstream service
Let’s create the service using spring boot for faster development time. Follow those steps to start this service.
3.1. Create Spring Boot Project
Create a Spring boot project from spring initializer portal with dependencies i.e.Web and Rest Repositories. Give other maven GAV coordinates as bellow and download the project.
Unzip and import the project into Eclipse as existing maven project. In this step do a fresh maven build using command mvn clean install so that all maven dependencies gets downloaded properly.
3.2. Add one Simple Rest Endpoint
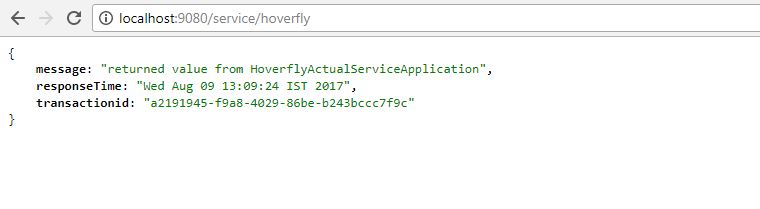
Add one RestController class which will expose a simple endpoint /service/hoverfly. This endpoint will be consumed by a second service that we will develop after this. For simplicity, we are just returning some hard-coded values with response time added in the response.
package com.example.hoverflyactualservice;

import java.util.Date;
import java.util.UUID;
import org.springframework.boot.SpringApplication;
import org.springframework.boot.autoconfigure.SpringBootApplication;
import org.springframework.web.bind.annotation.RequestMapping;
import org.springframework.web.bind.annotation.RestController;

@SpringBootApplication
public class HoverflyActualServiceApplication {

	public static void main(String[] args) {
		SpringApplication.run(HoverflyActualServiceApplication.class, args);
	}
}

@RestController
class MyRestController {

	@RequestMapping(value = "/service/hoverfly")
	public HoverflyServiceResponse getSampleResponse() {
		System.out.println("Inside HoverflyActualServiceApplication::getSampleResponse()");
		return new HoverflyServiceResponse("returned value from HoverflyActualServiceApplication", new Date().toString(), UUID.randomUUID().toString());
	}
}

class HoverflyServiceResponse {
	private String message;
	private String responseTime;
	private String transactionid;

	public HoverflyServiceResponse(String message, String responseTime, String transactionid) {
		super();
		this.message = message;
		this.responseTime = responseTime;
		this.transactionid = transactionid;
	}

	public String getMessage() {
		return message;
	}

	public void setMessage(String message) {
		this.message = message;
	}

	public String getResponseTime() {
		return responseTime;
	}

	public void setResponseTime(String responseTime) {
		this.responseTime = responseTime;
	}

	public String getTransactionid() {
		return transactionid;
	}

	public void setTransactionid(String transactionid) {
		this.transactionid = transactionid;
	}
}
3.3. Verify the Service
Change the application port to 9080 with property server.port = 9080. Start this project as a spring boot application by running the command java -jar target\hoverfly-actual-service-0.0.1-SNAPSHOT.jar.
Once the server starts, go to the browser and test whether these endpoints are working – http://localhost:9080/service/hoverfly
So our first downstream microservice is up and running. We will now create the second microservice which will invoke this service.
4. Create Client Service
Again follow the above steps to create this service. After importing the project in Eclipse, add the controller code.
4.1. Add Rest Endpoint
Add one RestControllerclass which will expose a simple endpoint /invoke. This endpoint method will internally call the downstream service that we have just developed (hoverfly-actual-service).
Also, we have added logic while creating the RestTemplate bean by taking one system property called mode.
If we pass mode=proxy while starting the service, then all requests to this will be first routed through Hoverfly proxy.
If we pass mode=production then all requests to this will go to actual service directly.
Please watch closely the method restTemplate() to understand the proxy mode. Note Hoverfly proxy server will run at http://localhost:8500.
package com.example.hoverflyactualserviceclient;

import java.net.InetSocketAddress;
import java.net.Proxy;
import java.net.Proxy.Type;

import org.springframework.beans.factory.annotation.Autowired;
import org.springframework.boot.SpringApplication;
import org.springframework.boot.autoconfigure.SpringBootApplication;
import org.springframework.context.annotation.Bean;
import org.springframework.core.ParameterizedTypeReference;
import org.springframework.http.HttpMethod;
import org.springframework.http.client.SimpleClientHttpRequestFactory;
import org.springframework.web.bind.annotation.RequestMapping;
import org.springframework.web.bind.annotation.RestController;
import org.springframework.web.client.RestTemplate;

@SpringBootApplication
public class HoverflyActualServiceClientApplication {

	public static void main(String[] args) {
		SpringApplication.run(HoverflyActualServiceClientApplication.class,
				args);
	}
}

@RestController

class TestController {

	private static final int HOVERFLY_PORT = 8500;
	private static final String HOVERFLY_HOST = "localhost";
	private static final String PROXY = "proxy";

	@RequestMapping("/invoke")
	public String invoke() {
		System.out.println("inside TestController::invoke()");
		String url = "http://localhost:9080/service/hoverfly";
		String response = restTemplate.exchange(url, HttpMethod.GET, null,
				new ParameterizedTypeReference<String>() {
				}).getBody();
		System.out.println("Actual Response : " + response);
		return response;
	}

	@Bean
	public RestTemplate restTemplate() {

		String mode = System.getProperty("mode");
		System.out.println("##################### Mode ################# " + mode);

		SimpleClientHttpRequestFactory requestFactory = new SimpleClientHttpRequestFactory();
		Proxy proxy = new Proxy(Type.HTTP, new InetSocketAddress(HOVERFLY_HOST, HOVERFLY_PORT));
		requestFactory.setProxy(proxy);
		RestTemplate template = null;

		if (mode != null && mode.equalsIgnoreCase(PROXY)) {
			System.out.println("######### Running application in PROXY mode so
									that we can use simulated hoverfly server!!!!");
			template = new RestTemplate(requestFactory);
		} else {
			System.out.println("######### Running application in PRODUCTION mode
									so that we can use simulated hoverfly server!!!!");
			template = new RestTemplate();
		}

		return template;
	}

	@Autowired
	RestTemplate restTemplate;
}
4.2. Verify the Service
This service is running in default port 8080 in local. Do a maven build using command mvn clean install and Start this project as spring boot application by running command java -jar -Dmode=proxy target\hoverfly-actual-service-client-0.0.1-SNAPSHOT.jar.
Please not that -Dmode=proxy is passed while for starting the service in proxy mode. In actual environments like production, we will not pass this parameter. Invoke API in a browser.
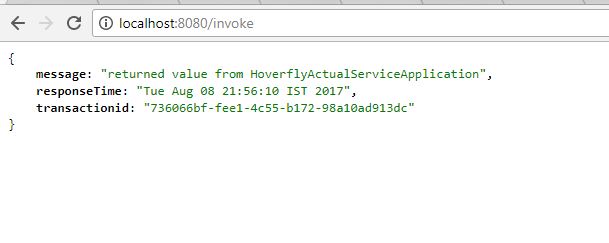
So we have developed the client application and we can also test the client service and get a response from the downstream service. We have also configured the Hoverfly proxy server in our client code properly so that we can integrate Hoverfly easily next.
5. Hoverfly Demo
We will now start the hoverfly locally and will test different modes and will see how it actually helps in case of service downtime. Hoverfly offers 4 different modes, capture, simulate, modify and synthesize. We will only look for capture and simulate mode in this demo.
5.1. Start Hoverfly in Capture mode
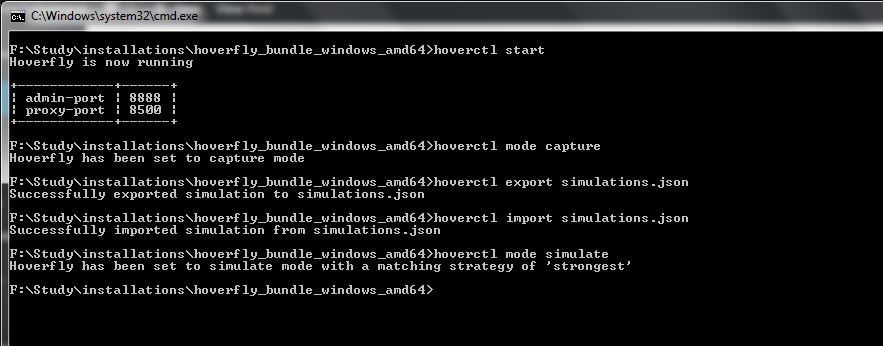
Open a command window to the Hoverfly directory (unzipped directory) and type hoverctl start command. It will start the hoverfly in local workstation in proxy mode and will start admin UI in 8888 port and proxy server in 8500 port.
Now type hoverctl mode capture in the same command prompt to change the hoverfly mode to capture. After those two commands, the command prompt window will look like-

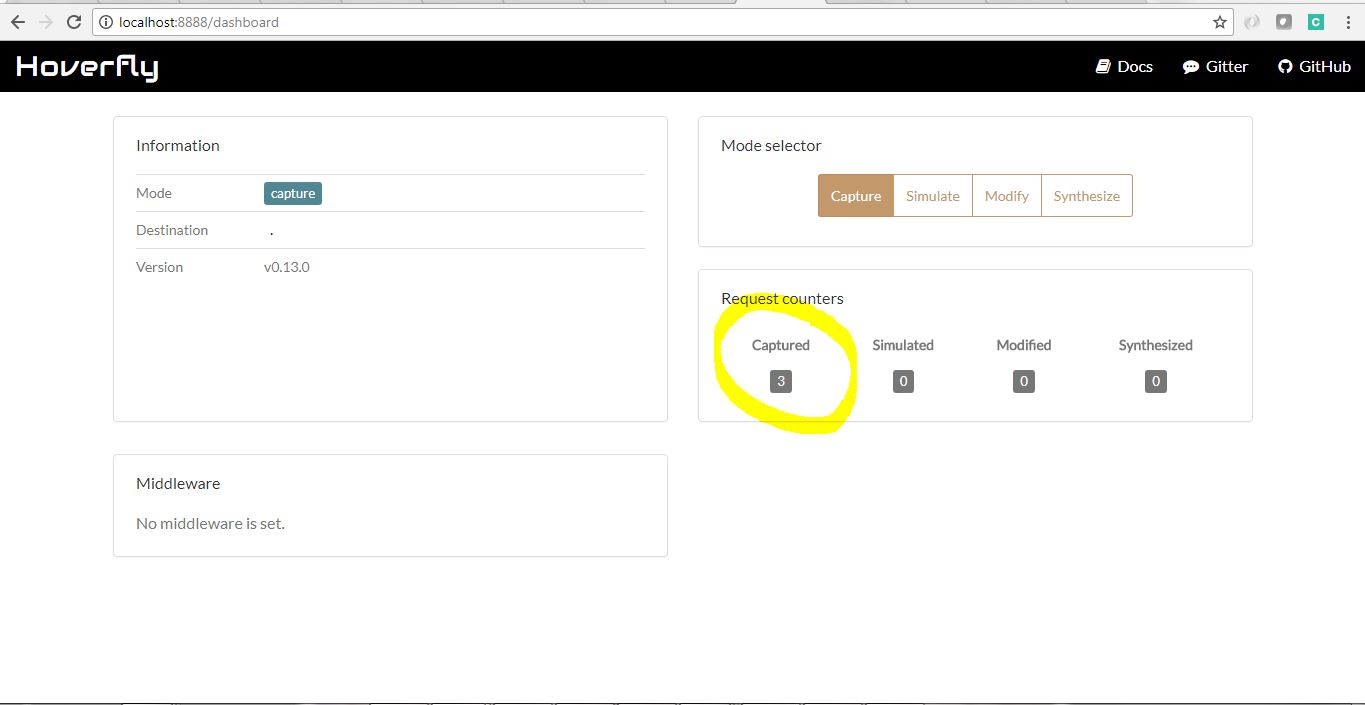
Now go to browser http://localhost:8888/dashboard and it will display the admin UI where also we can change the mode and also we can see how many requests have been captured or simulated.

5.2. Capture the Requests/Responses
Now with these settings, in the browser window run the client service a couple of times while hoverfly is in capture mode. Now go to the admin UI again and note that the Capture counter has been increased to the number of times you have accessed the client service application in the browser.
5.3. Export/Import captured requests
It’s a good idea to store the simulated requests and responses in some other place, so we do not need to run Hoverfly all the time. Whenever we will need it, we will import back saved requests/responses and start simulating the services.
Now we will export those captured requests in a JSON file and then import that file in Hoverfly and start Hoverfly in simulation mode.
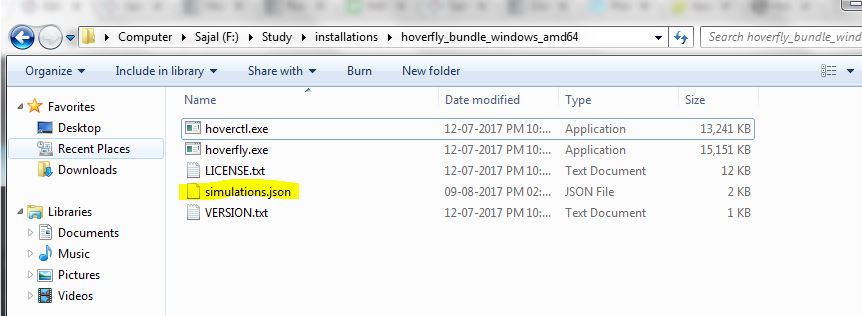
To Export, open the Hoverfly command window and type hoverctl export simulations.json command, this will export the already captured (in our case 3 transactions) in a json file simulations.json along with all the URLS, requests etc. Once exported the file will be created in the home directory of hoverfly.
To import back simulations.json file, you can type hoverctl import simulations.json command to import the captured definitions.
Once imported we will change the Hoverfly mode to simulate by hoverctl mode simulate command. We can also do this from the Hoverfly admin UI page.
Now we are ready to switch the Hoverfly mode to simulate and test.
5.4. Test in simulate mode
Go to simulate mode with this command – hoverctl mode simulate. Do the following simple steps-
- Open client application in the browser and hit the refresh button to see that the response is not changing in the browser (notice response time and transaction id field), that means Hoverfly is active and sending responses for all the URL patterns that match the imported file.
- No go to Hoverfly Admin UI and see that the Simulate counter has been increased to the number of times the client application has been accessed under simulation mode.
- Now stop the Downstream service and hit the client application, you can easily see that the Hoverfly is responding on behalf of the simulated downstream service. Which is great and really helpful in actual scenario where we want to test functionality when the actual service is down.
- Again start the downstream service and change the mode of Hoverfly to
capturefrom either command prompt or admin UI, and see that any request to the client service is round-tripped till the downstream service and the capture counter of the Hoverfly is increasing. So it is very easy to switch between capture vs simulate mode which is necessary if we want to capture new types of requests of the downstream services.

6. Summary
So today we have learned how effectively and easily we can use the service virtualization tool Hoverfly and integrate in our microservices ecosystem. We have seen only a few capabilities of Hoverfly, for more details please visit their beautiful documentation.
I will suggest you consider it in your next application design. You will like it.
Happy Learning !!
System.out.println("######### Running application in PRODUCTION mode
       so that we can use simulated hoverfly server!!!!");
Why would you want to use simulated responses in production?