
Learn to create a Maven web project in Eclipse, which we should be able to import into the Eclipse IDE for further development.
To create an Eclipse-supported web project, we will need to create a normal Maven web application and then make it compatible with the Eclipse IDE.
Step 1: Create a Maven Web Application
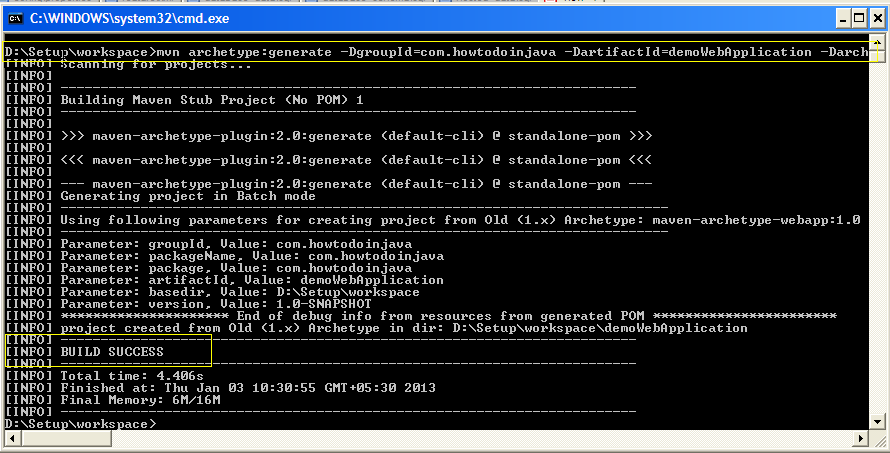
Run this maven command to create a maven web project named ‘demoWebApplication‘. Maven archetype used is ‘maven-archetype-webapp‘.
$ mvn archetype:generate
			-DgroupId=com.howtodoinjava
			-DartifactId=demoWebApplication
			-DarchetypeArtifactId=maven-archetype-webapp
-DinteractiveMode=falsegroupId: The unique identifier for your project (usually a reverse domain name, e.g.,com.example.mywebapp).artifactId: The name of your application or project (e.g.,mywebapp).maven-archetype-webapp: Archetype for creating a simple web application.interactiveMode: When set tofalse, Maven skips the interactive prompts.
This will create maven web project structure and web application-specific files like web.xml.
Step 2. Convert Project to Eclipse Dynamic Web Project
The following maven command needs to be run to convert the created Maven web project to an Eclipse dynamic web project.
$ mvn eclipse:eclipse -Dwtpversion=2.0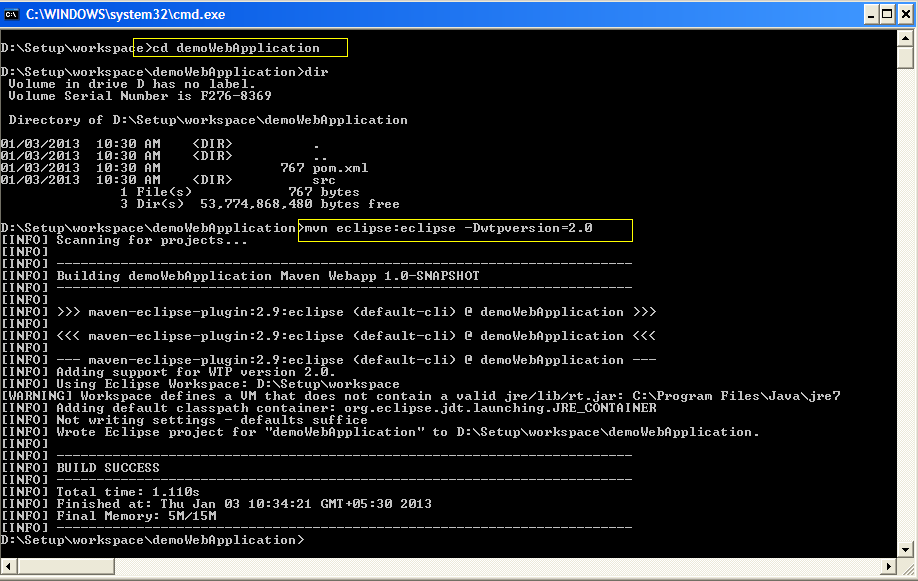
Please remember that adding “-Dwtpversion=4.0” is necessary, otherwise using only “
mvn eclipse:eclipse” will convert it to only normal Java project (without web support), and you will not be able to run it as web application.
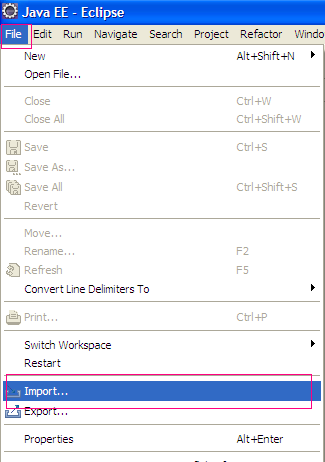
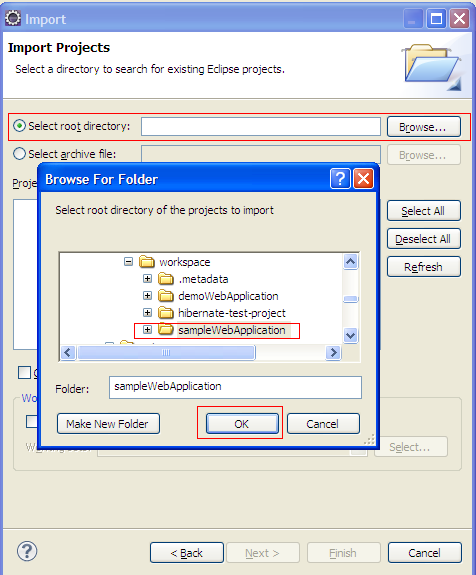
Step 3. Import Web Project into Eclipse
- Click on File menu and click on Import option.
- Now, click on “Existing project..” in general section.
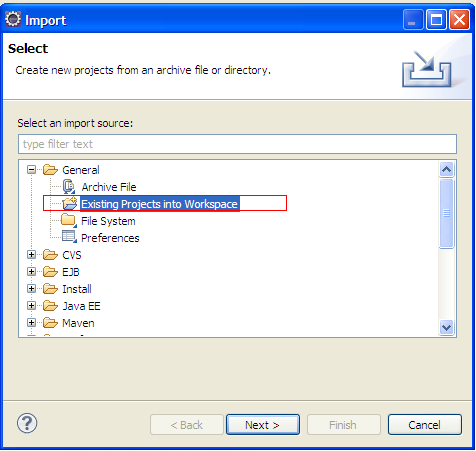
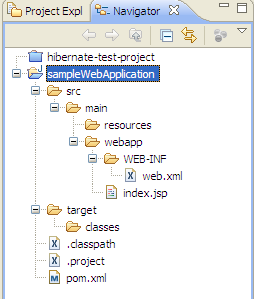
- Now, browse the project root folder and click OK. Finish.
- Above steps will import the project into eclipse work space. You can verify the project structure like this.
In this Maven tutorial, we learned how to create a Maven dynamic web project in Eclipse. For this example, I used Eclipse Oxygen. You may have a different Eclipse version, but the steps will be the same.
Happy Learning !!
Hi Lokhesh,
I am getting this error
NFO] Generating project in Interactive mode
ARNING] No archetype found in remote catalog. Defaulting to internal catalog
NFO] No archetype defined. Using maven-archetype-quickstart (org.apache.maven.archetypes:maven-archetype-quickstart:1.0)
oose archetype:
internal -> org.apache.maven.archetypes:maven-archetype-archetype (An archetype which contains a sample archetype.)
internal -> org.apache.maven.archetypes:maven-archetype-j2ee-simple (An archetype which contains a simplifed sample J2EE application.)
internal -> org.apache.maven.archetypes:maven-archetype-plugin (An archetype which contains a sample Maven plugin.)
internal -> org.apache.maven.archetypes:maven-archetype-plugin-site (An archetype which contains a sample Maven plugin site.
This archetype can be layered upon an existing Maven plugin project.)
internal -> org.apache.maven.archetypes:maven-archetype-portlet (An archetype which contains a sample JSR-268 Portlet.)
internal -> org.apache.maven.archetypes:maven-archetype-profiles ()
internal -> org.apache.maven.archetypes:maven-archetype-quickstart (An archetype which contains a sample Maven project.)
internal -> org.apache.maven.archetypes:maven-archetype-site (An archetype which contains a sample Maven site which demonstrates
some of the supported document types like APT, XDoc, and FML and demonstrates how
to i18n your site. This archetype can be layered upon an existing Maven project.)
internal -> org.apache.maven.archetypes:maven-archetype-site-simple (An archetype which contains a sample Maven site.)
: internal -> org.apache.maven.archetypes:maven-archetype-webapp (An archetype which contains a sample Maven Webapp project.)
oose a number or apply filter (format: [groupId:]artifactId, case sensitive contains): 7: -DarchetypeArtifactId=maven-archetype-webapp -DinteractiveMode=false
oose archetype:
Your filter doesn’t match any archetype (hint: enter to return to initial list)
oose a number or apply filter (format: [groupId:]artifactId, case sensitive contains): : 2
oose archetype:
Your filter doesn’t match any archetype (hint: enter to return to initial list)
oose a number or apply filter (format: [groupId:]artifactId, case sensitive contains): : 1
choose archetype:
Your filter doesn’t match any archetype (hint: enter to return to initial list)
oose a number or apply filter (format: [groupId:]artifactId, case sensitive contains): : 1.2
oose archetype:
Your filter doesn’t match any archetype (hint: enter to return to initial list)
oose a number or apply filter (format: [groupId:]artifactId, case sensitive contains): : mvn eclipse:eclipse -Dwtpversion=2.0
oose archetype:
Your filter doesn’t match any archetype (hint: enter to return to initial list)
oose a number or apply filter (format: [groupId:]artifactId, case sensitive contains): :
Please verify that you are using “archetypeArtifactId”.
Hi Lokesh,
Thanks for sharing this nice tutorials.
I have a doubt about test folder which should be inside src folder. It is not there.
Do I need to add this(i.e test) folder manually?
Thanks,
Vineet Kumar
Yes, you have to create manually. Read this tutorial : Creating java source folders in maven web application
i want very simple demo of struts spring hibernate please help
I will work on it.
Hi,
I am biswajit , using selenium webdriver for testing. I want to convert my project to maven project. While doing so, it is showing an error.
Can you pls guide me. I am seriously need help on Maven and configuring my pom.xml,
Thanks in advance.
What’s error?
I am getting the following error message (eclipse project with a red cross) after importing the project – “Java compiler level does not match the version of the installed Java project facet. – Unknown Faceted Project Problem (Java Version Mismatch)” Please help
Surprising I am helios which is supposed to support WTP 3.2 but I used WTP 2.0 since my WTP plugin support upto 2.0 only….what is the source of problem?
Read this: https://howtodoinjava.com/maven/solved-java-compiler-level-does-not-match-the-version-of-the-installed-java-project-facet/
Hi Lokesh,
while i run the -DarchetypeArtifactId=maven-archetype-webapp ” i am getting error like :’-DarchetypeArtifactId’ is not recognized as an internal or external command,
operable program or batch file. please correct me.
“mvn archetype:generate -DgroupId=com.howtodoinjava -DartifactId=demoWebApplication -DarchetypeArtifactId=maven-archetype-webapp -DinteractiveMode=false” is actually a single command. Remore any line break if there is any.
Not able to successfully run the mvn command:
Failed to execute goal org.apache.maven.plugins:maven-archetype-plugin:2.2:generate on project standalone-pom: The desired archtype does not exist
Sir, what is the meaning of wtpversion?? why we are giving only 2.0 as the version value?? cant we give any other value like “ch.1.000.200.1” etc..
wtp adds web application support to eclipse.
Read more: https://wiki.eclipse.org/WTP_FAQ#What_version_of_Eclipse_does_WTP_work_with.3F
I am getting this error after entering mvn archetype:generate -DgroupId=com.howtodoinjava -DartifactId=demoWebApplication
-DarchetypeArtifactId=maven-archetype-webapp -DinteractiveMode=false in cmd
Downloading: http://repo.maven.apache.org/maven2/org/apache/maven/plugins/maven- clean-plugin/2.5/maven-clean-plugin-2.5.pom
clean-plugin/2.5/maven-clean-plugin-2.5.pom
[WARNING] Failed to retrieve plugin descriptor for org.apache.maven.plugins:mave
n-clean-plugin:2.5: Plugin org.apache.maven.plugins:maven-clean-plugin:2.5 or on
e of its dependencies could not be resolved: Failed to read artifact descriptor
for org.apache.maven.plugins:maven-clean-plugin:jar:2.5
Please solve this issue
If you are behind some firewall then try configuring proxy settings.
runs correctly very fine