
In Spring Boot and Vaadin CRUD example, we will build a web application where Vaadin draws the screen (a table of rows plus a form) and Spring Boot with Spring Data JPA reads and writes those rows in a database. This tutorial builds a small Book Catalog application with Java 21, Spring Boot 4, Vaadin 25 and an in-memory H2 database. In this application, all CRUD operations happen on one screen, and we write no HTML or JavaScript.
1. Prerequisites
We need three things on the machine before we start:
- JDK 21 or newer. Run java -version to check.
- Maven 3.9 or newer. Run mvn -v to check. The project also builds with Gradle, but the commands in this article are Maven commands.
- An IDE that can import a Maven project (IntelliJ IDEA, Eclipse or VS Code).
You don’t need Node.js installed. Vaadin builds its frontend files with Node.js, and it downloads its own copy into your home folder the first time it needs one.
You should know what a Spring Boot application class and a JPA entity look like. Everything Vaadin-specific is explained where it first appears.
2. Create the Project
Let’s start with creating an empty Maven project and add every dependency the CRUD screen needs. We create a folder named spring-boot-vaadin-crud and put this pom.xml in it:
<?xml version="1.0" encoding="UTF-8"?>
<project xmlns="http://maven.apache.org/POM/4.0.0"
         xmlns:xsi="http://www.w3.org/2001/XMLSchema-instance"
         xsi:schemaLocation="http://maven.apache.org/POM/4.0.0 http://maven.apache.org/xsd/maven-4.0.0.xsd">
    <modelVersion>4.0.0</modelVersion>

    <parent>
        <groupId>org.springframework.boot</groupId>
        <artifactId>spring-boot-starter-parent</artifactId>
        <version>4.1.1</version>
        <relativePath/>
    </parent>

    <groupId>com.howtodoinjava</groupId>
    <artifactId>spring-boot-vaadin-crud</artifactId>
    <version>1.0.0</version>
    <packaging>jar</packaging>

    <properties>
        <java.version>21</java.version>
    </properties>

    <dependencyManagement>
        <dependencies>
            <dependency>
                <groupId>com.vaadin</groupId>
                <artifactId>vaadin-bom</artifactId>
                <version>25.3.2</version>
                <type>pom</type>
                <scope>import</scope>
            </dependency>
        </dependencies>
    </dependencyManagement>

    <dependencies>
        <dependency>
            <groupId>com.vaadin</groupId>
            <artifactId>vaadin-spring-boot-starter</artifactId>
        </dependency>
        <dependency>
            <groupId>com.vaadin</groupId>
            <artifactId>vaadin-dev</artifactId>
            <optional>true</optional>
        </dependency>
        <dependency>
            <groupId>org.springframework.boot</groupId>
            <artifactId>spring-boot-starter-data-jpa</artifactId>
        </dependency>
        <dependency>
            <groupId>org.springframework.boot</groupId>
            <artifactId>spring-boot-starter-validation</artifactId>
        </dependency>
        <dependency>
            <groupId>com.h2database</groupId>
            <artifactId>h2</artifactId>
            <scope>runtime</scope>
        </dependency>
        <dependency>
            <groupId>org.springframework.boot</groupId>
            <artifactId>spring-boot-starter-test</artifactId>
            <scope>test</scope>
        </dependency>
    </dependencies>

    <build>
        <plugins>
            <plugin>
                <groupId>org.springframework.boot</groupId>
                <artifactId>spring-boot-maven-plugin</artifactId>
            </plugin>
            <plugin>
                <groupId>com.vaadin</groupId>
                <artifactId>vaadin-maven-plugin</artifactId>
                <version>25.3.2</version>
                <executions>
                    <execution>
                        <goals>
                            <goal>prepare-frontend</goal>
                            <goal>build-frontend</goal>
                        </goals>
                    </execution>
                </executions>
            </plugin>
        </plugins>
    </build>

    <profiles>
        <profile>
            <id>production</id>
            <properties>
                <vaadin.productionMode>true</vaadin.productionMode>
            </properties>
        </profile>
    </profiles>
</project>
The dependencies, and what each one gives the application, are listed below.
| Dependency | What it gives us |
|---|---|
| vaadin-bom | One version number (25.3.2) for every Vaadin module, so we don’t repeat it |
| vaadin-spring-boot-starter | Vaadin’s components (Grid, TextField, Button) and the Spring integration that creates our views as Spring beans |
| vaadin-dev | The development server that rebuilds the frontend when we run mvn spring-boot:run |
| spring-boot-starter-data-jpa | Spring Data JPA and Hibernate, which turn Book objects into table rows |
| spring-boot-starter-validation | Jakarta Bean Validation, which checks the @NotBlank rules |
| h2 | An in-memory database, so nothing needs to be installed |
The vaadin-maven-plugin prepares the frontend files during a build, and the production profile at the end is only for the production jar (see the FAQ).
The trap in this step is leaving out vaadin-dev. Since Vaadin 25, the development server is a separate dependency. Without it, mvn spring-boot:run fails at startup with this error:
Caused by: java.lang.RuntimeException: 'vaadin-dev-server' not found.The fix is the vaadin-dev dependency shown above. We mark it optional, so it stays out of the production jar.
3. Project Structure
The finished project has one entity, one repository, one form, one view and two resource files. The rest of the article creates them in this order:
spring-boot-vaadin-crud
├── pom.xml
└── src/main
    ├── java/com/howtodoinjava/vaadincrud
    │   ├── VaadinCrudApplication.java
    │   └── book
    │       ├── Book.java
    │       ├── BookRepository.java
    │       ├── BookForm.java
    │       └── MainView.java
    └── resources
        ├── application.properties
        └── data.sql
The application class goes first. It is a normal Spring Boot main class with two Vaadin additions:
package com.howtodoinjava.vaadincrud;

import com.vaadin.flow.component.dependency.StyleSheet;
import com.vaadin.flow.component.page.AppShellConfigurator;
import com.vaadin.flow.theme.lumo.Lumo;
import org.springframework.boot.SpringApplication;
import org.springframework.boot.autoconfigure.SpringBootApplication;

@SpringBootApplication
@StyleSheet(Lumo.STYLESHEET)
public class VaadinCrudApplication implements AppShellConfigurator {

    public static void main(String[] args) {
        SpringApplication.run(VaadinCrudApplication.class, args);
    }
}
AppShellConfigurator marks the class that holds settings for the whole page, so they apply to every view. @StyleSheet(Lumo.STYLESHEET) loads Lumo, Vaadin’s default look (fonts, colors, button styles).
If we leave out @StyleSheet, the application still runs, but the page shows browser-default serif fonts and plain grey buttons. Vaadin 25 no longer loads a theme by itself, so this one line is the fix.
4. Building the App
The application has four classes, and we create them in the order they depend on each other: the entity, the repository that stores it, the form that edits it and the view that shows everything on one screen.
Step 1: Create the Book Entity and Seed Data
Next, we create the Book entity and give the database three books to start with. The entity has an id, a title, an author and an available flag:
package com.howtodoinjava.vaadincrud.book;

import jakarta.persistence.Entity;
import jakarta.persistence.GeneratedValue;
import jakarta.persistence.GenerationType;
import jakarta.persistence.Id;
import jakarta.validation.constraints.NotBlank;

@Entity
public class Book {

    @Id
    @GeneratedValue(strategy = GenerationType.IDENTITY)
    private Long id;

    @NotBlank(message = "Title must not be empty")
    private String title;

    @NotBlank(message = "Author must not be empty")
    private String author;

    private boolean available = true;

    public Book() {
    }

    public Book(String title, String author, boolean available) {
        this.title = title;
        this.author = author;
        this.available = available;
    }

    // Getters and setters
}
To keep the listing short, the getters and setters are left out here, and you can generate them in your IDE. They are required: the grid reads the getters and the form calls the setters. The full class is on GitHub.
The two @NotBlank annotations are the validation rules for the whole application. The form reads them in step 3, and Hibernate checks them again before it inserts a row. The no-argument constructor is required by JPA, and the second constructor is a shortcut we use when the user clicks “Add book”.
Next, src/main/resources/application.properties points Spring Boot at an in-memory H2 database:
spring.datasource.url=jdbc:h2:mem:bookcatalog
spring.jpa.hibernate.ddl-auto=create-drop
spring.jpa.defer-datasource-initialization=true
spring.sql.init.mode=always
server.port=8080
ddl-auto=create-drop tells Hibernate to create the book table from the entity at startup and drop it at shutdown. defer-datasource-initialization=true makes Spring wait for that table before it runs data.sql.
Finally, src/main/resources/data.sql inserts three books:
INSERT INTO book (title, author, available) VALUES ('Effective Java', 'Joshua Bloch', true);
INSERT INTO book (title, author, available) VALUES ('Clean Code', 'Robert Martin', true);
INSERT INTO book (title, author, available) VALUES ('Java Concurrency in Practice', 'Brian Goetz', false);
Because the database lives in memory, every restart begins again with these three rows. Any book you add is gone after a restart, which is what we want for a demo.
Step 2: Create the Repository
Now we create the repository that finds, saves and deletes books. It is an interface, and we don’t write any implementation for it:
package com.howtodoinjava.vaadincrud.book;

import org.springframework.data.jpa.repository.JpaRepository;

import java.util.List;

public interface BookRepository extends JpaRepository<Book, Long> {

    List<Book> findByTitleContainingIgnoreCase(String title);
}
JpaRepository already has findAll(), save() and delete(), which cover Read, Create, Update and Delete. We add one method for the filter box. Spring Data reads the method name findByTitleContainingIgnoreCase and generates the query from it (a LIKE search on title that ignores upper and lower case).
Step 3: Create the Book Form
Next, we create the form that shows one book, checks it and tells the view what the user clicked. The form doesn’t touch the database. It only fires events, so the view decides what to do with them:
package com.howtodoinjava.vaadincrud.book;

import com.vaadin.flow.component.ComponentEvent;
import com.vaadin.flow.component.ComponentEventListener;
import com.vaadin.flow.component.Key;
import com.vaadin.flow.component.button.Button;
import com.vaadin.flow.component.button.ButtonVariant;
import com.vaadin.flow.component.checkbox.Checkbox;
import com.vaadin.flow.component.orderedlayout.HorizontalLayout;
import com.vaadin.flow.component.orderedlayout.VerticalLayout;
import com.vaadin.flow.component.textfield.TextField;
import com.vaadin.flow.data.binder.BeanValidationBinder;
import com.vaadin.flow.data.binder.ValidationException;
import com.vaadin.flow.shared.Registration;

public class BookForm extends VerticalLayout {

    private final BeanValidationBinder<Book> binder = new BeanValidationBinder<>(Book.class);

    // Field names match the Book properties, so bindInstanceFields() can connect them
    private final TextField title = new TextField("Title");
    private final TextField author = new TextField("Author");
    private final Checkbox available = new Checkbox("Available");

    private final Button save = new Button("Save");
    private final Button delete = new Button("Delete");
    private final Button cancel = new Button("Cancel");

    private Book book;

    public BookForm() {
        binder.bindInstanceFields(this);

        save.addThemeVariants(ButtonVariant.LUMO_PRIMARY);
        delete.addThemeVariants(ButtonVariant.LUMO_ERROR);
        save.addClickShortcut(Key.ENTER);
        cancel.addClickShortcut(Key.ESCAPE);

        save.addClickListener(e -> validateAndSave());
        delete.addClickListener(e -> fireEvent(new DeleteEvent(this, book)));
        cancel.addClickListener(e -> fireEvent(new CloseEvent(this)));

        add(title, author, available, new HorizontalLayout(save, delete, cancel));
    }

    public void setBook(Book book) {
        this.book = book;
        binder.readBean(book);
    }

    private void validateAndSave() {
        try {
            binder.writeBean(book);
            fireEvent(new SaveEvent(this, book));
        } catch (ValidationException e) {
            // The @NotBlank messages are already shown under each field
        }
    }

    public static abstract class BookFormEvent extends ComponentEvent<BookForm> {
        private final Book book;

        protected BookFormEvent(BookForm source, Book book) {
            super(source, false);
            this.book = book;
        }

        public Book getBook() {
            return book;
        }
    }

    public static class SaveEvent extends BookFormEvent {
        SaveEvent(BookForm source, Book book) {
            super(source, book);
        }
    }

    public static class DeleteEvent extends BookFormEvent {
        DeleteEvent(BookForm source, Book book) {
            super(source, book);
        }
    }

    public static class CloseEvent extends BookFormEvent {
        CloseEvent(BookForm source) {
            super(source, null);
        }
    }

    public Registration addSaveListener(ComponentEventListener<SaveEvent> listener) {
        return addListener(SaveEvent.class, listener);
    }

    public Registration addDeleteListener(ComponentEventListener<DeleteEvent> listener) {
        return addListener(DeleteEvent.class, listener);
    }

    public Registration addCloseListener(ComponentEventListener<CloseEvent> listener) {
        return addListener(CloseEvent.class, listener);
    }
}
A Binder is the Vaadin object that copies values between a Java object and the form fields. bindInstanceFields(this) connects every field to the Book property with the same name, so the title TextField is bound to getTitle() and setTitle(). readBean() copies a book into the fields, and writeBean() copies the fields back into the book. writeBean() throws ValidationException when a rule fails, and in that case the error messages are already on the screen.
BeanValidationBinder is a Binder that also reads the Jakarta Bean Validation annotations (@NotBlank, @Size, @Email) on the entity. That is how the “Title must not be empty” message from Book reaches the form without any extra code.
The three event classes (SaveEvent, DeleteEvent, CloseEvent) carry the book from the form to the view. ComponentEvent is Vaadin’s base class for these events. The false in super(source, false) says the event came from our Java code, not from a click in the browser. fireEvent() sends the event to the listeners, and the view registers those listeners with addSaveListener(), addDeleteListener() and addCloseListener().
The trap here is using the plain Binder. Let’s say we replace the binder line with this one:
private final Binder<Book> binder = new Binder<>(Book.class);The plain Binder ignores @NotBlank. When the user clicks Save on an empty form, writeBean() succeeds, the view calls bookRepository.save(), and Hibernate rejects the row. The form shows no message at all, and only the log explains why nothing happened:
ERROR --- c.v.flow.server.DefaultErrorHandler : Unexpected error: Validation failed for classes [com.howtodoinjava.vaadincrud.book.Book] during persist time
jakarta.validation.ConstraintViolationException: ...
    ConstraintViolationImpl{interpolatedMessage='Author must not be empty', propertyPath=author}
    ConstraintViolationImpl{interpolatedMessage='Title must not be empty', propertyPath=title}
The fix is BeanValidationBinder, as in the code above. The rules stay in one place (the entity), and both the form and the database use them.
Step 4: Create the MainView
Finally, we create the screen itself: a filter box and an “Add book” button on top, a table of books on the left and the form on the right. MainView is the class that puts the grid, the form and the repository together:
package com.howtodoinjava.vaadincrud.book;

import com.vaadin.flow.component.button.Button;
import com.vaadin.flow.component.grid.Grid;
import com.vaadin.flow.component.orderedlayout.HorizontalLayout;
import com.vaadin.flow.component.orderedlayout.VerticalLayout;
import com.vaadin.flow.component.textfield.TextField;
import com.vaadin.flow.data.value.ValueChangeMode;
import com.vaadin.flow.router.Route;

@Route("")
public class MainView extends VerticalLayout {

    private final BookRepository bookRepository;

    private final Grid<Book> grid = new Grid<>(Book.class);
    private final TextField filterText = new TextField();
    private final BookForm form = new BookForm();

    public MainView(BookRepository bookRepository) {
        this.bookRepository = bookRepository;
        setSizeFull();

        configureGrid();
        configureForm();

        add(buildToolbar(), buildContent());

        updateGrid();
    }

    private HorizontalLayout buildToolbar() {
        filterText.setPlaceholder("Filter by title...");
        filterText.setClearButtonVisible(true);
        filterText.setValueChangeMode(ValueChangeMode.LAZY);
        filterText.addValueChangeListener(e -> updateGrid());

        Button addBookButton = new Button("Add book");
        addBookButton.addClickListener(e -> addBook());

        return new HorizontalLayout(filterText, addBookButton);
    }

    private HorizontalLayout buildContent() {
        HorizontalLayout content = new HorizontalLayout(grid, form);
        content.setFlexGrow(2, grid);
        content.setFlexGrow(1, form);
        content.setSizeFull();
        return content;
    }

    private void configureGrid() {
        grid.setSizeFull();
        grid.setColumns("title", "author", "available");
        grid.asSingleSelect().addValueChangeListener(e -> editBook(e.getValue()));
    }

    private void configureForm() {
        form.setWidth("25em");
        form.addSaveListener(this::saveBook);
        form.addDeleteListener(this::deleteBook);
        form.addCloseListener(e -> closeEditor());
        closeEditor();
    }

    private void updateGrid() {
        String filter = filterText.getValue();
        if (filter == null || filter.isBlank()) {
            grid.setItems(bookRepository.findAll());
        } else {
            grid.setItems(bookRepository.findByTitleContainingIgnoreCase(filter));
        }
    }

    private void addBook() {
        grid.asSingleSelect().clear();
        editBook(new Book("", "", true));
    }

    private void editBook(Book book) {
        if (book == null) {
            closeEditor();
            return;
        }
        form.setBook(book);
        form.setVisible(true);
    }

    private void closeEditor() {
        form.setBook(null);
        form.setVisible(false);
    }

    private void saveBook(BookForm.SaveEvent event) {
        bookRepository.save(event.getBook());
        updateGrid();
        closeEditor();
    }

    private void deleteBook(BookForm.DeleteEvent event) {
        bookRepository.delete(event.getBook());
        updateGrid();
        closeEditor();
    }
}
@Route(“”) maps the view to the root URL, so it opens at http://localhost:8080/. Vaadin creates the view as a Spring bean, which is why the constructor can receive BookRepository without any @Autowired.
Grid is Vaadin’s table component. new Grid<>(Book.class) reads the getters of Book, and setColumns(“title”, “author”, “available”) picks the three columns to show, in that order. asSingleSelect() lets the user select one row at a time, and the listener opens that book in the form.
VerticalLayout stacks its children from top to bottom, and HorizontalLayout places them side by side. setFlexGrow(2, grid) and setFlexGrow(1, form) give the grid two thirds of the width and the form one third.
Each CRUD action is one short method. The table below maps them.
| Action | What the user does | Method in MainView | Repository call |
|---|---|---|---|
| Read | Opens the page or types in the filter box | updateGrid() | findAll() or findByTitleContainingIgnoreCase() |
| Create | Clicks “Add book”, fills the form, clicks Save | addBook(), then saveBook() | save() on a book with no id (INSERT) |
| Update | Clicks a row, changes a field, clicks Save | editBook(), then saveBook() | save() on a book with an id (UPDATE) |
| Delete | Clicks a row, then Delete | deleteBook() | delete() |
After every save or delete, the view calls updateGrid() again and closes the form, so the table always shows what is in the database. Clicking Delete on a new book that was never saved does nothing except close the form, because delete() skips a book that has no id.
ValueChangeMode.LAZY on the filter box waits until the user pauses typing before it fires the listener. Without it, the grid would run one query for every key press.
5. Run and Test the Application
Now we start the application from the project folder:
mvn spring-boot:runThe first run takes a minute or two, because Vaadin prepares its frontend files and may download Node.js. Later runs start in under ten seconds. Once the log prints “Application running at http://localhost:8080/”, we open that URL.
The page lists the three books from data.sql:
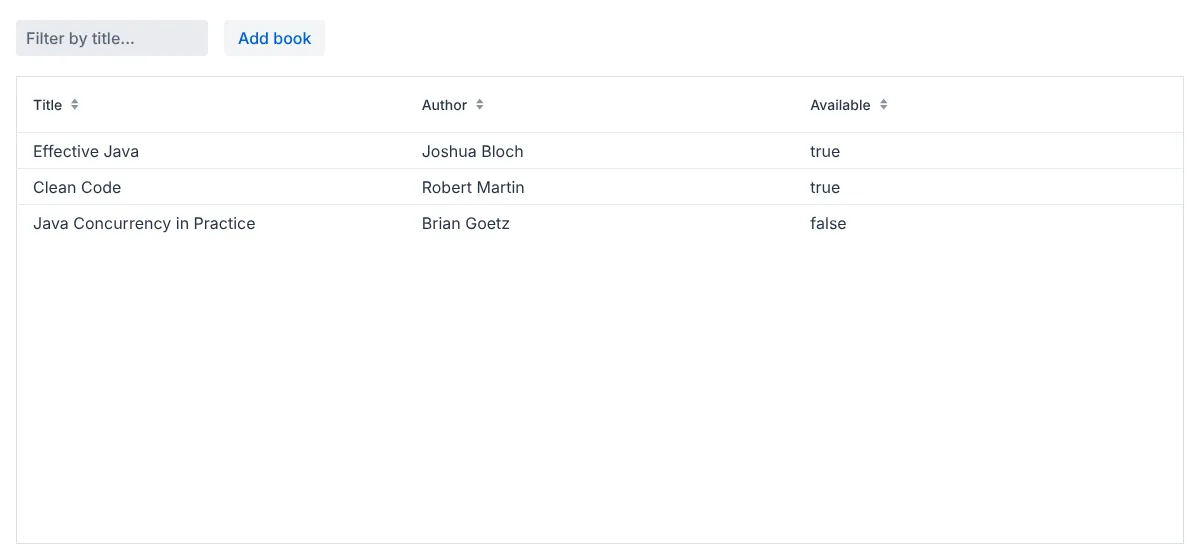
In development mode, Vaadin also shows a small “App is running in development mode” note and a toolbar in the corner. They are not part of our code, and they don’t appear in the production build.
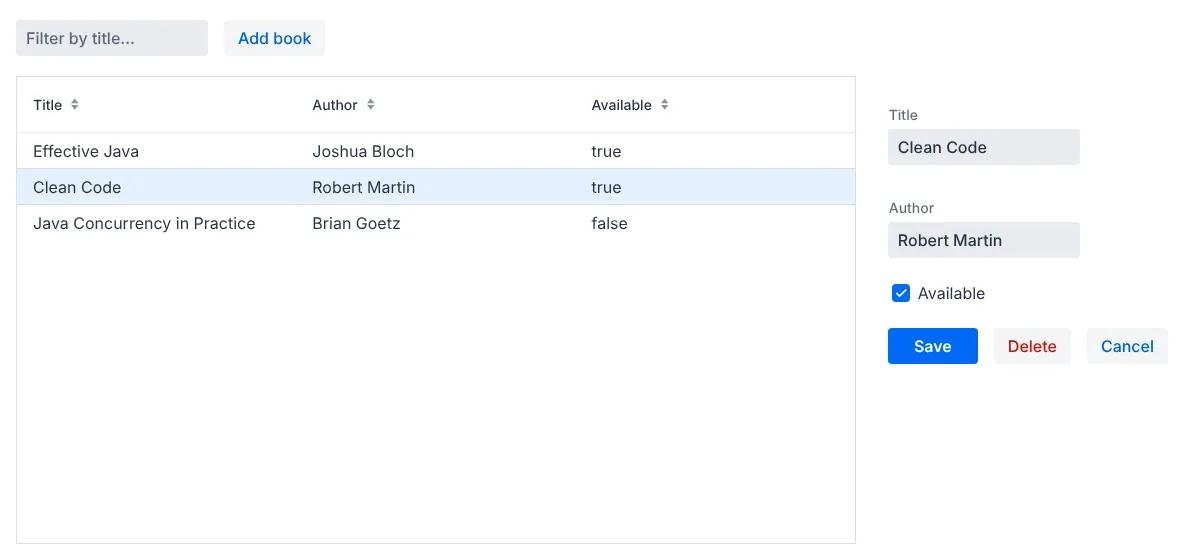
Clicking the “Clean Code” row opens it in the form on the right. Changing the author and clicking Save updates the row:
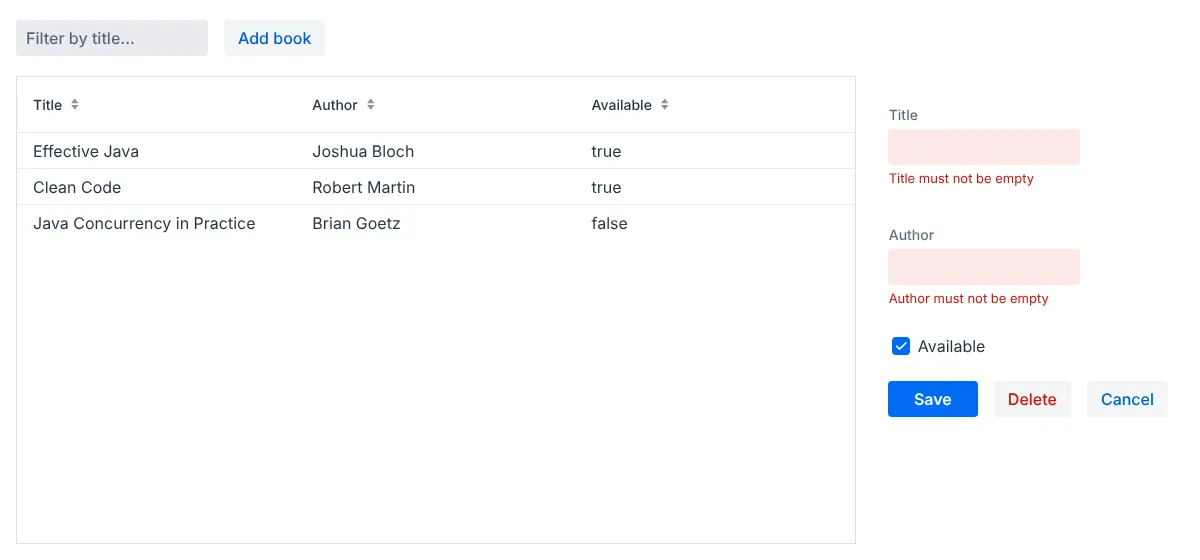
Clicking “Add book” opens an empty form. Clicking Save without typing anything shows the two @NotBlank messages, and nothing is saved:
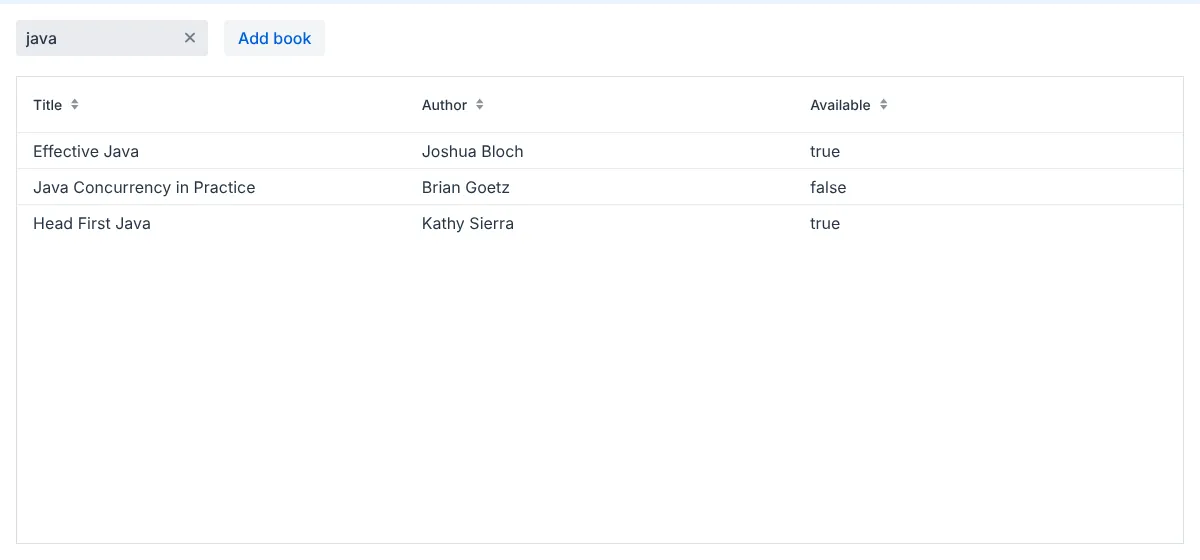
Filling in “Head First Java” and “Kathy Sierra” and clicking Save adds a fourth row. Typing “java” in the filter box then narrows the grid to the three titles that contain that word, in any case:
To stop the application, press Ctrl+C in the terminal. The GitHub project also has a small JUnit test that saves a book and finds it again by title, and mvn test runs it.
6. FAQs
6.1. How do I build a jar for production?
Run mvn -Pproduction clean package and then java -jar target/spring-boot-vaadin-crud-1.0.0.jar. The production profile builds the frontend into the jar once, so the server doesn’t need the development server or Node.js. The development-mode note and toolbar are gone in this build.
6.2. Why does the Available column show true and false?
The grid prints the value that isAvailable() returns. To show “Yes” and “No” instead, replace the column with grid.addColumn(book -> book.isAvailable() ? “Yes” : “No”).setHeader(“Available”).
6.3. Can I ask for confirmation before deleting a book?
Yes. Vaadin’s ConfirmDialog component shows a dialog with Confirm and Cancel buttons. Open it in the delete listener, and call bookRepository.delete() only from its confirm listener.
6.4. Will the grid work with thousands of rows?
grid.setItems(list) loads every row into memory, which is fine for a few hundred. For a large table, pass a callback to setItems() that loads one page at a time from the repository with a Pageable, and the grid fetches rows as the user scrolls.
7. Conclusion
A Spring Boot and Vaadin CRUD screen needs four classes: an entity with validation rules, a Spring Data repository, a form with a BeanValidationBinder, and a view that connects a Grid to both. The whole Book Catalog is about 300 lines of Java, and none of it is HTML or JavaScript.
The trap to remember is the binder. With BeanValidationBinder, the @NotBlank rules on the entity appear as messages under the fields; with the plain Binder, the user sees nothing and the error only shows up in the log.
8. References
- Vaadin: Using Vaadin with Spring
- Vaadin: Grid component
- Vaadin: Binding beans to forms
- Spring Data JPA: Query methods
Drop me your questions related to Spring Boot and Vaadin CRUD in the comments.
Happy Learning !!
