
Docker is a popular platform for building, shipping, and running applications. Its ability to create lightweight, portable, and scalable containers has revolutionized how developers approach software development and deployment. As Docker gains more popularity, the demand for professionals with Docker skills continues to rise. To help prepare for a Docker interview, it is essential to understand some of the common questions and topics that may arise.
In this article, we will explore some of the most frequently asked Docker interview questions for devops and provide insights on how to approach them.
Docker Interview Questions for Beginners
1. What is Docker?
To understand Docker, it is important to understand what containerization is. Containerization is a technology that allows software applications and services to be packaged into small, lightweight, and portable units called containers. Containers are similar to virtual machines in that they provide an isolated environment for running applications. However, unlike virtual machines, containers do not require a full operating system and hardware emulation, which makes them more lightweight and portable.
Containers were evolved to solve a very familiar problem “it works on my local machine“.
Docker is a tool to manage the lifecycle of containers. It provides an easy way to create, deploy, and manage containers on a given machine. With Docker, we can package an application and its dependencies into a container image, which can then be distributed and run on any machine that runs Docker.
Docker also provides features such as container networking, storage management, and orchestration, making it easier to manage a large number of containers in a complex system.
2. Explain Dockerfile, docker-compose, docker image, docker container and docker hub
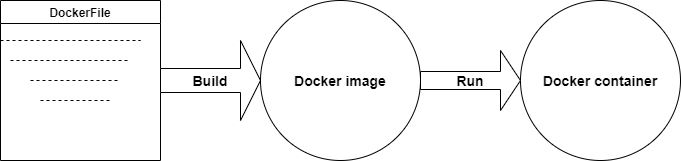
Dockerfile
It is a script that contains a set of instructions to build a Docker image. These instructions include commands to install dependencies, configure settings, and run applications. Dockerfiles are written in a simple, declarative syntax and are used to automate the creation of Docker images.
Docker Image
It is a lightweight, standalone, executable package that includes everything needed to run an application, such as the code, runtime, system tools, libraries, and settings. Docker images are created using a Dockerfile and command ‘docker build‘ or pulled from a registry like Docker Hub. Images can be shared and reused across different machines and environments.
Docker Container
It is essentially a runtime instance of a Docker image that bundle together application and all their dependencies. Docker containers operate as isolated systems within the host operating system, sharing the kernel and system resources with other containers. The primary objective of using Docker containers is to eliminate the dependency on infrastructure when deploying and running applications. This allows containerized applications to run on any platform, regardless of the underlying infrastructure.
Docker Compose
It is a tool for defining and running multi-container applications. It allows developers to describe the services, networks, and volumes needed for an application in a YAML file and then start and stop the application with a single command. Docker Compose simplifies managing multi-container applications by allowing developers to define all containers and their interdependencies in a single file.
Docker Hub
It is a public registry where Docker images can be stored, shared, and downloaded. Docker Hub is a central repository for Docker images, allowing developers to share and distribute their images with others easily. Docker Hub also provides a convenient way to search for and download existing Docker images.
3. How to create a Docker Container?
Creating a Docker container involves a few steps:
- The first thing we should do is to write a Dockerfile that specifies the base image, packages to install, commands to run, and other settings for our container.
- We can build our container image by running the command “
docker build -t my-image-name .” in the directory containing the Dockerfile. - After building the image, we can run a container based on it using the command “
docker run --name my-container-name my-image-name“.
docker build -t my-image-name .   # Create image

docker run -p 8080:8080 --name my-image-name   # Run image
4. How do we create a Dockerfile? What are its Parameters?
To create a Dockerfile, we need to follow these steps:
- Choose a base image: We first need to choose a base image for our container. This image will be the starting point for the container. We can choose from the official Docker images, or we can create our own custom base image.
- Write Dockerfile instructions: Once we have chosen a base image, we need to write the instructions for building our container. We can use various Dockerfile instructions to configure the container, including installing packages, copying files, setting environment variables, and exposing ports.
Here are some of the most commonly used instructions and parameters that can be used in a Dockerfile:
- FROM: instruction specifies the base image that we want to use for the container.
- RUN: instruction runs a command inside the container during the build process. For example, we can use RUN to install packages or update software.
- COPY/ADD: instructions copy files from the host system into the container. COPY is used to copy files from the build context into the container, while ADD can also download files from a URL and extract compressed files.
- WORKDIR: instruction sets the working directory for subsequent instructions in the Dockerfile.
- ENV: instruction sets environment variables in the container.
- EXPOSE: instruction specifies the port on which the container will listen for incoming connections.
- CMD: instruction specifies the command to run when the container starts.
- ENTRYPOINT: instruction specifies the command that should be run when the container starts, but it also allows us to specify additional arguments that should be passed to the command.
- ARG: instruction defines a build-time argument that can be passed to the Docker build command using the
--build-argflag.
The following is an example of a Dockerfile:
# Base image
FROM ubuntu:latest

# Set environment variables
ENV MY_APP_HOME=/usr/local/myapp \
    MY_APP_VERSION=1.0.0

# Install dependencies
RUN apt-get update \
    && apt-get install -y \
       python3 \
       python3-pip \
       git

# Clone repository
RUN git clone  $MY_APP_HOME \
    && cd $MY_APP_HOME \
    && git checkout tags/$MY_APP_VERSION

# Install application dependencies
RUN cd $MY_APP_HOME \
    && pip3 install -r requirements.txt

# Set working directory
WORKDIR $MY_APP_HOME

# Expose ports
EXPOSE 8000

# Start application
CMD ["python3", "app.py"]
5. Explain Image Layers and how do they work?
Docker image layers represent the changes made to the filesystem by instructions in a Dockerfile. Each layer is uniquely identified by a hash value and can be cached and shared across images. When we run a container, Docker combines the image layers into a single read-only filesystem and adds a separate writable container layer for any changes made during runtime (container = image layers + read-write layer).
Note that each layer is read-only. If we make a change to a layer, Docker creates a new layer on top of the previous layer. When we stop the container, the container layer is deleted, but the image layers remain.
Image layers enable efficient storage, sharing, and updating of container images and help minimize the size and complexity of the images.
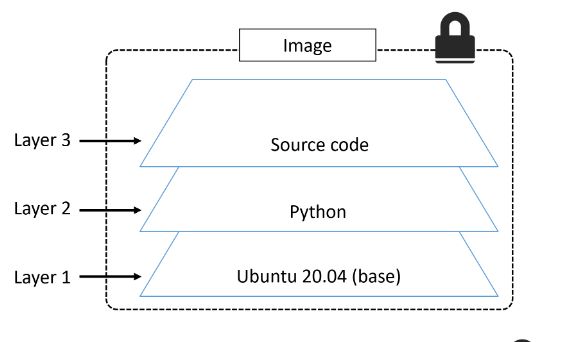
By separating the application and its dependencies into layers, Docker can build, cache, and reuse images more efficiently, which reduces build times and saves disk space.
6. What are Docker Namespace and Docker Registry?
Namespaces and registries are a key part of the Docker ecosystem and are essential for building, sharing, and deploying containerized applications.
- Docker namespaces can group related images under a common name prefix.
- Docker registries are services that store and distribute Docker images.
Namespaces help organize and manage images by identifying their source and ownership, while registries enable sharing and discovering images across different environments and teams.
The most common Docker registry is Docker Hub, which is a public registry that hosts a large number of pre-built Docker images. However, organizations can also set up their own private Docker registries to store and distribute custom images that are specific to their needs.
7. Will data on the container be lost when the docker container exits?
No, we will not lose any data when Docker container exits. Any data the application writes to the container gets preserved on the disk until we explicitly delete the container.
The file system for the container persists even after the container halts.
8. Explain Docker Components and how they interact with each other?
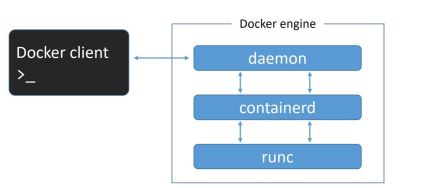
- Docker daemon (dockerd): The Docker daemon is the core component of the Docker architecture. It runs inside the docker engine in the background and manages the container lifecycle. The Docker daemon is responsible for creating, starting, stopping, and deleting containers, as well as managing the storage and networking for those containers (handling docker client requests).
- Docker client: The Docker client is a command-line tool that allows users to interact with the Docker daemon. Users can issue commands to the Docker client, which then communicates with the Docker daemon to perform the requested actions.
- Containerd: The containerd is a container runtime for managing container lifecycle operations, such as creating, starting, stopping, and deleting containers. It was originally developed as a component of Docker and later spun off as a standalone project under the stewardship of the Cloud Native Computing Foundation (CNCF). Docker uses containerd as its default container runtime to manage the lifecycle of containers, providing low-level functionality for container management.
- Runc. runc is a portable implementation of the Open Container Initiative (OCI) runtime specification. It is used by containerd to run containers (Only creates containers ).
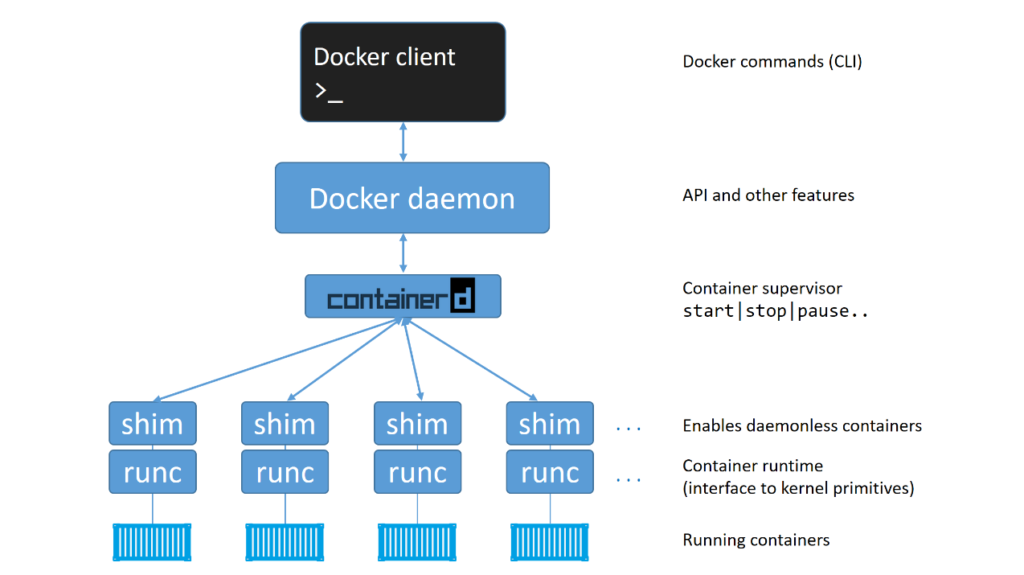
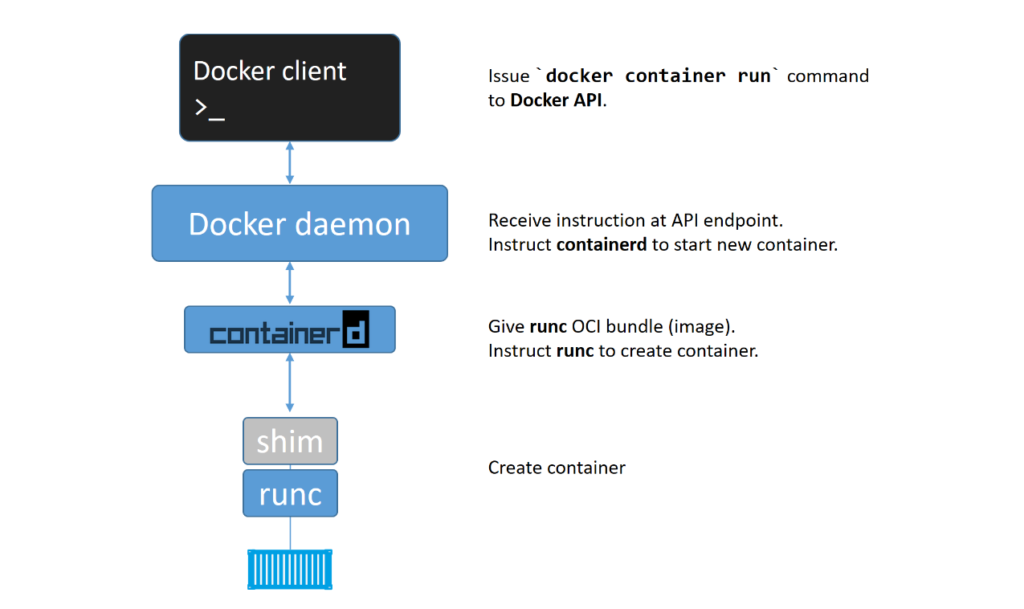
9. Explain the Docker Container startup process?
When a Docker container is started, Docker performs the following steps:
- The Docker client receives the ‘
docker container run‘ command and converts it into an appropriate API payload. - The Docker client sends the API payload to the Docker daemon, which is listening on a Unix socket (usually located at
/var/run/docker.sockon Linux). - The Docker daemon receives the API payload and uses its built-in container runtime, containerd, to manage containers.
- The containerd converts the required Docker image into an OCI bundle, a collection of files and metadata representing the container filesystem and configuration.
- The containerd passes the OCI bundle to runc, which is a low-level tool that creates and manages container processes according to the OCI runtime specification.
- The runc interfaces with the operating system kernel to create a new container process with its namespace, cgroups, and other system resources. The container process runs the command specified in the ‘
docker container run‘ command or the default command defined in the Docker image. - The container process communicates with the Docker client through the container’s standard input, output, and error streams, which are connected to the host system’s console or network sockets.
- When the container process exits, runc cleans up the container’s resources, and containerd reports the container’s status to the Docker daemon. If the container was started in interactive mode (with the
-itoption), the Docker client returns control to the user’s shell. Otherwise, the Docker client exits.
10. What are Docker volumes and how do we use them?
When a Docker container is deleted, any data stored on its local file system is also deleted. This can be problematic if we need to persist data generated by a container or share data between containers. This happens because When an image is executed as a container, a read-write layer is added on top of the image layers. This read-write layer allows the container to create, modify and delete files and directories while running, but the underlying image layers remain immutable. The read-write layer and any stored data are deleted when the container is deleted.
Docker volumes provide a persistent data storage mechanism that can be used to store data generated by a container or to share data between containers. Volumes allow data to persist even after the container is deleted.
Docker volume is a named storage location that can be created and managed using Docker CLI commands, Docker Compose, or Dockerfile instructions. A volume can be mounted to a container at runtime, providing a persistent data storage location.
Here is an example command to create a volume named “v1”:
docker volume create v1Here is an example command to mount the “v1” volume to a container named “mycontainer“:
docker run -d -v v1:/where/to/mount/it mycontainerBy default, Docker stores volumes under the /var/lib/docker/volumes directory on Linux hosts.
11. What is a Docker Swarm?
Docker Swarm is a clustering and orchestration tool for Docker containers, allowing us to manage and scale a cluster of Docker nodes. It enables to create a cluster of Docker nodes, called a swarm, and deploy the application stack to that swarm.
A Docker Swarm cluster consists of one or more Docker nodes, which can be either physical or virtual machines. The swarm manager node controls the cluster and schedules containers to run on the swarm’s worker nodes.
Docker Swarm also provides features like automatic load balancing, service discovery, and rolling updates, making it easier to manage and scale containerized applications across a cluster of nodes.
12. What are Docker plugins and how do we use them?
Docker plugins are extensions to the Docker Engine that allow us to add additional features and functionality to our Docker environment. They are designed to integrate seamlessly with Docker, allowing us to easily enhance and customize our deployments.
Plugins can be used to add support for new storage drivers, network drivers, logging drivers, volume plugins, and more. They allow us to extend the functionality of Docker beyond what is available out of the box, enabling us to tailor our environment to our specific needs better.
To use a Docker plugin, we first need to install it. Docker plugins can be installed from the Docker Hub or from other sources, such as GitHub or a private registry.
Docker Interview Questions for Experienced
13. How to check resource utilization of a container?
To check the resource utilization of a container, we can use the ‘docker stats‘ command:
docker statsThis command displays real-time usage statistics for all containers running on the Docker host.
CONTAINER ID        NAME                CPU %               MEM USAGE / LIMIT     MEM %               NET I/O             BLOCK I/O           PIDS
9c4666a1e6b3        my-container        0.00%               20MiB / 2GiB         1.00%               30.5kB / 8.69kB     0B / 0B             6
- CONTAINER ID: The identifier for the container
- NAME: The name of the container
- CPU %: The percentage of CPU usage
- MEM USAGE / LIMIT: The amount of memory the container uses and its memory limit
- MEM %: The percentage of memory usage
- NET I/O: The network input and output
- BLOCK I/O: The block input and output
- PIDS: The number of processes running in the container
14. How can we reduce the size of a Docker Image?
There are several ways to reduce the size of a Docker image:
- Using minimal base images: A minimal base image like Alpine or Distroless can help reduce the size of the Docker image significantly. These images contain only the necessary runtime libraries and binaries required to run the application and are designed for containerization, making them ideal for Docker images.
- Multistage builds: Multistage builds allow to use multiple Docker images to build a single optimized image. We can use a separate image for building and compiling your application and then copy only the required files to the final image. This reduces the image size and improves the build time and security by reducing the number of dependencies required.
- Minimizing the number of layers: Each instruction in a Dockerfile creates a new layer, which increases the image size. Group multiple instructions in a single layer using the “
&&” operator to minimize the number of layers. For example, instead of using two separate RUN commands to install two packages, use a single RUN command with both packages. - Understanding caching: Docker uses layer caching to speed up builds by reusing layers from previous builds. Make sure your Dockerfile is optimized to take advantage of layer caching. For example, put frequently changing commands towards the end of the Dockerfile to avoid invalidating earlier layers.
- Using Dockerignore: The Docker build context includes all the files in the directory where the Dockerfile is located. However, not all files are necessary for building the Docker image. You can use a .dockerignore file to exclude unnecessary files from the build context. This can significantly reduce the final Docker image’s build time and size.
- Keeping application data elsewhere: Avoid storing application data inside the Docker image. Instead, use volumes to store data outside the container. This can reduce the Docker image’s size and improve the application’s scalability.
15. How to link one container with another?
In Docker, we can link containers together to enable them to communicate with each other. Start the container we want to link to as a named container. We can use the --name option to give the container a name.
docker run --name my-container1 image1 This Command will start an nginx container with the name “my-container1“. Start the container that we want to link with the named container using the --link option.
docker run --link my-container1 my-container2 image2Now my-container1 & my-container2 are linked successfully.
The --link flag is a legacy feature in Docker that has been superseded by other networking features. The recommended way to link two containers in modern versions of Docker is to use Docker networks.
A Docker network is a virtual network that allows containers to communicate with each other over a private network, without exposing their network services to the host system or the public internet. We can create a Docker network using the command:
docker network create And then we connect containers to the network using the --network (–net) flag when starting them.
For example, to create a Docker network named my-network and start two containers connected to that network:
docker network create my-network

docker run --name my-container1 --network my-network my-image1

docker run --name my-container2 --network my-network my-image2
In this example, the my-container1 and my-container2 containers are connected to the my-network network.
16. How do we sequence the containers?
Docker containers can be sequenced and orchestrated using Docker Compose (depends_on option), Kubernetes, or other tools. These tools provide a way for us to define and manage the dependencies between containers and the order in which they should be started and stopped.
Here are some basic steps to sequence Docker containers using Docker Compose:
- Define the containers: We can create a docker-compose.yml file that lists the containers and their configurations. We can define dependencies between the containers using the
depends_onkeyword. - Start the containers: We can use the
docker-compose upcommand to start the containers. Docker Compose will start the containers in the order specified in the docker-compose.yml file, considering their dependencies. - Stop the containers: We can use the
docker-compose downcommand to stop and remove the containers. Docker Compose will stop the containers in the reverse order that they were started, again taking into account their dependencies.
Here’s an example of how to use depends_on in a Docker Compose file. In this example, when we run docker-compose up, Docker Compose will start the db service first, wait for it to be ready, and then start the api service. This ensures that the database is available before the API service tries to connect to it.
version: '3'

services:
  db:
    image: postgres
    restart: always
    environment:
      POSTGRES_PASSWORD: secret

  api:
    build: .
    restart: always
    depends_on:
      - db
    ports:
      - "8000:8000"
17. How does a container get an internal IP?
In Docker, containers get an internal IP address through the networking subsystem of Docker. When a container is started, Docker creates a virtual network interface for the container and assigns it an IP address from the network range specified for the container’s network.
By default, Docker uses a bridge network driver to create a bridge network interface on the host machine. When a container is started with the default bridge network, it is assigned an IP address from the 172.17.0.0/16 subnet.
We can also create our own user-defined networks with custom IP address ranges. When you start a container on a user-defined network, Docker assigns it an IP address from the network range we specified.
We can use the docker inspect command to view the IP addresses assigned to the containers in a network. On a Windows machine, use double quotes in place of single quote.
docker inspect -f '{{range .NetworkSettings.Networks}}{{.IPAddress}}{{end}}' CONTAINER_IDTo get all container names and their IP addresses in just one single command.
docker inspect -f '{{.Name}} - {{.NetworkSettings.IPAddress }}' $(docker ps -aq)18. How do we secure Docker Containers?
To secure Docker containers, there are several best practices that we should follow.
- We should regularly update Docker and the host operating system to ensure they are up-to-date and have the latest security upgrades.
- Running containers as non-root user can also help to mitigate security vulnerabilities, as it prevents malicious content from accessing the host container.
- Configuring resource quotas and setting resource limits for containers can help to enhance container security and prevent them from consuming too many system resources.
To avoid security vulnerabilities, we should keep container images clean by downloading them from trusted and secure sources, such as Docker Hub, and verifying them using tools like Docker Content Trust and Docker security scanning tools. Additionally, securing container registries is essential to mitigate risks and breaches on the internet, and using a trusted registry like Docker Trusted Registry can help to reduce these risks. Finally, denying users access to upload or download images from the registry can further enhance security.
19. How do we monitor Docker Containers?
There are several tools and approaches for monitoring Docker containers, including:
- Docker Stats: Docker Stats is a built-in command that provides real-time information on CPU usage, memory consumption, network I/O, and other statistics for all running containers.
- Docker Metrics: Docker Metrics is a plugin-based monitoring system that collects and displays metrics on Docker containers and hosts. It includes pre-built dashboards for popular monitoring tools like Grafana, Prometheus, and Datadog.
- cAdvisor: cAdvisor (short for “Container Advisor”) is a standalone monitoring tool that provides detailed performance metrics for containers running on a host. It supports various container runtimes including Docker, Kubernetes, and Mesos.
- Prometheus: Prometheus is a popular open-source monitoring solution that can collect metrics from Docker containers using exporters. It provides a powerful query language and a rich set of visualization tools.
20. How do we scale Docker containers horizontally and vertically?
Docker containers can be scaled horizontally or vertically to meet our performance and resource requirements.
Horizontal scaling means adding more instances of the same container to distribute the workload across multiple nodes or machines. Vertical scaling means increasing the resources allocated to a single container to improve its performance.
Here’s how we can scale Docker containers horizontally and vertically:
Horizontal Scaling
Using an orchestration tool we can horizontally scale Docker containers, such as Docker Swarm or Kubernetes. These tools provide features such as automatic load balancing and container scheduling, which make it easy to scale containers across multiple nodes or machines.
In the following example, if we want to scale a service called web to four replicas, we can run the following command:
docker service scale web=4
Vertical Scaling
Here are the steps to vertically scale a container:
- Stop the container: The container that needs to be vertically scaled must be stopped first.
- Modify the container configuration: The container’s configuration must be changed to allocate additional resources such as CPU, memory, or storage. This can be done by modifying the container’s configuration file or by passing new configuration parameters to the
docker runcommand. - Start the container: Using the
docker startcommand, the container can be started again with the updated configuration.
version: '3'

services:
  web:
    image: nginx
    deploy:
      resources:
        limits:
          memory: 512M
        reservations:
          cpus: '0.5'
Alternatively, we can also use an orchestration tool such as Docker Swarm or Kubernetes to automate vertical scaling. These tools allow us to define resource limits and requests for each container and automatically allocate resources based on the workload.
21. How do we configure and manage Docker Logs?
Docker logs can be configured and managed using various Logging drivers.
Logging drivers specify where the logs generated by a container should be sent. When a container runs, it generates log messages containing information about its activities and state. These log messages can be helpful for debugging, troubleshooting, and monitoring the container.
The default logging driver is json-file, which writes container logs to a JSON file on the host. The logs are stored in the /var/lib/docker/containers directory on the host system, and each container’s logs are stored in a separate file named after the container ID.
The json-file logging driver has several characteristics, including:
- It writes logs in a structured format, which makes them easy to parse and analyze.
- It supports log rotation based on either size or time.
- It buffers log messages in memory before writing them to disk, which can improve performance.
- It can limit the number of log files created for a given container to a specified maximum.
To configure another logging driver for a container, we use the --log-driver flag followed by the name of the logging driver that we want to use when we run the docker run command. For example:
docker run --log-driver=syslog my-imageThis would start a new container running the my-image image with the syslog logging driver.
Overall, the json-file logging driver is a good default option for most use cases, but other drivers like syslog, journald, or fluentd maybe more appropriate for specific use cases.
When configuring Docker logs, it’s essential to consider security. We should ensure that our logs are stored securely and that sensitive information is not logged.
22. How do we manage secrets in Docker Containers?
Managing secrets in Docker is important for securing sensitive information like passwords, API keys, and other credentials. Docker provides several options for managing secrets:
Docker Secret Manager
Docker has a built-in secret management tool called Docker Secret Manager. It allows you to store and manage sensitive data using encrypted files securely. We can create and manage secrets using the Docker CLI or APIs. Secrets can be mounted as files in a container or accessed through environment variables.
docker secret create mysecret -Create a service that uses the secret by defining the secret in the docker-compose.yml file. Secrets are encrypted both in transit and at rest and are only accessible to the services that are authorized to use them.
version: '3.7'
services:
  web:
    image: nginx
    secrets:
      - mysecret
secrets:
  mysecret:
    external: true
External Key Management Systems
Docker also allows us to use external key management systems like HashiCorp Vault or AWS Key Management Service (KMS) to manage secrets. These systems provide secure storage and management of sensitive data and can be integrated with Docker containers through APIs.
Environment Variables
We can also use environment variables to manage secrets. This method is not as secure as the previous two but can be helpful in some cases. We can pass secrets as environment variables to Docker containers, which can be accessed by applications running in them.
23. How to implement CI/CD in Docker?
CI/CD (Continuous Integration/Continuous Deployment) with Docker is a common practice in software development, as it allows us to quickly build, test, and deploy our applications to production.
Here are the steps to implement CI/CD in Docker:
- Version control: Our application code should be version controlled using a tool such as Git.
- Build process: Define the build process in a Dockerfile. This file contains instructions on how to build the application container image, including the base image to use, the necessary packages to install, and any application dependencies.
- Build automation: Set up a CI/CD pipeline using a tool such as Jenkins, GitLab, or Travis CI to automate the build process. This pipeline should include a trigger to initiate the build process automatically when new code is committed to the version control system.
- Testing: Configure the pipeline to run automated tests against the container image after it is built. This ensures that the application is functioning as expected before deployment.
- Deployment: Once the container image has passed all tests, it can be deployed to a production environment using a tool such as Kubernetes, Docker Swarm, or AWS ECS. The deployment process should also be automated to ensure that the latest version of the application is always running in production.
- Monitoring: Set up monitoring tools to track the health and performance of the application in production. This will help us quickly identify and resolve any issues that arise.
24. What is Kubernetes and how does it relate to Docker?
Kubernetes is a container orchestration platform, while Docker is a containerization platform. Docker packages and distributes applications in containers, while Kubernetes provides tools to manage multiple containers and automate containerized applications’ deployment, scaling, and management.
Together, Kubernetes and Docker provide a complete solution for building and running containerized applications at scale.
25. How do we use Docker to create a Microservices Architecture?
Docker can create a microservices architecture by breaking down an application into small, independent services that can be run in separate containers. Each microservice can be developed, tested, and deployed independently, making maintaining and updating the application easier.
To create a microservices architecture with Docker, each service should be packaged in its container, with all the necessary dependencies and configurations included in the container image. Docker Compose can be used to define and manage the relationships between the services, and orchestration tools like Kubernetes can be used to manage the deployment and scaling of the containers.
Frequently Asked Docker Commands
26. How to view all running containers?
To list all running containers, we can use the command:
docker ps docker ps -alists all containers, including stopped ones.docker ps -qlists only the container IDs.
docker container lsIs a newer command that provides an alternative to docker ps. The ls command is used to list the running containers. It has some additional options, such as:
docker container ls --alllists all containers, including stopped ones.docker container ls --quietlists only the container IDs.
27. How to run the container with a specific name?
To run a container with a specific name, we can use the –name flag followed by the name we want to give to the container. For example:
docker run --name my_container_name image_name28. How to run a container in the background?
To run a container in the background, we can use the -d flag followed by the name of the image we want to run. For example:
docker run -d image_name29. How to go inside a container if the container is running in the background?
To go inside a container if the container is running in the background, we can use the command:
docker exec -it container_name /bin/sh30. How to stop a container?
To stop a container, we can use the command:
docker stop container_name31. How to delete a container?
To delete a container, we can use the command:
docker rm container_name32. How to remove all stopped containers, unused networks, build caches, and dangling images?
To remove all stopped containers, unused networks, build caches, and dangling images, we can use the command:
docker system prune -a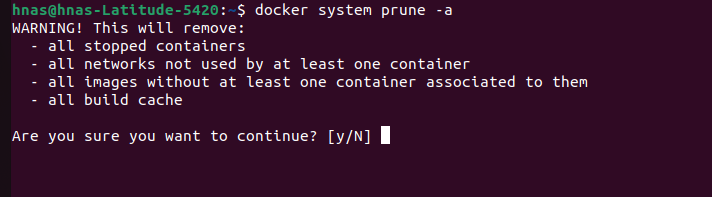
33. How to export a docker image?
To export a docker image, we can use the command:
docker save -o file_name.tar image_name34. How to import an already existing docker image?
To import an already existing docker image, we can use the command:
docker load -i file_name.tar35. How to create a volume in a docker container to store data?
To create a volume in a docker container to store data, we can use the -v flag followed by the name we want to give to the volume and the path where we want to mount it. For example:
docker run -v my_volume:/path/in/container image_name36. How to mount a local directory into a container?
To mount a local directory into a container, we can use the -v flag followed by the path of the local directory and the path where we want to mount it inside the container. For example:
docker run -v /path/on/host:/path/in/container image_name37. How to expose a port to access a container?
To expose a port to access a container, we can use the -p flag followed by the port we want to expose and the port inside the container. For example:
docker run -p 80:80 image_name38. How to create a bridge in a container?
To create a bridge in a container, we can use the --network flag followed by the name of the bridge network we want to create. For example:
docker run --network my_bridge_network image_name39. Difference between docker commands up, cmd, run & start?
The docker run command creates a new container and starts it.
docker run --name my-nginx-container -p 8080:80 -d nginxThe docker start command starts a stopped container.
docker start my-containerThe docker up command is similar to the docker run but also creates and starts any necessary dependencies.
The docker up command does not exist in Docker. However, the docker-compose up command is similar to docker run but is used for multi-container Docker applications that are managed using a docker-compose.yml file.
When we use docker-compose up, it creates and starts all the services defined in the docker-compose.yml file, including any necessary dependencies. It is similar to docker run in that it creates new containers and starts them, but it goes beyond that by allowing you to manage multiple containers simultaneously and define the relationships between them.
Here is an example of using docker-compose up to start a multi-container application. Create a docker-compose.yml file with the following content:
version: "3.9"
services:
  web:
    image: nginx
    ports:
      - "8080:80"
  api:
    build: .
    ports:
      - "5000:5000"
In this example, we define two services: web and api. The web uses the nginx image and maps port 8080 on the host to port 80 in the container. The api builds an image from the Dockerfile in the current directory and maps port 5000 on the host to port 5000 in the container.
Run the docker-compose up command in the same directory as the docker-compose.yml file:
docker-compose up40. Difference between docker COPY and ADD?
COPY is the most straightforward instruction to copy files and directories from the host machine to a container. It takes two arguments: a source path on the host machine and a destination path in the container. For example:
COPY app.py /app/This would copy the file app.py from the current directory on the host machine to the /app/ directory in the container.
ADD is similar to COPY, but it has a few extra features. In addition to copying local files and directories, it can also copy files and directories from remote URLs and automatically extract compressed files. It takes two arguments: a source path and a destination path. For example:
ADD https://example.com/app.tar.gz /app/This would download the app.tar.gz file from the specified URL, extract it, and copy the contents to the /app/ directory in the container.
However, it’s important to note that because ADD has more functionality, it can be slower and more complex than COPY. So, if you only need to copy local files and directories, COPY is generally recommended.
Conclusion
In conclusion, Docker is a powerful tool for containerizing applications and simplifying deployment. However, as with any technology, many questions may arise during the interview process. In this article, we have covered a range of common Docker interview questions and provided detailed answers to help you prepare for your interview.
By understanding these answers, we will be better equipped to demonstrate our knowledge and expertise in Docker and increase your chances of landing your desired role. Remember to stay up-to-date with the latest developments in Docker and related technologies, and continue learning and growing your software professional skills.
Happy Learning !!