
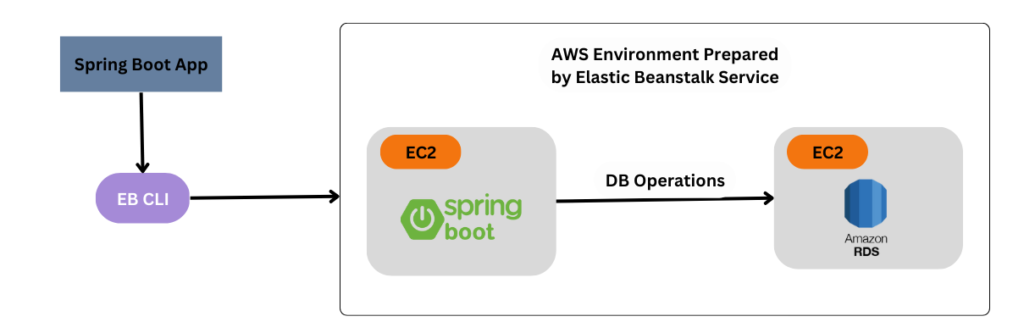
Step by step, we will learn to deploy a Spring Boot application to AWS Elastic Beanstalk, which uses RDS for persisting the records in the database. We will create an Elastic Beanstalk environment, deploy the Spring Boot application, and configure the necessary environment variables to get the app running.
1. Introduction to Elastic Beanstalk
AWS Elastic Beanstalk (EB) is a cloud-based fully-managed service that makes it easy to deploy, manage, and scale applications developed in various programming languages and frameworks, including Java. Elastic Beanstalk is a Platform as a Service (PaaS) offering that abstracts the underlying infrastructure components, such as EC2 instances, RDS databases, and load balancers. It automates the process of provisioning and configuring resources based on the application’s needs.
Elastic Beanstalk also provides tools for monitoring and scaling the application. The service automatically handles these tasks and allows developers to focus on writing code.
2. Deployment at a High Level
The deployment process is done using the Beanstalk CLI. The CLI takes a locally developed String boot application and uses the configuration-driven approach to prepare the AWS environment and deploy the application into it.
At the lower level, the Beanstalk service creates multiple EC2 instances for each service the application needs and connects and manages.
3. Deployment Options on Beanstalk
There are two main ways to deploy an application to EB:
- AWS Management Console: provides a user-friendly graphical interface to easily create, configure, and deploy our application without additional tools or software.
- EB CLI: is a command-line tool for a more flexible and configurable deployment process.
While both methods are valid, choosing the right one depends on the specific needs and preferences. If we’re looking for a quick and easy way to deploy our application, the AWS Management Console is a great option, but if we want more control and automation, the EB CLI might be a better fit.
We will use EB CLI in this article.
4. Prerequisites
- An AWS account is required to utilize AWS services. If you do not have an AWS account, you can sign up at aws.amazon.com/console.
- EB CLI offers us various convenient commands, from creating & configuring new applications to efficiently deploying code. Use the official AWS instructions for installing EB CLI on your machine.
- AWS CLI is required to configure AWS credentials on our local machine and to use the EB CLI. So, please make sure to install AWS CLI.
5. Spring Boot App
We are creating a straightforward application that exposes a REST endpoint. The endpoint, when requested, returns the list of employees fetched from the backed database.
In the development environment, the application may use the in-memory database. In production, it will connect to the AWS RDS instance.
5.1. REST API
We will use a simple Spring Boot application with a single endpoint “/employees“to keep things simple.
@RestController
public class EmployeeController {

    @Autowired
    private EmployeeService employeeService ;

    @GetMapping("/employees")
    public ResponseEntity<Employee> getAllEmployees(){

        return ResponseEntity.ok().body(employeeService.getAllEmployees());
    }
}
The controller connects to EmployeeService, which connects to EmployeeRepository. The EmployeeRepository is a normal JpaRepository implementation.
5.2. DataSource Configuration
Let us define the datasource configuration in application.properties file. The autoconfiguration will configure a DataSource bean during application bootstrapping.
Please use the database URL, username and password that you configure in RDS, in the next step.
spring.datasource.url=jdbc:postgresql://......
spring.datasource.username=test-user
spring.datasource.password=test-password
spring.datasource.driver-class-name=org.postgresql.Driver
spring.jpa.database-platform=org.hibernate.dialect.PostgreSQLDialect
We can execute the following command to create a deployable JAR file:
mvn clean install6. AWS RDS Configuration
6.1. What is RDS?
Amazon Relational Database Service (RDS) is a managed database service to easily set up, operate, and scale a relational database in the cloud. With RDS, we can create, manage, and scale our databases on popular engines like Amazon Aurora, MySQL, PostgreSQL, MariaDB, Oracle, and SQL Server.
RDS manages the underlying infrastructure, including server maintenance, software updates, and backups, allowing us to focus on our application and data. We can also choose to replicate our database instance for high availability or disaster recovery purposes, and we can set up automated backups and snapshots to protect our data.
We can monitor our database performance using Amazon CloudWatch, and we can use AWS Identity and Access Management (IAM) to manage access to our databases.
6.2. Setting Up PostgreSQL using Amazon RDS
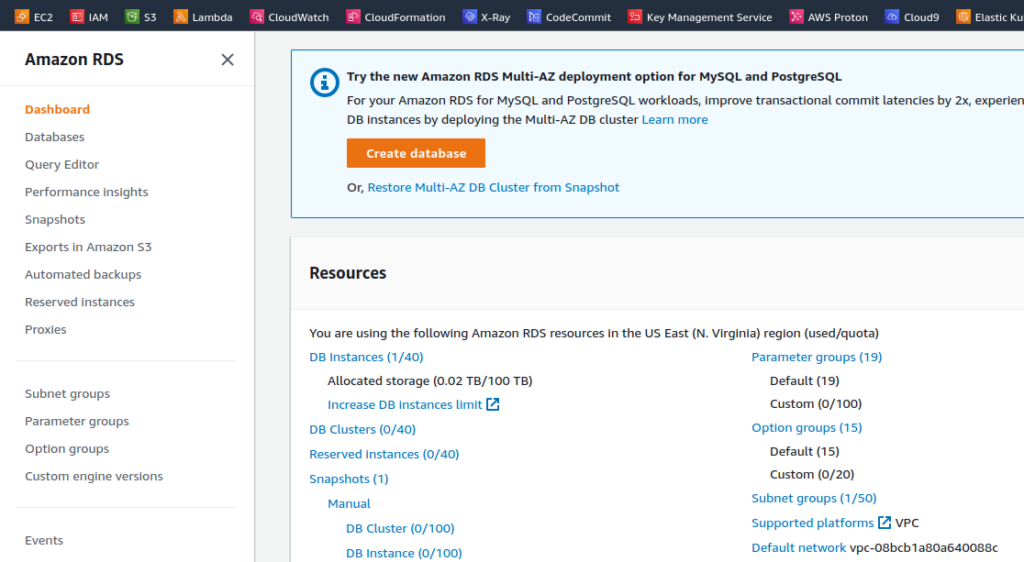
Here are the general steps to create an RDS database using the AWS Management Console:
- Navigate to the RDS dashboard.
- Click on the “Create database” button.
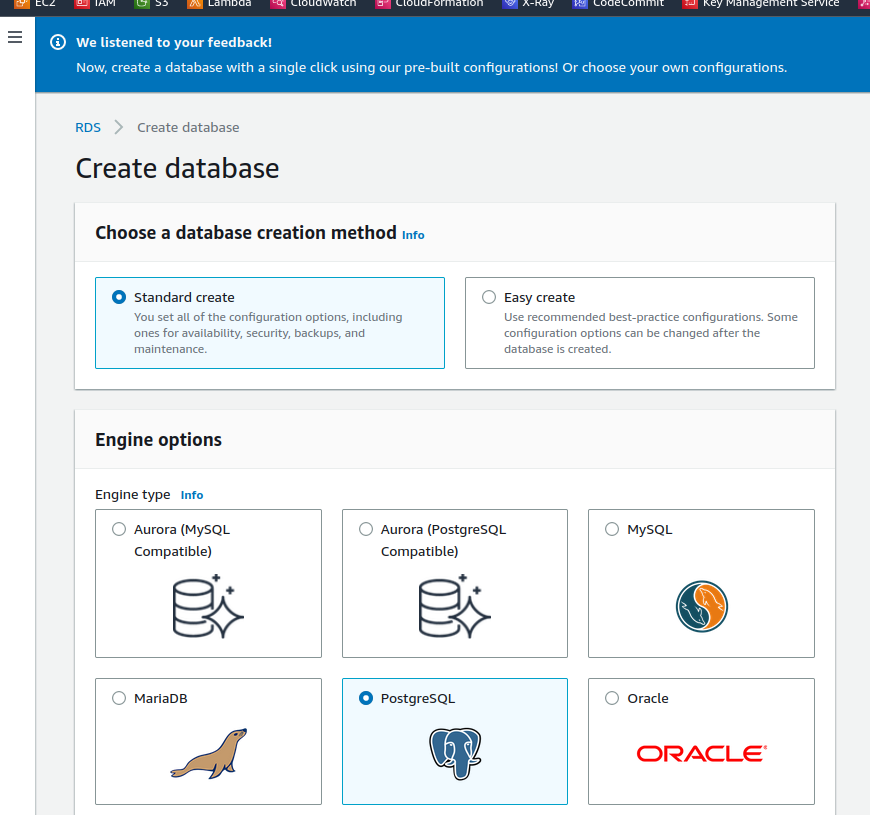
- Select the database engine you want to use (e.g. MySQL, PostgreSQL, etc.) and choose the version and edition you need. In this article, we will create a PostgreSQL database. However, if you are more comfortable with using another database, feel free to check out the RDBMS of your choice.
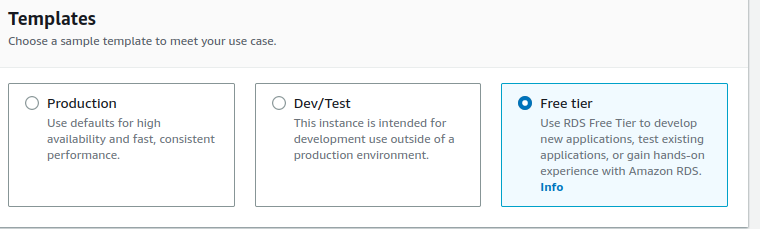
- Choose a template: We will go with a free-tier template with what we need now.
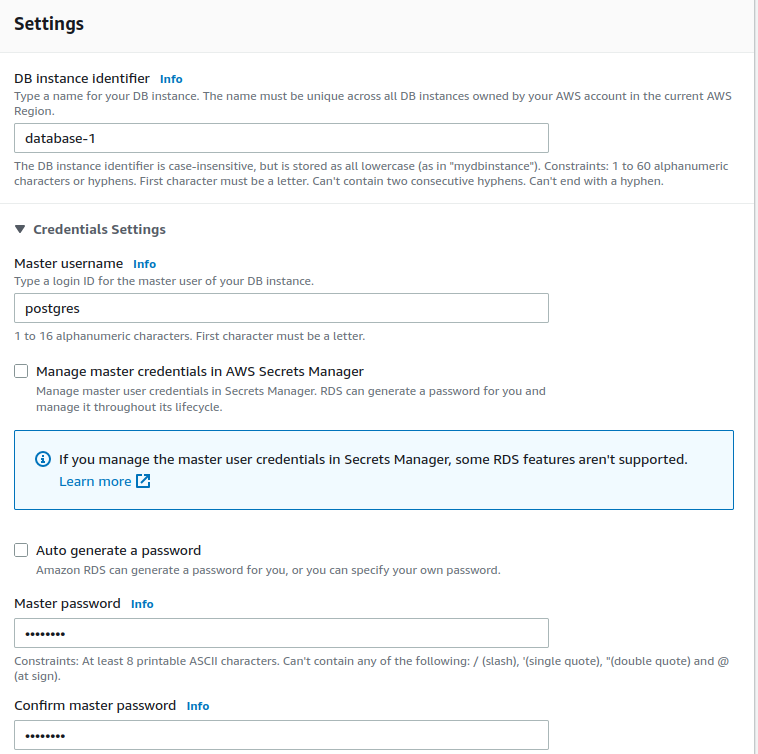
- We Will Configure the settings for our database, such as username, and password.
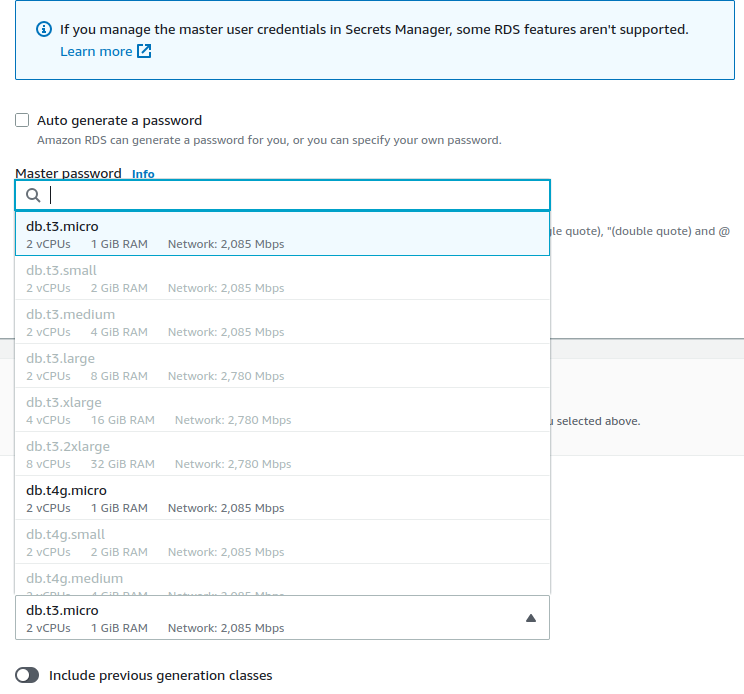
- When choosing the instance type for the database, it’s important to consider the workload, performance and resource requirements. Since we are using the free tier, we may have limited options to choose from. However, here are some general guidelines to follow when selecting an instance type:
- If you have a small workload with low traffic and storage requirements, you can select a smaller instance type, such as a t2.micro.
- If you have a larger workload with higher traffic and storage requirements, you may want to consider a larger instance type, such as a t2.small or t2.medium.
- If your workload requires higher CPU or memory resources, you may want to consider an instance type that provides more CPU or memory, such as a t2.large or t2.xlarge.
- Keep the connectivity configuration (VPC, subnet group) settings as default, except the check the ‘Publicly Accessible‘ parameter to ‘yes‘ if you want to make the database accessible to the public (not recommended). It’s always a good practice to limit the exposure of your database to only authorized users and applications.
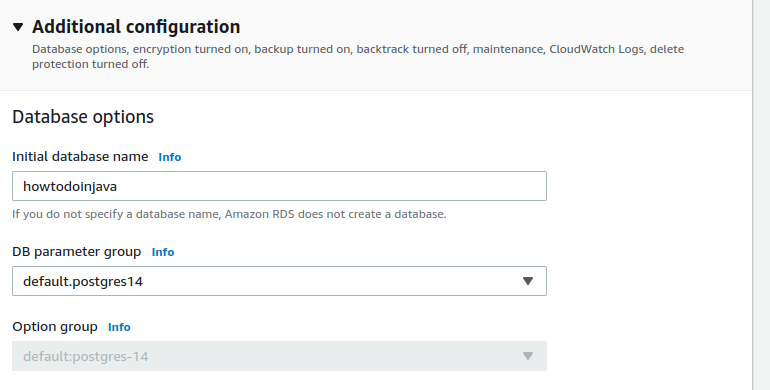
- One last thing, we would love to give our database a name. So, go to the Additional Configuration section and give it a name.
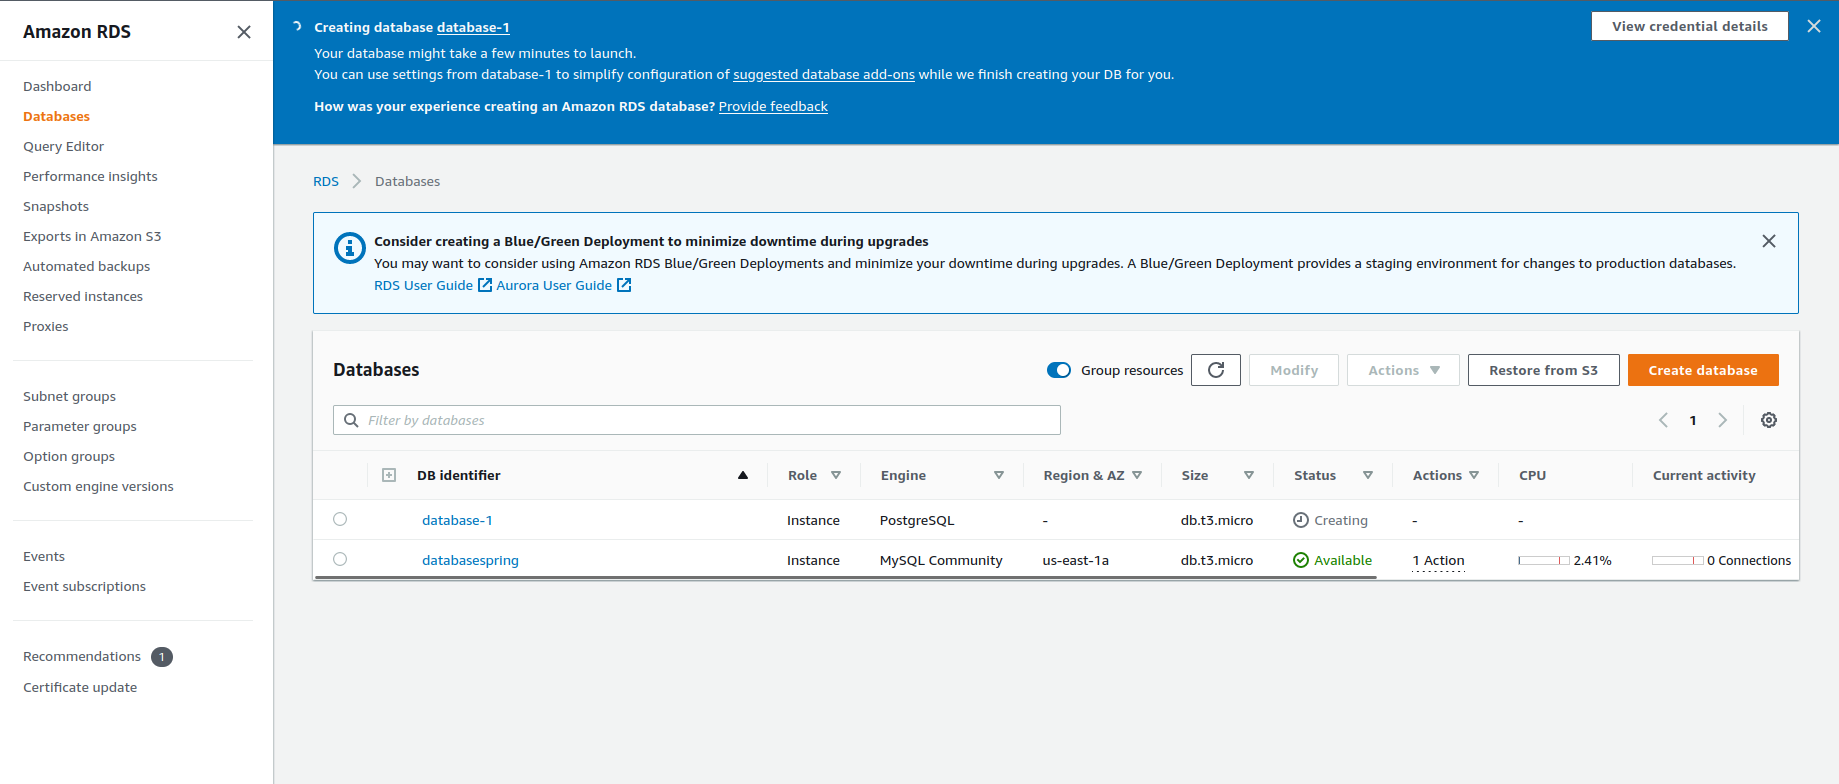
- Review and confirm the database settings, and then click on the “Create database” button.
- Wait for the database to be created. This usually takes a few minutes but can take longer depending on the size of your database and the configuration options you selected.
Once your database is created, you can connect to it using your preferred database client (e.g. MySQL Workbench, pgAdmin, etc.) and start using it.
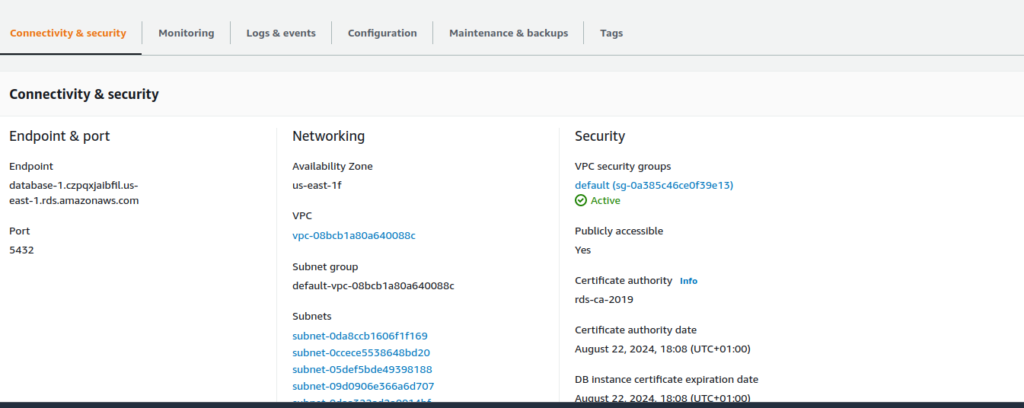
Once available, you can find the database endpoint (hostname) which will be used as the host for our database in the Spring Boot project.
We will add the following parameters to our applications.properties file in order to use the database that we just created:
spring.datasource.url=jdbc:postgresql://database-1.czpqxjaibfil.us-east-1.rds.amazonaws.com:5432/howtodoinjava
spring.datasource.username={your_database_username}
spring.datasource.password={your_database_password}
spring.datasource.driver-class-name=org.postgresql.Driver
spring.jpa.database-platform=org.hibernate.dialect.PostgreSQLDialect
6.3. Setting up Security Group
If we run our application now, we may encounter an error as our Spring Boot app might fail to establish a connection to the database.

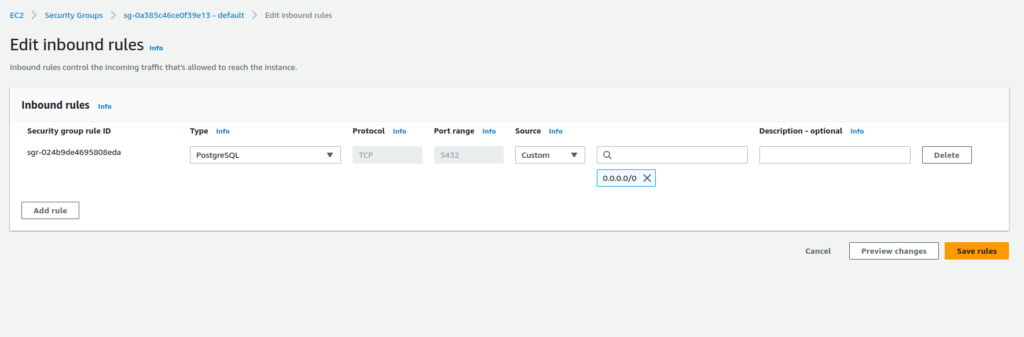
To resolve this issue, we need to override the VPC’s security group’s default settings by editing the inbound rules.
To do that, we can access the Amazon RDS console and select our database instance. Thereafter:
- Navigate to the “Connectivity & security” tab and ensure that the “Public accessibility” option is enabled.
- Click on the “Security group” link and edit the inbound rules accordingly.
In the “Security Group” section, we can click on the “Edit inbound rules” button to add/modify a new security rule that allows incoming traffic.
7. Deploying to Elastic Beanstalk
7.1. Initializing EB CLI
Navigate to the project’s root directory, open up a terminal, and type the following command :
eb initWe will Follow the EB wizard (a series of configuration questions) to set up our environment. The questions will include :
- Your AWS region
- The application name
- The platform & Platform branch (such as Java, Tomcat, etc). Since we are deploying a Spring boot app, so we choose Java as a platform (if you are deploying a Spring Rest API with a non-spring boot project, please choose Tomcat as a Platform) and Java 17 (as we are using Spring boot 3).
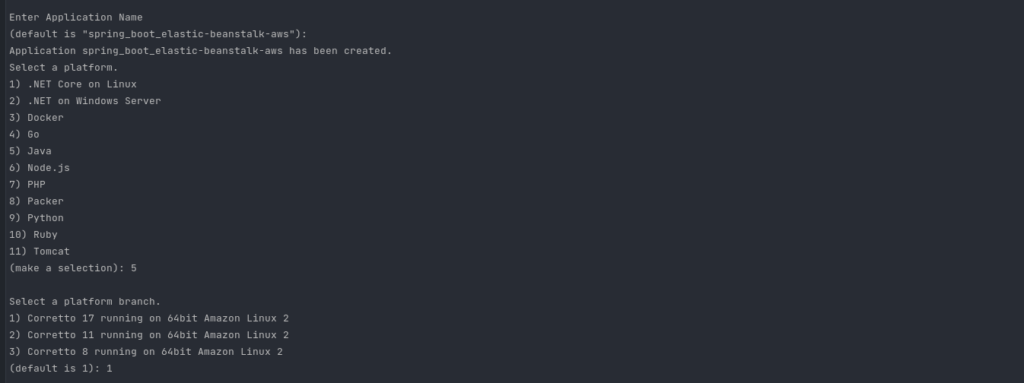
- The SSH key for instances in the environment

7.2. Deployment
After the successful execution of “eb init“, we should see a folder called “.elasticbeanstalk” in the root directory of our project. This folder contains a unique file named “config.yml“. Add the following line to “config.yml” file.
artifact:
      target/{you jar name}.jar
Ohe final config.yml should look like this :
branch-defaults:
  default:
    environment: spring-boot-app-qa-env
    group_suffix: null
deploy:
  artifact: target/{you jar name}.jar
global:
  application_name: spring_boot_elastic-beanstalk-aws
  branch: null
  default_ec2_keyname: eb-howtodoinjava
  default_platform: Corretto 17 running on 64bit Amazon Linux 2
  default_region: us-east-1
  include_git_submodules: true
  instance_profile: null
  platform_name: null
  platform_version: null
  profile: eb-cli
  repository: null
  sc: null
  workspace_type: Application
After that execute the command 'eb create' to create a new Elastic Beanstalk environment from scratch. It provisions and configures all the necessary resources and deploys the application to the newly created environment.
eb create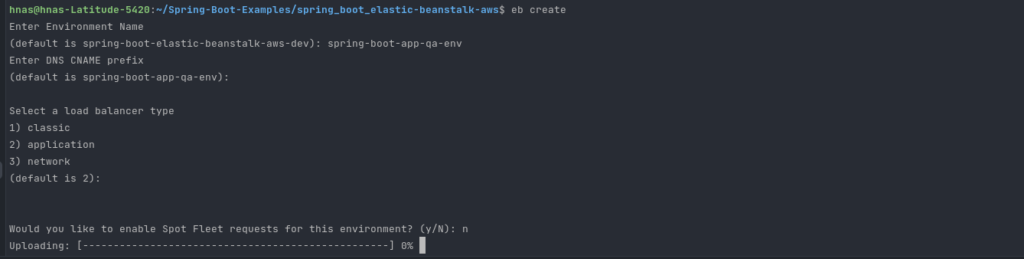
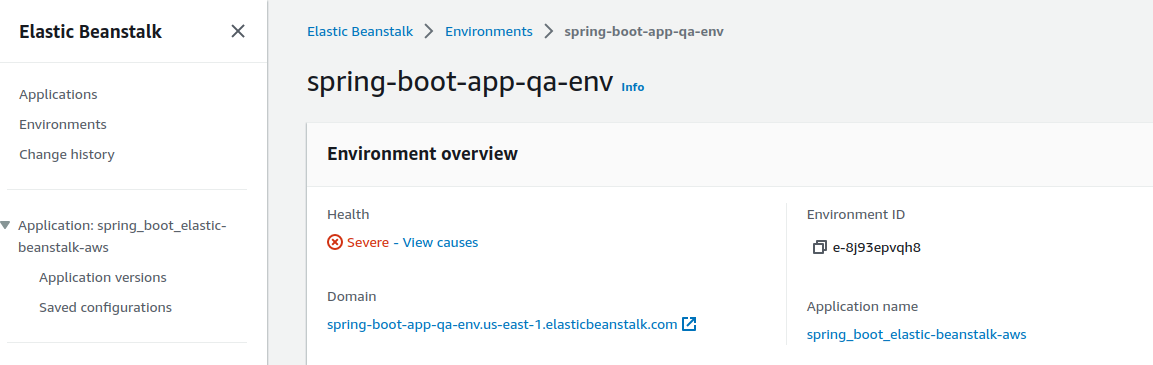
This process might take a few minutes to finish. After completion, we can check our environment in the AWS console.
8. Test
Copy the domain endpoint and attempt to access it in a web browser. Unfortunately, we are unable to access the application, you will encounter an error message saying Bad Gateway.

To fix the issue, please follow these steps:
- Go to your environment settings and Click Configuration tab on the left side
- Scroll down until you find the “Environment variables” section.
- Add a new environment variable named “SERVER_PORT”.
- Set the value of “SERVER_PORT” to “5000”.
- Save the changes and restart your application.
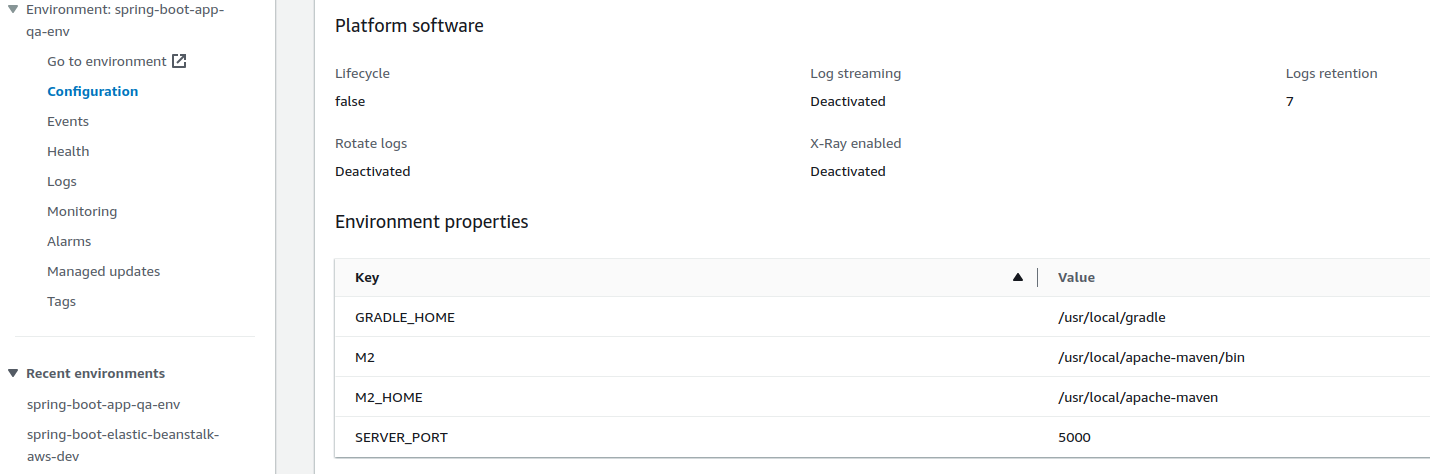
By setting the “SERVER_PORT” environment variable to 5000, you are telling your application to listen on port 5000, which should allow you to access your application through the domain endpoint without encountering any errors.
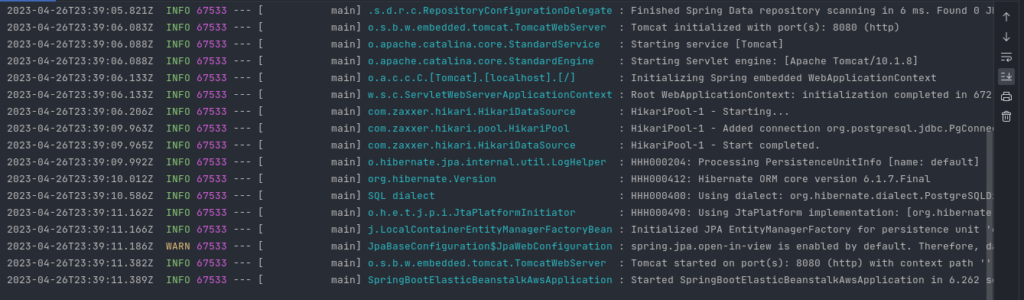
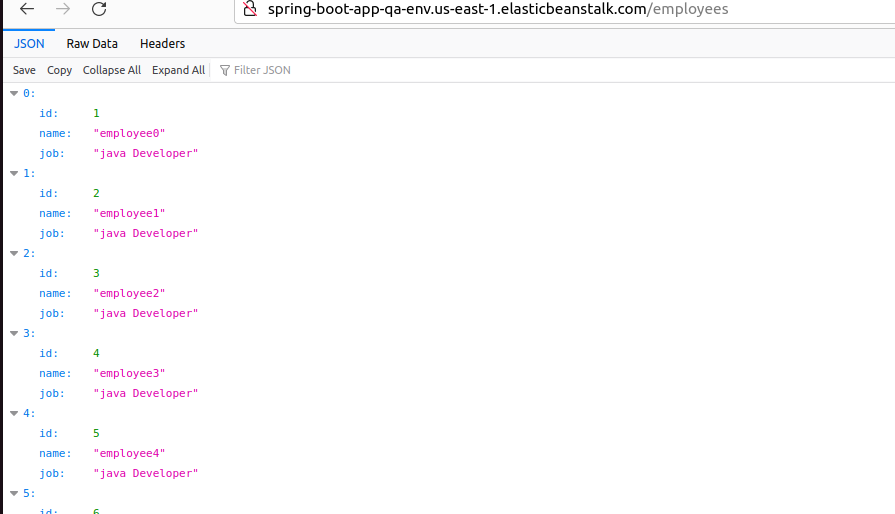
Now we can access the REST API deployed in Beanstalk accessing the data from RDS.
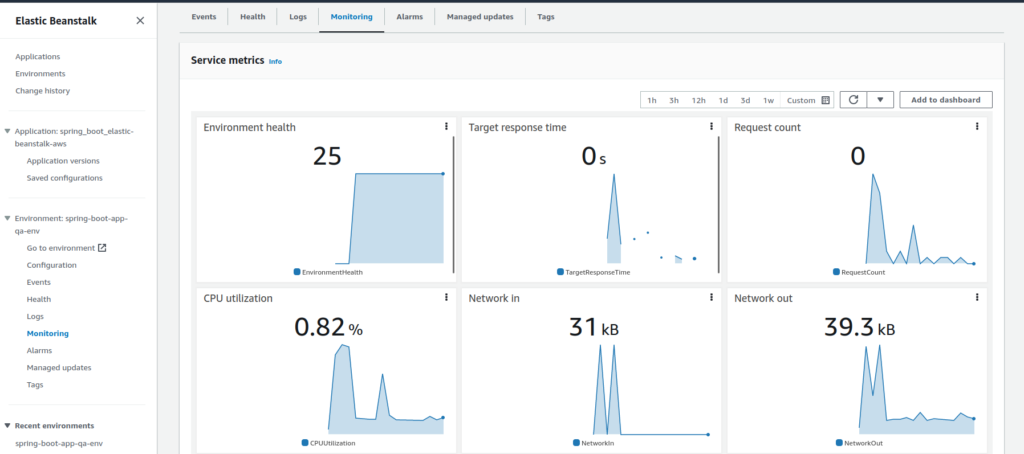
9. Monitoring
To monitor your environment in Elastic Beanstalk, you can use the AWS Management Console or AWS CloudWatch.
9.1. Using AWS Management Console
- Go to the Elastic Beanstalk console and select your environment.
- You can view environment health, resource utilization, and recent events from the environment dashboard.
9.2. Amazon CloudWatch
By default, Amazon CloudWatch is integrated into Elastic Beanstalk, enabling us to track the status of our application and environment effortlessly.
We can visit the Amazon CloudWatch console and access our dashboard to gain insights into our resources and alarms. If we wish to view additional metrics or incorporate custom metrics, we can do so.
10. Scaling
Elastic Beanstalk provides automatic scaling for our environment by default. We can configure customized scaling to adjust the number of instances in our environment based on the demand of our application.
Elastic Beanstalk offers two types of automatic scaling:
10.1. Basic Scaling
With basic scaling, we specify our environment’s minimum and maximum instances. Elastic Beanstalk automatically scales the setting up or down within this range based on the CPU utilization of the instances.
Basic scaling can be configured in the console UI or in the configuration file. For example, the following is a YAML configuration file that enables Basic Scaling with a minimum of 2 instances and a maximum of 4 instances:
option_settings:
  aws:autoscaling:asg:
    MinSize: '2'
    MaxSize: '4'
10.2. Advanced Scaling
With advanced scaling, we can define scaling policies that specify the conditions for scaling, such as CPU utilization, memory utilization, or request count. We can also define custom CloudWatch metrics to trigger scaling actions based on specific metrics.
With advanced scaling, Elastic Beanstalk will automatically adjust the number of instances based on the metrics that you specified in your scaling policies.
For more information, please check the AWS documentation.
11. FAQs
11.1. AWS Credentials Error
If you have not already configured your AWS credentials on your local machine, you will be prompted to provide them.

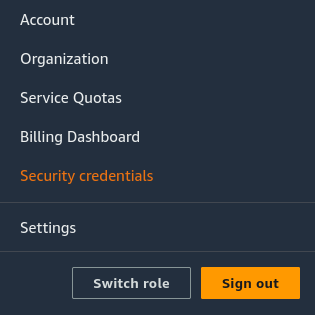
To set up your access ID and secret key, you can add them directly in the prompt as I did. If you don’t have them, you can follow these steps:
- Click on the username in the top right corner and select “Security Credentials” from the dropdown menu.
- Under the “Access keys” section, click on the “Create access key” button.
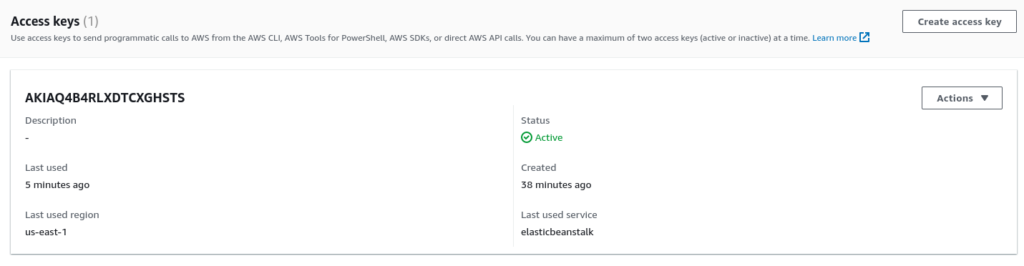
- Your access ID and secret key will be displayed. Copy and save them in a secure location.
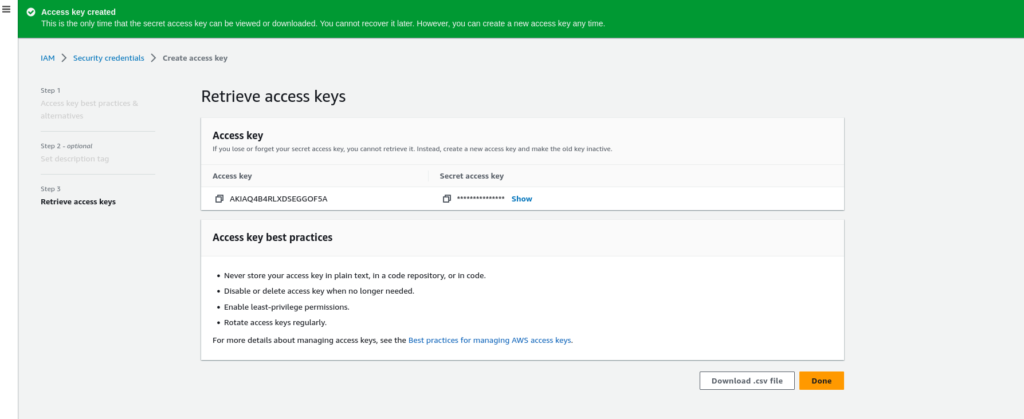
- In your terminal, enter the command
aws configure. This will prompt you to enter your access ID, secret key, and default region and output format.
- Once you’ve entered your access ID and secret key, you should be able to continue with
eb initand select a region without any issues.
11. Conclusion
Deploying a Spring Boot app using Elastic Beanstalk and a database in RDS is a powerful and efficient way to build and scale web applications in the Cloud. In the saved time, we can focus on building the application logic while letting AWS handle the underlying infrastructure.
By following the steps discussed in this tutorial, we should be able to deploy our own Spring Boot application to AWS and take advantage of the power and scalability of Elastic Beanstalk and RDS.
Happy Learning !!
Comments