
Welcome to the Git interview preparation guide where we will discuss the most asked Git interview questions to beginners as well as experienced professionals. Whether you’re gearing up for a devops or testing interview or looking to sharpen your Git skills, this resource will help you by delving into some of the most commonly asked interview questions related to Git’s essential concepts and practices.
We will cover all important topics such as branching, repository management, handling merge conflicts, and collaboration workflows. By exploring these questions, you will gain a deeper understanding of Git’s version control system and be better equipped to tackle real-world challenges in your development projects.
Git Interview Questions – Basic Concepts
1. What is a Version Control System?
A version control system (VCS) is software that helps track and manage changes to files and code over time. It allows multiple people to collaborate on a project, keep track of revisions, and easily revert to previous versions if needed.
There are three main types of version control systems:
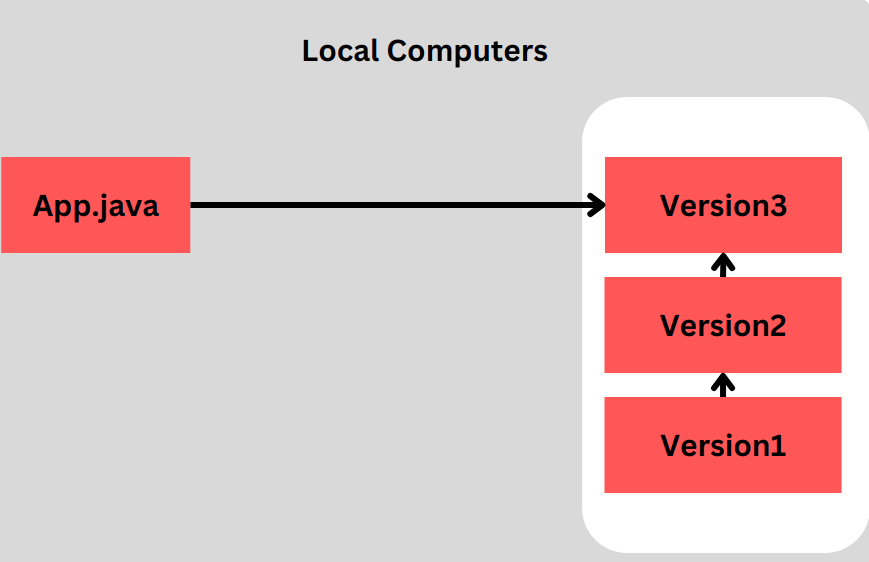
- Local Version Control System (LVCS): In an LVCS, the version control database is stored on the local machine. Changes and revisions are tracked within the local repository, which resides on the user’s computer. However, this type of system lacks collaboration features and does not facilitate team-based development.
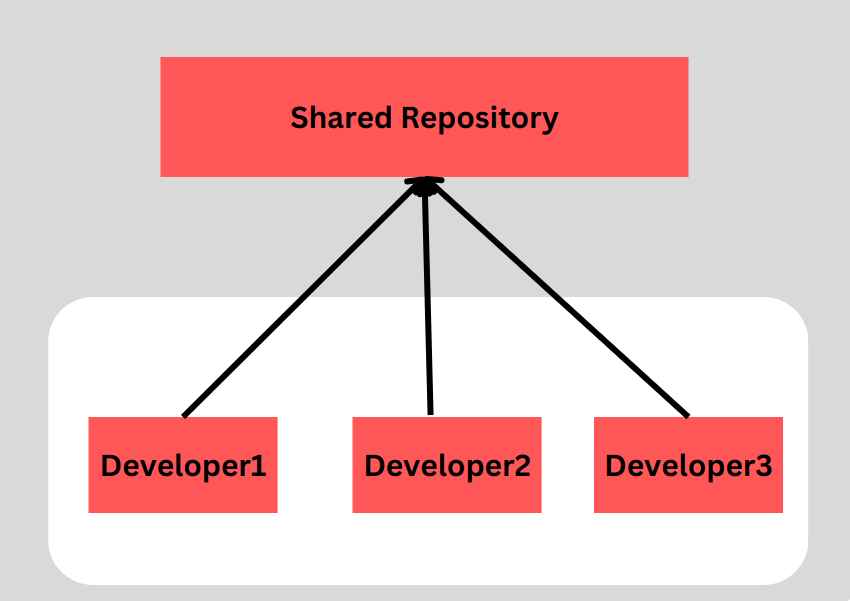
- Centralized Version Control System (CVCS): In a CVCS, the version control database is stored on a central server. Users can check out files from the server, make changes, and commit them back to the server. This allows multiple users to collaborate on the same project and provides centralized control over the repository. However, a downside of CVCS is that if the central server goes down, collaborators cannot perform certain operations until the server is restored.
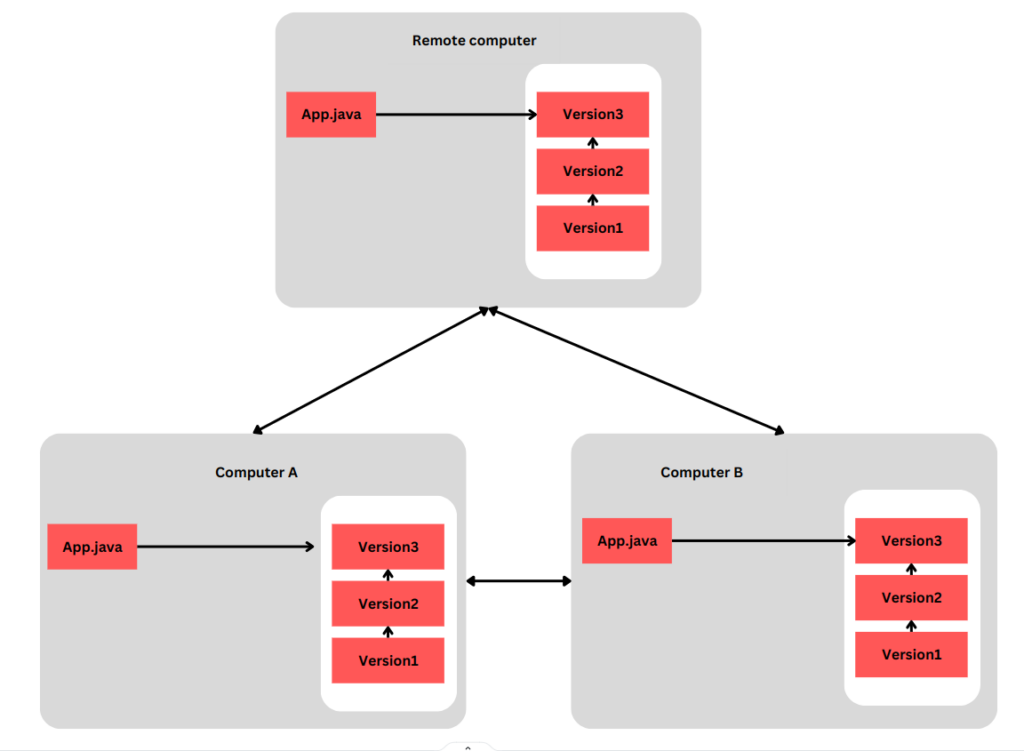
- Distributed Version Control System (DVCS): In a DVCS, each user has a local repository that contains the entire version history. This means that every user has a full copy of the project’s repository, including all branches and revisions. Users can work independently on their local repositories and synchronize changes with other repositories. DVCSs provide better support for distributed and decentralized workflows, allowing users to work offline and collaborate more effectively.
2. What is Origin in Git?
In Git, “origin” refers to the remote repository that we cloned from. When we clone a repository from a remote server, Git automatically creates a remote reference called “origin” that points to the original remote repository.
By default, when we clone a repository, Git sets up the “origin” and associates it with the original repository from which we cloned. we can verify this by running the command ‘git remote -v‘. This command displays the list of remote repositories associated with our local repository, along with their URLs.
git remote -v

origin  https://github.com/lokeshgupta1981/Spring-Boot3-Demos (fetch)
origin  https://github.com/lokeshgupta1981/Spring-Boot3-Demos (push)
Please note that “origin” is just an alias that is not hard coded and could be changed using the following command prompt:
git remote rename origin newName3. How do we configure a global username and email in Git?
It’s important to set a globally consistent username and email address, as Git uses this information to associate commits with the correct author. It helps in identifying who made each commit and allows for proper collaboration and attribution within a project.
To configure a global username and email in Git, we can use the following commands:
git config --global user.name "MyName"

git config --global user.email "myname@gmail.com"
These commands will set the username and email globally, meaning they will be used for all Git repositories on your machine unless overridden at the repository level.
You can verify the changes by running the following commands. These commands will display the configured username and email, respectively.
git config --global user.name   # Prints 'lokeshgupta1981'
git config --global user.email    # Prints 'howtodoinjava@gmail.com'
4. What is the meaning of “Staging Area” in Git?
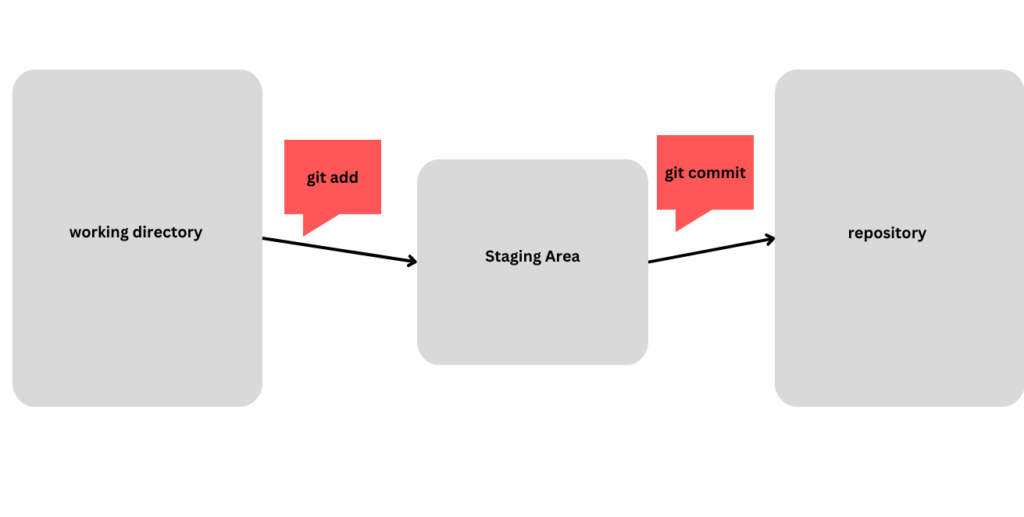
The “staging area” in Git, also known as the “Index,” is an intermediate area where changes to our files are prepared before they are committed to the Git repository.
When we make changes to our project files, Git provides a two-step process to commit those changes. The staging area serves as the bridge between the working directory (where you make modifications) and the repository (where the commits are stored => .git folder).
By using the staging area, we can separate unrelated changes into multiple commits or selectively include specific modifications while excluding others. It provides an opportunity to review and refine our changes before they become a part of the project history.
5. Difference between Forking, Branching and Cloning in Git?
Forking, branching, and cloning are all Git operations that serve different purposes in the version control workflow. Let us compare them side by side before going deep into each.
Here’s a tabular comparison of forking, branching, and cloning in Git:
| Feature | Forking | Branching | Cloning |
|---|---|---|---|
| Purpose | Create a copy of a remote repository on your GitHub account. | Create a separate line of development within a Git repository. | Create a local copy of a Git repository on your machine. |
| Ownership | Creates an entirely separate repository owned by you. | Within the same repository, branches are owned by the original repository. | Local copy; no change in ownership. |
| Origin | Derived from a remote repository, usually on GitHub. | Derived from the existing local or remote repository. | Derived from an existing remote or local repository. |
| Changes Visibility | Changes made in your fork are independent of the original repository until you create a pull request. | Changes made in a branch are isolated until you merge them back into the main branch. | Changes are local until you push them to a remote repository. |
| Use Cases | Typically used for contributing to open-source projects or creating a separate copy for personal use. | Used for feature development, bug fixes, and isolating changes in a collaborative environment. | Used for working on a local copy of a repository, typically for individual development. |
Forking
Forking is a concept related to remote repositories, particularly on platforms like GitHub, GitLab, and Bitbucket. Forking creates a copy of the original repository in our own account.
To fork a repository on GitHub (or similar platforms), you usually have a “Fork” button on the repository page. Clicking this button will create a fork of the original repository in your GitHub account.
Forking is commonly used when we want to contribute to an open-source project or create our own independent version of a project. The forked repository is separate from the original repository, allowing us to make changes, experiment, and submit pull requests without affecting the original project.
Branching
Branching allows to create separate lines of development within a repository. It enables us to work on different features, bug fixes, or experiments independently of each other.
To create a branch in Git, we use the following command:
git branch <branch_name>By creating a branch, we essentially create a new timeline where we can make changes without affecting the main branch (usually called “master” or “main”). Once we’re satisfied with the changes made in the branch, we can merge the branch back into the main branch to incorporate the changes.
Branching is a powerful tool for collaborative development, enabling multiple developers to work on different tasks concurrently while maintaining a clean and organized commit history.
Cloning
Cloning creates a local copy of a remote repository. When we clone a repository, we download the entire project’s history, files, and branches to our local machine.
To clone a remote repository to our local machine, we use the following command:
git clone <repository_url>Cloning establishes a connection between the local repository and the remote repository, allowing us to fetch updates, push changes, and collaborate with others. Cloning is typically done when we want to start working with an existing repository.
6. What is Git Stash?
In Git, the “Stash” feature allows us to temporarily save changes that we have made to our working directory without committing them. It provides a way to store our modifications and switch to a different branch or apply other operations without committing incomplete or experimental changes.
Stashes are stored locally and are not pushed to remote repositories, making them suitable for personal workflow organization and experimentation.
The git stash command is used to create and manage stashes. Here are some common use cases and commands related to Git stash:
Creating a stash
git stash save "Stash message"This command saves our modifications in a new stash with an optional message describing the stash. Git will revert the changes from our working directory, leaving it clean.
Viewing stashes
git stash listThis command displays a list of stashes you have created, along with their stash references and messages.
Applying a stash
git stash apply stash@{n} // n in [0.....P]This command applies the changes from a specific stash onto your current branch. The stash@{n} refers to the stash reference in the list. By default, it applies to the most recent stash.
Applying and removing a stash
git stash pop stash@{n}This command applies the changes from a specific stash and removes it from the stash list in one step. It is equivalent to applying the stash and then using git stash drop to remove it.
Applying a stash to a different branch
git stash branch branch-name stash@{n}This command creates a new branch (new-branch-name) and applies the changes from a specific stash onto that branch. It is a convenient way to switch to a new branch and apply your stashed changes in a single step.
Discarding a stash
git stash drop stash@{n}This command removes a specific stash from the stash list without applying its changes.
Git stash is useful when we are in the middle of working on something but we need to switch to a different task or branch. It allows us to save our changes temporarily, switch context, and later come back to the saved state to continue where we left off.
7. What is the difference between ‘git fetch‘ and ‘git pull‘?
Both git fetch and git pull are used to fetch and incorporate changes from a remote repository into our local repository. However, they differ in how they handle the fetched changes and update our local branch.
Here are the key differences between git fetch and git pull:
git fetch
- Retrieves the latest changes from the remote repository, including new branches, commits, and tags, without automatically merging them into the current branch.
- Updates the remote-tracking branches (e.g.,
origin/master) to reflect the state of the remote repository. - Does not modify your local branches or working directory.
- Allows us to inspect and review the fetched changes before merging them manually, providing an opportunity to decide how to integrate the changes.
To fetch the latest changes from the remote repository we use the following command:
git fetch origingit pull
- Performs a
git fetchfollowed by an automatic merge of the fetched changes into the current branch. - Updates both the remote-tracking branches and your local branch, incorporating the fetched changes.
- If the current branch has local modifications,
git pullattempts to merge the changes automatically. If there are conflicts, you need to resolve them manually. - Automatically update your working directory to reflect the merged changes.
To pull the latest changes from the remote repository we use the following command:
git pullThe choice between git fetch and git pull depends on our workflow and the level of control we want over integrating changes.
- If we want to review the changes before merging and have more control over the integration process,
git fetchis suitable. - If we prefer a more automated approach and are confident in automatically merging the changes,
git pullcan be more convenient.
8. Explain Git checkout, rebase and merge?
These are three important commands in Git for managing branches and incorporating changes from one branch into another.
| Git Command | Purpose | Common Use Cases |
|---|---|---|
| checkout | Switch to a different branch or commit, making it the current working branch/commit. | – Creating and switching between branches – Checking out specific commits for inspection or testing |
| rebase | Reapply changes from one branch onto another branch. Typically used to maintain a linear commit history. | – Integrating feature branches into the main branch – Maintaining a clean, linear commit history |
| merge | Combine changes from one branch into another branch. Commits are preserved, creating a merge commit. | – Integrating feature branches into the main branch – Merging changes from multiple contributors |
Let’s explain each of them:
git checkout
The git checkout is used to switch between different branches or versions of a project.
To switch to another branch we use the following command:
git checkout <branch-name>- When you run
git checkout <branch-name>, it updates your working directory to match the contents of the specified branch. - You can also use
git checkoutto switch to a specific commit or tag, allowing you to view the project at a particular state in history. - Additionally,
git checkout -b <new-branch-name>creates a new branch and switches to it in a single command.
git rebase
The git rebase is used to integrate changes from one branch onto another, typically used to incorporate changes from a feature branch into a main branch.
Let’s assume we have two branches: the source branch (let’s call it “feature”) and the target branch (usually “master” or “main”). The “feature” branch contains some changes, and we want to incorporate those changes into the “master” branch. However, we don’t want to perform a standard merge because we want to maintain a linear commit history.
First, you need to ensure that you are on the target branch( git checkout master). In this case, it would be master, Then, initiate the rebase command, specifying the source branch you want to rebase onto the current branch (target branch).
git rebase feature- When you run
git rebase <target-branch>, Git identifies the common ancestor of the current branch and the target branch, then reapplies the commits from the current branch on top of the target branch. - Rebase allows for a linear history by placing the commits in sequential order, making it appear as if the changes were made directly on top of the target branch.
- This can help maintain a clean commit history, especially when working on long-lived feature branches.
git merge
The git merge combines changes from different branches into the current branch.
To merge the changes of a branch into a target branch we use the following command(after git checkout <targer-branch>):
git merge <source-branch>- When you run
git merge <source-branch>, Git creates a new commit that incorporates the changes from the source branch into the current branch. - The merge commit preserves the history of both branches, including the point at which they diverged.
- By default, Git performs a “fast-forward” merge if possible, which means it moves the current branch pointer forward to the commit of the source branch without creating an additional merge commit.
- However, if a fast-forward merge is not possible due to divergent changes, Git performs a “recursive” or “non-fast-forward” merge, creating a new merge commit.
9. What is the “git cherry-pick” command used for?
The ‘git cherry-pick‘ command is used to apply specific commits from one branch to another. It allows us to select individual commits and apply them to a different branch, incorporating their changes into the target branch.
Here’s how we work with git cherry-pick command:
- Identify the commit: Determine the commit(s) you want to apply to another branch. You can find the commit hash or use other Git commands like
git logorgitkto visualize the commit history. - Switch to the target branch: Make sure you are on the branch where you want to apply the selected commit(s). You can use
git checkoutto switch to the target branch. - Run
git cherry-pick: Execute thegit cherry-pickcommand followed by the commit hash(es) of the commit(s) you want to apply. For example:
git cherry-pick <commit-hash>It’s important to note that git cherry-pick copies the selected commit(s) and applies them as new commits on the target branch. This means the new commits will have different commit hashes, as they are separate copies rather than a direct transfer of the original commit.
10. Explain Git Resetting and Reverting
In Git, resetting and reverting are two different approaches to undoing changes. They are used to correct mistakes, undo commits, or restore the repository to a previous state.
| Action | Git Reset | Git Revert |
|---|---|---|
| Purpose | Move the HEAD and branch pointers to a specified commit. | Create a new commit that undoes the changes made by a specific commit. |
| Common Use Cases | – Undoing commits locally before pushing to the remote repository – Reorganizing commit history – Removing changes from the staging area | – Safely undoing a commit without altering the commit history – Collaborative code correction |
git reset
The git reset moves the current branch pointer to a specific commit, effectively resetting the branch to that commit.
#Let's say we have a commit history like this: A - B - C - D (master)
#To Perform a hard reset to move the branch pointer to commit B, discarding changes in C and D.
git reset --hard B
The reset command has three modes: soft, mixed, and hard.
- Soft reset (
git reset --soft) moves the branch pointer to the specified commit while keeping the changes in the staging area and working directory intact. It allows you to “undo” commits and make additional modifications based on the previous state. - Mixed reset (default behavior,
git reset --mixed) moves the branch pointer to the specified commit, resetting the staging area but preserving the changes in the working directory. It “unstages” the changes, allowing you to modify and stage them again before committing. - Hard reset (
git reset --hard) moves the branch pointer to the specified commit, discarding any changes in the staging area and working directory. It completely removes the changes, reverting the branch and the entire repository to the state of the specified commit.
git revert
The git revert creates a new commit that undoes the changes made in a previous commit. It provides a safe way to undo commits without altering the commit history.
git revert C # This command will Create a new commit that undoes the changes in commit C.Instead of modifying or removing existing commits, git revert creates new commits that reverse the changes introduced by the specified commit(s). Each revert commit is dedicated to undoing the changes from a specific commit, ensuring that the commit history remains intact.
11. What is the purpose of the “.gitignore” file?
The .gitignore file specifies intentionally untracked files and directories that should not be committed to the repository. It allows us to define patterns of file and directory names that Git should ignore when tracking changes and staging files.
Some common use cases and benefits of using a “.gitignore” file include:
- Ignoring build artifacts such as compiled binaries, object files, log files, or temporary files.
- Ignoring dependencies or libraries that are managed separately. Including these dependencies in the repository is unnecessary and can lead to a bloated repository.
- Ignoring configuration files that contain sensitive information like API keys, database credentials, or environment-specific settings.
- Ignoring personal development environment files such as project settings, editor backup files, or cached files, that are not relevant to other team members.
Here’s an example of a .gitignore file with 3 entries:
# Ignore build artifacts
*.exe
*.o
*.log

# Ignore dependency directories
/node_modules
/vendor

# Ignore sensitive configuration files
config.ini
secrets.json
12. What is the difference between Git reflog and log?
The git log is primarily used to view the commit history of a specific branch or commit, while git reflog is more focused on tracking reference movements in the entire repository, making it particularly useful for recovery and debugging purposes.
| Aspect | git log | git reflog |
|---|---|---|
| Purpose | Displays the commit history of a branch. | Displays a reference log of the repository. |
| Common Use Cases | – Reviewing project history – Checking commit messages and changes made over time. | – Recovering lost commits or branches – Debugging and understanding changes in the repository. |
git log
The git log command provides a chronological list of commits in the repository, displaying details such as commit hash, author, date, and commit message. By default, it shows the commit history for the current branch, starting from the most recent commit and going backward in time. Various options and flags allow customization, like filtering by author, date range, or branch.
# To see the commit history for the current branch
git log
To display the commit history with a compact one-line format we use the following command :
git log --oneline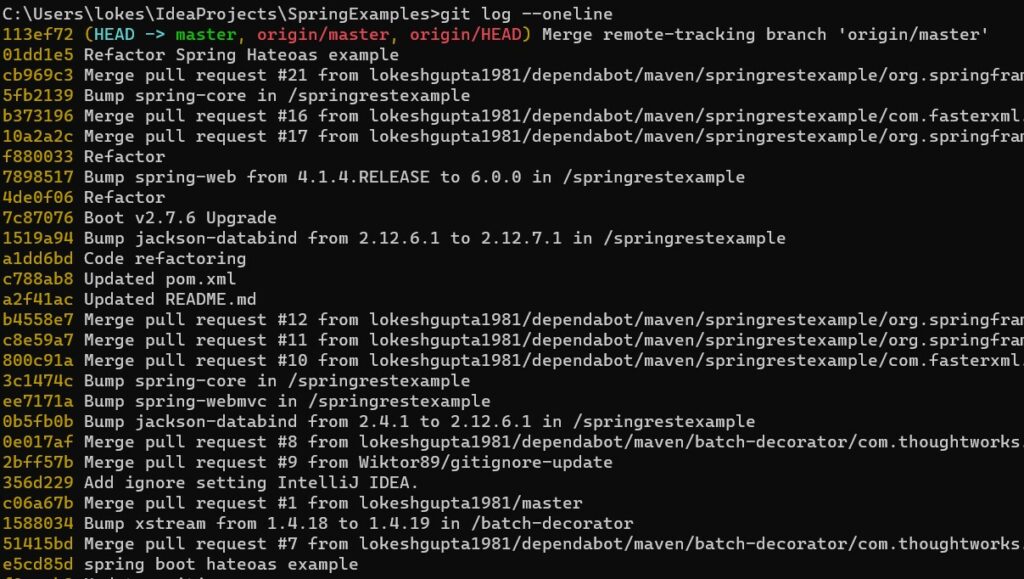
git reflog
On the other hand, git reflog gives a detailed log of reference (branch or tag) updates and other actions that modify commit pointers.
# To view the reflog for the repository
git reflog
Unlike git log, the reflog records branch movements and operations affecting the commit history, even without creating new commits. It serves as a valuable tool for recovering lost commits or branches that may have been accidentally deleted or moved, acting as a safety net in case of mistakes or unforeseen events.
13. What is the purpose of the “git bisect” command?
The git bisect command performs a binary search through the commit history to identify the specific commit that introduced a bug or caused a regression. It helps in isolating and pinpointing the commit responsible for a particular issue by efficiently narrowing down the range of commits to investigate.
Here’s an overview of how git bisect works:
- Identify a known good and bad commit: Start by identifying two commits in the project’s history: one that represents a known good state (a commit where the bug or issue is not present) and one that represents a known bad state (a commit where the bug or issue is present).
- Start the bisect process: Use
git bisect startto begin the bisect process. Specify the commit hash of the known good state withgit bisect good <commit>and the commit hash of the known bad state withgit bisect bad <commit>. Git will create a range of commits between the known good and bad states.
git bisect start

git bisect good <good_commit_hash>

git bisect bad <bad_commit_hash>
14. How do we squash multiple commits into a single commit in Git?
To squash multiple commits into a single commit in Git, we can use the interactive rebase feature. Ensure we are on the branch containing the commits we want to squash.
Run the following command to start an interactive rebase:
git rebase -i HEAD~nReplace n with the number of commits, we want to squash. For example, if we want to squash the last 3 commits, use HEAD~3.
An interactive text editor will open, showing a list of the commits we specified in the previous step. Each commit will have the word “pick” in front of it.
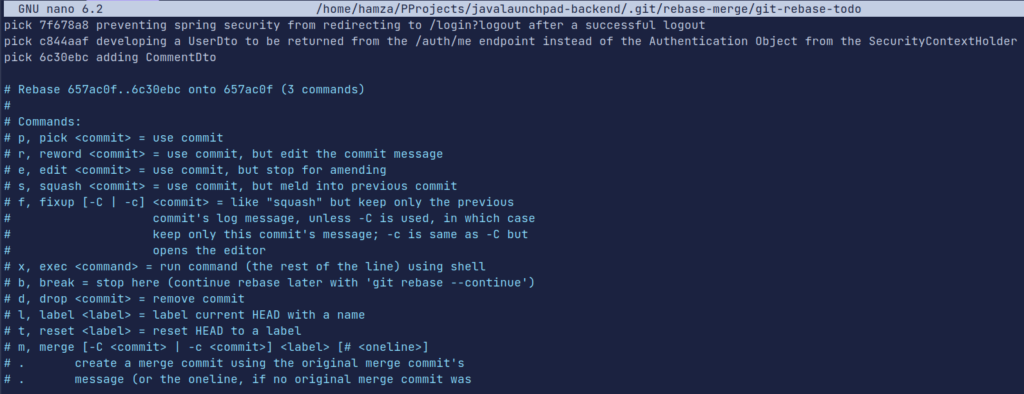
To squash commits, change “pick” to “squash” (or “s”) for all commits except the first one. Leave the first commit as “pick” since it will be the resulting commit message. You can also re-arrange the order of the commits if desired by moving the lines in the text editor.

- Save and exit the text editor.
- Another text editor will open, allowing you to modify the commit message. You can combine the commit messages of the squashed commits or write a new message. Edit the message as needed, save, and exit the editor.
- Git will perform the rebase, squashing the commits into a single commit.
- If the rebase is successful, you will see a message indicating that the rebase is complete.
- If there are any conflicts, Git will stop the rebase process and allow us to resolve them. After resolving conflicts, use
git rebase --continueto continue the rebase process. - Push the changes to the remote repository if necessary.
Warning: Be cautious when squashing commits, as it rewrites history. If the commits have already been pushed to a shared repository and others have based work on those commits, it’s generally not recommended to squash them, as it can cause conflicts for other team members.
15. How to identify if a certain branch has been merged into Master?
To identify if a certain branch has been merged into the master branch in Git, we can run the following command:
git checkout masterThen run the below command, replacing <branch_name> with the name of the branch, we want to check:
git branch --merged <branch_name>- If the branch has been merged into
master, it will appear in the list of branches displayed after running this command. - If the branch hasn’t been merged into
master, it will not appear in the list of merged branches.
Alternatively, we can use the following command to see a concise view of merged branches:
git branch --mergedThis command will list all branches that have been merged into the current branch, which is master in this case.
Git Interview Questions – Repository and Operations
16. What is a Git repository? How to Initialize a Git Repository?
A Git repository is a storage location where Git tracks and manages changes to a set of files and directories. It contains the complete history of all the changes made to the files, allowing us to track and revert changes, collaborate with others, and maintain different versions of our project.
To initialize a Git repository in a directory, we can use the git init command. Here’s how we do it:
cd /path/to/your/local-repo-path

git init
This command initializes an empty Git repository in the current directory. Git creates a hidden .git directory where it stores all the repository data, including the commit history and configuration.
17. How to show the current status of the repository, including modified files and branch information?
To show the current status of the repository, including modified files and branch information, we can use the git status command.
git status

# Sample Output

Changes not staged for commit:
  (use "git add <file>..." to update what will be committed)
  (use "git restore <file>..." to discard changes in working directory)
        modified:   spring-boot-actuator-example/pom.xml
        modified:   spring-boot-actuator-example/src/main/java/com/howtodoinjava/demo/SimpleRestController.java
        modified:   spring-boot-actuator-example/src/main/resources/application.properties
        modified:   spring-webflux-demo/src/test/java/com/howtodoinjava/demo/EmployeeControllerTest.java

no changes added to commit (use "git add" and/or "git commit -a")
This command will display a summary of the current state of our repository. It will show us information such as:
- The current branch we are on.
- Untracked files (files that Git is not currently tracking).
- Modified files (files that have been modified but not staged).
- Staged files (files that have been modified and staged for the next commit).
- The branch status (e.g., “Your branch is up to date with ‘origin/master'”).
18. How to connect a local repository to a remote repository?
To connect a local repository to a remote repository, we need to add a remote URL to our local Git repository. This remote URL points to the location of the remote repository (e.g., on GitHub, GitLab, or Bitbucket) where we want to store and synchronize our code.
git remote add origin <remote_url>This command adds a remote named “origin” (we can choose a different name if we prefer) and associates it with the specified remote URL.
Git Interview Questions – Branches and Operations
19. How to list existing branches? How to create a new branch?
To list existing branches, we can use the ‘git branch’ command. It displays a list of all branches in the repository with the current branch highlighted.
git branchTo create a new branch, we can use the command:
git branch <branch-name>20. How to switch to a specific branch?
We can switch to a specific branch using the command:
git checkout <branch-name>21. How to merge changes from a different branch into the current branch?
After ensuring that we are on the branch where we want to merge (for example main branch ) the changes, use the merge command to merge the changes from the specified branch into the current branch.
git checkout < main-branch >
git merge <branch-name>
22. How do you delete a branch in Git?
To delete a branch, we can pass the -d flag.
git branch -d <branch-name>Git Interview Questions – Add, Commit, Merge, Difference
23. How to add a file to the staging area?
To add a file to the staging area, we use git add command:
git add <file>To easily add all files to the staging area, we can utilize a “.” instead of a specific file :
git add .24. How to commit changes in the staging area with a descriptive message?
After adding files to the staging area, we can commit the changes using the command :
git commit -m "message".Replace “message” with a descriptive message summarizing the changes.
25. How to push committed changes to a remote repository?
To push committed changes to a remote repository, we use the command:
git push <remote-name> <branch-name>26. How do you undo the last commit in Git?
To undo the last commit while keeping the changes as uncommitted modifications, we can use the command:
git reset HEAD~1This will move the HEAD pointer back one commit. The changes will still be in your working directory, allowing us to modify them or make a new commit.
27. What is a merge conflict, and how do you resolve it?
A merge conflict occurs when Git is unable to automatically merge changes from different branches due to conflicting modifications on the same lines of code.
To resolve a merge conflict we need to manually edit the conflicting files, to choose the desired changes. After resolving the conflicts, we can add and commit the changes to complete the merge.
28. How do you pull changes from a remote repository?
To pull changes from a remote repository in Git, we can use the git pull command. The git pull command fetches the latest changes from the remote repository and merges them into our local branch.
git pull origin <branch-name>For example, if we want to pull changes from the master branch, we use git pull origin master. If we cloned the repository, the default remote name is usually origin, but it can be different if you customized it.
If there are any conflicts, Git will notify us, and we will need to resolve the conflicts manually. If the merge is successful, our local branch will be updated with the latest changes from the remote repository.
Before pulling changes, it’s recommended to commit or stash your local changes to avoid conflicts. If you have uncommitted changes, Git may refuse to pull until you either commit or stash them.
29. How do you show the differences between two commits?
To show the differences between two Git commits you can use the command:
git diff <commit1> <commit2>30. How do you revert a commit in Git?
To revert a commit and create a new commit that undoes the changes, we can use the command:
git revert <commit-hash>Replace <commit> with commit hash you want to revert. Git will create a new commit that undoes the changes, made in the specified commit.
31. How do you view the commit history in Git?
Every branch in Git maintains its own commit history. To access and view the commits associated with a particular branch, we can utilize the command :
git log branch-nameHere are the different scenarios for using “git log”:
- Without specifying a branch name: “git log” displays the commit history of the branch currently checked out. If no branch is checked out, it shows the commit history of the entire repository.
- With a specific branch name: “git log <branch-name>” reveals the commit history for the specified branch, including any commits shared by its parent branches.
32. How to unstage a file?
To unstage files in Git, we can use the following command:
git reset HEAD -- path/to/fileSimilar to how you can use “git add” recursively, you can unstage files by directories or perform a bulk unstage operation. To unstage everything at once, run this command from the root directory of your repository:
git reset HEAD -- .
33. How to remove a file from the remote repository?
To remove a file from the remote repository, you can use the command:
git rm <file>This will remove the file from both the working directory and the Git repository. After removing the file, you need to commit and push the changes to update the remote repository.
Conclusion
In conclusion, this comprehensive guide on common Git interview questions and answers provides a thorough exploration of essential concepts and practices within the Git version control system.
By delving into topics such as repository management, branching, merging, resolving conflicts, and collaboration workflows, you gain a solid understanding of key aspects of Git.
Happy Learning !!