
Learn to create and configure a custom authentication provider in an application secured with Spring security. This may be needed when we have to authenticate the user using 3rd party identity providers.
1. Understanding AuthenticationProvider
1.1. Default Authentication Flow
As shown in the spring security architecture diagram, the AuthenticationProvider is the one responsible for the logic of authentication.
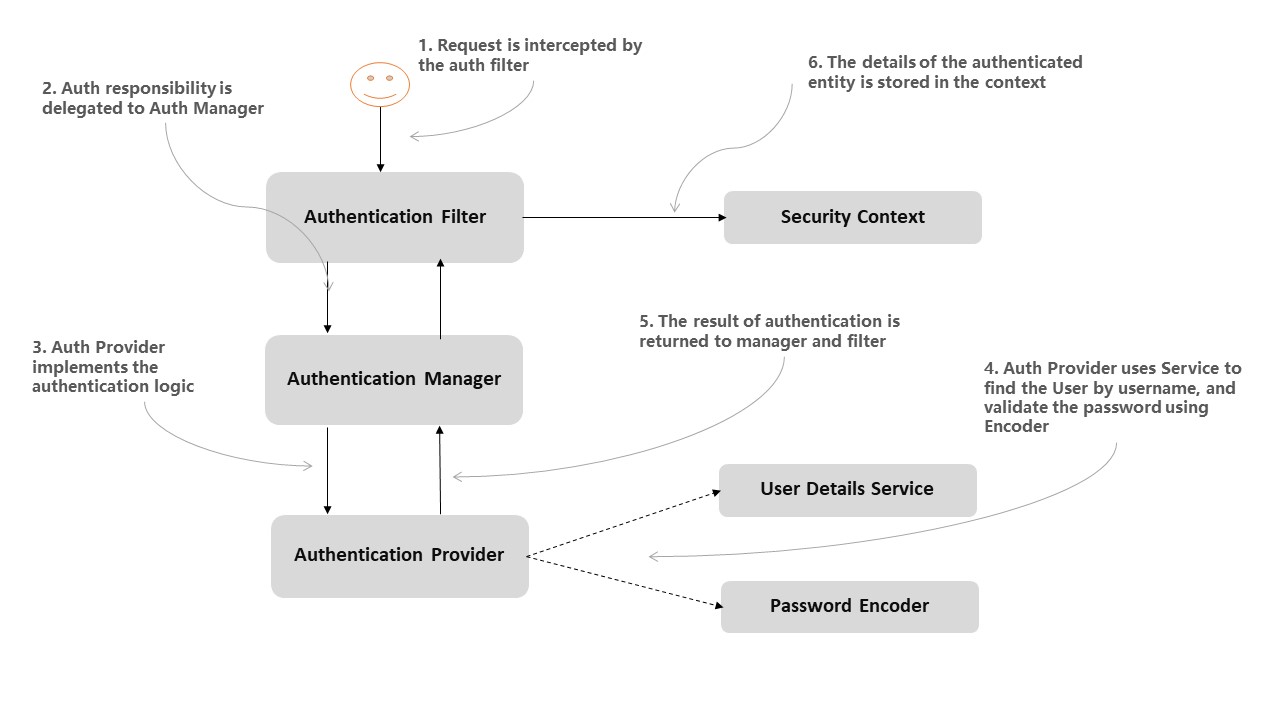
The AuthenticationManager receives a request from the HTTP filter layer and delegates the responsibility to authenticate the user to the AuthenticationProvider.
- If the user making the request is not authenticated, the response status sent back to the client is HTTP 401 Unauthorized.
- If the user is authenticated, user details along with authentication status are stored in the SecurityContext.
1.2. Custom Authentication Flow
By default, spring-security matches the username and password supplied with the request to validate the user credentials. User details are generally fetched from provided UserDetailsService that loads the user details from the underlying database.
But when we have to authenticate the user using a 3rd party identity provider or any specific system that spring security doesn’t support by default, then we need to create our custom authentication logic with a custom AuthenticationProvider implementation.
The contract is defined by AuthenticationProvider interface is:
public interface AuthenticationProvider {

  Authentication authenticate(Authentication authentication)
    throws AuthenticationException;

  boolean supports(Class<?> authentication);
}- The
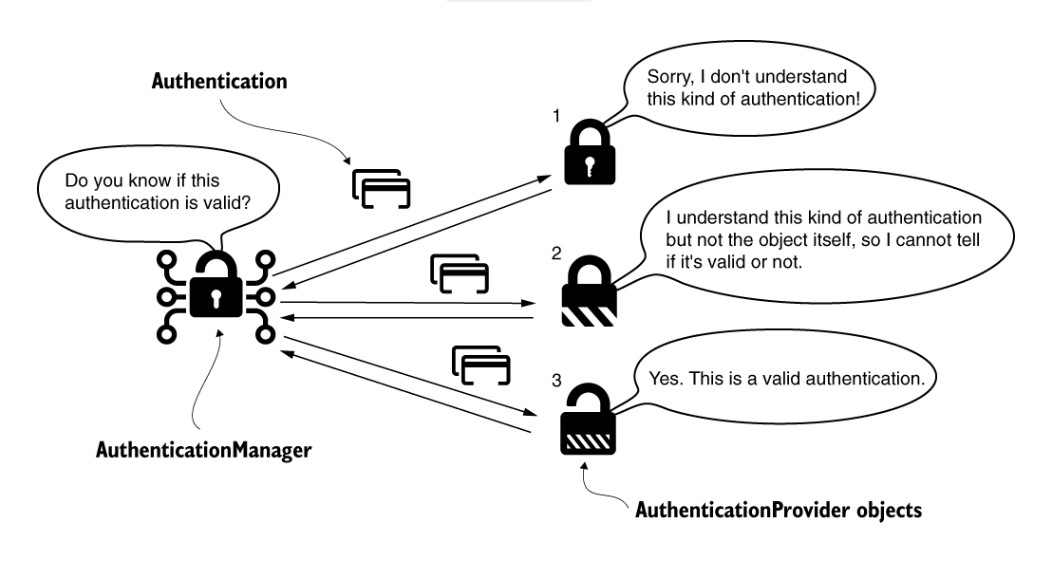
authenticate()method receives an unauthenticatedAuthenticationobject as a parameter and returns a fully authenticatedAuthenticationobject having the final authentication result including credentials. - It can return
nullif the AuthenticationProvider is unable to support authentication of the passed Authentication object. In this case, if application has multiple AuthorizationProvider classes then the next provider will be tried. - It should throw an AuthenticationException if the authentication fails.
- The second method supports() should return true if the AuthenticationProvider supports the indicated Authentication object.
- In the case of multiple authentication providers, the selection of an AuthenticationProvider capable of performing authentication is conducted at runtime by the ProviderManager.
2. Implementing Custom Authentication Provider
Creating and registering a custom authentication provider is two-step process.
In the first step, decide which kinds of Authentication objects the new AuthenticationProvider supports? Override the supports() method to specify this. In this example, we are using UsernamePasswordAuthenticationToken type that supports username and password based authentication flows.
@Component
public class CustomIdentityAuthenticationProvider
  implements AuthenticationProvider {

  // ...

  @Override
  public boolean supports(Class<?> authenticationType) {
    return authenticationType
            .equals(UsernamePasswordAuthenticationToken.class);
  }
}
In the second step, implement the authentication logic by overriding the authenticate() method. In given example, we are expected to write our logic in isValidUser() method that will connect to 3rd party systems to validate the users.
@Component
public class CustomIdentityAuthenticationProvider
    implements AuthenticationProvider {

  // TODO:
  // In this function we need to connect with identity provider
  // and validate the user
  // we are hardcoding for a single user for demo purposes
  UserDetails isValidUser(String username, String password) {
    if (username.equalsIgnoreCase("user")
        && password.equals("password")) {

      UserDetails user = User
          .withUsername(username)
          .password("NOT_DISCLOSED")
          .roles("USER_ROLE")
          .build();

      return user;
    }
    return null;
  }

  @Override
  public Authentication authenticate(Authentication authentication) {
    String username = authentication.getName();
    String password = authentication.getCredentials().toString();

    UserDetails userDetails = isValidUser(username, password);

    if (userDetails != null) {
      return new UsernamePasswordAuthenticationToken(
          username,
          password,
          userDetails.getAuthorities());
    } else {
      throw new BadCredentialsException("Incorrect user credentials !!");
    }
  }

  @Override
  public boolean supports(Class<?> authenticationType) {
    return authenticationType
        .equals(UsernamePasswordAuthenticationToken.class);
  }
}
3. Registering the Custom Authentication Provider
To plug in the new implementation of the AuthenticationProvider, override the configure(AuthenticationManagerBuilder auth) method of the WebSecurityConfigurerAdapter class in the configuration class.
To register the multiple AuthenticationProvider implementations, we can invoke the auth.authenticationProvider() for each provider separately.
@EnableWebSecurity
public class ApplicationSecurityConfig extends WebSecurityConfigurerAdapter {

  @Autowired
  private CustomIdentityAuthenticationProvider customIdentityAuthenticationProvider;

  @Override
  protected void configure(AuthenticationManagerBuilder auth) {
      auth.authenticationProvider(customIdentityAuthenticationProvider);

      //We can register as many providers as we may have
      //auth.authenticationProvider(customProviderTwo);
      //auth.authenticationProvider(customProviderThree);
  }

  // ...
}
4. Testing Custom Authentication
Before testing the authentication using the MockMvc, let us ensure that the autowiring of different components is working as expected.
The following test gives an unauthenticated Authentication instance to AuthenticationManager. The authentication manager uses the configured CustomIdentityAuthenticationProvider class to authenticate the credentials.
@Test
public void expectOKResponse_WhenAuthenticaionManagerIsTestedWithCorrectDetails() {
  AuthenticationManager authenticationManager = this.spring.getContext()
      .getBean(AuthenticationManager.class);

  Authentication authentication = authenticationManager
      .authenticate(UsernamePasswordAuthenticationToken.unauthenticated("user", "password"));

  assertThat(authentication.isAuthenticated()).isTrue();
}
To check if we get the BadCredentialsException in case of incorrect credentials, we can use the expected exception test.
@Test
public void expectBadCredentialsException_WhenTestedWithInCorrectDetails() {
  AuthenticationManager authenticationManager = this.spring.getContext()
      .getBean(AuthenticationManager.class);

  Exception exception =
      assertThrows(BadCredentialsException.class, () -> {
        Authentication authentication = authenticationManager
            .authenticate(UsernamePasswordAuthenticationToken.unauthenticated("user", "bad-password"));
      });
}
We can write more such tests based on requirements.
5. Conclusion
In this tutorial, we learned to create and plugin a custom AuthenticationProvider implementation into the spring security authentication flow. We learned to implement the contract of AuthenticationProvider interface as well as implement the custom logic to authenticate the user with 3rd part identity providers.
Finally, we learned to test the custom authentication provider for success and fail scenarios.
Happy Learning !!