So far in previous tutorials, we have learned about securing your application behind login form, custom user detail service and even method level security also. All these security implementations were on controller or model layer of MVC. Its time to add security in view layer. It is mostly needed when we want to hide certain links or buttons based on user’s role so that he will not be able to access that functionality.
Taglib declaration
To secure view later of applications, spring Security has its own taglib which provides basic support for accessing security information and applying security constraints in JSPs. To use security features in jsp file, following tag library declaration needs to added:
<%@ taglib uri="http://www.springframework.org/security/tags" prefix="security" %>
You can choose the prefix of your own choice and you will need to use this prefix in jsp files.
Security tags
Spring provide basically 3 tags for securing view layer information i.e.
- authorize tag
- authenticate tag
- accesscontrollist tag
Lets see them one by one.
1) authorize tag:
This tag is used to determine whether its contents should be evaluated or not. This tag has two flavors i.e. securing information based on user’s role or securing information based on user’s permission to access a particular URL.
Sample usage will look like this:
<security:authorize ifAnyGranted="ROLE_ADMIN">
    <tr>
        <td colspan="2">
            <input type="submit" value="<spring:message code="label.add"/>"/>
        </td>
    </tr>
</security:authorize>

OR

<security:authorize url="/admin">
    <tr>
        <td colspan="2">
            <input type="submit" value="<spring:message code="label.add"/>"/>
        </td>
    </tr>
</security:authorize>
2) authenticate tag
This tag allows access to the current Authentication object stored in the security context. It renders a property of the object directly in the JSP. So, for example, if the principal property of the Authentication is an instance of Spring Security’s UserDetails object, then using <sec:authentication property=”principal.username”></sec:authentication> will render the name of the current user.
This tag is not for security purpose directly, but it can be used for accessing information which can be used for view layer security.
<security:authentication property="principal.username" />
3) accesscontrollist tag
This tag is only valid when used with Spring Security’s ACL module. It checks a comma-separated list of required permissions for a specified domain object. If the current user has any of those permissions, then the tag body will be evaluated. If they don’t, it will be skipped.
<sec:accesscontrollist hasPermission="1,2" domainObject="someObject">
	This will be shown if the user has either of the permissions
	represented by the values "1" or "2" on the given object.
</sec:accesscontrollist>
Source# http://static.springsource.org/spring-security/site/docs/3.0.x/reference/taglibs.html
Example use in application
We have developed an employee management application in login form based spring security tutorial. In this application, a an authenticated user can add/delete/list the employees. Now, let modify the application so that any user which does not has ‘ROLE_ADMIN’ permission, he should not able to see Add button.
Below is the code change which I did in application:
< %@ taglib uri="http://www.springframework.org/tags" prefix="spring" %>
< %@ taglib uri="http://www.springframework.org/tags/form" prefix="form" %>
< %@ taglib uri="http://java.sun.com/jsp/jstl/core" prefix="c" %>
< %@ taglib uri="http://www.springframework.org/security/tags" prefix="security" %>
<html>
<head>
    <title>Spring 3 hibernate integration example on www.howtodoinjava.com</title>
</head>
<body>

<h2>Employee Management Screen : <security:authentication property="principal.username"></security:authentication></h2>
 <h6><a href="<c:url value='j_spring_security_logout'></a>">Click here to logout</h6>
<form:form method="post" action="add" commandName="employee">

    <table>
    <tr>
        <td><form:label path="firstname"><spring:message code="label.firstname"></spring:message></form:label></td>
        <td><form:input path="firstname"></form:input></td>
    </tr>
    <tr>
        <td><form:label path="lastname"><spring:message code="label.lastname"></spring:message></form:label></td>
        <td><form:input path="lastname"></form:input></td>
    </tr>
    <tr>
        <td><form:label path="email"><spring:message code="label.email"></spring:message></form:label></td>
        <td><form:input path="email"></form:input></td>
    </tr>
    <tr>
        <td><form:label path="telephone"><spring:message code="label.telephone"></spring:message></form:label></td>
        <td><form:input path="telephone"></form:input></td>
    </tr>
    <security:authorize ifAnyGranted="ROLE_ADMIN">
    <tr>
        <td colspan="2">
            <input type="submit" value="<spring:message code="label.add"/>"/>
        </td>
    </tr>
    </security:authorize>
</table>
</form:form>

<h3>Employees</h3>
<c:if test="${!empty employeeList}">
<table class="data">
<tr>
    <th>Name</th>
    <th>Email</th>
    <th>Telephone</th>
    <th></th>
</tr>
<c:foreach items="${employeeList}" var="emp">
    <tr>
        <td>${emp.lastname}, ${emp.firstname} </td>
        <td>${emp.email}</td>
        <td>${emp.telephone}</td>
        <td>delete</td>
    </tr>
</c:foreach>
</table>
</c:if>

</body>
</html>
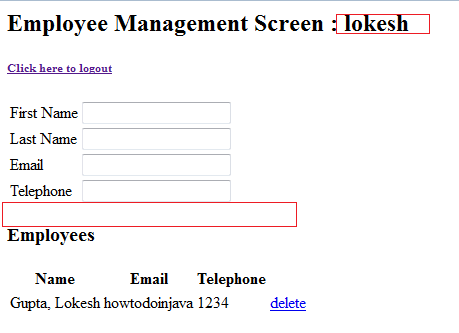
And below is the result of above changes in browser screen.
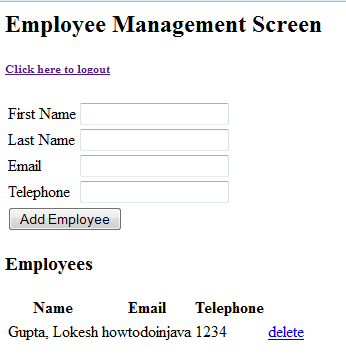
After applying security tags, add button goes invisible and logged in user’s name ‘lokesh’ appears in screen.
Let me know if something is still unclear.
Happy Learning !!
Hi Sir,
I am using authorize tag but its not working
Here its addNew.gif is displaying in UI for both ROLE_USER and ROLE_ADMIN
Can you please suggest me whats wrong here
Hi Sir
Sorry, i have added both roles while doing authentication, thats the reason the button is coming, now i commented for USER, the button is not coming
List authorities = new ArrayList();
authorities.add(new SimpleGrantedAuthority(“ROLE_ADMIN”));
//authorities.add(new SimpleGrantedAuthority(“ROLE_USER”));
Thanks for your tutorial, its so easy to learn new things..thanks a lot !!!
Glad, you got it.