In this Spring Security tutorial, we will explore the implementation of role-based authorization in the Spring boot web application. We will also delve into the core concepts of configuring role-based authorization through the code examples specifically tested with Spring Boot 3 and Spring 6. By the end of this tutorial, we will have a solid understanding of how to ensure that access privileges are granted based on defined roles.
1. Authorization Flow
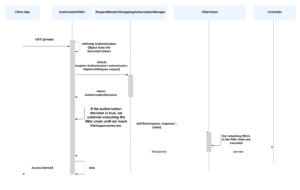
Let’s visualize the authorization workflow to understand how role-based authorization works in Spring Security.
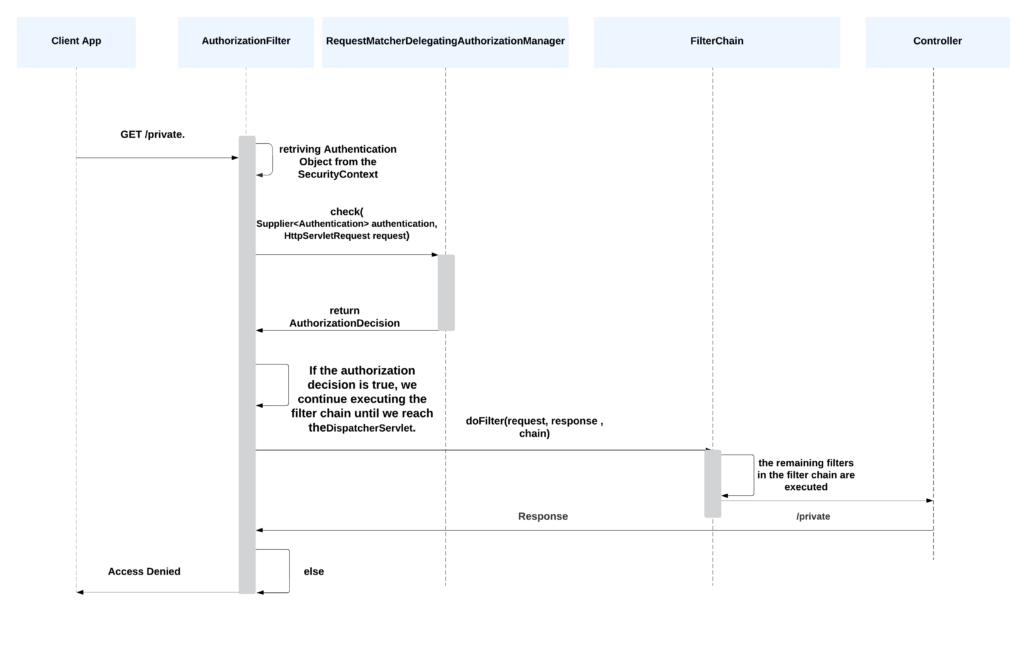
The authorization begins with the user attempting to access a protected resource. After authentication, Spring Security checks the user’s roles to determine if access is allowed using AuthorizationManager. If the user possesses the necessary role, access is granted; otherwise, an AuthorizationDeniedEvent is published, and an AccessDeniedException is thrown. In this case, the ExceptionTranslationFilter handles the AccessDeniedException.
Spring Security includes one concrete GrantedAuthority implementation which is SimpleGrantedAuthority. It converts any user-specified String into a GrantedAuthority instance. All instances of AuthenticationProvider support the SimpleGrantedAuthority instances. For more information, please refer to the official documentation.
The GrantedAuthority interface, commonly used in Spring Security, includes a single method called getAuthority(). This method returns a String representation of the authority associated with the user, which is utilized by the AuthorizationManager to make authorization decisions.
public interface GrantedAuthority extends Serializable {

  String getAuthority();
}
2. Understanding Roles and Authorities in Spring Security
In Spring Security, roles and authorities represent the permissions or privileges that can be granted to a user. Although both seem the same, however, there is a subtle difference between the two:
Roles represent high-level, coarse-grained permissions that are typically associated with a group of users. For example, we can define roles such as “USER“, “ADMIN“, “MANAGER” etc. An application user can be assigned one or more roles that decide what actions or resources they can access.
@Secured("ROLE_ADMIN")
public void deleteUserData() {

    // Code to delete user data
}
Authorities, also known as privileges or permissions, represent fine-grained access rights within an application. Authorities are granted to individual users or specific user groups, opposite to roles that are assigned to a group of users. They allow access to specific functionalities or resources in the application. For example, different authorities can be defined to allow users to “CREATE“, “UPDATE” AND “DELETE” a particular resource.
@PreAuthorize("hasAuthority('DELETE')")
public void deleteUserAccount() {

    // Code to delete user account
}
In practice, roles are often composed of multiple authorities to provide a flexible and granular access control mechanism.
We can assign roles and authorities to a user as follows:
@Bean
public UserDetailsService users() {

	UserBuilder users = User.withDefaultPasswordEncoder();

	UserDetails user = users
		.username("user")
		.password("password")
		.roles("USER")
		.authorities("READ")
		.build();

	UserDetails admin = users
		.username("admin")
		.password("password")
		.roles("ADMIN")
		.authorities("READ", "CREATE", "DELETE")
		.build();

	return new InMemoryUserDetailsManager(user, admin);
}
3. Configuring Roles
3.1. Default Role Prefix
By default, role-based authorization rules include ROLE_ as a prefix. If the application requires a security context to have the role of “USER“, Spring Security will by default look for a GrantedAuthority#getAuthority that returns “ROLE_USER“.
To customize the default prefix, we can define a bean of type GrantedAuthorityDefaults as follows. Note that the bean method is static so it is executed before other Spring security configuration classes.
@Bean
static GrantedAuthorityDefaults grantedAuthorityDefaults() {

	return new GrantedAuthorityDefaults("MYPREFIX_");
}
3.2. Hierarchical Roles
In practice, roles have a hierarchy. It means that an ADMIN role will automatically have all the capabilities of a USER role and a GUEST role. Maintaining such a relationship while assigning the authorities can be challenging so we can define the role hierarchy using the bean type RoleHierarchy.
In the following example, a user authorized as “ADMIN” will have all the privileges assigned to “USER” and “GUEST” as well. Similarly, a user authorized as “USER” will have all the privileges assigned to “GUEST“. No explicit declaration is needed.
@Bean
static RoleHierarchy roleHierarchy() {
    var hierarchy = new RoleHierarchyImpl();
    hierarchy.setHierarchy("ROLE_ADMIN > ROLE_USER\n" +
            "ROLE_USER > ROLE_GUEST");
}

@Bean
static MethodSecurityExpressionHandler methodSecurityExpressionHandler(RoleHierarchy roleHierarchy) {

	DefaultMethodSecurityExpressionHandler expressionHandler = new DefaultMethodSecurityExpressionHandler();
	expressionHandler.setRoleHierarchy(roleHierarchy);
	return expressionHandler;
}
4. Default Behavior
In a Spring boot application, we only need to include the spring-boot-starter-security dependency.
<dependency>
  <groupId>org.springframework.boot</groupId>
  <artifactId>spring-boot-starter-security</artifactId>
</dependency>
By default, Spring Security creates a user with the name “user” with an auto-generated password. We can customize this by adding properties:
spring.security.user.name=admin
spring.security.user.password=secret
spring.security.user.roles=ADMIN
Spring security enables URL-based authorization, by default. We can secure the URLs by additional configuration:
@Bean
public SecurityFilterChain securityFilterChain(HttpSecurity httpSecurity) throws Exception {

  httpSecurity.authorizeHttpRequests()
	  .requestMatchers("/public/**").permitAll()
	  .requestMatchers("/admin/**").hasRole("ADMIN")
	  .anyRequest().authenticated()
	  .and()
	  .formLogin();

  return  httpSecurity.build();
}
Note that, by default, Spring Boot Security DOES NOT activate method-level authorization. To activate, we need to use the @EnableMethodSecurity Annotation. It allows us to use method-level authorization using the annotations like @Secured, @PreAuthorize, and @PostAuthorize for fine-grained authorization control.
@Configuration
@EnableMethodSecurity(securedEnabled = true, prePostEnabled = true)
public class SecurityConfig {

    //other configs
}
5. Authorization-related Annotations
Spring Security provides several annotations that facilitate authorization control in web applications. These annotations allow us to define fine-grained access rules for specific methods or endpoints.
5.1. @Secured
The @Secured allows us to specify the roles or permissions required to access a method. We can use it at the method level or class level to protect all methods within a class.
In the following example above, the createItem() can only be accessed by users with the “ADMIN” role.
@Secured("ROLE_ADMIN")
public void createItem() {

    // Method implementation
}
5.2. @PreAuthorize and @PostAuthorize
The @PreAuthorize and @PostAuthorize annotations provide more expressive access-control expressions using SePL (Security Expression Language). The @PreAuthorize is used to specify authorization rules before invoking a method, while @PostAuthorize verifies the authorization after the method execution.
In the example above, the getItem() can only be invoked by users with the “USER” role. Additionally, the authorization is further checked after method execution to ensure that the returned item belongs to the authenticated user.
@PreAuthorize("hasRole('ROLE_USER')")
@PostAuthorize("returnObject.owner == authentication.principal.username")
public Item getItem(String itemId) {

    // Mehod implementation
}
6. Enabling JSR-250 Annotations
To use JSR-250 annotations ( such as @RolesAllowed, @PermitAll, and @DenyAll) for authorization control, we need to enable it through @EnableMethodSecurity annotation by setting ‘jsr250Enabled = true’.
@EnableWebSecurity
@EnableGlobalMethodSecurity(prePostEnabled = true, securedEnabled = true, jsr250Enabled = true)
@Configuration
public class SecurityConfig {

    // security beans
}
Do not forget to add the jakarta.annotation-api dependency, if not added already.
<dependency>
    <groupId>jakarta.annotation</groupId>
    <artifactId>jakarta.annotation-api</artifactId>
    <version>2.1.1</version>
</dependency>
Once you’ve enabled JSR-250 support, we can use the JSR-250 annotations to specify the roles required for method access.
@RolesAllowed({"ROLE_USER", "ROLE_ADMIN"})
public void updateItem() {

    //...
}
7. Implementing Custom Authorization
To implement role-based custom authorization, we need to configure the necessary security components and define the roles and their associated permissions. The sections related to security and authorization outlined below will guide us through the process in 4 steps:
- Data Model: We create two entity classes, namely
UserandRole, to represent users and roles in our application. TheUserentity class contains fields such as username, password, and a set of roles assigned to the user. TheRoleentity class represents the different roles that can be assigned to users. - Custom UserDetails Implementation: The custom implementation of the
UserDetailsinterface encapsulates user-specific information required for authentication and authorization, such as the user’s username, password, and authorities (roles). This class enables us to retrieve the user’s roles and map them to Spring Security’sGrantedAuthorityinterface. - Custom UserDetailsService Implementation: It retrieves the UserDetails, including roles, based on the provided username. This implementation allows Spring Security to authenticate and authorize users using our custom user details.
- Configuration: Within the configuration, we define authorization rules for different HTTP requests, specifying which roles are required to access certain endpoints or resources.
7.1. Data Model
Let’s create a User entity class that represents a user in our application.
@Entity
@Table(name = "users")
public class User implements Serializable {

    @Id
    @GeneratedValue(strategy = GenerationType.IDENTITY)
    private Long id;

    @Column(nullable = false, unique = true)
    private String username;

    @Column(nullable = false)
    private String password;

    @ManyToMany
    private Set<Role> roles ;

    private boolean enabled;

    // Constructors, getters, and setters
}
Also, create a Role entity class that represents a role in our application.
@Entity
@Table(name = "roles")
public class Role implements Serializable {

    @Id
    @GeneratedValue(strategy = GenerationType.IDENTITY)
    private Long id;

    @Column(nullable = false, unique = true)
    private String name;

    // Constructors, getters, and setters
}
7.2. Custom UserDetails Implementation
The UserDetailsImpl class is an implementation of the UserDetails interface provided by Spring Security. It is used to represent the details of a user during the authentication and authorization process.
public class UserDetailsImpl implements UserDetails {

    private User user ;

    @Override
    public Collection<? extends GrantedAuthority> getAuthorities() {

        Set<Role> roles = user.getRoles();
        List<SimpleGrantedAuthority> authorities = new ArrayList<>();

        for (Role role : roles) {
            authorities.add(new SimpleGrantedAuthority(role.getName()));
        }
        return authorities;
    }

    @Override
    public String getPassword() {
        return user.getPassword();
    }

    @Override
    public String getUsername() {
        return user.getUsername();
    }

    @Override
    public boolean isAccountNonExpired() {
        return false;
    }

    @Override
    public boolean isAccountNonLocked() {
        return false;
    }

    @Override
    public boolean isCredentialsNonExpired() {
        return false;
    }

    @Override
    public boolean isEnabled() {
        return true;
    }
}
The getAuthorities() method is responsible for returning a set of roles (authorities) that Spring Security will use during the authorization process.
7.3. Custom UserDetailsService Implementation
Implement the UserDetailsService interface provided by Spring Security.
@Service
public class UserDetailsServiceImpl implements UserDetailsService {

    private final UserRepository userRepository;

    public UserDetailsServiceImpl(UserRepository userRepository) {
        this.userRepository = userRepository;
    }

    @Override
    public UserDetails loadUserByUsername(String username) throws UsernameNotFoundException {

        User user = userRepository.findByUsername(username);
        if (user == null) {
            throw new UsernameNotFoundException("User not found");
        }
        return new UserDetailsImpl(user);
    }
}
7.4. Authorizing URL Access
We will create a SecurityConfig class annotated with @Configuration and @EnableWebSecurity to enable and customize the security features.
@Configuration
@EnableWebSecurity
public class SecurityConfig {

    @Bean
    public PasswordEncoder passwordEncoder() {
        return new BCryptPasswordEncoder();
    }

    // Other security configuration beans or methods

    @Bean
    SecurityFilterChain securityFilterChain(HttpSecurity httpSecurity) throws Exception {

        httpSecurity.formLogin(Customizer.withDefaults());
        httpSecurity.csrf().disable();
        httpSecurity.headers().frameOptions().disable();
        httpSecurity
                .authorizeHttpRequests()
                    .requestMatchers("/test").hasAuthority("ADMIN")
                    .requestMatchers("/h2-console/**").permitAll()
                    .anyRequest().authenticated();
        return httpSecurity.build();
    }
}
We customize the security settings by defining the securityFilterChain bean, which configures the security filters for HTTP requests. The customization includes:
- Enabling form-based login with
httpSecurity.formLogin(Customizer.withDefaults()). - Disabling Cross-Site Request Forgery (CSRF) protection with
httpSecurity.csrf().disable(). - Disabling frame options to ensure compatibility with the H2 database console using
httpSecurity.headers().frameOptions().disable(). - Specifying authorization rules for different HTTP requests with
httpSecurity.authorizeHttpRequests().- The
/testrequest can only be accessed by users with the “ADMIN” authority. - The
/h2-console/**request is permitted for all users. - All other requests require authentication, meaning the user must be logged in to access them.
- The
7.5. Authorizing Method Access
In addition to securing the application at the URL level, Spring Security also provides the flexibility to apply security measures at the method level using annotations such as @PreAuthorize and @Secured. This allows us to control access to specific methods based on user roles or authorities. Do not forget to add the @EnableMethodSecurity annotation.
In the following controller, to ensure that only users with the ‘ADMIN‘ authority can access this method, we use the @PreAuthorize annotation with the expression hasAuthority('ADMIN'). This means that Spring Security will check if the user has the required authority before executing the method. If not, an access denied exception will be thrown.
@EnableMethodSecurity
@RestController
public class TestController {

    @PreAuthorize("hasAuthority('ADMIN')")
    @GetMapping("/test")
    public Authentication getAuthenticatedUser(){

       return SecurityContextHolder.getContext().getAuthentication();
    }
}
8. Unit Testing with @WithMockUser
The @WithMockUser annotation is a utility annotation provided by the Spring Security Test framework. It allows us to simulate an authenticated user during testing scenarios by creating a mock user with specified credentials and roles.
When using @WithMockUser, we can provide various attributes to customize the mock user, such as the username, password, roles, and authorities.
@WithMockUser(username = "john", roles = {"USER", "ADMIN"})
public void testAdminAccess() {

    // Test logic that requires admin access
    // ...
}
Let’s demonstrate how to write comprehensive tests that cover different user roles and verify their access to various endpoints.
import org.springframework.security.core.Authentication;
import org.springframework.security.core.context.SecurityContextHolder;
import org.springframework.security.test.context.support.WithMockUser;
import org.springframework.test.web.servlet.MockMvc;
import org.springframework.test.web.servlet.request.MockMvcRequestBuilders;
import org.springframework.test.web.servlet.result.MockMvcResultMatchers;

@WebMvcTest(TestController.class)
public class TestControllerTest {

  @Autowired
  private MockMvc mockMvc;

  @Test
  @WithMockUser(authorities = "ADMIN")
  void getAuthenticatedUser_AdminRole_Success() throws Exception {

    Authentication authentication = new TestingAuthenticationToken("user", "password", "ADMIN");
    SecurityContextHolder.getContext().setAuthentication(authentication);

    String auth = "{\"authorities\":[{\"authority\":\"ADMIN\"}],\"details\":null,\"authenticated\":true," +
    								"\"credentials\":\"password\",\"principal\":\"user\",\"name\":\"user\"}";

    mockMvc.perform(MockMvcRequestBuilders.get("/test"))
      .andExpect(MockMvcResultMatchers.status().isOk())
      .andExpect(MockMvcResultMatchers.content().string(auth));
  }

  @Test
  @WithMockUser(authorities = "USER")
  void getAuthenticatedUser_UserRole_AccessDenied() throws Exception {

    Authentication authentication = new TestingAuthenticationToken("user", "password", "USER");
    SecurityContextHolder.getContext().setAuthentication(authentication);

    mockMvc.perform(MockMvcRequestBuilders.get("/test"))
      .andExpect(MockMvcResultMatchers.status().isForbidden());
  }

  @Test
  void getAuthenticatedUser_UnauthenticatedUser_AccessDenied() throws Exception {

    mockMvc.perform(MockMvcRequestBuilders.get("/test"))
      .andExpect(MockMvcResultMatchers.status().isUnauthorized());
  }
}
9. Conclusion
The role-based authorization is a crucial aspect of an application’s security. Developers can create secure applications with granular access control by defining roles and authorities, configuring security settings, and implementing user role management.
Happy Learning !!
Best explanation I ever seen! Thank you very much!
You’re saying:
Authorities, also known as privileges or permissions, represent fine-grained access rights within an application.
But at the end you’re using
@PreAuthorize(“hasAuthority(‘ADMIN’)”)
little bit confusing.
Please elaborate your question? What is confusing?
Wonderful Article. It has everything on Spring Security’s Roles and Authorities.
—