In this tutorial, learn how to secure web applications using the Spring Security framework. We will learn the core concepts with code examples (tested with Spring Boot 3 and Spring 6) of how to configure a particular security aspect.
1. What is Authentication, Authorization and Access Control?

Authentication is the process of verifying a principal’s identity against what it claims to be. A principal can be anyone who is trying to access the application, such as a User, another program or API etc. When accessing a secured application, the principal must provide evidence of its identity which, generally, is a username and password combination. If the principal is another program, identity is confirmed by matching the provided API key and secret.
Authorization refers to the process of granting authority (typically the roles) to an authenticated principal and allowing access to particular secured resources. Authorization is always performed after the authentication process.
Access control means controlling access to the resources by making a decision, on whether the user is allowed to access a resource, after comparing the resource’s access attributes with the user’s granted authorities.
2. How does Spring Security Work?
2.1. How does Container Process a Request?
Spring security is based on Servlet Filters. The core task of a Filter is to pre-process and post-process certain actions when a request is sent to a Servlet for actual request processing.
The filters are defined in the deployment descriptor (web.xml). When a request is sent, the container creates a FilterChain that contains all the Filter instances and Servlet that should process the HttpServletRequest, based on the path of the request URI. In Spring, the request handler servlet is always DispatcherServlet.
2.2. Enter DelegatingFilterProxy
During application startup, Spring registers a Filter named DelegatingFilterProxy. This is the main integration point between a Servlet container and Spring’s ApplicationContext.
<filter>
   <filter-name>springSecurityFilterChain</filter-name>
   <filter-class>org.springframework.web.filter.DelegatingFilterProxy</filter-class>
</filter>
<filter-mapping>
   <filter-name>springSecurityFilterChain</filter-name>
   <url-pattern>/*</url-pattern>
</filter-mapping>
In a Spring Boot application, SecurityFilterAutoConfiguration automatically registers the DelegatingFilterProxy filter with the name springSecurityFilterChain.
Once the request reaches to DelegatingFilterProxy, Spring delegates the processing to FilterChainProxy bean that utilizes the SecurityFilterChain to execute the list of all filters to be invoked for the current request.

Once the request reaches registered filters inside the SecurityFilterChain, the corresponding filters delegate the request to other beans for performing corresponding tasks. For example, AuthenticationProcessingFilter prepares the Authentication instance and delegates it to AuthenticationManager for authentication flow.
3. Getting Started
Let us learn how to setup Spring security in a web application.
3.1. In Spring Boot Application
In a Spring boot application, we only need to include the spring-boot-starter-security dependency and Spring boot auto-configured the security with sensible defaults defined in WebSecurityConfiguration class. Later on, we can customize the various security features by defining feature-specific beans and configurations.
<dependency>
  <groupId>org.springframework.boot</groupId>
  <artifactId>spring-boot-starter-security</artifactId>
</dependency>
By default, Spring Security autoconfiguration configures the following:
- Creates a bean named
springSecurityFilterChain. Registers theFilterwith a bean namedspringSecurityFilterChainwith the Servlet container for every request. - HTTP basic authentication for authenticating requests made with remoting protocols and web services.
- Generate a default login form.
- Creates a user with a username of
userand a password that is logged to the console. - Protects the password storage with BCrypt.
- Enables logout feature.
- Servlet API integration to access security information via standard Servlet APIs, such as HttpServletRequest.isUserInRole() and HttpServletRequest.getUserPrincipal().
- Other features such as protection from CSRF attacks, session fixation and clickjacking.
3.2. Without Spring Boot
Using Spring Security’s BOM is the preferred way to include Spring Security in a non-boot application.
<dependencies>
	...
	<dependency>
		<groupId>org.springframework.security</groupId>
		<artifactId>spring-security-web</artifactId>
	</dependency>
	<dependency>
		<groupId>org.springframework.security</groupId>
		<artifactId>spring-security-config</artifactId>
	</dependency>
</dependencies>

<dependencyManagement>
	<dependencies>
		...
		<dependency>
			<groupId>org.springframework.security</groupId>
			<artifactId>spring-security-bom</artifactId>
			<version>{spring-security-version}</version>
			<type>pom</type>
			<scope>import</scope>
		</dependency>
	</dependencies>
</dependencyManagement>
Several security modules provide their own dependency that we need to include to use those modules.
To register the springSecurityFilterChain with the war file, we can use Spring’s WebApplicationInitializer support. Spring Security provides a base class AbstractSecurityWebApplicationInitializer that will ensure the springSecurityFilterChain gets registered for every URL in the application.
public class SecurityWebApplicationInitializer extends AbstractSecurityWebApplicationInitializer {
  //...
}
3.3. Custom Configurations
The next step is to provide custom configurations which can be done by using @EnableWebSecurity annotation of a @Configuration class.
@Configuration
@EnableWebSecurity
public class WebSecurityConfig {

	@Bean
	public UserDetailsService userDetailsService() {

		InMemoryUserDetailsManager manager = new InMemoryUserDetailsManager();
		manager.createUser(User.withDefaultPasswordEncoder()
				.username("user")
				.password("password")
				.roles("USER").build());
		return manager;
	}
}
Spring boot will automatically scan the WebSecurityConfig and register its beans due to @Configuration annotation.
In non-boot applications, we need to register it explicitly as follows:
public class SecurityWebApplicationInitializer extends AbstractSecurityWebApplicationInitializer {

	@Override
	protected Class<?>[] getRootConfigClasses() {
		return new Class[] { WebSecurityConfig.class };
	}

	// ... other overrides ...
}
Further, how we override the configurations in WebSecurityConfig is similar for both i.e. Spring boot and non-boot applications.
4. Configuring Authentication
Spring Security provides comprehensive support for different kinds of authentication mechanisms such as Username/password, OAuth2, SAML 2, JAAS, SiteMinder etc.
The following diagrams demonstrate how the authentication flow happens at a high level:
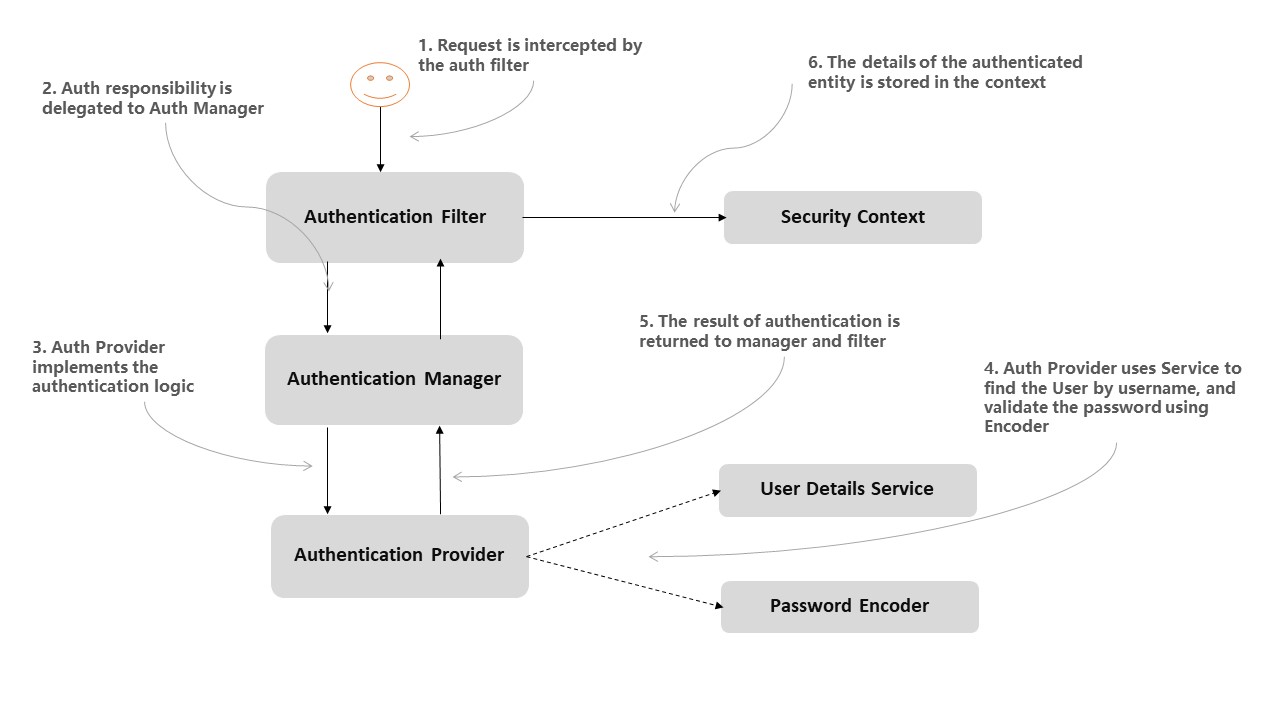
Let us learn a few common configurations used for authentication.
4.1. In-Memory UserDetails
The InMemoryUserDetailsManager registers the users in memory without the need of persistence storage. This is super useful for unit testing purposes.
@Bean
public UserDetailsService userDetailsService() {

  var userDetailsService = new InMemoryUserDetailsManager();

  var user = User.withUsername("user")
          .password("password")
          .authorities("USER_ROLE")
          .build();

  userDetailsService.createUser(user);
  return userDetailsService;
}
4.2. Database-backed UserDetails
To store and retrieve the username and passwords from a SQL database, we use JdbcUserDetailsManager. It connects to the database directly through JDBC.
Note that the JdbcUserDetailsManager needs a DataSource to connect to the database so we need to define it as well. The datasource can be configured to connect to any kind of database.
@Bean
public DataSource dataSource() {

  return new EmbeddedDatabaseBuilder()
    .setType(EmbeddedDatabaseType.H2)
    .addScript(JdbcDaoImpl.DEFAULT_USER_SCHEMA_DDL_LOCATION)
    .build();
}

@Bean
public UserDetailsService jdbcUserDetailsService(DataSource dataSource) {

  return new JdbcUserDetailsManager(dataSource);
}
By default, Spring Security queries user details, including authorities, with the following SQL statements:
SELECT username, password, enabled FROM users WHERE username = ?
SELECT username, authority FROM authorities	WHERE  username = ?
Spring Boot automatically creates a schema for us. Otherwise, we must create the respective tables in the database.
CREATE TABLE USERS
(
    USERNAME VARCHAR(50) NOT NULL,
    PASSWORD VARCHAR(60) NOT NULL,
    ENABLED  SMALLINT    NOT NULL DEFAULT 0,
    PRIMARY KEY (USERNAME)
);
CREATE TABLE AUTHORITIES
(
    USERNAME  VARCHAR(50) NOT NULL,
    AUTHORITY VARCHAR(50) NOT NULL,
    FOREIGN KEY (USERNAME) REFERENCES USERS
);
4.3. Form Login
The following configuration uses the .formLogin() method for configuring a username/password-based login form. By default, Spring Security provides a default login page. We can customize the login page and other aspects using the following methods:
@Bean
public SecurityFilterChain securityFilterChain (HttpSecurity http) throws Exception {
  http
    // ...
    .and()
      .formLogin()
      .loginPage("/login.html")
      .loginProcessingUrl("/perform_login")
      .defaultSuccessUrl("/homepage.html", true)
      .failureUrl("/login.html?error=true")
      .failureHandler(authenticationFailureHandler())
    .and()
      .logout()
      .logoutUrl("/perform_logout")
      .deleteCookies("JSESSIONID")
      .logoutSuccessHandler(logoutSuccessHandler());

    return http.build();
}
4.4. OAuth2
The OAuth2 login needs a lot of configurations. You can read about them in detail in the OAuth2 Social Login tutorial. A spanshot of configuration is:
@Bean
public ClientRegistrationRepository clientRepository() {

  ClientRegistration githubRegistration =
      CommonOAuth2Provider.GITHUB.getBuilder("github")
      .clientId("id")
      .clientSecret("secret")
      .build();

  ClientRegistration facebookRegistration =
      CommonOAuth2Provider.FACEBOOK.getBuilder("facebook")
      .clientId("id")
      .clientSecret("secret")
      .build();

  return new InMemoryClientRegistrationRepository(githubRegistration,
      facebookRegistration);
}

@Bean
public SecurityFilterChain filterChain(HttpSecurity http) throws Exception {

	http.authorizeHttpRequests()
	    .requestMatchers("/login").permitAll()
	    .anyRequest().authenticated()
	  .and()
	    .oauth2Login()
	    .loginPage("/login");

	return http.build();
}
5. Configuring Authorization
In the authentication process, an application will grant a few authorities (roles) to a successfully authenticated user. These authorities decide whether a user is eligible to access a particular resource or not.
5.1. Authorization Manager
In Spring Security, authorization decisions are made by authorization managers, which have to implement the AuthorizationManager interface. Spring provides several default implementations, and we can create our own custom authorization manager as well. For example, when use ‘.requestMatchers("/api-url").hasAuthority("USER")‘, the hasAuthority() function uses the AuthorityAuthorizationManager instance.
http.authorizeHttpRequests()
	    .requestMatchers("/api-url").hasAuthority("USER")
	    .anyRequest().authenticated()
Another helper class AuthorizationManagers can be used to combine multiple authorization managers in situations where either one or all of the managers must allow access to the resource (access decision voters).
	...
	.requestMatchers(HttpMethod.DELETE, "/api-url/*")
		.access(AuthorizationManagers.allOf(
			AuthorityAuthorizationManager.hasAuthority("ADMIN"),
			new AllowedIPRangeAuthorizationManager<>()))
	...
5.2. @Secured
Spring Security allows to secure method invocations, in a declarative, way using the following annotations:
- @Secured
- @PreAuthorize /@PostAuthorize
- @PreFilter /@PostFilter
@Service
class EmployeeService {

  @Secured("USER")
  public List<Todo> getMe() {
    //...
  }

  @Secured({ "USER", "ADMIN" })
  public Employee updateMe(Employee employee) {
    //...
  }

  @Secured("ADMIN")
  public void remove(long id) {
    //...
  }
}
We must use the @EnableMethodSecurity to enable these annotations.
@EnableWebSecurity
@EnableMethodSecurity(securedEnabled = true, prePostEnabled = false)
public class WebSecurityConfig {
	//...
}
6. Advanced Security
Apart from regular security features, Spring supports protection from common threats seen on the web. Lets discuss a few of them.
6.1. CSRF Protection
CSRF (Cross-Site Request Forgery) is enabled by default in Spring Security. When CSRF is enabled, then after login, trying to perform a secured action will fail in the absence of a CSRF token.
Generally, we insert a hidden input element in the generated HTML views that store and submit the token to the server. In case of Spring MVC, CsrfRequestDataValueProcessor automatically adds the token to the form.
<input type="hidden" name="${_csrf.parameterName}" value="${_csrf.token}"/>Use csrf().disable() to remove it but it is highly discouraged.
6.2. Redirect to HTTPS
If a client makes a request using HTTP rather than HTTPS, we can redirect the request to HTTPS by configuring requiresSecure() as follows;
@Bean
public SecurityFilterChain filterChain(HttpSecurity http) throws Exception {
	http
		// ...
		.requiresChannel(channel -> channel
			.anyRequest().requiresSecure()
		);
	return http.build();
}
7. Unit Testing the Spring Security
We must have the following dependency in the application classpath to use the Spring security test-related features.
<dependency>
    <groupId>org.springframework.security</groupId>
    <artifactId>spring-security-test</artifactId>
    <version>${spring.version}</version>
    <scope>test</scope>
</dependency>
7.1. Disable Security
Until we are not testing the application security, it makes sense to disable the security to keep the tests clean according to Single Responsibility Principle. We can disable the security in a test class as follows:
@WebMvcTest(controllers = UserController.class, excludeAutoConfiguration = {WebSecurityConfig.class})
public class UserControllerTest {

 // tests
}
Alternatively, if we are using MockMVC then we can @AutoConfigureMockMvc to disable the security.
@WebMvcTest
@AutoConfigureMockMvc(addFilters = false)
public class UserControllerTest {

    //...
}
Alternatively, if we want to disable Spring Security for a Profile, we can create a new Security configuration class and use @Profile annotation on it with the desired profile. Then allow access to everything in this configuration class.
@Profile("psdev")
@Configuration
@EnableWebSecurity
@Order(value = Ordered.HIGHEST_PRECEDENCE)
public class DisableWebSecurityConfig {

	@Bean
	public SecurityFilterChain filterChain(HttpSecurity http) throws Exception {

		http
			.authorizeHttpRequests()
			.requestMatchers("/").permitAll();

		return http.build();
	}
}
7.2. Test Users
Suppose we want to test the following service method.
@Service
public class EmployeeService {

	@Secured("USER")
	public Employee getMe() {
		//..
	}
}
The above method is a secured method so if we try to access it without any credentials then we will get AuthenticationCredentialsNotFoundException.
@ExtendWith(SpringExtension.class)
@ContextConfiguration
public class TestEmployeeService {

	@Test(expected = AuthenticationCredentialsNotFoundException.class)
	public void testGetMe() {
		service.getMe();
	}
}
@WithMockUser
To help run the above test with a mock user (username “user”, password “password”, and role “ROLE_USER”), we can use the
@WithMockUser annotation on the test.
@Test
@WithMockUser
public void testGetMe() {
	service.getMe();
}
We can supply the custom username and roles as well if we want to test for another username and/or roles.
@Test
@WithMockUser(username="admin", roles={ "USER", "ADMIN" })
public void testGetMe() {
	service.getMe();
}
@WithUserDetails
If we want to test with a real user present in the database, we can use @WithUserDetails annotation and supply the username to it. When executing the test, Spring will fetch the user details and authorities from the database.
@Test
@WithUserDetails("admin@app.com")
public void testGetMe() {

	service.getMe();
}
7.3. Test MVC
The MockMVC helps in testing the controllers by explicitly starting a Servlet container during integration testing.
In the following test class declaration, The @WebMvcTest annotation disables full auto-configuration and instead applies only configuration relevant to MVC tests. It also auto-configures the MockMvc instance as well.
@RunWith(SpringRunner.class)
@WebMvcTest(EmployeeController.class)
public class TestEmployeeController {

  @Autowired
  private MockMvc mvc;

}
After getting the MockMVC instance, we can apply the security configuration defined in WebSecurityConfig as follows:
@ExtendWith(SpringExtension.class)
@ContextConfiguration(classes = WebSecurityConfig.class)
@WebMvcTest(EmployeeController.class)
public class TestEmployeeController {

	private MockMvc mvc;

	@BeforeEach
	public void setup() {
		mvc = MockMvcBuilders
				.apply(springSecurity())
				.build();
	}

	// ...
}
After the MVC has been configured for security, we can invoke the secured URIs and pass on the required authentication details. Note that we can still use the @WithMockUser and @WithUserDetails annotations if we do not want to use the following approach.
mvc
	.perform(get("/me").with(user("user")))

//or

mvc
	.perform(get("/me").with(user("admin").password("pass").roles("USER","ADMIN")))
Similarly, we can use formLogin() for testing the form submissions. In the following example, we are submitting the form and including the username and password parameters with values “admin” and “pass”.
mvc
	.perform(formLogin("/submit").user("username", "admin").password("password", "pass"))
Spring security testing is itself a very big topic and needs a dedicated post to cover all concepts.
8. Conclusion
In this article, we learned how to secure applications using Spring Security. We discussed the concepts of authentication, authorization, and access control. Also, we discussed how Spring security works under the hood.
We touched upon the basic configuration for authentication, authorization and testing. Extensive discussion is not possible in this post so I suggest you to read the official documentation for this purpose.
Happy Learning !!