
Given Spring MVC interview questions and answers have been written to help you prepare for the job interviews and quickly revise the concepts in general. I will strongly suggest you go deeper into each concept if you have extra time. The more you know, the more you will be confident.
1. What is Spring WebMVC?
The Spring WebMVC module provides MVC architecture (model-view-controller) capability and readymade components that can be used to develop flexible and loosely coupled web applications. The MVC pattern results in separating the different aspects of the application (UI and backend APIs) while providing a loose coupling between models, views and controllers.
Spring framework provides lots of advantages over other MVC frameworks e.g.
- Clear separation of roles – controller, validator, command object, form object, model object, DispatcherServlet, handler mapping, view resolver, etc. Each role can be fulfilled by a specialized object.
- Powerful and straightforward configuration options of both framework and application classes as JavaBeans.
- Reusable business code – no need for duplication. We can use existing business objects as command or form objects instead of mirroring them in order to extend a particular framework base class.
- Customizable binding and bean validation support
- Customizable handler mapping and view resolution
- Customizable locale and theme resolution
2. What is DispatcherServlet and ContextLoaderListener?
Spring’s WebMVC framework is, like many other web MVC frameworks, request-driven, designed around a front-controller Servlet that receives all the HTTP requests and responses. Spring’s DispatcherServlet however, does more than just that. It is completely integrated with the Spring IoC container so it allows us to use every feature that Spring has.
After receiving an HTTP request, DispatcherServlet consults the HandlerMapping (configuration files) to call the appropriate Controller. The Controller takes the request and calls the appropriate handler method and sets model data and then returns the view name to the DispatcherServlet.
The DispatcherServlet will take help from ViewResolver to pick up the defined view for the request. Once the view is finalized, the DispatcherServlet passes the model data to the view which is finally rendered on the browser.
<servlet>
    <servlet-name>spring</servlet-name>
        <servlet-class>
            org.springframework.web.servlet.DispatcherServlet
        </servlet-class>
    <load-on-startup>1</load-on-startup>
</servlet>

<servlet-mapping>
    <servlet-name>spring</servlet-name>
    <url-pattern>/</url-pattern>
</servlet-mapping>
By default, DispatcherServlet loads its configuration file using <servlet_name>-servlet.xml. E.g. with above web.xml file, DispatcherServlet will try to find spring-servlet.xml file in classpath.
ContextLoaderListener reads the spring configuration file (with value given against “contextConfigLocation” in web.xml), parse it and loads the beans defined in that config file. e.g.
<init-param>
    <param-name>contextConfigLocation</param-name>
    <param-value>/WEB-INF/applicationContext.xml</param-value>
</init-param>
3. What is Front Controller in Spring MVC?
A front controller is defined as “a controller which handles all requests for a Web Application.” DispatcherServlet (actually a servlet) is the front controller in Spring MVC that intercepts every request and then dispatches/forwards requests to an appropriate controller.
When a web request is sent to a Spring MVC application, the dispatcher servlet first receives the request. Then it organizes the different components configured in Spring’s web application context (e.g. actual request handler controller and view resolvers) or annotations present in the controller itself, all needed to handle the request.
4. How to use Java Based Configuration?
To configure a Java-based MVC application, firstly we need to add the required dependencies.
<!-- Spring MVC support -->

<dependency>
    <groupId>org.springframework</groupId>
    <artifactId>spring-webmvc</artifactId>
    <version>${spring-version}</version>
</dependency>

<dependency>
    <groupId>org.springframework</groupId>
    <artifactId>spring-web</artifactId>
    <version>${spring-version}</version>
</dependency>

<!-- Tag libs support for view layer -->

<dependency>
    <groupId>javax.servlet</groupId>
    <artifactId>jstl</artifactId>
    <version>${jstl-version}</version>
    <scope>runtime</scope>
</dependency>

<dependency>
    <groupId>taglibs</groupId>
    <artifactId>standard</artifactId>
    <version>${taglibs-version}</version>
    <scope>runtime</scope>
</dependency>
Now we need to add DispatcherServlet support. Spring provides SpringServletContainerInitializer which knows how to handle WebApplicationInitializer instances. AbstractAnnotationConfigDispatcherServletInitializer class implements WebMvcConfigurer which internally implements WebApplicationInitializer.
It registers a ContextLoaderlistener (optionally) and a DispatcherServlet and allows you to easily add configuration classes to load for both classes, to apply filters to the DispatcherServlet and to provide the servlet mapping.
public class AppInitializer extends
        AbstractAnnotationConfigDispatcherServletInitializer {

   @Override
   protected Class<?>[] getRootConfigClasses() {
      return new Class[] { HibernateConfig.class };
   }

   @Override
   protected Class<?>[] getServletConfigClasses() {
      return new Class[] { WebMvcConfig.class };
   }

   @Override
   protected String[] getServletMappings() {
      return new String[] { "/" };
   }
}
Now we need to configure various MVC components such as view resolvers, validators etc. Notice the use of @EnableWebMvc that imports the Spring MVC configuration from WebMvcConfigurationSupport.
@Configuration
@EnableWebMvc
@ComponentScan(basePackages = { "com.howtodoinjava.demo.spring"})
public class WebMvcConfig implements WebMvcConfigurer {

   @Bean
   public InternalResourceViewResolver resolver() {
      InternalResourceViewResolver resolver = new InternalResourceViewResolver();
      resolver.setViewClass(JstlView.class);
      resolver.setPrefix("/WEB-INF/views/");
      resolver.setSuffix(".jsp");
      return resolver;
   }

   @Bean
   public MessageSource messageSource() {
      ResourceBundleMessageSource source = new ResourceBundleMessageSource();
      source.setBasename("messages");
      return source;
   }

   @Override
   public Validator getValidator() {
      LocalValidatorFactoryBean validator = new LocalValidatorFactoryBean();
      validator.setValidationMessageSource(messageSource());
      return validator;
   }
}
5. How to Create Rest APIs returning JSON?
For adding JSON support to our spring application, you will need to add Jackson dependency in first step.
<dependency>
    <groupId>com.fasterxml.jackson.core</groupId>
    <artifactId>jackson-databind</artifactId>
    <version>${jackson-version}</version>
</dependency>
Now we are ready to return JSON response from the MVC controller. All you have to use @ResponseBody annotation on the method return type.
@Controller
public class EmployeeRESTController
{
	@RequestMapping(value = "/employees")
	public @ResponseBody EmployeeListVO getAllEmployees()
	{
		EmployeeListVO employees = new EmployeeListVO();
		//Add employees
		return employees;
	}
}
Alternatively, we can use @RestController annotation in place of @Controller annotation. This will remove the need to using @ResponseBody.
@RestController = @Controller + @ResponseBody
So we can rewrite the above controller.
@RestController
public class EmployeeRESTController
{
	@GetMapping("/employees")
	public EmployeeListVO getAllEmployees()
	{
		EmployeeListVO employees = new EmployeeListVO();
		//Add employees
		return employees;
	}
}
6. Can We have Multiple Spring Configuration Files?
YES. we can have multiple spring context files. There are two ways to make spring read and configure all such files.
Specify all files in web.xml file using contextConfigLocation init parameter.
<init-param>
    <param-name>contextConfigLocation</param-name>
    <param-value>
        WEB-INF/spring-dao-hibernate.xml,
        WEB-INF/spring-services.xml,
        WEB-INF/spring-security.xml
    </param-value>
</init-param>
OR, we can import into the existing configuration file that we have already configured.
<beans>
    <import resource="spring-dao-hibernate.xml"/>
    <import resource="spring-services.xml"/>
    <import resource="spring-security.xml"/>

    ... //Other configuration stuff

</beans>
7. Difference between <context:annotation-config> vs <context:component-scan>?
- First big difference between both tags is that
<context:annotation-config>is used to activate applied annotations in already registered beans in application context.
Note that it simply does not matter whether bean was registered by which mechanism e.g. using<context:component-scan>or it was defined in application-context.xml file itself. - Second difference is driven from first difference itself. It registers the beans defined in config file into context + it also scans the annotations inside beans and activate them. So
<context:component-scan>does what<context:annotation-config>does, but additionally it scan the packages and register the beans in application context.
<context:annotation-config>= Scanning and activating annotations in already registered beansRead More
<context:component-scan>= Bean Registration + Scanning and activating annotations
8. Difference between @Component, @Controller, @Repository and @Service Annotations?
- The @Component annotation marks a java class as a bean so the component-scanning mechanism of spring can pick it up and pull it into the application context.
- The @Repository annotation is a specialization of the
@Componentannotation with similar use and functionality. In addition to importing the DAOs into the DI container, it also makes the unchecked exceptions (thrown from DAO methods) eligible for translation into SpringDataAccessException. - The @Service annotation is also a specialization of the component annotation. It doesn’t currently provide any additional behavior over the @Component annotation, but it’s a good idea to use @Service over
@Componentin service-layer classes because it specifies intent better. - @Controller annotation marks a class as a Spring Web MVC controller. It too is a
@Componentspecialization, so beans marked with it are automatically imported into the DI container. When you add the@Controllerannotation to a class, you can use another annotation i.e.@RequestMapping; to map URLs to instance methods of a class.
Read More : @Component, @Repository, @Service and @Controller Annotations?
9. Explain ViewResolvers?
ViewResolver is an interface to be implemented by objects that can resolve views by name. There are plenty of ways using which you can resolve view names.
These ways are supported by various in-built implementations of this interface. The most commonly used implementation is InternalResourceViewResolver class. It defines prefix and suffix properties to resolve the view component.
<bean class="org.springframework.web.servlet.view.InternalResourceViewResolver">
    <property name="prefix" value="/WEB-INF/views/" />
    <property name="suffix" value=".jsp" />
</bean>
So with the above view resolver configuration, if the controller method return “login” string, then the “/WEB-INF/views/login.jsp” file will be searched and rendered.
10. What is a MultipartResolver and When It is Used?
Spring comes with MultipartResolver to handle file upload in web applications. There are two concrete implementations included in Spring:
- CommonsMultipartResolver for Jakarta Commons FileUpload
- StandardServletMultipartResolver for Servlet 3.0 Part API
To define an implementation, create a bean with the id “multipartResolver” in a DispatcherServlet’s application context. Such a resolver gets applied to all requests handled by that DispatcherServlet.
If a DispatcherServlet detects a multipart request, it will resolve it via the configured MultipartResolver and pass on a wrapped HttpServletRequest. Controllers can then cast their given request to the MultipartHttpServletRequest interface, which permits access to any MultipartFiles.
11. How to Upload a File using Spring WebMVC?
Let’s say we are going to use CommonsMultipartResolver which uses the Apache commons upload library to handle the file upload in a form. So you will need to add the commons-fileupload and commons-io dependencies.
Create a bean of type CommonsMultipartResolver.
<bean id="multipartResolver" class="org.springframework.web.multipart.commons.CommonsMultipartResolver">
    <!-- one of the properties available; the maximum file size in bytes -->
    <property name="maxUploadSize" value="100000"/>
</bean>
Now create the model class FileUploadForm which will hold the multipart data submitted from HTML form.
import org.springframework.web.multipart.MultipartFile;

public class FileUploadForm
{
	private MultipartFile file;

	public MultipartFile getFile() {
		return file;
	}

	public void setFile(MultipartFile file) {
		this.file = file;
	}
}
Now create FileUploadController class that will actually handle the upload logic.
import org.springframework.stereotype.Controller;
import org.springframework.ui.Model;
import org.springframework.web.bind.annotation.ModelAttribute;
import org.springframework.web.bind.annotation.RequestMapping;
import org.springframework.web.bind.annotation.RequestMethod;
import org.springframework.web.multipart.MultipartFile;
import com.howtodoinjava.form.FileUploadForm;

@Controller
public class FileUploadController
{
	@RequestMapping(value = "/upload", method = RequestMethod.POST)
	public String save(@ModelAttribute("uploadForm") FileUploadForm uploadForm,	Model map) {

		MultipartFile multipartFile = uploadForm.getFile();

		String fileName = "default.txt";

		if (multipartFile != null) {
			fileName = multipartFile.getOriginalFilename();
		}

		//read and store the file as you like

		map.addAttribute("files", fileName);
		return "file_upload_success";
	}
}
12. Explain Spring MVC Request Validation Support?
Spring supports validations primarily in two ways.
- Using JSR-303 Annotations and any reference implementation e.g. Hibernate Validator
- Using custom implementation of org.springframework.validation.Validator interface
In the next question, you see an example of how to use validation support in Spring MVC application.
13. How to Validate the Submitted Form Data?
Spring MVC supports validation by means of a validator object that implements the Validator interface. You need to create a class and implement Validator interface. In this custom validator class, you use utility methods such as rejectIfEmptyOrWhitespace() and rejectIfEmpty() in the ValidationUtils class to validate the required form fields.
@Component
public class EmployeeValidator implements Validator
{
    public boolean supports(Class clazz) {
        return EmployeeVO.class.isAssignableFrom(clazz);
    }

    public void validate(Object target, Errors errors)
    {
        ValidationUtils.rejectIfEmptyOrWhitespace(errors, "firstName", "error.firstName", "First name is required.");
        ValidationUtils.rejectIfEmptyOrWhitespace(errors, "lastName", "error.lastName", "Last name is required.");
        ValidationUtils.rejectIfEmptyOrWhitespace(errors, "email", "error.email", "Email is required.");
    }
}
If any of the form fields are empty, these methods will create a field error and bind it to the field. The second argument of these methods is the property name, while the third and fourth are the error code and default error message.
Read More : Spring MVC Custom Validator and JSR-303 Annotations Examples
14. What is Spring MVC Interceptor?
As you know about servlet filters that they can pre-handle and post-handle every web request they serve — before and after it’s handled by that servlet.
In a similar way, you can use HandlerInterceptor interface in your spring MVC application to pre-handle and post-handle web requests that are handled by Spring MVC controllers. These handlers are mostly used to manipulate the model attributes returned/submitted they are passed to the views/controllers.
A handler interceptor can be registered for particular URL mappings, so it only intercepts requests mapped to certain URLs. Each handler interceptor must implement the HandlerInterceptor interface, which contains three callback methods for you to implement: preHandle(), postHandle() and afterCompletion().
Problem with HandlerInterceptor interface is that your new class will have to implement all three methods irrespective of whether it is needed or not. To avoid overriding, you can use HandlerInterceptorAdapter class. This class implements HandlerInterceptor and provides default blank implementations.
Read More : Spring MVC Interceptor Example
15. How to Handle Exceptions?
In a Spring MVC application, you can register one or more exception resolver beans in the web application context to resolve uncaught exceptions. These beans have to implement the HandlerExceptionResolver interface for DispatcherServlet to auto-detect them.
Spring MVC comes with a simple exception resolver for you to map each category of exceptions to a view i.e. SimpleMappingExceptionResolver to map each category of exceptions to a view in a configurable way.
Let’s say we have an exception class i.e. AuthException. And we want that everytime this exception is thrown from anywhere into application, we want to show a pre-determined view page /WEB-INF/views/error/authExceptionView.jsp.
So the configuration would be.
<bean class="org.springframework.web.servlet.handler.SimpleMappingExceptionResolver">
    <property name="exceptionMappings">
        <props>
            <prop key="com.howtodoinjava.demo.exception.AuthException">
                error/authExceptionView
            </prop>
        </props>
    </property>
    <property name="defaultErrorView" value="error/genericView"/>
</bean>
The “defaultErrorView” property can be configured to show a generic message for all other exceptions which are not configured inside “exceptionMappings” list.
Read More : Spring MVC SimpleMappingExceptionResolver Example
16. How to Achieve Localization and Internationalization?
Spring framework is shipped with LocaleResolver to support the internationalization and thus localization as well. To make the Spring MVC application supports internationalization, you will need to register two beans.
SessionLocaleResolver: It resolves locales by inspecting a predefined attribute in a user’s session. If the session attribute doesn’t exist, this locale resolver determines the default locale from the accept-language HTTP header.
<bean id="localeResolver" class="org.springframework.web.servlet.i18n.SessionLocaleResolver">
    <property name="defaultLocale" value="en" />
</bean>
LocaleChangeInterceptor : This interceptor detects if a special parameter is present in the current HTTP request. The parameter name can be customized with the paramName property of this interceptor. If such a parameter is present in the current request, this interceptor changes the user’s locale according to the parameter value.
<bean id="localeChangeInterceptor" class="org.springframework.web.servlet.i18n.LocaleChangeInterceptor">
    <property name="paramName" value="lang" />
</bean>

<!-- Enable the interceptor -->
<bean class="org.springframework.web.servlet.mvc.annotation.DefaultAnnotationHandlerMapping">
    <property name="interceptors">
        <list>
            <ref bean="localeChangeInterceptor" />
        </list>
    </property>
</bean>
Next step is to have each locale-specific properties file have texts in that locale-specific language e.g. messages.properties and messages_zh_CN.properties etc.
Read More : Spring MVC Localization (i10n) Example
17. How to get ServletContext and ServletConfig Object in a Spring Bean?
Simply implement ServletContextAware and ServletConfigAware interfaces and override the respective methods.
@Controller
@RequestMapping(value = "/magic")
public class SimpleController implements ServletContextAware, ServletConfigAware {

    private ServletContext context;
    private ServletConfig config;

    @Override
    public void setServletConfig(final ServletConfig servletConfig) {
        this.config = servletConfig;

    }

    @Override
    public void setServletContext(final ServletContext servletContext) {
        this.context = servletContext;
    }

	//other code
}
18. How to Configure JNDI DataSource?
For using the servlet container configured JNDI DataSource, we need to configure it in the spring bean configuration file and then inject it to spring beans as dependencies. Then we can use it with JdbcTemplate to perform database operations.
<bean id="dataSource" class="org.springframework.jndi.JndiObjectFactoryBean">
    <property name="jndiName" value="java:comp/env/jdbc/MySQLDB"/>
</bean>
19. Compare Spring MVC Framework to 3-Tier Architecture?
3-tier is an architecture style and MVC is a design pattern.
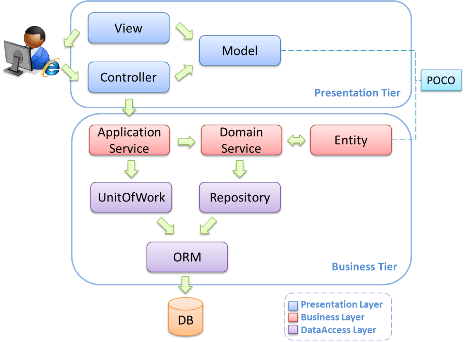
In larger applications, MVC is the presentation tier only of a 3-tier architecture. The models, views, and controllers are only concerned with the presentation and make use of a middle-tier to populate the models with data from the data tier.
Happy Learning !!
Comments