
Learn to use Maven assembly plugin to package an application as an executable fat Jar that includes all the dependencies to make the application run on any machine. Note that we can use the assembly plugin for packaging the application in other formats, such as zip, tar, tar.gz and even war files.
We can control inclusions or exclusions using this plugin. For more controlled packaging, use Maven Shade plugin.
1. A Simple Application
Let us create a simple Java application that prints a log message into the console. To keep things simple, we have included only Log4j2, SLF4J2 and JUnit 5 dependencies.
import org.slf4j.Logger;
import org.slf4j.LoggerFactory;

public class MainClass
{
    private static Logger LOGGER = LoggerFactory.getLogger(MainClass.class);
    public static void main( String[] args )
    {
        LOGGER.info( "Hello World! from Inside a Jar..." );
    }
}
2. Including Maven Assembly Plugin
To package this application, as fat jar, include maven-assembly-plugin plugin in pom.xml file.
2.1. Pre-defined Goal and Descriptors
The assembly plugin has two goals:
help: displays help information on maven-assembly-plugin.single: packages an application bundle or distribution using the assembly descriptor.
The plugin relies on the provided descriptors for controlling the execution and packaging of the project. Though we can create our own descriptors for custom packaging, it provides the following default descriptors:
bin: Creates a binary JAR produced by running ‘mvn package‘ plus any README, LICENSE, and NOTICE files available in the project root directory.jar-with-dependencies: creates a JAR that contains the binary output of your project, along its the unpacked dependencies.src: packages the contents of the project’s /src directory structure.project: produces an assembly containing the entire project, minus any build output in /target directory.
2.2. POM Changes
We are using the descriptor jar-with-dependencies for creating a single package for all the compiled resources. Additionally, we have provided the MainClass classpath as a Manifest entry. Its main() method will be executed when we execute this jar file from the command line.
Including the maven-assembly-plugin dependency will result in a larger Jar file because it will include the plugin Jar file as well as its dependencies, additionally. Consider adding the plugin dependency only when you need to use it during the build process for providing specific functionalities to your build lifecycle.
<!-- Optional dependency inclusion -->

<dependencies>
  <dependency>
        <groupId>org.apache.maven.plugins</groupId>
        <artifactId>maven-assembly-plugin</artifactId>
        <version>3.4.2</version>
        <type>maven-plugin</type>
    </dependency>
</dependencies>

<!-- Required plugin declaration -->

<build>
  <plugins>
    <plugin>
      <groupId>org.apache.maven.plugins</groupId>
      <artifactId>maven-assembly-plugin</artifactId>
      <configuration>
          <descriptorRefs>
              <descriptorRef>jar-with-dependencies</descriptorRef>
          </descriptorRefs>
          <archive>
              <manifest>
                <mainClass>com.howtodoinjava.app.MainClass</mainClass>
              </manifest>
          </archive>
      </configuration>
      <executions>
          <execution>
              <id>make-assembly</id>
              <phase>package</phase>
              <goals>
                <goal>single</goal>
              </goals>
          </execution>
      </executions>
    </plugin>
  </plugins>
</build>
3. Packaging as Executable Jar
3.1. Default Packaging
Run the maven package command in the project’s root folder to compile and package the project as a fat jar.
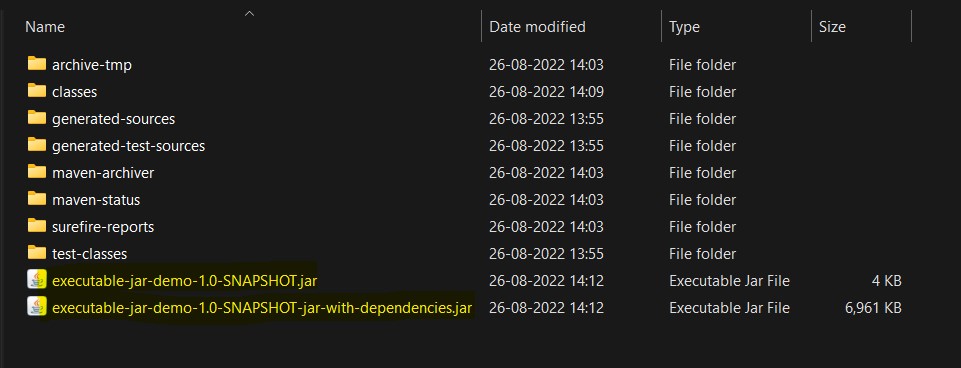
$ mvn clean packageThe command will produce two jar files in the /target folder:
- executable-jar-demo-1.0-SNAPSHOT.jar: This is a thin jar that does not include its dependencies. If you use this jar, it will search for the dependencies in the classpath.
- executable-jar-demo-1.0-SNAPSHOT-jar-with-dependencies.jar: This is a fat jar and includes all required classes and dependencies. We can run this jar file in any system where Java is installed.
3.2. Custom Packaging
The generated file name contains the assembly id, which may be desired at times. We can set it to false.
<configuration>
  <appendAssemblyId>false</appendAssemblyId>
  ...
  ...
</configuration>
Now the plugin will produce a single artifact with name executable-jar-demo-1.0-SNAPSHOT.jar.
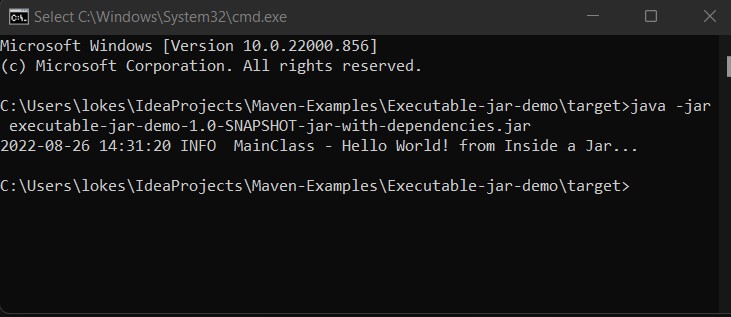
4. Demo
To run the fat jar, run it with 'java -jar' from the terminal. It will execute the application. In our case, it will print the log message in the console.
5. Conclusion
In this tutorial, we learned to use the Maven assembly plugin for creating executable Jar files with dependencies. we learned to configure various options provided by the plugin to control the build processing and output artifacts.
Happy Learning !!
For my case when i am trying to create fat jar, its also including jsp and js and images.
Add exclusions under <configuration> tag.
<excludes>
<exclude>**/*.jsp</exclude>
<exclude>**/*.js</exclude>
<exclude>**/*.jpg</exclude>
<!– Add more exclusions if needed –>
</excludes>
If you add the dependency
  <dependency>
        <groupId>org.apache.maven.plugins</groupId>
        <artifactId>maven-assembly-plugin</artifactId>
        <version>3.4.2</version>
        <type>maven-plugin</type>
    </dependency>
the fat jar generated is very very fat. It seems it includes all the code for the maven-plugin. But if I just put the version number of the maven-assembly plugin element in the plugin element like this
<build>
  <plugins>
    <plugin>
      <groupId>org.apache.maven.plugins</groupId>
      <artifactId>maven-assembly-plugin</artifactId>
      <version>3.4.2</version>
      <configuration>
          <descriptorRefs>
the fat jar contains only the code of my application and the code of the java libraries my applications depends on.
Isn’t it better to do it this way ?
Yes, you are correct. When you add the Maven Assembly Plugin as a dependency in your project, it gets included in the generated JAR along with all its dependencies, which can result in a larger JAR file. On the other hand, specifying the plugin directly in the build section of your POM file avoids including the plugin and its dependencies in the final JAR.
Thanks for a good tutorial!
Following these instructions doesn’t create the fat jar for me. Nor do any of the other instructions on the internet relating to make-assembly even if I literally cut and paste the entire mvn pom file and change the names to match my project. Always just creates a single “thin” jar.
To create the fat jar I have to do:
mvn assembly:single
Please make sure that you are adding the <dependency> in <dependencies> section, and not in <dependency-management>.
Actually what did the trick for me was when I found out that I had put the <plugin> within <pluginManagement> which is wrong, it should go into <plugins>, after that it worked like a charm!.