
In this Spring boot and React tutorial, we will create REST APIs in Spring Boot to accept multiple file uploads and store them in a folder. We will also develop a React application to create the UI and consume the APIs.
1. Spring Boot App
We are creating a spring boot app containing three APIs:
- first API to upload multiple files. It uploads the file to a folder in the server and saves the file details in database for quick lookup.
- second API to download a specific file.
- third API to fetch details of all files uploaded to the server. It fetches the data from the database for display purposes.
POST: localhost:8080/file/upload

GET: localhost:8080/file/download/{fileName:.+}
GET: localhost:8080/file
Note that spring, by default, truncate all the characters after the last dot (.) as it considers it as a file name extension. So, in order to take that extension also as a path variable in a string we have to add a regex mapping “:.+” in the second API.
1.1. Model
The FileDetails class will be used for storing and querying the details of the uploaded files on the server.
@Entity
@Table(name = "file_details")
@Data
@NoArgsConstructor
public class FileDetails {

  @Id
  @GeneratedValue(strategy = GenerationType.IDENTITY)
  private int id;

  @Column private String fileName;
  @Column private String fileUri;
  @Column private String fileDownloadUri;
  @Column private long fileSize;
  @Column private String uploaderName;

  public FileDetails(String fileName, String fileUri, String fileDownloadUri, long fileSize, String uploaderName) {

    this.fileName = fileName;
    this.fileUri = fileUri;
    this.fileDownloadUri = fileDownloadUri;
    this.fileSize = fileSize;
    this.uploaderName = uploaderName;
  }
}
1.2. Controller
Note that we need to enable the request from the cross-origin “http://localhost:3000” on which our React app will be hosted.
@RestController
@RequestMapping(value = "file")
@CrossOrigin(origins = "http://localhost:3000")
public class FileUploadController {

    @Autowired
    private FileUploadService fileUploadService;

    //...
}
The getAllFiles() invokes the FileUploadService.getAllFiles() method, which is responsible for retrieving file details stored inside the database.
  @GetMapping
  @ResponseStatus(code = HttpStatus.OK)
  public List<FileDetails> getAllFiles() {
    return this.fileUploadService.getAllFiles();
  }
The downloadFile() takes the file name and returns the file as a resource in the response body.
@GetMapping("/download/{fileName:.+}")
public ResponseEntity<Object> downloadFile(@PathVariable String fileName, HttpServletRequest request) {

  try {
    Resource resource = this.fileUploadService.fetchFileAsResource(fileName);
    String contentType = request.getServletContext().getMimeType(resource.getFile().getAbsolutePath());

    if (contentType == null) {
      contentType = "application/octet-stream";
    }

    return ResponseEntity.ok()
        .contentType(MediaType.parseMediaType(contentType))
        .header(HttpHeaders.CONTENT_DISPOSITION, "attachment; filename=\"" + resource.getFilename() + "\"")
        .body(resource);

  } catch (IOException ex) {
    return new ResponseEntity<>(ex.getMessage(), HttpStatus.NOT_FOUND);
  }
}
The uploadFiles() accepts a list of files and saves the file details in database, and saves the file content into a directory.
@PostMapping(value = "/upload")
public ResponseEntity<Object> uploadFiles(@RequestParam("name") String name ,@RequestParam("files") MultipartFile[] files) {

  try {
    List<FileUploadResponse> fileUploadResponses =
        Arrays.stream(files).map(file -> {
          try {
            return fileUploadService.uploadFile(file, name);
          } catch (IOException e) {
            throw new UncheckedIOException(e);
          }
        }).collect(Collectors.toList());

    return new ResponseEntity<>(fileUploadResponses, HttpStatus.OK);
  } catch (UncheckedIOException e) {
    return new ResponseEntity<>(e.getMessage(), HttpStatus.INTERNAL_SERVER_ERROR);
  } catch (FileNotSupportedException e) {
    return new ResponseEntity<>(e.getMessage(), HttpStatus.BAD_REQUEST);
  }
}
1.3. Service
Now we need to create a FileUploadServiceImpl, which is the implementing class of FileUploadService interface.
public interface FileUploadService {

  public FileUploadResponse uploadFile(MultipartFile file, String uploaderName) throws IOException;
  public Resource fetchFileAsResource(String fileName) throws FileNotFoundException;
  public List<FileDetails> getAllFiles();
}
The Service class methods are pretty straightforward; they store and load the file in a folder and file details in the database.
This uploadFile() is the main core method of the application which actually responsible to upload the file to the server. This method follows a set of essential steps in order to perform an effective file upload. These steps are
- It creates the directory to which the file is needed to upload(server-accessible folder i.e target\classes\static\image) if it doesn’t exist.
- It validates the format of the file. (In our case, only jpeg and png files are allowed)
- It added the current timestamp to the original file name in order to avoid the duplication of files.
- It copies the actual file to the given filePath.
- It creates the fileUri (to direct access files from the server) and fileDownloadUri (to download the file).
- It inserts originalFileName, fileUri, fileDownloadUri, fileSize, and uploaderName to the database using FileDetailsRepository.
- It creates the object of FileUploadResponse, stores the related information in it, and returns that created object.
The loadFileAsResource() method is responsible for loading and returning the file as a resource using the given fileName, which is converted into URI using the Path.toUri() method.
The getAllFiles() method is responsible for returning all file details from the database using the FileDetailsRepository.
@Service
public class FileUploadSerivceImpl implements FileUploadService {

  public FileUploadSerivceImpl() throws IOException {}

  @Autowired
  private FileDetailsRepository fileDetailsRepository;

  private final Path UPLOAD_PATH =
      Paths.get(new ClassPathResource("").getFile().getAbsolutePath() + File.separator + "static"  + File.separator + "image");

  @Override
  public FileUploadResponse uploadFile(MultipartFile file, String uploaderName) throws IOException {

    if (!Files.exists(UPLOAD_PATH)) {
      Files.createDirectories(UPLOAD_PATH);
    }

    // file format validation
    if (!file.getContentType().equals("image/jpeg") && !file.getContentType().equals("image/png")) {
      throw new FileNotSupportedException("only .jpeg and .png images are " + "supported");
    }

    String timeStampedFileName = new SimpleDateFormat("ssmmHHddMMyyyy")
        .format(new Date()) + "_" + file.getOriginalFilename();

    Path filePath = UPLOAD_PATH.resolve(timeStampedFileName);
    Files.copy(file.getInputStream(), filePath);

    String fileUri = ServletUriComponentsBuilder.fromCurrentContextPath()
        .path("/image/").path(timeStampedFileName).toUriString();

    String fileDownloadUri = ServletUriComponentsBuilder.fromCurrentContextPath()
        .path("/file/download/").path(timeStampedFileName).toUriString();

    FileDetails fileDetails = new FileDetails(file.getOriginalFilename(), fileUri, fileDownloadUri, file.getSize(), uploaderName);

    this.fileDetailsRepository.save(fileDetails);

    FileUploadResponse fileUploadResponse =
        new FileUploadResponse(fileDetails.getId(),
            file.getOriginalFilename(), fileUri, fileDownloadUri,
            file.getSize(),
            uploaderName);

    return fileUploadResponse;
  }

  @Override
  public Resource fetchFileAsResource(String fileName) throws FileNotFoundException {

    try {
     Path filePath = UPLOAD_PATH.resolve(fileName).normalize();
      Resource resource = new UrlResource(filePath.toUri());
      if (resource.exists()) {
        return resource;
      } else {
        throw new FileNotFoundException("File not found " + fileName);
      }
    } catch (MalformedURLException ex) {
      throw new FileNotFoundException("File not found " + fileName);
    }
  }

  @Override
  public List<FileDetails> getAllFiles() {
    return this.fileDetailsRepository.findAll();
  }
}
1.4. Repository
The FileDetailsRepository is a standard JpaRepository providing standard CRUD methods.
public interface FileDetailsRepository extends JpaRepository<FileDetails, Integer> {
}
2. React App
In order to create react app, make sure Node.js is installed on the machine. Check if node.js is successfully installed or not by using the following command.
node -v If node is not installed, then download and install it from this website: https://nodejs.org/en/download/
2.1. Create React App Skeleton
To create the basic react single-page application, we will use the official Create React App CLI tool.
Using the following commands we can create a basic skeleton of our react app that will create a directory named my-react-app (whatever name we have given) in the current working directory, which contains the basic files to run a simple react app.
npx create-react-app my-react-app
npm init react-app my-react-app
Open that project folder in the favorite IDE and type the following command to run the default react app.
npm startRunning the above command will open the index page of react app in your browser.
2.2. File Service To Consume REST APIs
To call spring boot APIs we will use axios that help make AJAX requests from the browser. It also supports automatic data object serialization to multipart/form-data and x-www-form-urlencoded body encodings Add the axios using the following command:
npm add axiosCreate a folder named services inside the src folder of our app, then create a file named FileService.js in which we write functions to communicate with the rest API using axios inside the class-based component.
import axios from "axios"

const BASE_URL = "http://localhost:8080/file"

class FileService {
    getAllImages() {
        return axios.get(BASE_URL);
    }

    uploadImage(fileFormData){
        return axios.post(BASE_URL+'/upload', fileFormData);
    }
}

export default new FileService();- getAllImages() function calls the
GET http://localhost:8080/fileendpoint to get details about all images stored in the database. - uploadImage() function calls the
POST http://localhost:8080/file/uploadendpoint along with the file and name of the uploader as FormData to upload the files.
2.3. Components and Views
Now create a folder named components inside the src folder where we design different components of our react app.
MyImagesComponent.jsx
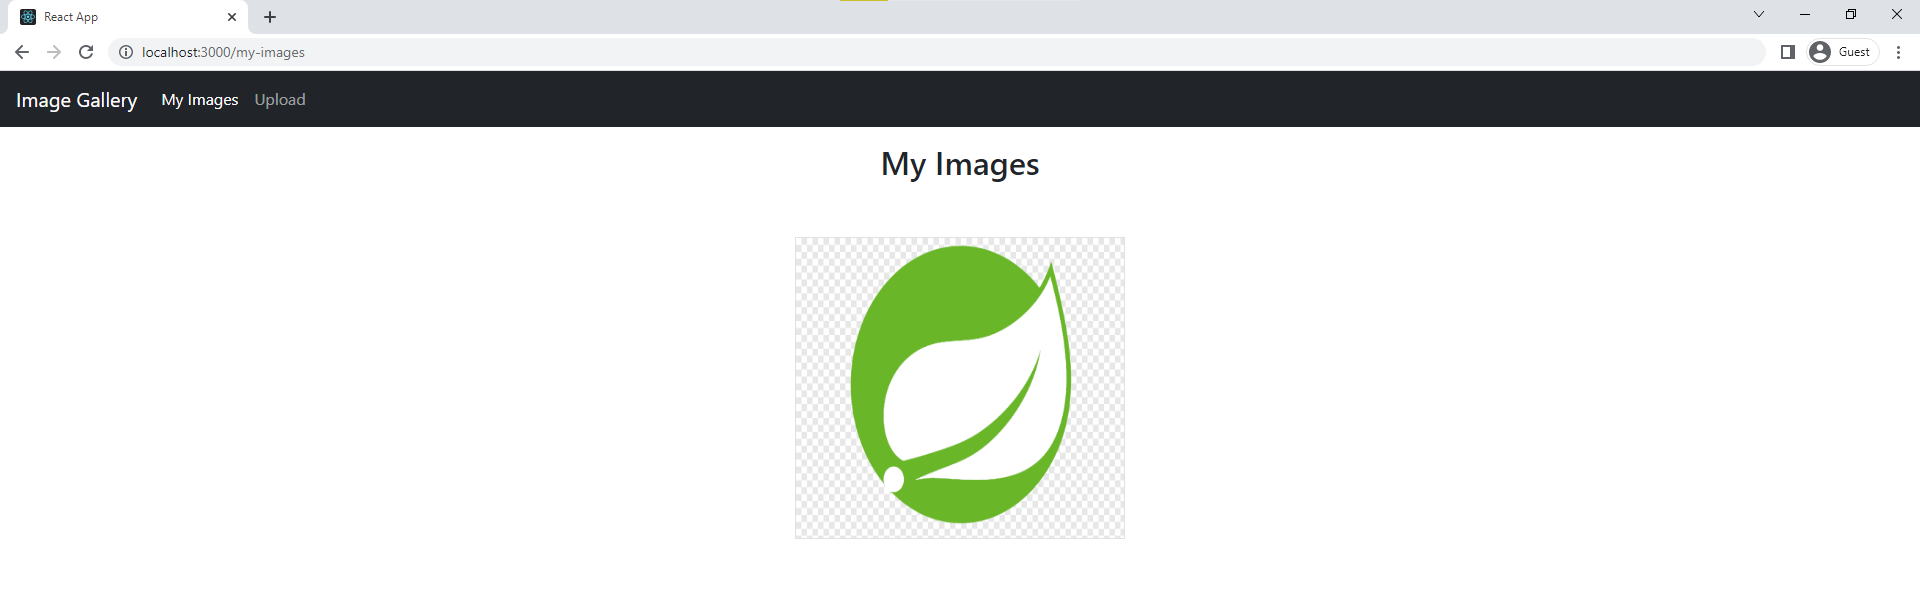
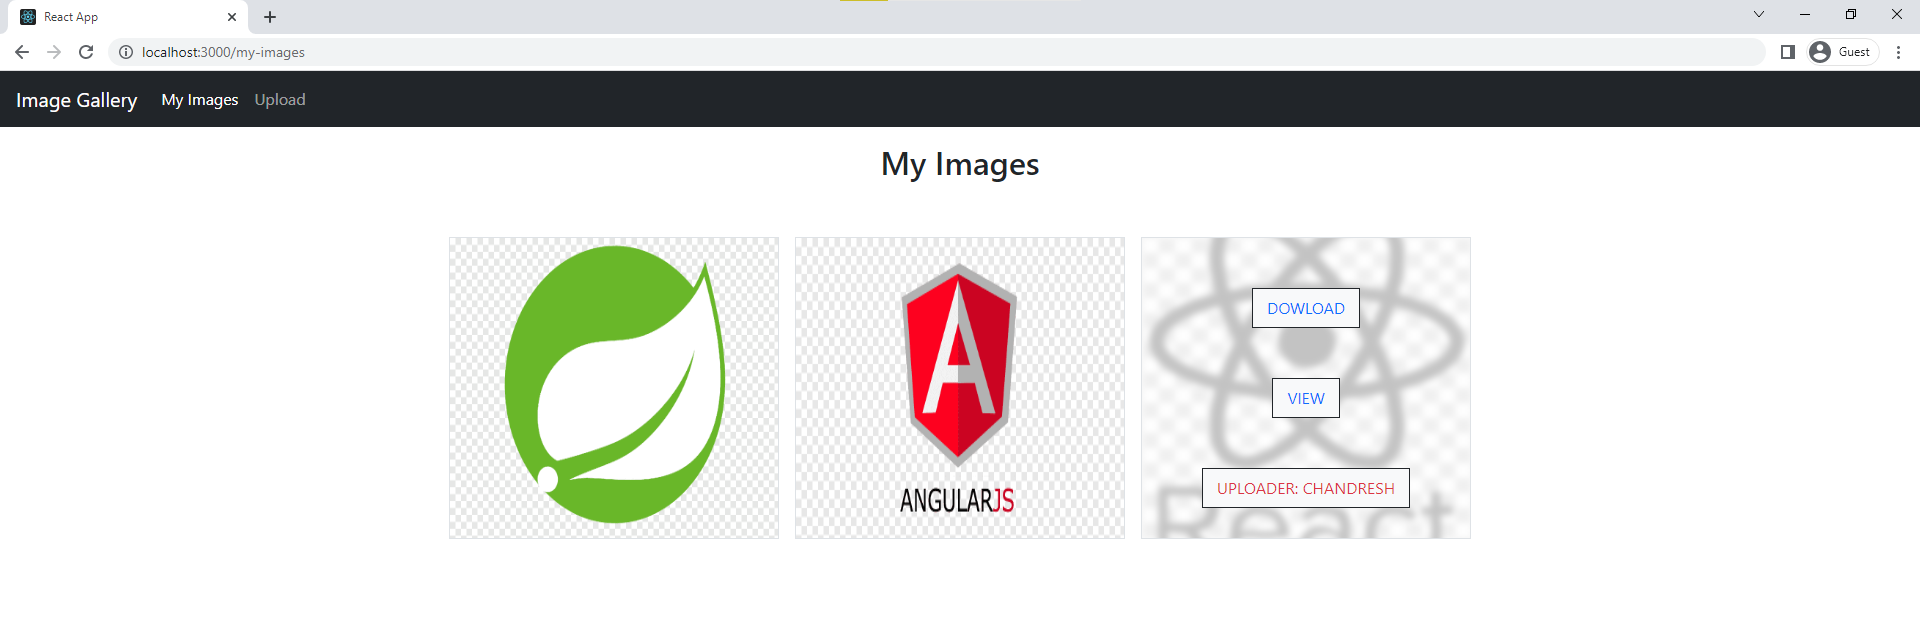
First, let’s create a class-based component named MyImagesComponent.jsx which is responsible for rendering the view for displaying all images.
import React, { Component } from 'react';
import FileService from '../services/FileService';

class MyImagesComponent extends Component {
    constructor(props) {
        super(props);

        this.state = {
            imageList: []
        }
    }

    componentDidMount() {
        FileService.getAllImages().then((response) => {
            this.setState({ imageList: response.data });
        });
    }
    render() {
        return (
            <div>
                <h2 className='mt-3 text-center mb-5'>My Images</h2>
                <div className='row justify-content-center'>
                    {
                        this.state.imageList.map(
                            image => <div key={image.id} className='px-0 m-2 border bg-light col-3'>
                                <div className='hovereffect'>
                                    <img src={image.fileUri} width="330" height="300" alt="no"></img>
                                    <div className='overlay'>
                                        <a className='info text-primary bg-light border border-dark' href={image.fileDownloadUri} target="_blank" rel='noopener noreferrer'>Dowload</a>
                                        <br />
                                        <a className='info text-primary bg-light border border-dark' href={image.fileUri} target="_blank" rel='noopener noreferrer'>View</a>
                                        <br />
                                        <a className='info text-danger bg-light border border-dark' href='/'>Uploader: {image.uploaderName}</a>
                                    </div>
                                </div>
                            </div>
                        )
                    }
                </div>
            </div>
        );
    }
}

export default MyImagesComponent;
Extension JSX stands for Javascript XML which allows us to write HTML in react component.
Here componentDidMount() is the function that is immediately called after loading a component. In that function, we are using the FileService‘s getAllImages() to get the details of all images.
UploadImageComponent.jsx
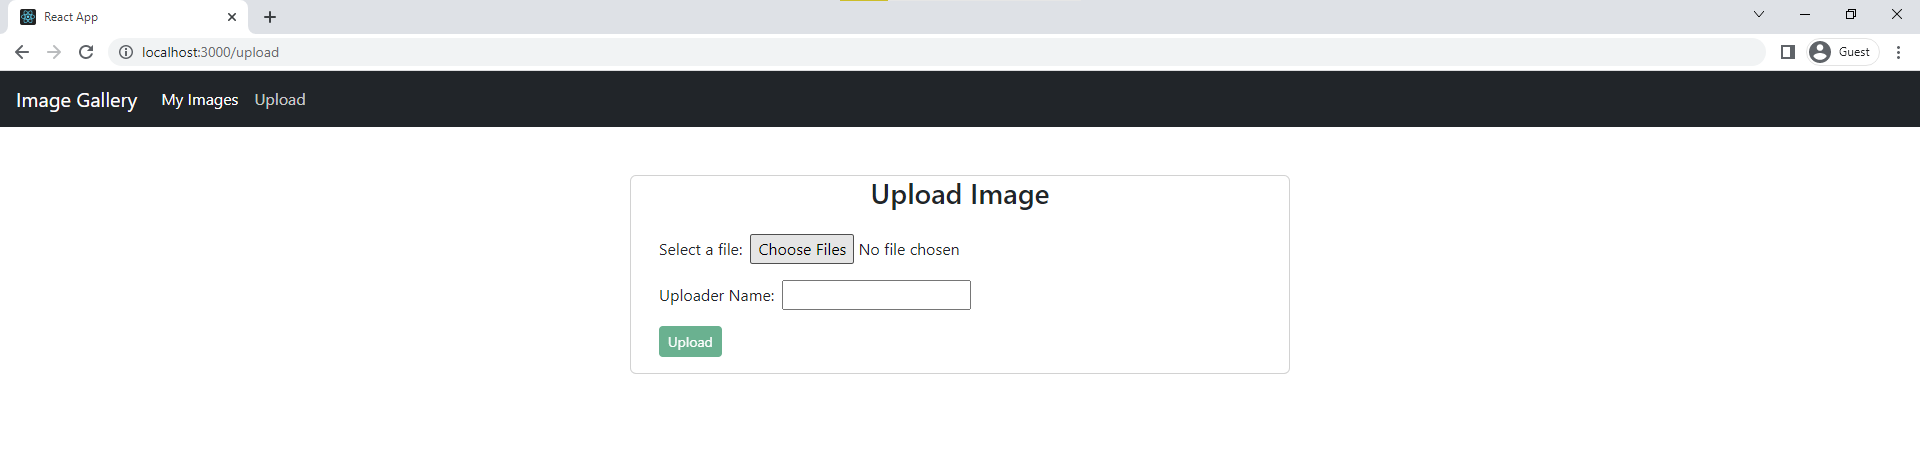
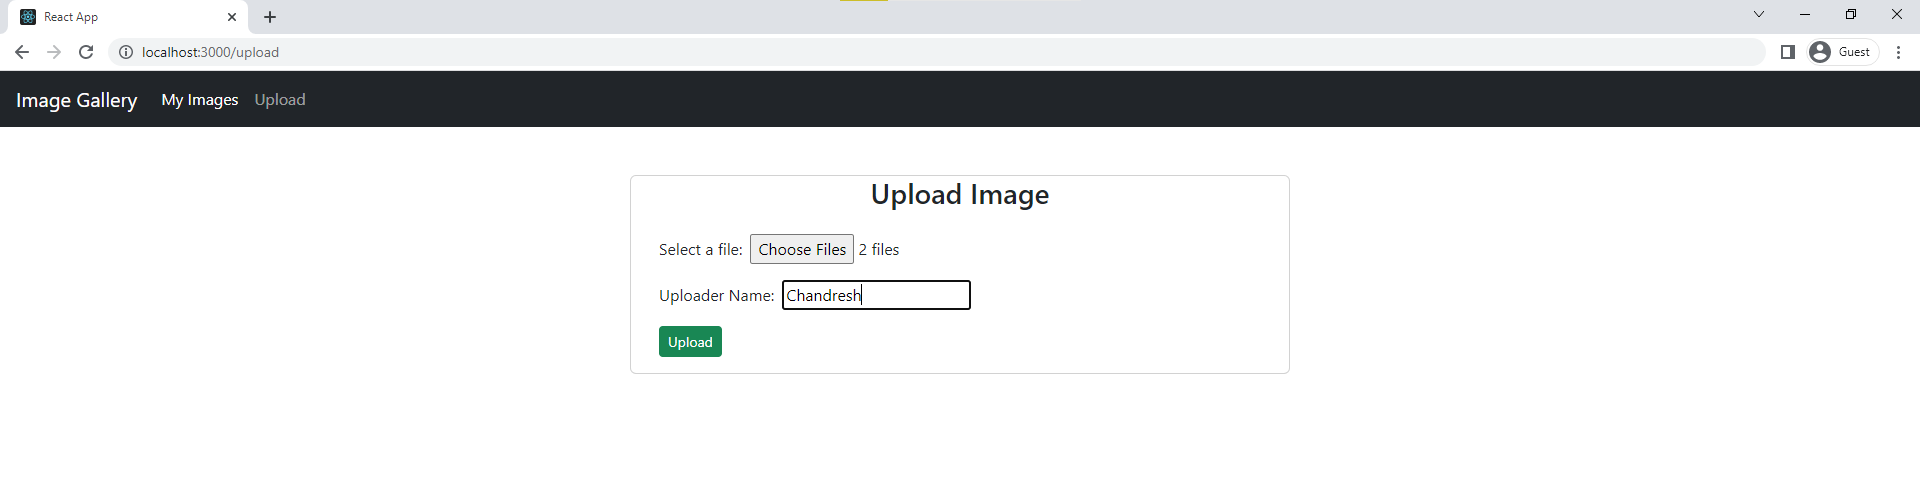
Next, create the second class-based component named UploadImageComponent.jsx which is responsible for rendering the view for displaying the form for uploading the files and the uploader’s name.
import React, { Component } from 'react';
import { Navigate } from 'react-router-dom';
import FileService from '../services/FileService';

class UploadImageComponent extends Component {
    constructor(props) {
        super(props);

        this.state = {
            files: null,
            fileUploaded: null,
            uploaderName: ''
        }
    }

    onFileChange = (event) => {
        this.setState({
            files: event.target.files
        });
    }

    onUploaderNameChange = (event) =>{
        this.setState({uploaderName : event.target.value});
    }
    onUpload = (event) => {
        event.preventDefault();
        const formData = new FormData();

        for (const key of Object.keys(this.state.files)) {
            formData.append('files', this.state.files[key]);
        }
        formData.append('name', this.state.uploaderName);

        FileService.uploadImage(formData).then((response) => {
            console.log(response.data);
            this.setState({ fileUploaded: true });
        }).catch(error => {
            console.log(error);
        });
    }

    render() {
        if(this.state.fileUploaded){
            return  <Navigate to="/my-images" replace={true} />;
        }

        return (
            <div className='row'>
                <div className='card col-md-6 offset-md-3 mt-5'>
                    <h3 className='text-center'>Upload Image</h3>
                    <div className='card-body'>
                        <form onSubmit={this.onUpload}>
                            <div>
                                <label>Select a file:</label>
                                <input className='mx-2' type='file' name='file' onChange={this.onFileChange} multiple></input>
                            </div>

                            <div className="mt-3">
                                <label>Uploader Name:</label>
                                <input className='mx-2' type='text' name='uploaderName' value={this.state.uploaderName} onChange={this.onUploaderNameChange}></input>
                            </div>
                            <button className='btn btn-success btn-sm mt-3' type='submit' disabled={!this.state.files || !this.state.uploaderName}>Upload</button>
                        </form>
                    </div>
                </div>
            </div>
        );
    }
}

export default UploadImageComponent;
The state is a built-in React object that is used to contain data or information about the component.
The onFileChange(), onUploaderNameChange(), onUpload() are the event handling functions that are called respectively when the input file value changes, uploader name i.e input text value changes and submit button is clicked.
The onUpload() function used the FileService’s uploadImage() function to upload the files and the name of the uploader in the form of FormData.
HeaderComponent.jsx
The third and last class-based component is a HeaderComponent.jsx contains the HTML code to render a simple header.
import React, { Component } from 'react';
import { Link } from 'react-router-dom';
import '../hover.css'

class HeaderComponent extends Component {
    render() {
        return (
            <div>
                <nav className='navbar navbar-expand-lg navbar-dark bg-dark'>
                    <Link to='/' className='navbar-brand mx-3'>Image Gallery</Link>
                    <ul className='navbar-nav me-auto mb-2 mb-lg-0'>
                        <li className='nav-item'>
                            <Link className='nav-link active' to='/my-images'>My Images</Link>
                        </li>
                        <li className="nav-item">
                            <Link className='nav-link' to='/upload'>Upload</Link>
                        </li>
                    </ul>
                </nav>
            </div>
        );
    }
}

export default HeaderComponent;
2.4. Configure Routes
In order to perform routing between different URLs we need to install react-router-dom.
npm install react-router-domEdit the App.js files as below to configure the routes between URLs.
import { Navigate, Route, Routes } from "react-router";
import { BrowserRouter as Router } from "react-router-dom";
import './App.css';
import HeaderComponent from './components/HeaderComponent';
import MyImagesComponent from './components/MyImagesComponent';
import UploadImageComponent from './components/UploadImageComponent';

function App() {
  return (
    <Router>
      <HeaderComponent />
      <div className='container'>
        <Routes>
          <Route path='/' element={<Navigate to='/my-images' />}></Route>
          <Route path='/my-images' element={<MyImagesComponent />}></Route>
          <Route path='/upload' element={<UploadImageComponent />}></Route>
        </Routes>
      </div>
    </Router>
  );
}

export default App;
3. Demo
Run the spring boot app using mvn sping-boot:run command or by running Application.java file. And then, run the react app using npm start command.
4. Conclusion
This tutorial taught us how to create REST APIs using Spring Boot that handles multiple file uploads and downloading a file, and how to invoke these APIs from the single page react js application.
Happy Learning!