
JasperReports is a Java reporting tool that writes content to the printer, onto the screen, or into files like PDF, XLS, RTF, CSV, XML, HTML, ODT, and TXT. Combined with Spring Boot, we can create APIs allowing users to download the application data in the form of reports.
In this Spring Boot Jasper Report example, we will learn to serve PDF reports using a Spring Boot REST API.
1. Goals
In the demo application created in this article, we will create and learn the followings:
- An API accepting the request to generate the report.
- Accepting multiple report formats such as PDF or XML.
- Creating a report from the Jasper template with data fetched from the backend database.
- Serving the report in an appropriate format that can be downloaded in the browser.
- Improving the performance by saving and loading the compiled Jasper report as the serialized object.
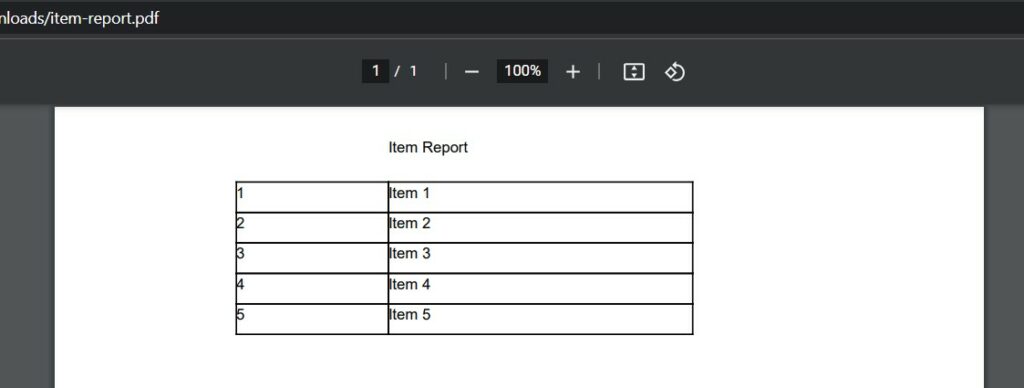
By the end of the article, the generated report is as follows:
2. Setup
Before integrating the Jasper Reports, create a simple Spring boot application with database connectivity and some records into the database.
We have used the H2 database to keep things simple. Also, we have created a very simple Item entity class with only two attributes: id and name.
@Entity
@Data
@AllArgsConstructor
@NoArgsConstructor
public class Item {

  @Id
  @GeneratedValue(strategy = GenerationType.IDENTITY)
  private Long id;
  private String name;

  public Item(String name) {
    this.name = name;
  }
}
To interact with database, we have created the ItemRepository which is a standard ListCrudRepository to perform database operations.
@Repository
public interface ItemRepository extends ListCrudRepository<Item, Long> {
	//...
}
We are initializing the application with 5 items using the CommandLineRunner interface. It executes the save() methods when the application starts.
@SpringBootApplication
public class App implements CommandLineRunner {

  @Autowired
  ItemRepository itemRepository;

  public static void main(String[] args) {
    SpringApplication.run(App.class, args);
  }

  @Override
  public void run(String... args) throws Exception {

    itemRepository.save(new Item("Item 1"));
    itemRepository.save(new Item("Item 2"));
    itemRepository.save(new Item("Item 3"));
    itemRepository.save(new Item("Item 4"));
    itemRepository.save(new Item("Item 5"));
  }
}
Let us start integrating the Jasper Reports into this application.
3. Maven
Start with including the latest version of Jasper reports library. We are excluding commons-logging so the Spring’s configured logging can take place.
<dependency>
  <groupId>net.sf.jasperreports</groupId>
  <artifactId>jasperreports</artifactId>
  <version>6.20.5</version>
  <exclusions>
    <exclusion>
      <artifactId>commons-logging</artifactId>
      <groupId>commons-logging</groupId>
    </exclusion>
  </exclusions>
</dependency>
4. Create Jasper Report Template
Creating the Jasper report template is out of the scope of this article. To create a template, download and install JasperReports Library, which provides the necessary tools for report creation. We can obtain it from the official JasperReports website.
This demo uses the following template file. Primarily, it contains the report title, item id and name fields in report data.
<?xml version="1.0" encoding="UTF-8"?>
<jasperReport xmlns="http://jasperreports.sourceforge.net/jasperreports"
  xmlns:xsi="http://www.w3.org/2001/XMLSchema-instance"
  xsi:schemaLocation="http://jasperreports.sourceforge.net/jasperreports
  https://jasperreports.sourceforge.net/xsd/jasperreport.xsd"
  name="item-report" pageWidth="612" pageHeight="792" columnWidth="555" leftMargin="20" rightMargin="20"
  topMargin="20" bottomMargin="20">

  <parameter name="title" class="java.lang.String" isForPrompting="false"/>
  <field name="id" class="java.lang.Long"/>
  <field name="name" class="java.lang.String"/>
  <title>
    <band height="30" splitType="Stretch">
      <textField>
        <reportElement x="200" y="0" width="200" height="30"/>
        <textElement/>
        <textFieldExpression class="java.lang.String"><![CDATA[$P{title}]]></textFieldExpression>
      </textField>
    </band>
  </title>
  <detail>
    <band height="20" splitType="Stretch">
      <textField isStretchWithOverflow="true" isBlankWhenNull="true">
        <reportElement x="100" y="0" width="100" height="20" />
        <box>
          <pen lineWidth="1.0" lineColor="#000"/>
        </box>
        <textElement/>
        <textFieldExpression class="java.lang.Long"><![CDATA[$F{id}]]></textFieldExpression>
      </textField>
      <textField isStretchWithOverflow="true" isBlankWhenNull="true">
        <reportElement x="200" y="0" width="200" height="20"/>
        <box>
          <pen lineWidth="1.0" lineColor="#000"/>
        </box>
        <textElement/>
        <textFieldExpression class="java.lang.String"><![CDATA[$F{name}]]></textFieldExpression>
      </textField>
    </band>
  </detail>
</jasperReport>
5. Creating Jasper Report from Template
We are allowing the reports to be downloaded in the browser, so we will create the report in byte[] form and write it in the ServletOutputStream.
5.1. Loading Jasper Template
To load the template in runtime, we can store the template file in the /src/main/resources folder. Spring ResourceUtils will load the file in runtime, and JasperCompileManager compiles it to the JasperReport instance.
An instance of JasperReport represents the compiled report template objects ready to fill with data and report generation.
public byte[] getItemReport(List<Item> items, String format) {

	File file = ResourceUtils.getFile("classpath:item-report.jrxml");
	JasperReport jasperReport = JasperCompileManager.compileReport(file.getAbsolutePath());

	//...
}
To further improve the performance, we can avoid compiling the template everytime by serializing the compiled report into the file system using the JRSaver, and later loading it directly when generating the report in the future using the JRLoader.
public byte[] getItemReport(List<Item> items, String format) {

	JasperReport jasperReport;

	try {

		jasperReport = (JasperReport) JRLoader.loadObject(ResourceUtils.getFile("item-report.jasper"));
	} catch (FileNotFoundException | JRException e) {
	try {

		  File file = ResourceUtils.getFile("classpath:item-report.jrxml");
		  jasperReport = JasperCompileManager.compileReport(file.getAbsolutePath());
		  JRSaver.saveObject(jasperReport, "item-report.jasper");
		} catch (FileNotFoundException | JRException ex) {
		  throw new RuntimeException(e);
		}
	}

	//...
}
5.2. Filling Data into Jasper Report
After we have compiled the template to JasperReport instance, we can JasperFillManager.fillReport() method to populate the report data in various ways.
For example, in our usecase, we can pass the items list using the JRBeanCollectionDataSource. Similarly, we can use other data providers such as CSV, JSON, JPA/Hibernate datasources etc.
public byte[] getItemReport(List<Item> items, String format) {

	File file = ResourceUtils.getFile("classpath:item-report.jrxml");
	JasperReport jasperReport = JasperCompileManager.compileReport(file.getAbsolutePath());

	//Set report data
	JRBeanCollectionDataSource dataSource = new JRBeanCollectionDataSource(items);
	Map<String, Object> parameters = new HashMap<>();
	parameters.put("title", "Item Report");

	//Fill report
	JasperPrint jasperPrint = JasperFillManager.fillReport(jasperReport, parameters, dataSource);

	//...
}
Finally, we get the JasperPrint instance that can be viewed, printed or exported to other file formats.
TIP: Considering the report creation a long running process, consider it making a asynchrouns operation by returning a JMS topic location where user can periodically check if the report has been generated or not.
5.3. Exporting Filled Report to Various Formats
After we have obtained the JasperPrint instance, we can use its export…() methods to export the filled Jasper report in various targets such as byte[], OutputStream, File or serialize to the objects.
In our case, we are converting the JasperPrint to byte[] and using Spring’s ResponseEntity type to control the API response.
public byte[] getItemReport(List<Item> items, String format) {

	//...

	//Fill report
	JasperPrint jasperPrint = JasperFillManager.fillReport(jasperReport, parameters, dataSource);

	byte[] reportContent = JasperExportManager.exportReportToPdf(jasperPrint);

	return reportContent;
}
If we are supporting multiple report formats, we can write a switch expression to create logic for the requested file type.
public byte[] getItemReport(List<Item> items, String format) {

	//...

	JasperPrint jasperPrint = null;
	byte[] reportContent;

	try {
	  jasperPrint = JasperFillManager.fillReport(jasperReport, parameters, dataSource);
	  switch (format) {
	    case "pdf" -> reportContent = JasperExportManager.exportReportToPdf(jasperPrint);
	    case "xml" -> reportContent = JasperExportManager.exportReportToXml(jasperPrint).getBytes();
	    default -> throw new RuntimeException("Unknown report format");
	  }
	} catch (JRException e) {
	  //handle exception
	}
	return reportContent;
}
6. Returning Generated Reports from API Controller
As we want to allow the user to download the generated report in the browser, we need to write the report content in the ServletOutputStream. It can be achieved by setting the mediatype to MediaType.APPLICATION_OCTET_STREAM and a response body with ByteArrayResource containing the generated byte[].
@Controller
public class ReportController {

  @Autowired
  ItemRepository itemRepository;

  @Autowired
  JasperReportService jasperReportService;

  @GetMapping("item-report/{format}")
  public ResponseEntity<Resource> getItemReport(@PathVariable String format) throws JRException, IOException {

    byte[] reportContent = jasperReportService.getItemReport(itemRepository.findAll(), format);

    ByteArrayResource resource = new ByteArrayResource(reportContent);

    return ResponseEntity.ok()
        .contentType(MediaType.APPLICATION_OCTET_STREAM)
        .contentLength(resource.contentLength())
        .header(HttpHeaders.CONTENT_DISPOSITION,
            ContentDisposition.attachment()
                .filename("item-report." + format)
                .build().toString())
        .body(resource);
  }
}
7. Demo
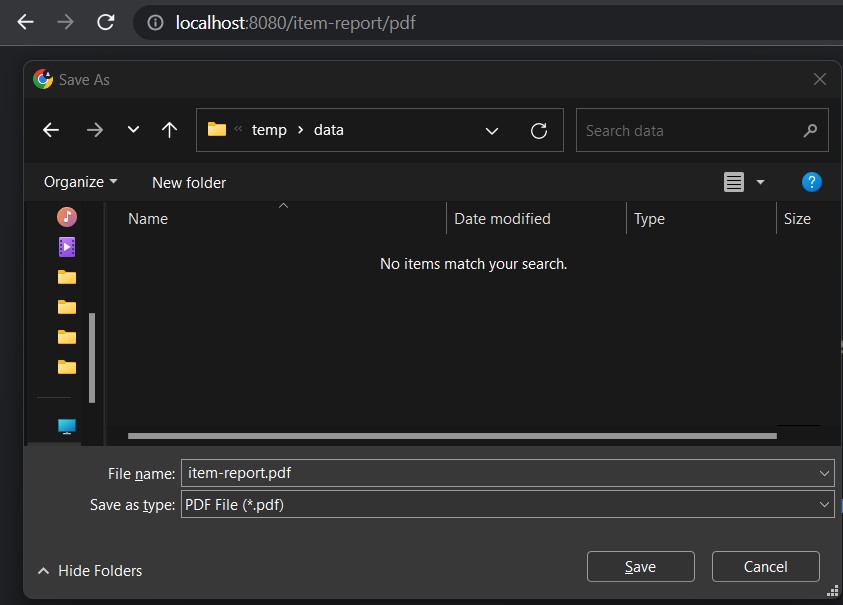
We can now hit the API in the browser and wait for the process to complete. Once the report is ready, the browser will prompt us to download the generated report.
HTTP GET http://localhost:8080/item-report/pdf
When we download and open the report, we can see the item data in the report as per the supplied report template.
To download the same report in XML format, we can invoke the HTTP GET http://localhost:8080/item-report/xml and it will download the report as an XML file.
8. Conclusion
This article discusses how to create Jasper reports in a Spring boot application, step by step. We learned to configure the JasperReport library, create and load the report templates, fill the data into reports and finally export the filled reports into a variety of formats.
Happy Learning !!