
In this Spring Boot tutorial, we will learn to display images from different sources using the Thymeleaf view templates and to upload images to the PostgreSQL database using the Spring MVC and Thymeleaf.
1. Thymeleaf Syntax for Displaying Images
For quick reference, we can display an image from two sources. Either it is stored in a file in the resources directory, or stored in the backend database as a byte array.
Displaying the images from the static resources is quite simple. To display static images, the thymleaf template should refer to the file with a path relative to the ‘/src/main/resources/static‘ directory.
<img th:src="@{/images/demo.png}" />For displaying the small images from the database, we use the Base64.encodeBase64String(byte[] imageData) to generate the base64 encoded string from the corresponding byte array of the image. Then use ‘data:image/jpeg;base64‘ prefix to embed the image directly into HTML.
<img th:src="@{'data:image/jpeg;base64,'+${image.generateBase64Image()}}" />Note that the above approach is useful for small images as it increases the size of HTML. For large images, HTML size may increase substantially.
For displaying large images we can create a serve raw image bytes retrieved from the database from a Spring MVC controller that handles requests for serving images based on their IDs.
@GetMapping(value = "/images/{imageId}", produces = MediaType.IMAGE_JPEG_VALUE)
Resource downloadImage(@PathVariable Long imageId) {
    byte[] image = imageRepository.findById(imageId)
      .orElseThrow(() -> new ResponseStatusException(HttpStatus.NOT_FOUND))
      .getImageData();

    return new ByteArrayResource(image);
}
And finally updating the Thymeleaf template to use the dynamic image URLs generated by the controller.
<img th:src="@{/images/${image.id}}" alt="Image">
2. Project Structure
For demo purposes, let’s create a simple team management project, in which we can add the new member’s profile into our team which will contain the basic details and the profile image of the member. For this requirement, we need three different APIs:
- first API to get the form to add the profile.
- second API to handle the submit action of the form and insert the profile details into the database.
- third API to get all team member’s profiles stored in the database.
Let’s walk through step by step and understand.
2.1. Maven
First of all, we will require all the common dependencies of a simple spring web project.
- spring-boot-starter-web: for Spring MVC support.
- spring-boot-starter-data-jpa: for storing and fetching image data from the database.
- spring-boot-starter-security: for securing the restricted images.
<dependency>
	<groupId>org.springframework.boot</groupId>
	<artifactId>spring-boot-starter-web</artifactId>
</dependency>
<dependency>
	<groupId>org.springframework.boot</groupId>
	<artifactId>spring-boot-starter-data-jpa</artifactId>
</dependency>
<dependency>
        <groupId>org.springframework.boot</groupId>
        <artifactId>spring-boot-starter-security</artifactId>
</dependency>
Next, we need to add support for the Thymeleaf template engine for displaying the images in UI.
<dependency>
	<groupId>org.springframework.boot</groupId>
	<artifactId>spring-boot-starter-thymeleaf</artifactId>
</dependency>
We will also require the dependency of the database (in our case PostgreSQL)
<dependency>
	<groupId>org.postgresql</groupId>
	<artifactId>postgresql</artifactId>
	<version>42.6.0</version>
</dependency>
2.2. Model
Let’s design a POJO class named Profile.java in the model package to hold the profile details of the team member. Here we are using the ‘profileImage‘ field to store the image data for the profile image uploaded from UI.
@Entity
@Data
@NoArgsConstructor
@AllArgsConstructor
@Table(name = "profiles")
public class Profile {

    @Id
    @GeneratedValue(strategy = GenerationType.IDENTITY)
    private long id;

    @Column(nullable = false)
    private String fullName;

    @Column(nullable = false)
    private String designation;

    @Column
    private String githubLink;

    @Column
    private String twitterLink;

    @Column
    private String email;

    @Lob
    @Column
    private byte[] imageData;

    public String generateBase64Image() {
        return Base64.encodeBase64String(this.imageData);
    }
}
2.3. Service
The ProfileService performs business logic and inserts the profile details into the database, and gets all the team member’s profiles from the database using the repository.
@Service
@Slf4j
public class ProfileService {

  @Autowired
  private ProfileRepository profileRepository;

  public void save(Profile profile, MultipartFile file) {
    try {
      profile.setImageData(file.getBytes());
      profileRepository.save(profile);
    } catch (Exception e) {
      log.debug("Some internal error occurred", e);
    }
  }

  public List<Profile> getAll() {
    return profileRepository.findAll();
  }

  public Optional<Profile> findById(Long imageId) {
    return profileRepository.findById(imageId);
  }
}
The data type of the image file is MultipartFile, but we require the byte array as we are inserting the image in the byte array form into our database. Hence we have to convert the MultipartFile into the byte[] using the getBytes() method of the MultipartFile class.
2.4. Repository
Let’s create the ProfileRepository.java interface in the repository package and use the built-in methods provided by the JPA by extending the JpaRepository interface.
public interface ProfileRepository extends JpaRepository<Profile, Long> {
}
3. Image Upload and Display Controller
Now, let’s design the ProfileController.java in the controller package to handle all APIs of upload and view profile details along with profile images.
@Controller
@Slf4j
public class ProfileController {

  @Autowired
  private ProfileService profileService;

  @GetMapping("/")
  public String home() {

    return "redirect:/profiles/view";
  }

  @GetMapping("/profiles/view")
  public ModelAndView view(Model model) {

    return new ModelAndView("view", "profiles", profileService.getAll());
  }

  @GetMapping(value = "/image/{imageId}", produces = MediaType.IMAGE_JPEG_VALUE)
  public Resource downloadImage(@PathVariable Long imageId) {
    byte[] image = profileService.findById(imageId)
        .orElseThrow(() -> new ResponseStatusException(HttpStatus.NOT_FOUND))
        .getImageData();

    return new ByteArrayResource(image);
  }

  @GetMapping("/profiles/add")
  public ModelAndView addProfile() {

    return new ModelAndView("addProfile", "profile", new Profile());
  }

  @PostMapping(value = "/profiles/add", consumes = MULTIPART_FORM_DATA_VALUE)
  public String handleProfileAdd(Profile profile, @RequestPart("file") MultipartFile file) {

    log.info("handling request parts: {}", file);
    profileService.save(profile, file);
    return "redirect:/profiles/view";
  }
}
Here we are getting all the profile details in the Profile model, but not the profile image file why?
The reason is in our model the profile image is in the form of byte[] and in the HTML form the uploaded file can’t be converted to the byte[] directly, hence we are getting this separately and converting it into the byte[] in the service layer.
4. Displaying Static Images from ‘/resources‘ Directory
To display some static image assets from the ‘/resources/static/images’ directory in our HTML file, we have created a header.html file inside the ‘/resources/templates/fragments’ directory. We will use in all our HTML files as a header component and display the logo and social media icons.
<header th:fragment="header">
   <div class="...">
      <div class="...">
         <img th:src="@{/images/logo.png}" class="...">
         <h2 class="...">My Team</h2>
      </div>

      <div class="...">
         <span class="...">
         <button type="button" onclick="location.href='/profiles/view'" class="...">
         <img th:src="@{/images/link.svg}" class="..."/>
         View
         </button>
         </span>
         <span class="...">
         <button type="button" onclick="location.href='/profiles/add'" class="...">
         <img th:src="@{/images/tick.svg}" class="..."/>
         Add
         </button>
         </span>
      </div>
   </div>
</header>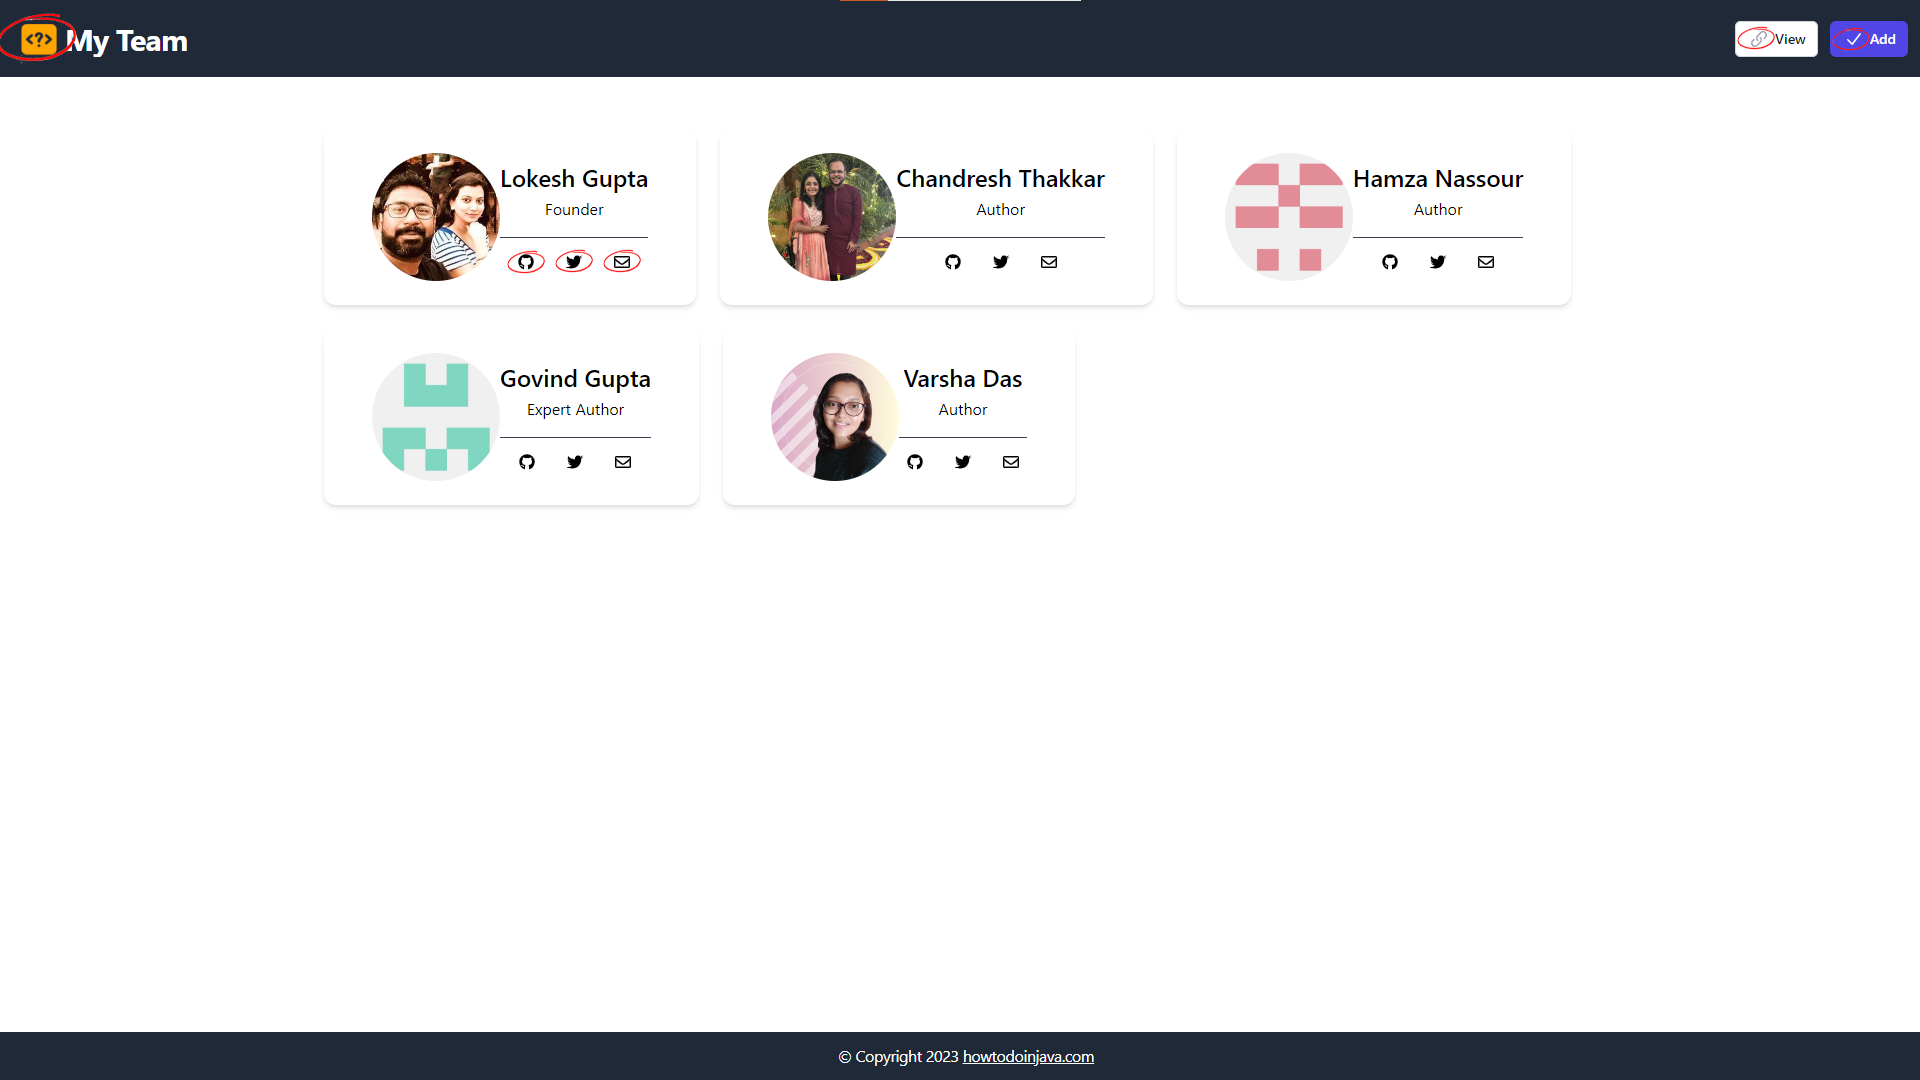
All the highlighted images are loaded from the ‘/resources/static/images‘ directory. The icons in the profile card are also loaded from the static directory, and that code will be present in the view.html which we will see in the next section.
5. Displaying Images Fetched from Database
Now, let’s display the dynamic profile images of all team members that are fetched from the database. Create a view.html file inside the ‘/resources/templates/‘ directory, which will contain the HTML code to show all profile cards.
<!DOCTYPE html>
<html lang="en"
   xmlns:th="http://www.thymeleaf.org">
   <head>
      <meta charset="UTF-8">
      <meta name="viewport" content="width=device-width, initial-scale=1.0"/>
      <title>View</title>
      <script src="https://cdn.tailwindcss.com"></script>
   </head>
   <body class="...">

	  <div th:replace="~{fragments/header :: header}"></div>

	  <div class="...">
         <div class="...">

            <div th:each="profile : ${profiles}" class="...">

			   <img th:src="@{'data:image/jpeg;base64,'+${profile.generateBase64Image()}}" alt="profile" class="...">

			   <div class="...">
                  <div class="...">
                     <h2 class="..." th:text="${profile.fullName}"></h2>
                     <p class="..." th:text="${profile.designation}"></p>
                  </div>

                  <div class="...">
                     <a rel="noopener noreferrer" th:href="${profile.githubLink}" target="_blank" aria-label="GitHub" class="...">
                     <img th:src="@{/images/github.svg}" class="..."/>
                     </a>
                     <a rel="noopener noreferrer" th:href="${profile.twitterLink}" target="_blank" aria-label="Twitter" class="...">
                     <img th:src="@{/images/twitter.svg}" class="..."/>
                     </a>
                     <a rel="noopener noreferrer" th:href="${'mailto:'+profile.email}" aria-label="Email" class="...">
                     <img th:src="@{/images/email.svg}" class="..."/>
                     </a>
                  </div>
               </div>
            </div>
         </div>
      </div>

      <div th:replace="~{fragments/footer :: footer}"></div>

   </body>
</html>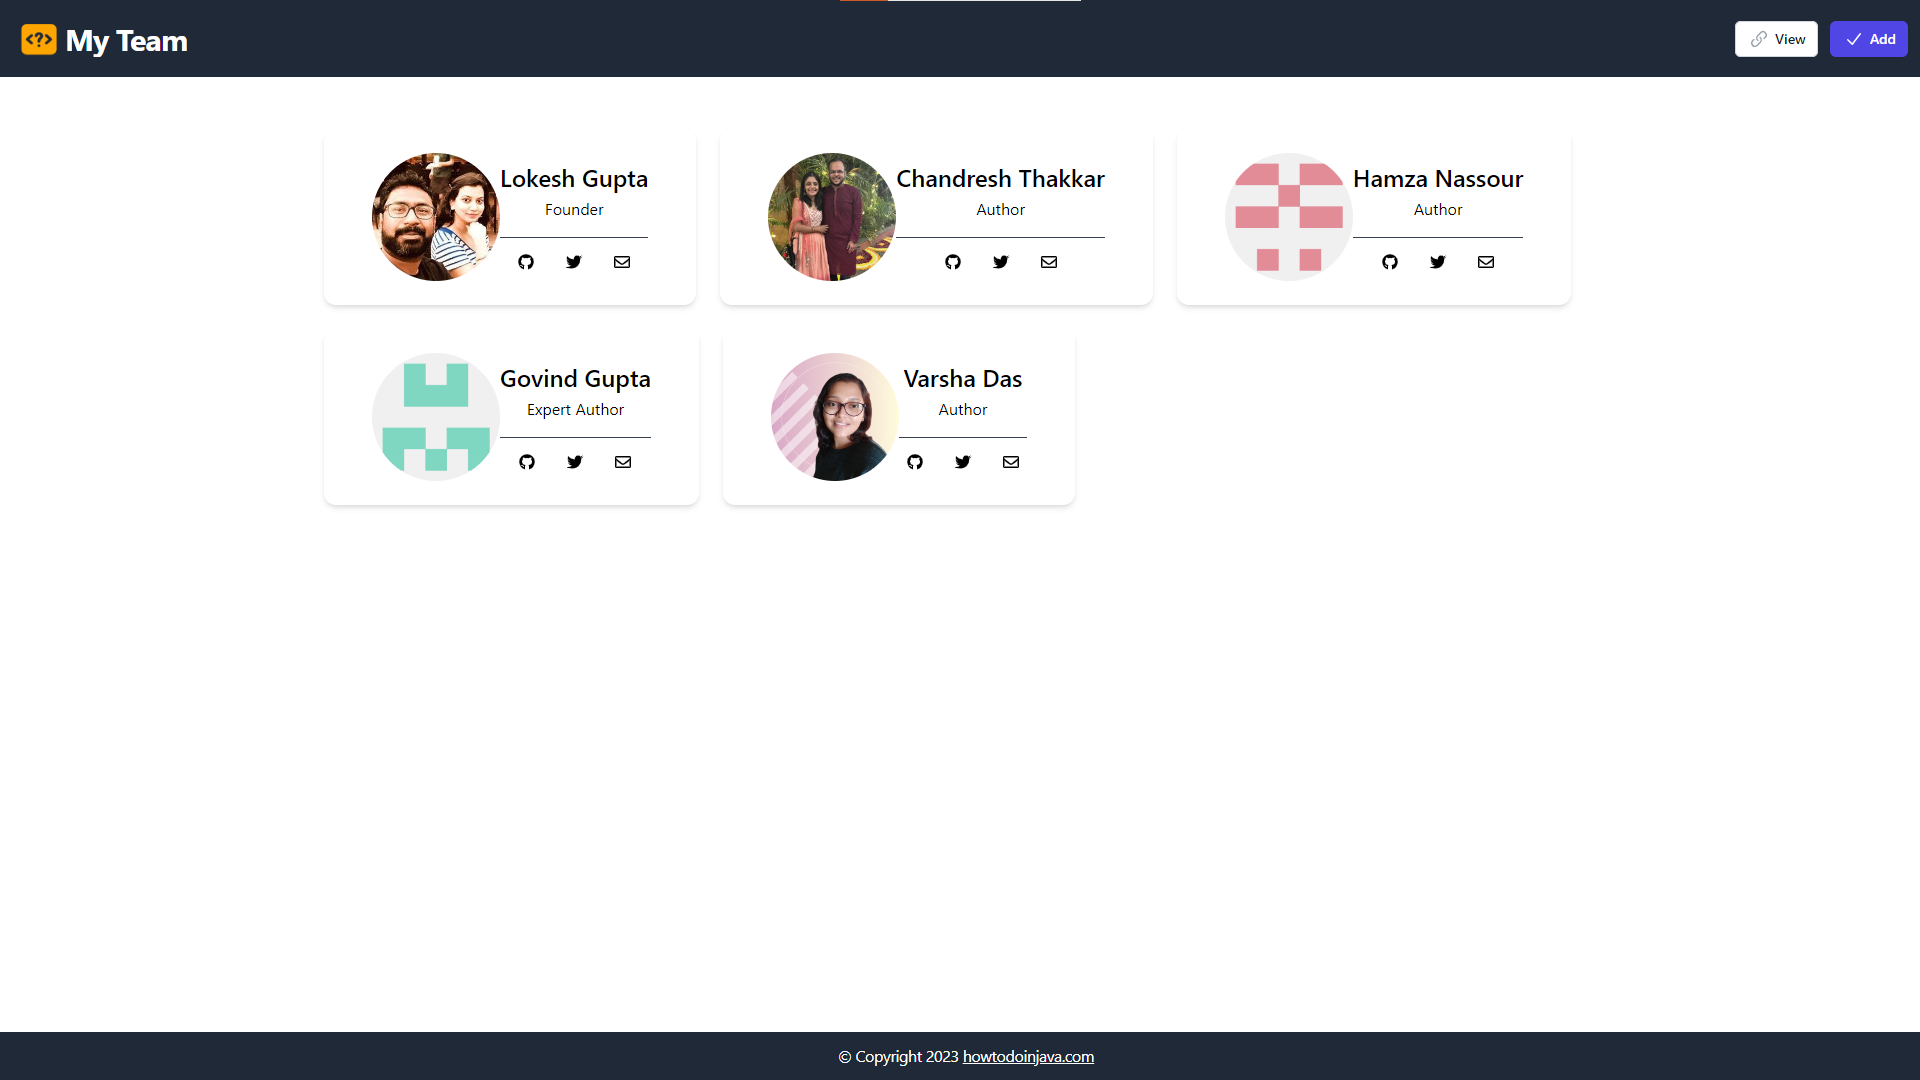
All the profile images are fetched from the database, and the rest of the images are loaded from the static directory.
6. Preventing Unauthorized Access to Sensitive Images
In order to prevent unauthorized access to sensitive/restricted/personal images, let’s configure the spring security. We start with creating a SecurityConfiguration.java file in the configuration package. In this configuration file, we will permit all requests for ‘static/images’ directory but to access the other directory user must be authenticated.
@Configuration
public class SecurityConfiguration {

  @Bean
  public SecurityFilterChain securityFilterChain(HttpSecurity http) throws Exception {

    http.authorizeHttpRequests(request -> request.requestMatchers("/profiles/*").permitAll()
        .requestMatchers("/").permitAll()
        .requestMatchers("/images/*").permitAll()
        .anyRequest().authenticated());

    return http.build();
  }
}
Now, move the logo.png file which is present in the ‘/static/image’ directory to a ‘/static/private’ directory and then restart the project.
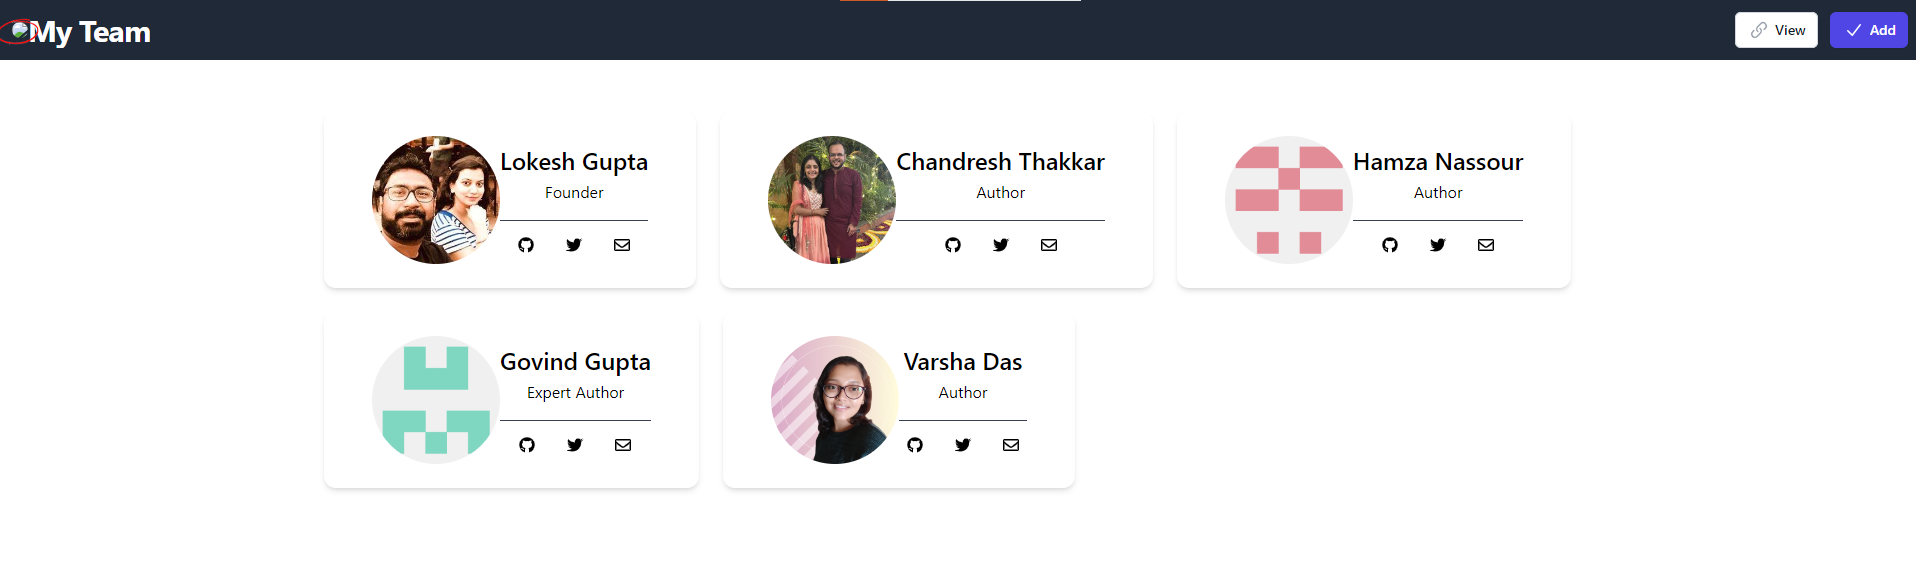
Here we can access all the images except the main logo on the top, as we’ve moved that to a protected directory containing sensitive images, and to access that user must be authenticated.
7. Conclusion
This Spring Boot tutorial taught us how to access the images from different sources into the Thymeleaf template files, how to upload a file using Spring MVC Model and Thymeleaf, and how to prevent access to sensitive images using Spring security. That’s all for displaying images with Thymeleaf and Spring Boot.
Happy Learning!